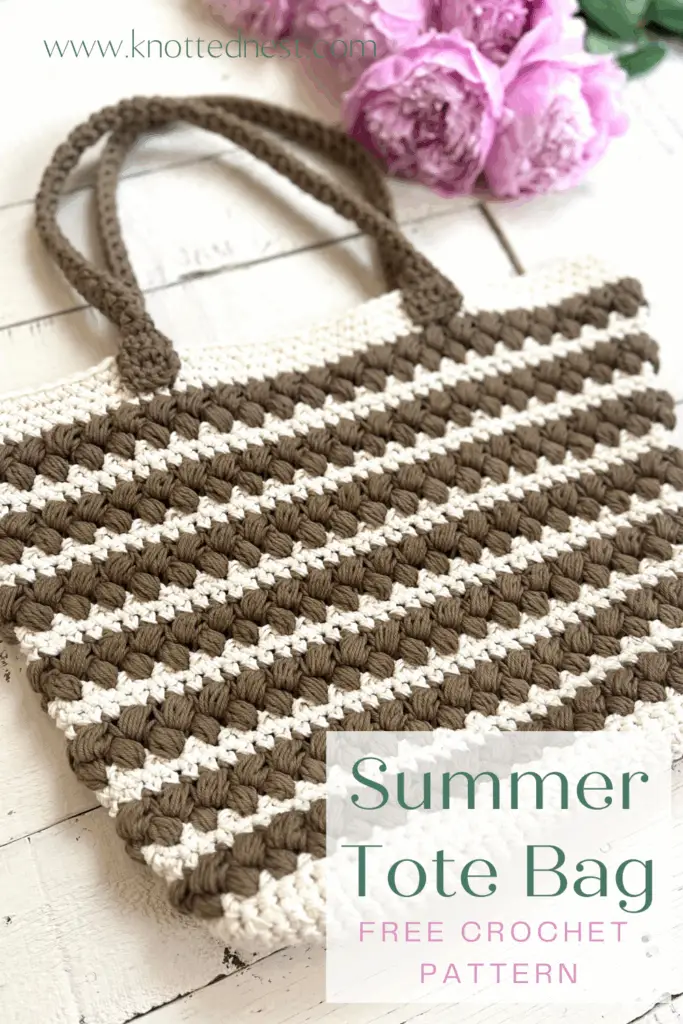
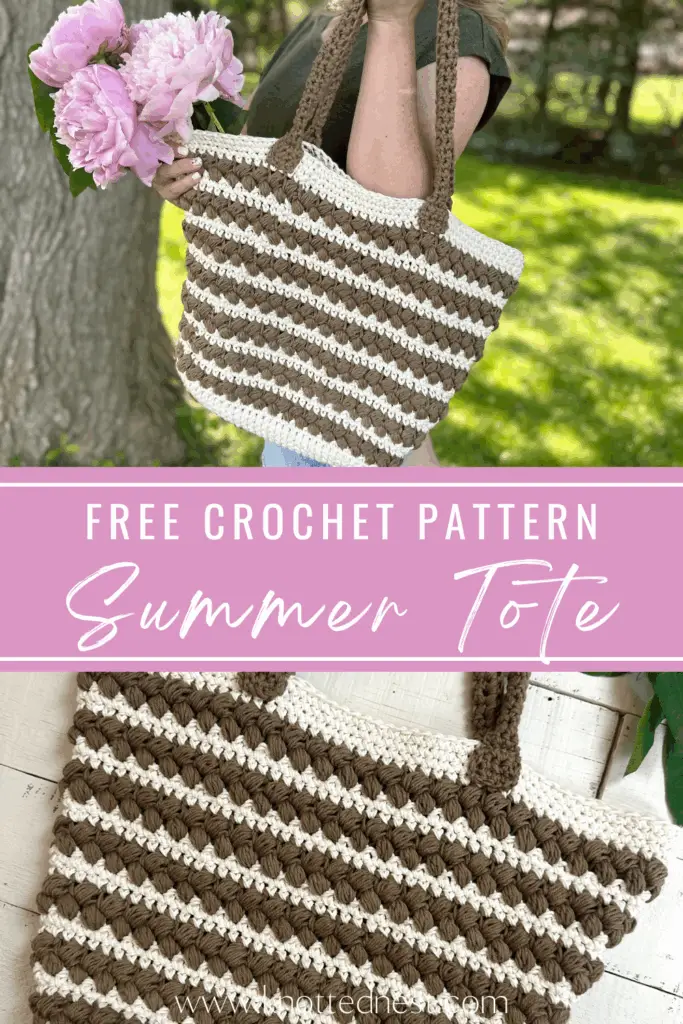
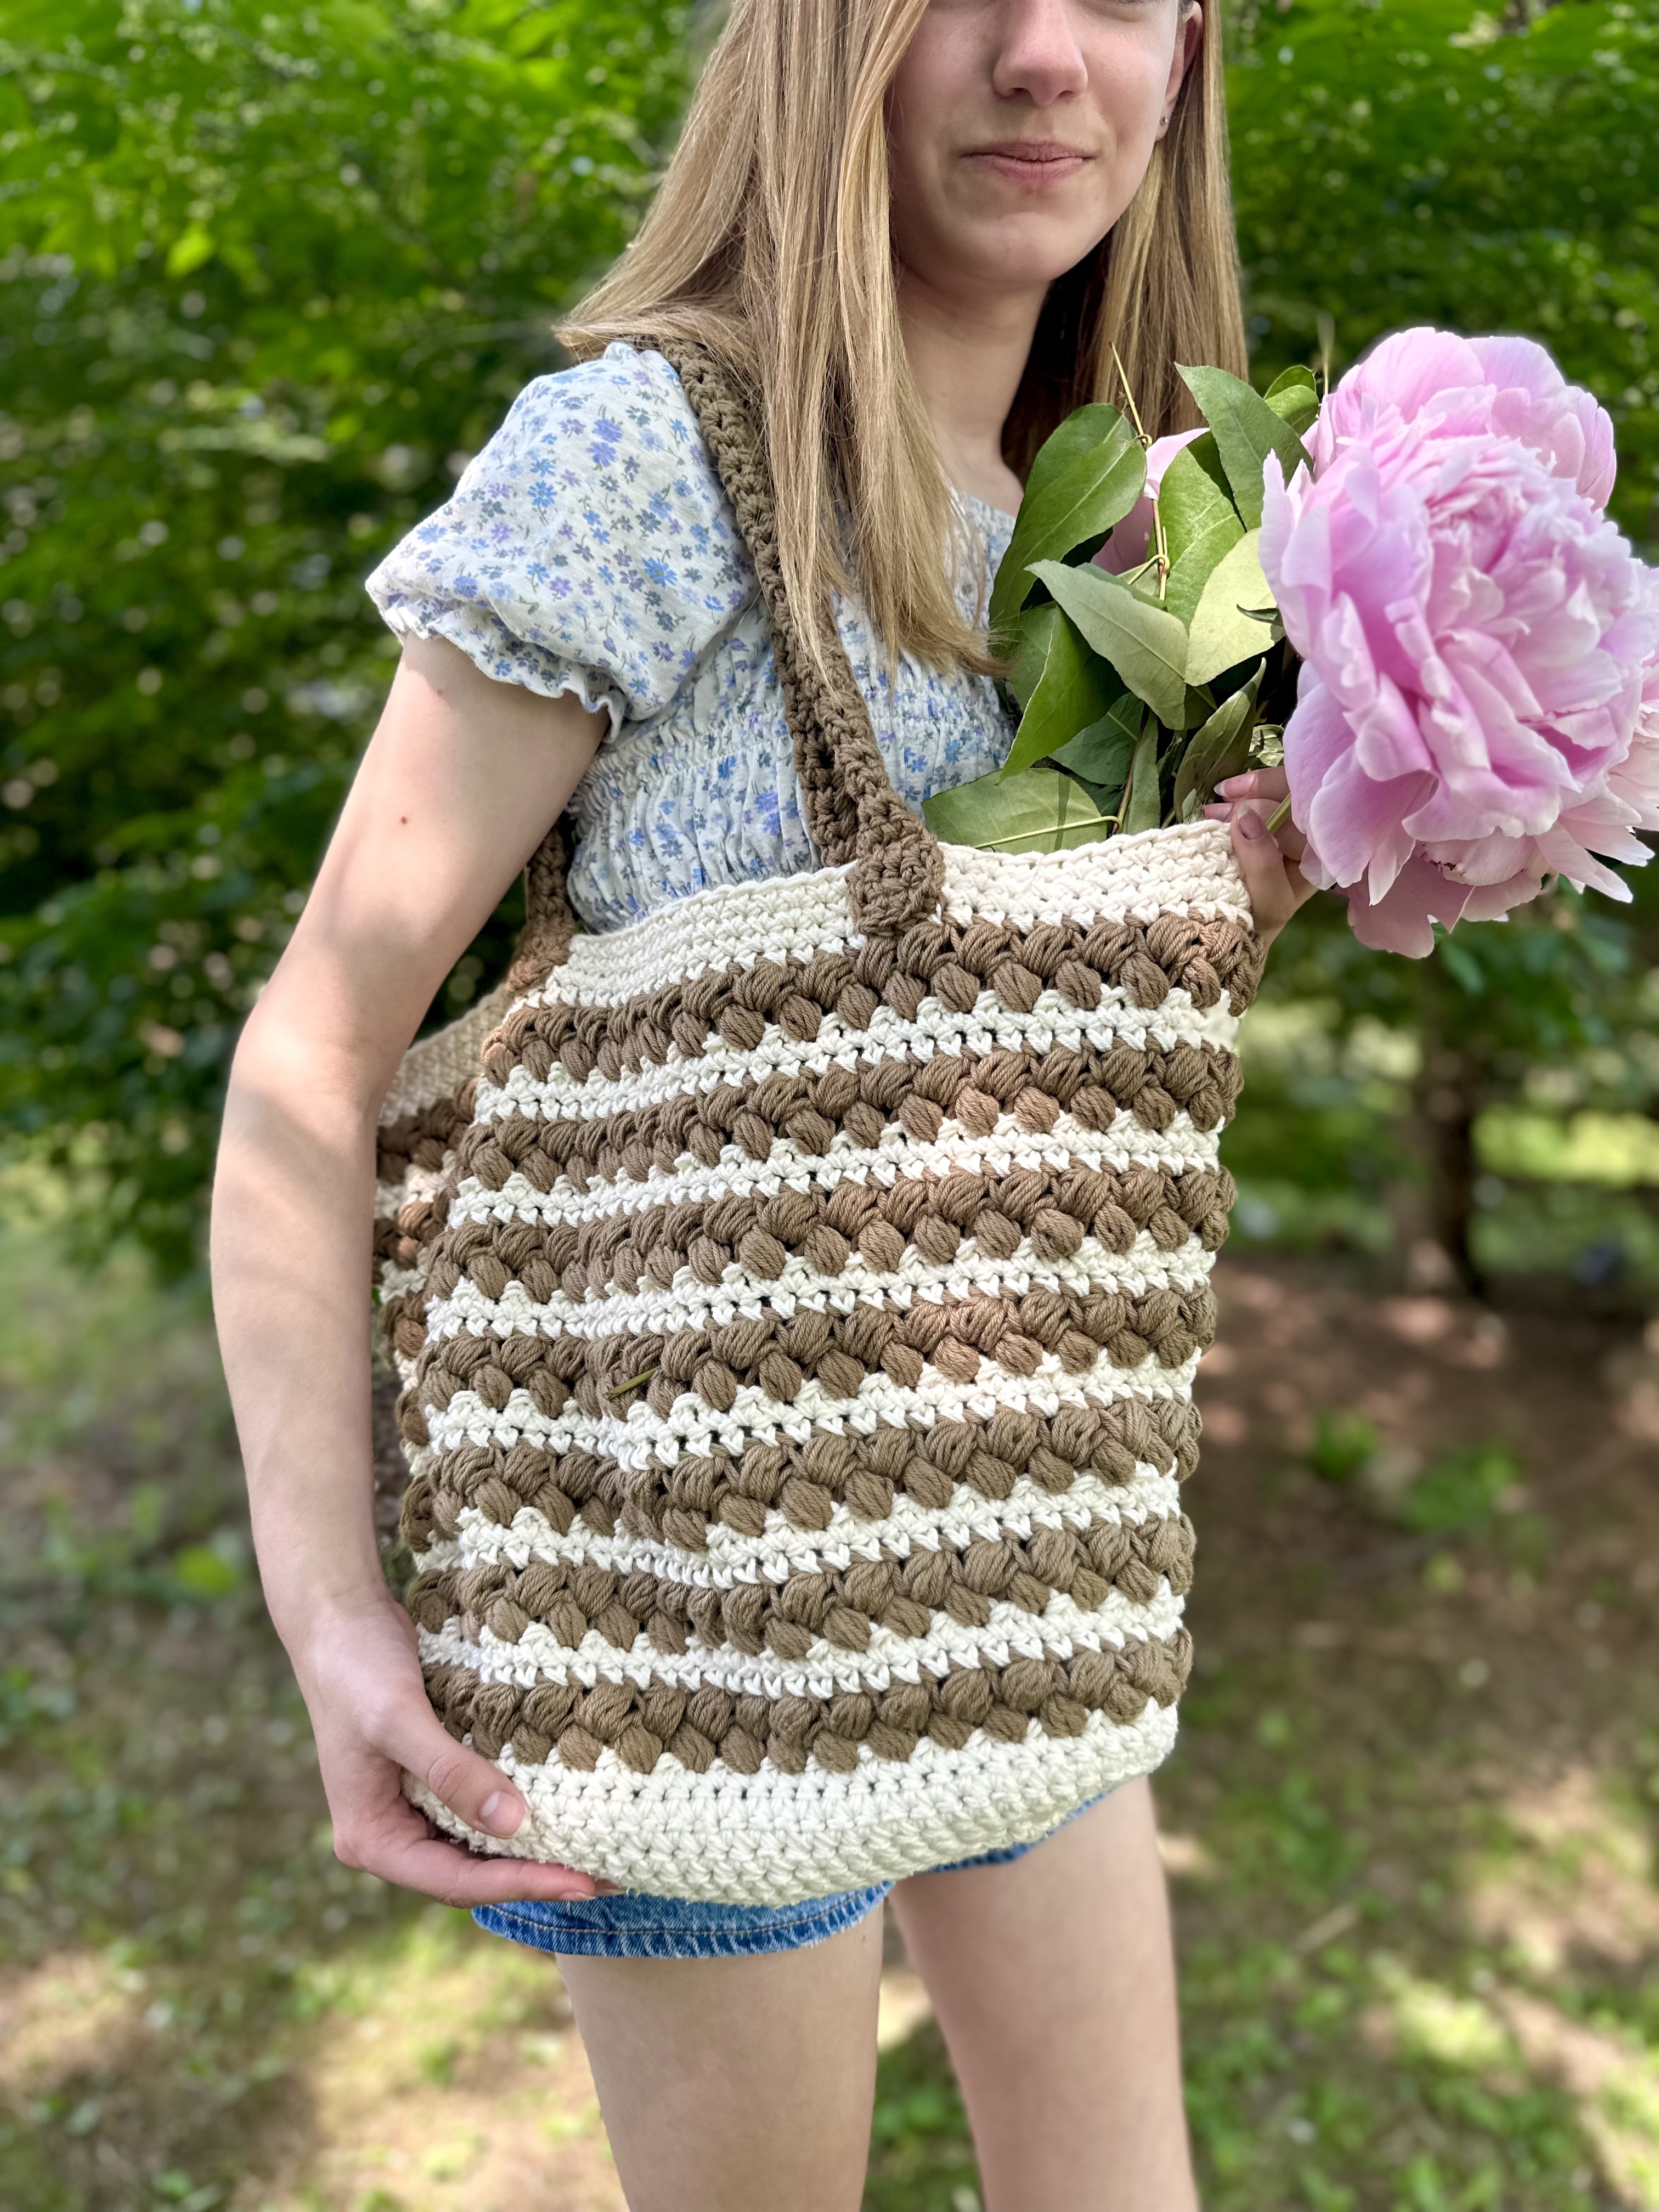
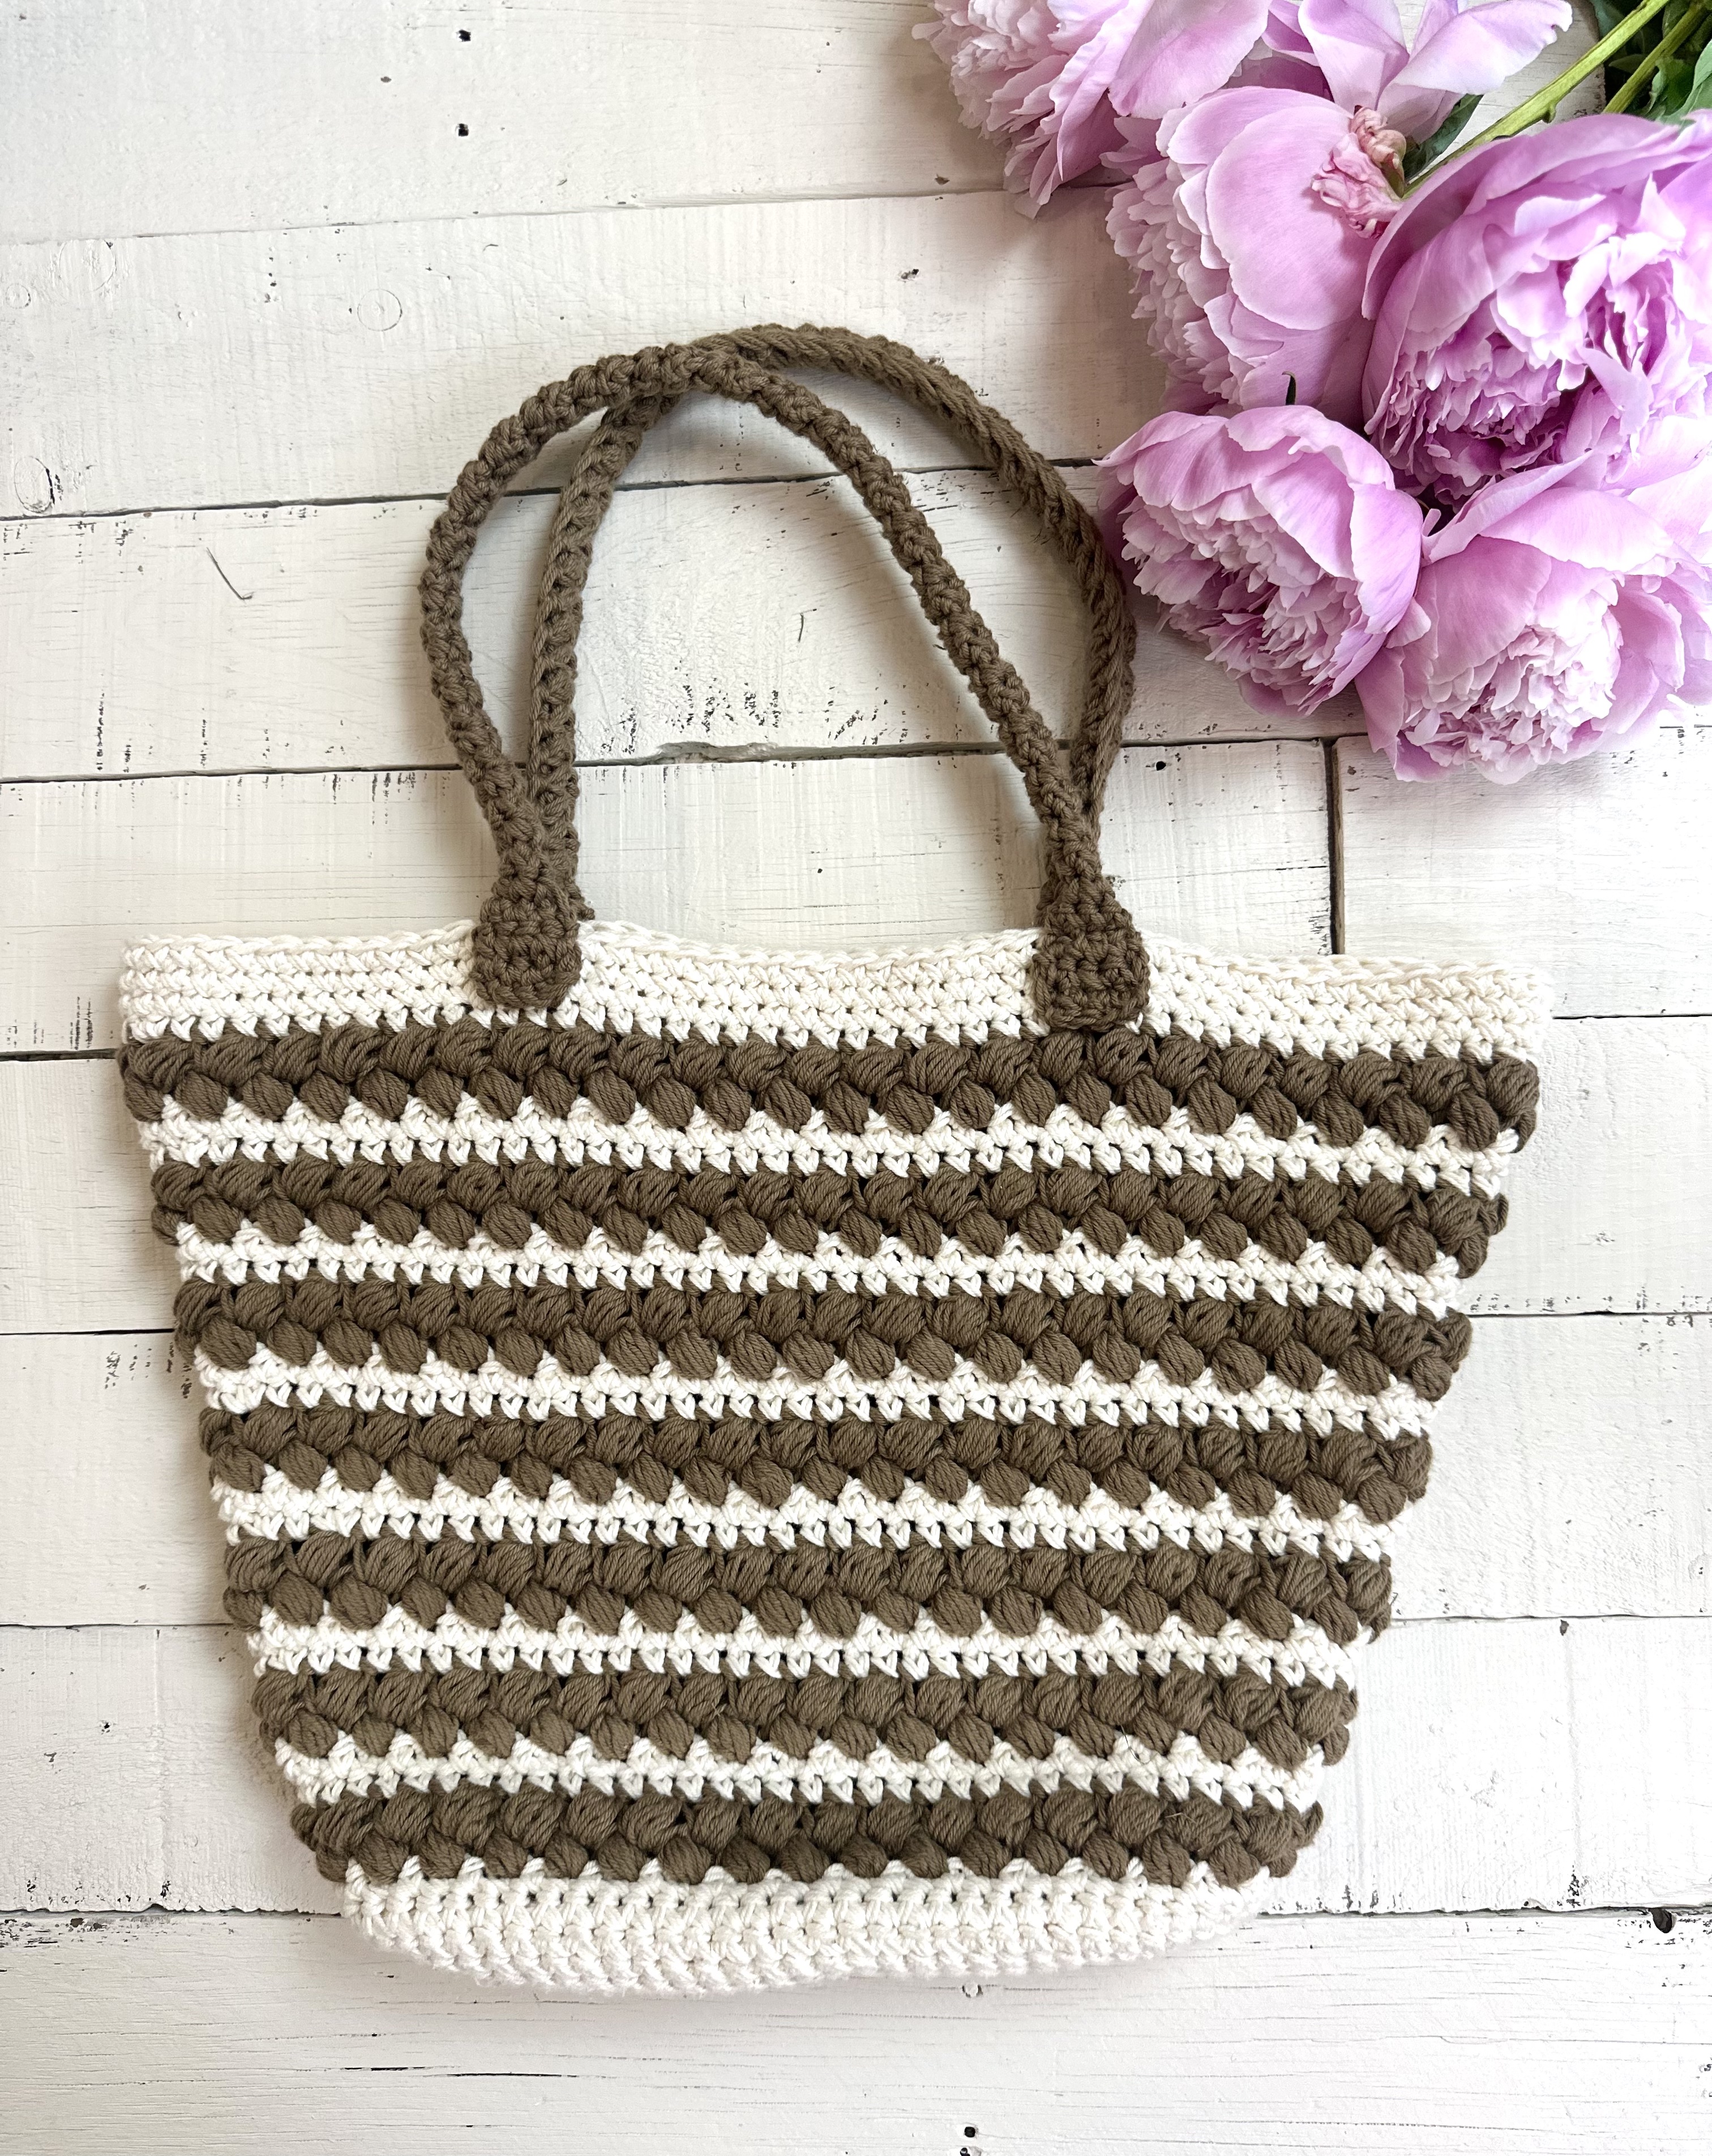
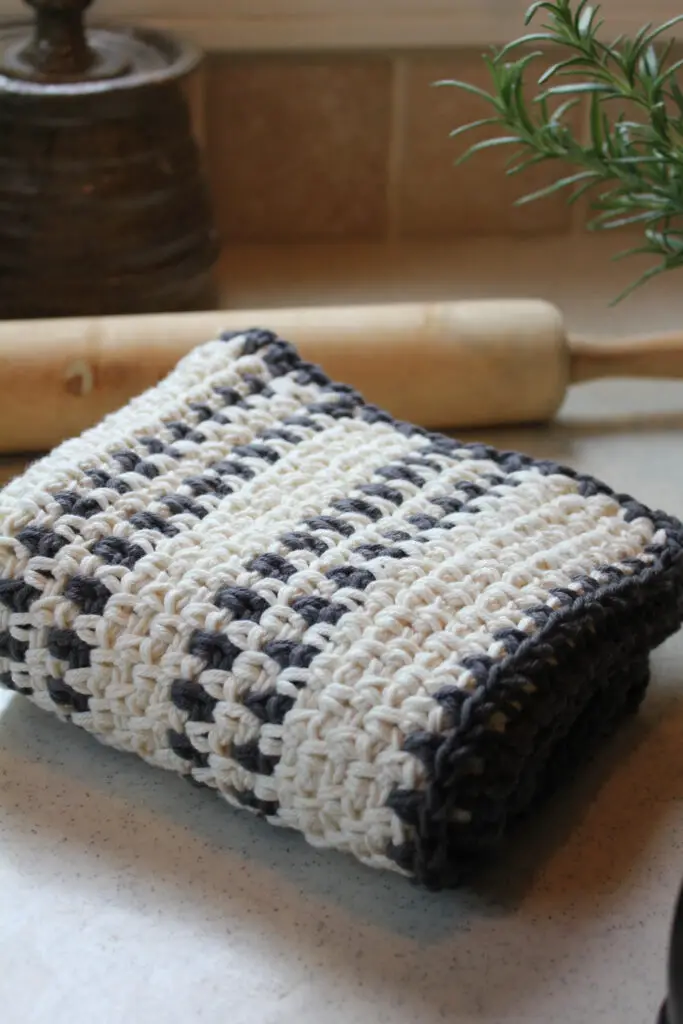
Free Crochet Tote Bag Pattern – The Braided Summer Tote
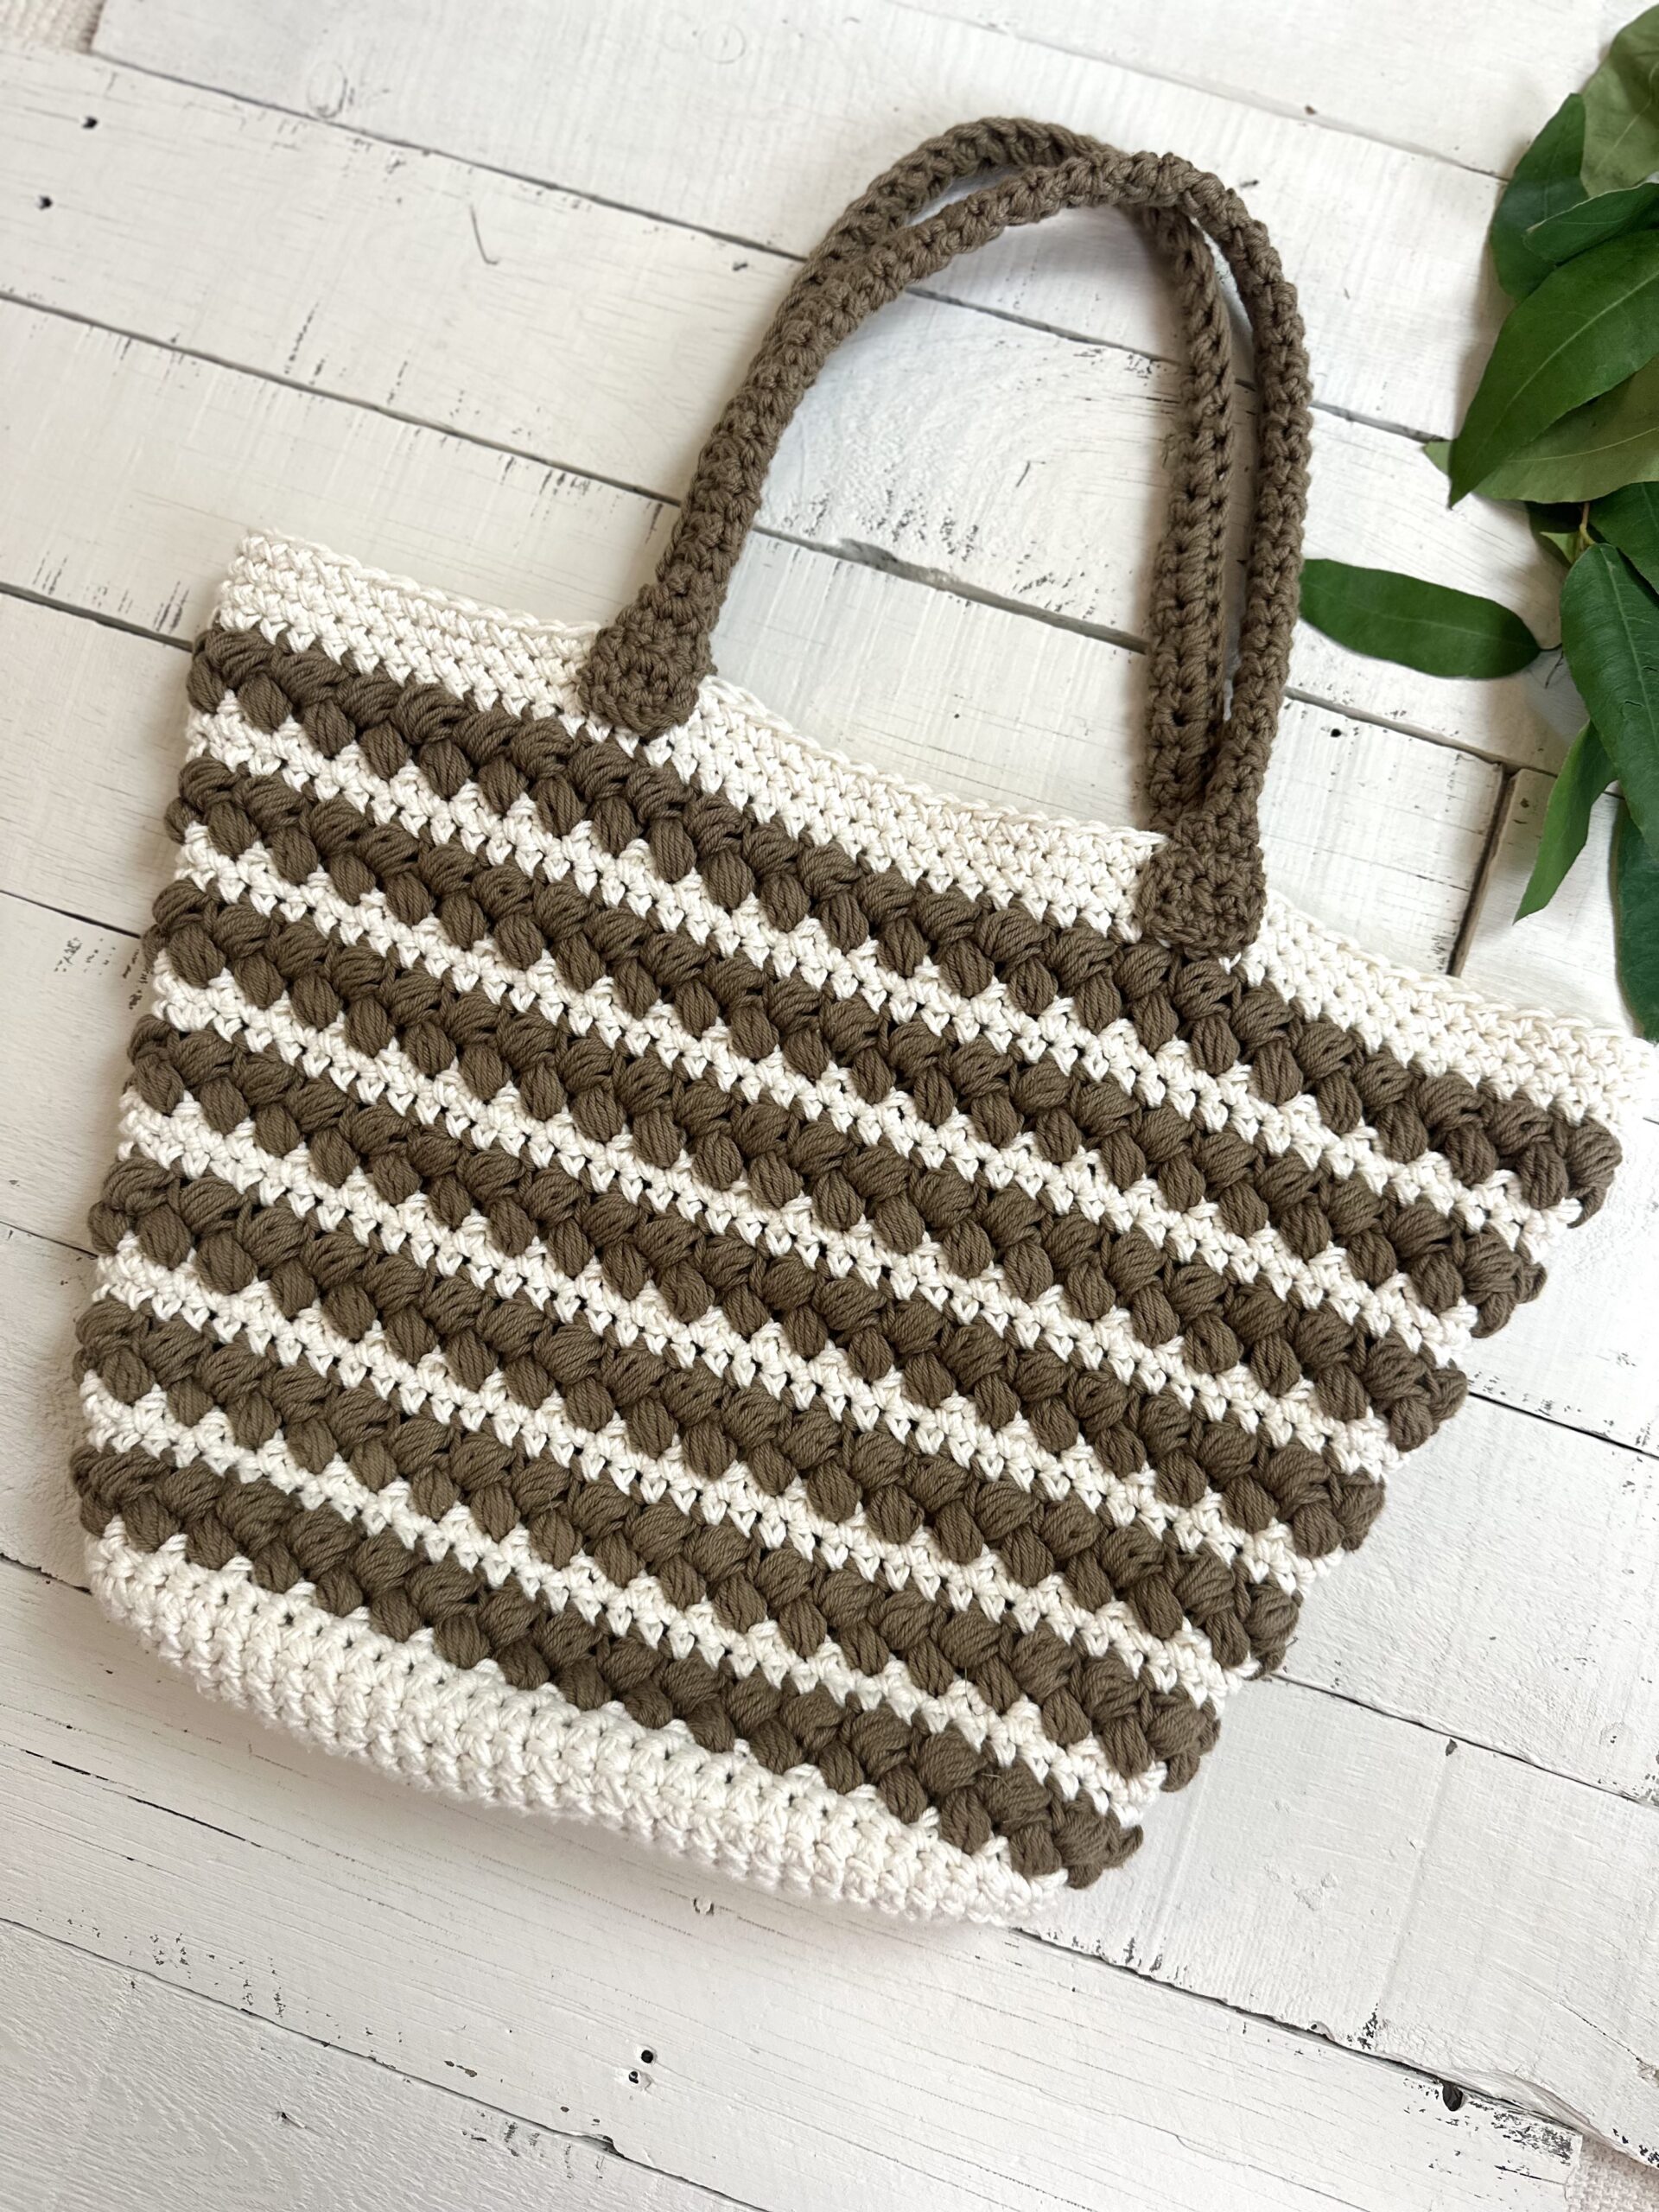
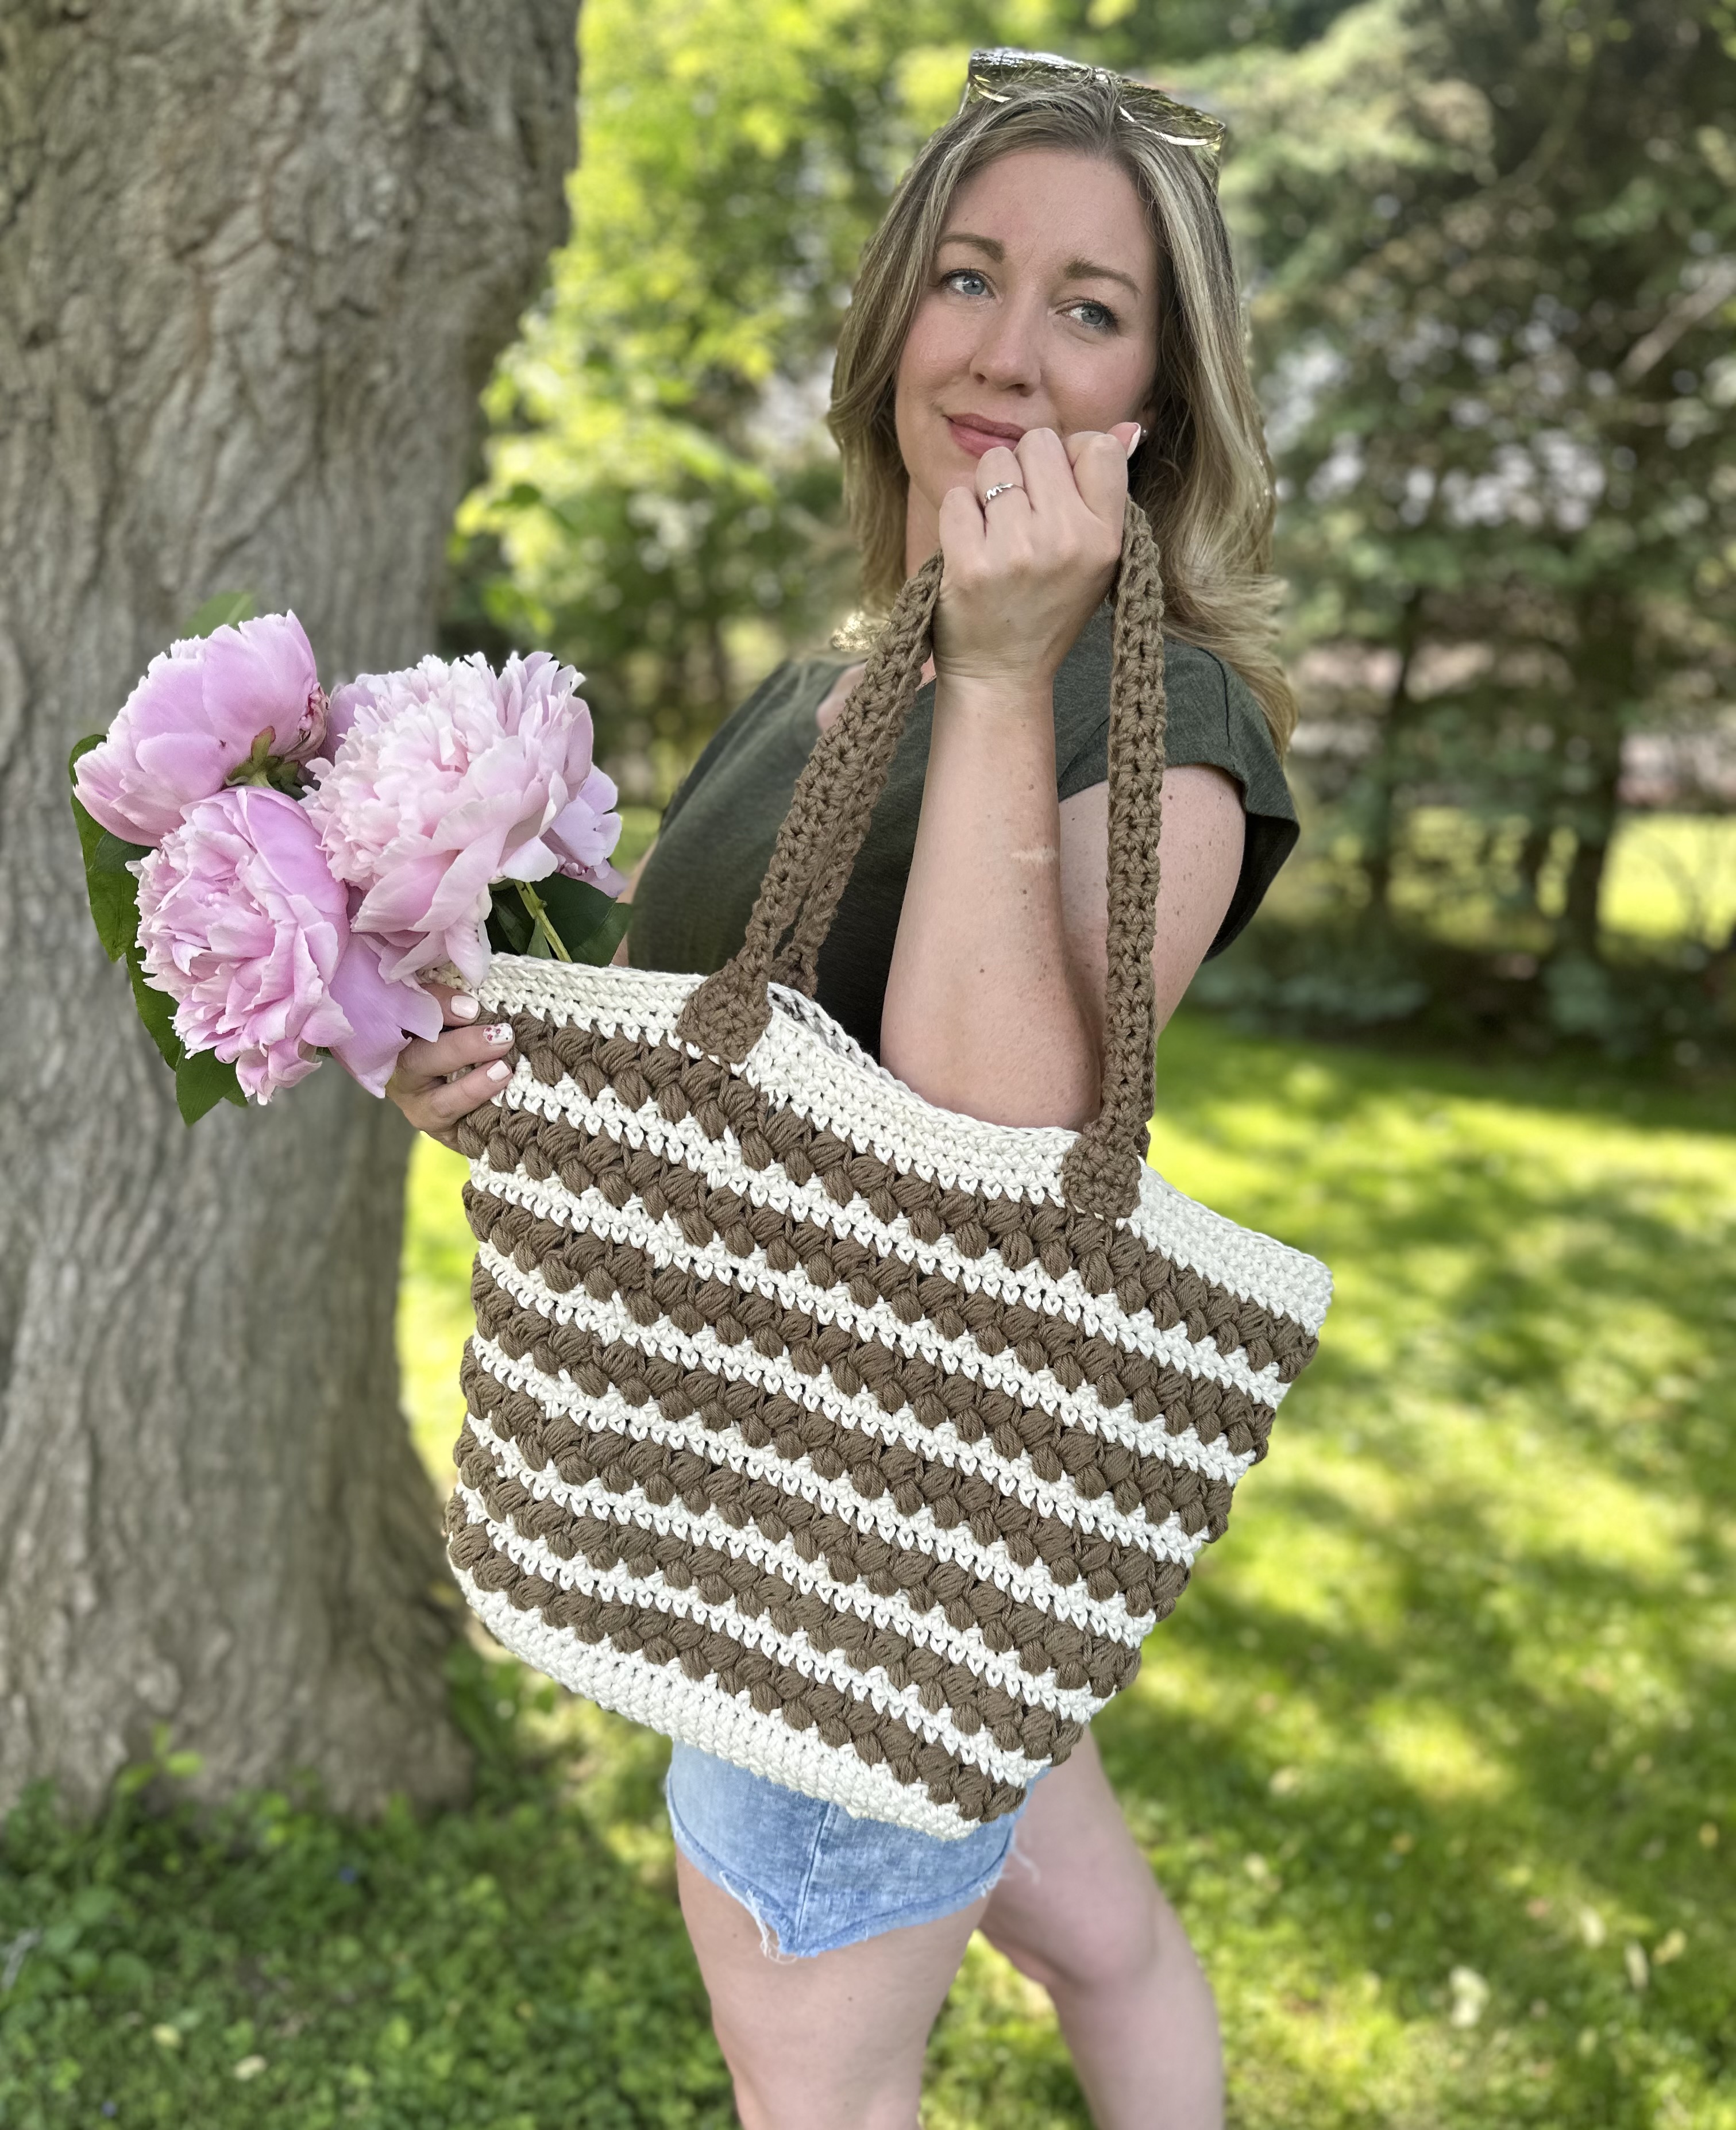
The Braided Summer crochet tote bag takes texture to a whole new level! Double stranded yarn and a two-layer base give this sturdy and stylish summer tote bag extra durability. You can customize it with crocheted handles (included in the pattern) or elevate the look with store-bought leather handles. This crocheted bag is perfect for the beach, the farmers’s market, or even to take on vacation! Scroll down (or click here) for the free pattern or click to purchase an ad-free printable version from my Etsy or Ravelry shops. The printable version includes a bonus printer-friendly round tracker!
Don’t have time to make it now? Pin this pattern for later!
This pattern may contain affiliate links, which means I may receive a small commission, at no extra cost to you, when you make a purchase. Please read my affiliate disclosure for more details.
About the Braided Summer Crochet Tote Bag
I wish I could say that the Braided Summer crochet tote bag was inspired by the stylish, sophisticated totes I noticed women carrying while I was vacationing in the south of France or in the coastal cities of Greece…but the truth is, I got the idea for this bag from an Easter basket I found while shopping at 5 Below in western NY. Inspiration is everywhere!
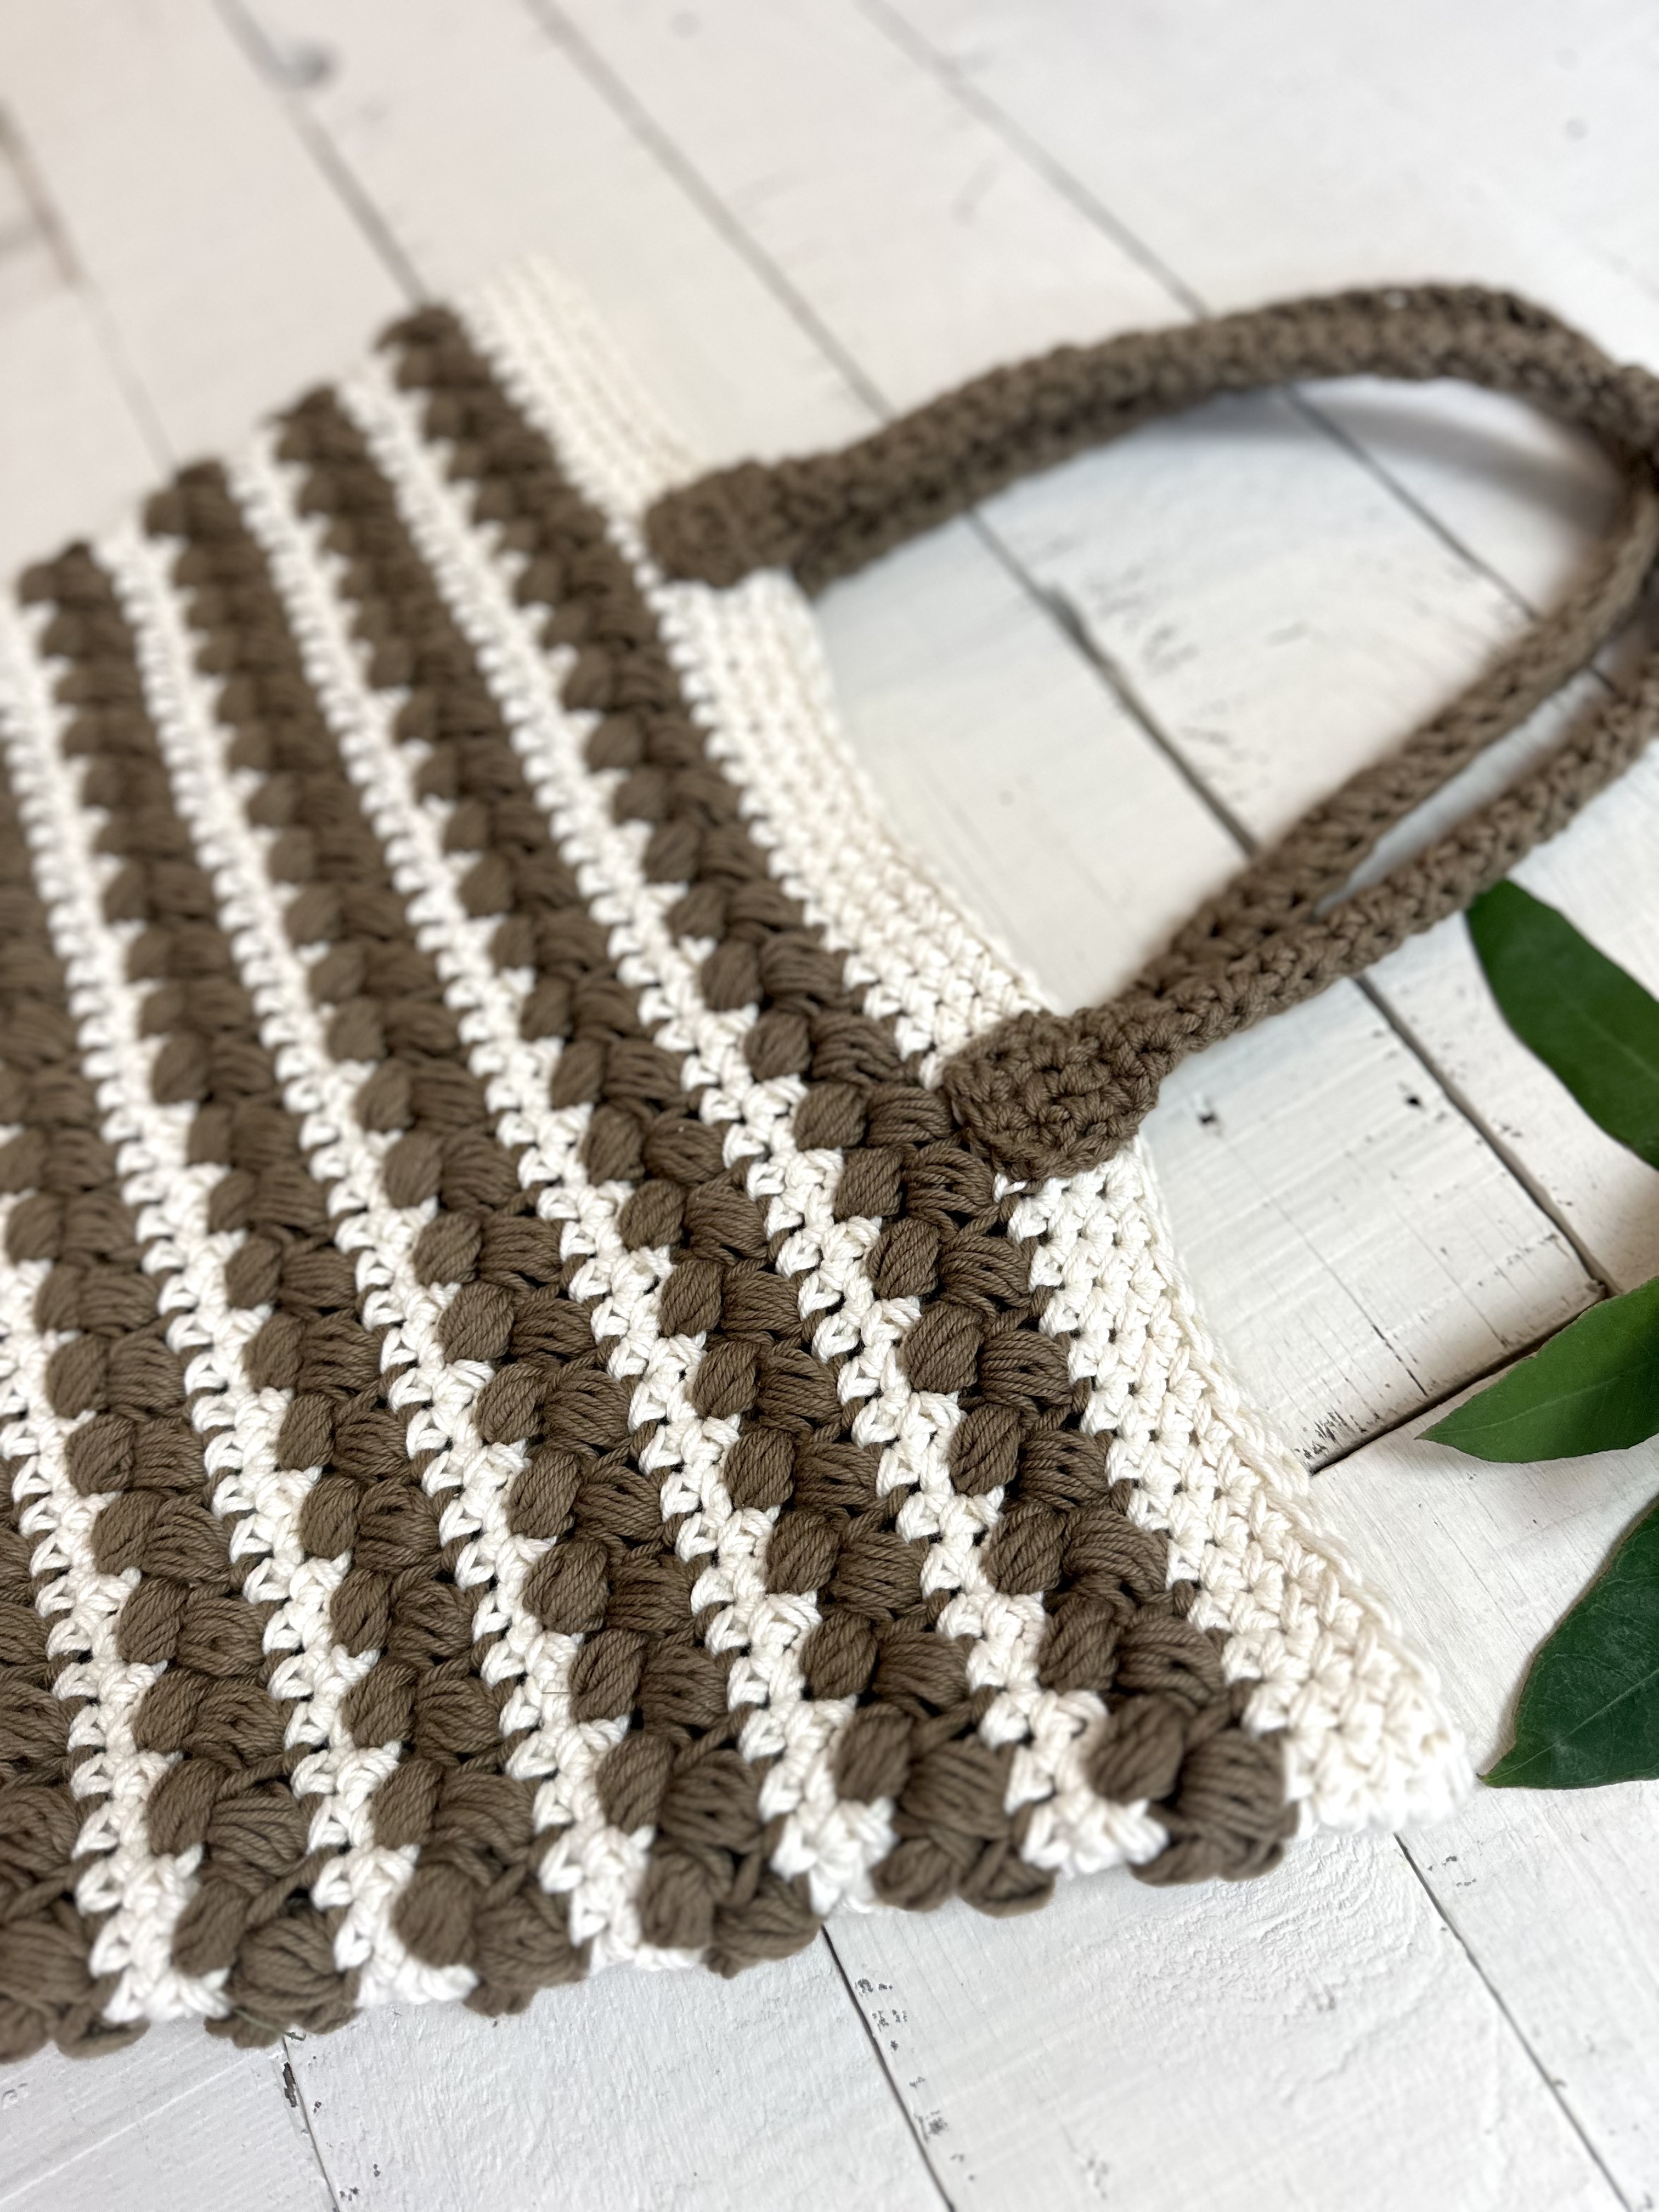
The inspirational basket had stripes of smooth white contrasting against taupe stripes of a braided-style woven texture. I loved the juxtaposition of the two textures! I thought that would make a fabulous crocheted tote bag if I could figure out how to mimic the braided look – and I did! The answer is puff stitches worked in opposite directions. I decided to separated the braided rows with a couple rows of simple single crochet so that the “braid” really stands out. I think it works!
Braided Summer Tote Bag – Construction
Crochet tote bags sometimes get a bad rap when it comes to durability, but the Braided Summer Tote has a few features that make it extra functional: 1) a double-layer base – two identical sc spiral panels that are sandwiched together and joined with sc so the bottom of your tote will be extra strong and nothing will fall through, 2) yarn held double stranded throughout – makes for an extra thick stitch with less stretch, and 3) crochet handles that are made in the shape of a tube so they are tough with minimal stretch. This bag can handle everything from weeknight groceries to a farmer’s market bouquet to beach towels for the whole family!
Crochet Tote Bag – Materials
You will want to use cotton yarn (or a similar durable fiber) for this crocheted tote. It’s important to use yarn that is durable and won’t have too much stretch. Washability is also a plus for crocheted bags. I used Dishie yarn from WeCrochet in the colors Swan (3 balls )and Mushroom (4 balls). Dishie is my favorite cotton yarn – it’s strong, but much softer than most 100% cotton yarns and it comes in tons of colors! I’ve also used it for a couple of my dish towel patterns – The Easy Crocheted Kitchen Towel and The Modern Farmhouse Kitchen Towel. Truly love it!
This free pattern includes instructions to crochet handles for the tote bag, but using leather handles also works and would add a modern touch. I ordered this set of handles, but ultimately decided I liked the crocheted handles better.
Additional materials include a size J hook, a yarn needle, stitch markers, and scissors.
Ok let’s make a crochet tote bag!
Purchase an ad-free Printer friendly version of this pattern in my Etsy shop or Ravelry shop. Bonus! The printer friendly version includes a printable table to help you keep track of the repeated rows!
Crochet Summer Tote Bag Free Pattern
Skill Level
Intermediate: this pattern is worked in single crochet and puff stitches, with some increasing and color changes. The bottom of the bag is worked in spiraled rounds and the main body is worked in joined rounds. The handles are made separately and sewn on. Detailed instructions are given for all special stitches and techniques.
Materials
- Yarn:
- About 550 yards of worsted weight (size 4) yarn for color A (white). I used 3 balls of WeCrochet’s Dishie cotton yarn (100% cotton, 190yds/100grams) in the color “Swan.”
- About 760 yards of worsted weight (size 4) yarn for color B (brown). I used 4 balls of WeCrochet’s Dishie cotton yarn (100% cotton, 190yds/100grams) in the color “Mushroom.”
- *I recommend using a cotton yarn (or similar fibers – linen, hemp, etc) for this bag to get a final product with more durability, structure, and washability. Acrylic or wool is not recommended.
- Hook: size J/10 (6.00mm)
- (Optional) Leather bag handles
- Stitch markers
- Yarn needle, scissors
Size
When laid flat: Approximately 19.5″ at the widest point and 13″ tall (not including handles).
Gauge
5 sts x 7 rows = 2″ using sc.
Notes
- You will hold two strands of yarn together for the entire pattern. You can either pull from two separate balls OR pull one strand from the center and one from the outside of a single ball.
- This bag is worked from the bottom up. The double layer base is worked in spiral rounds, and the body of the bag is worked in joined rounds.
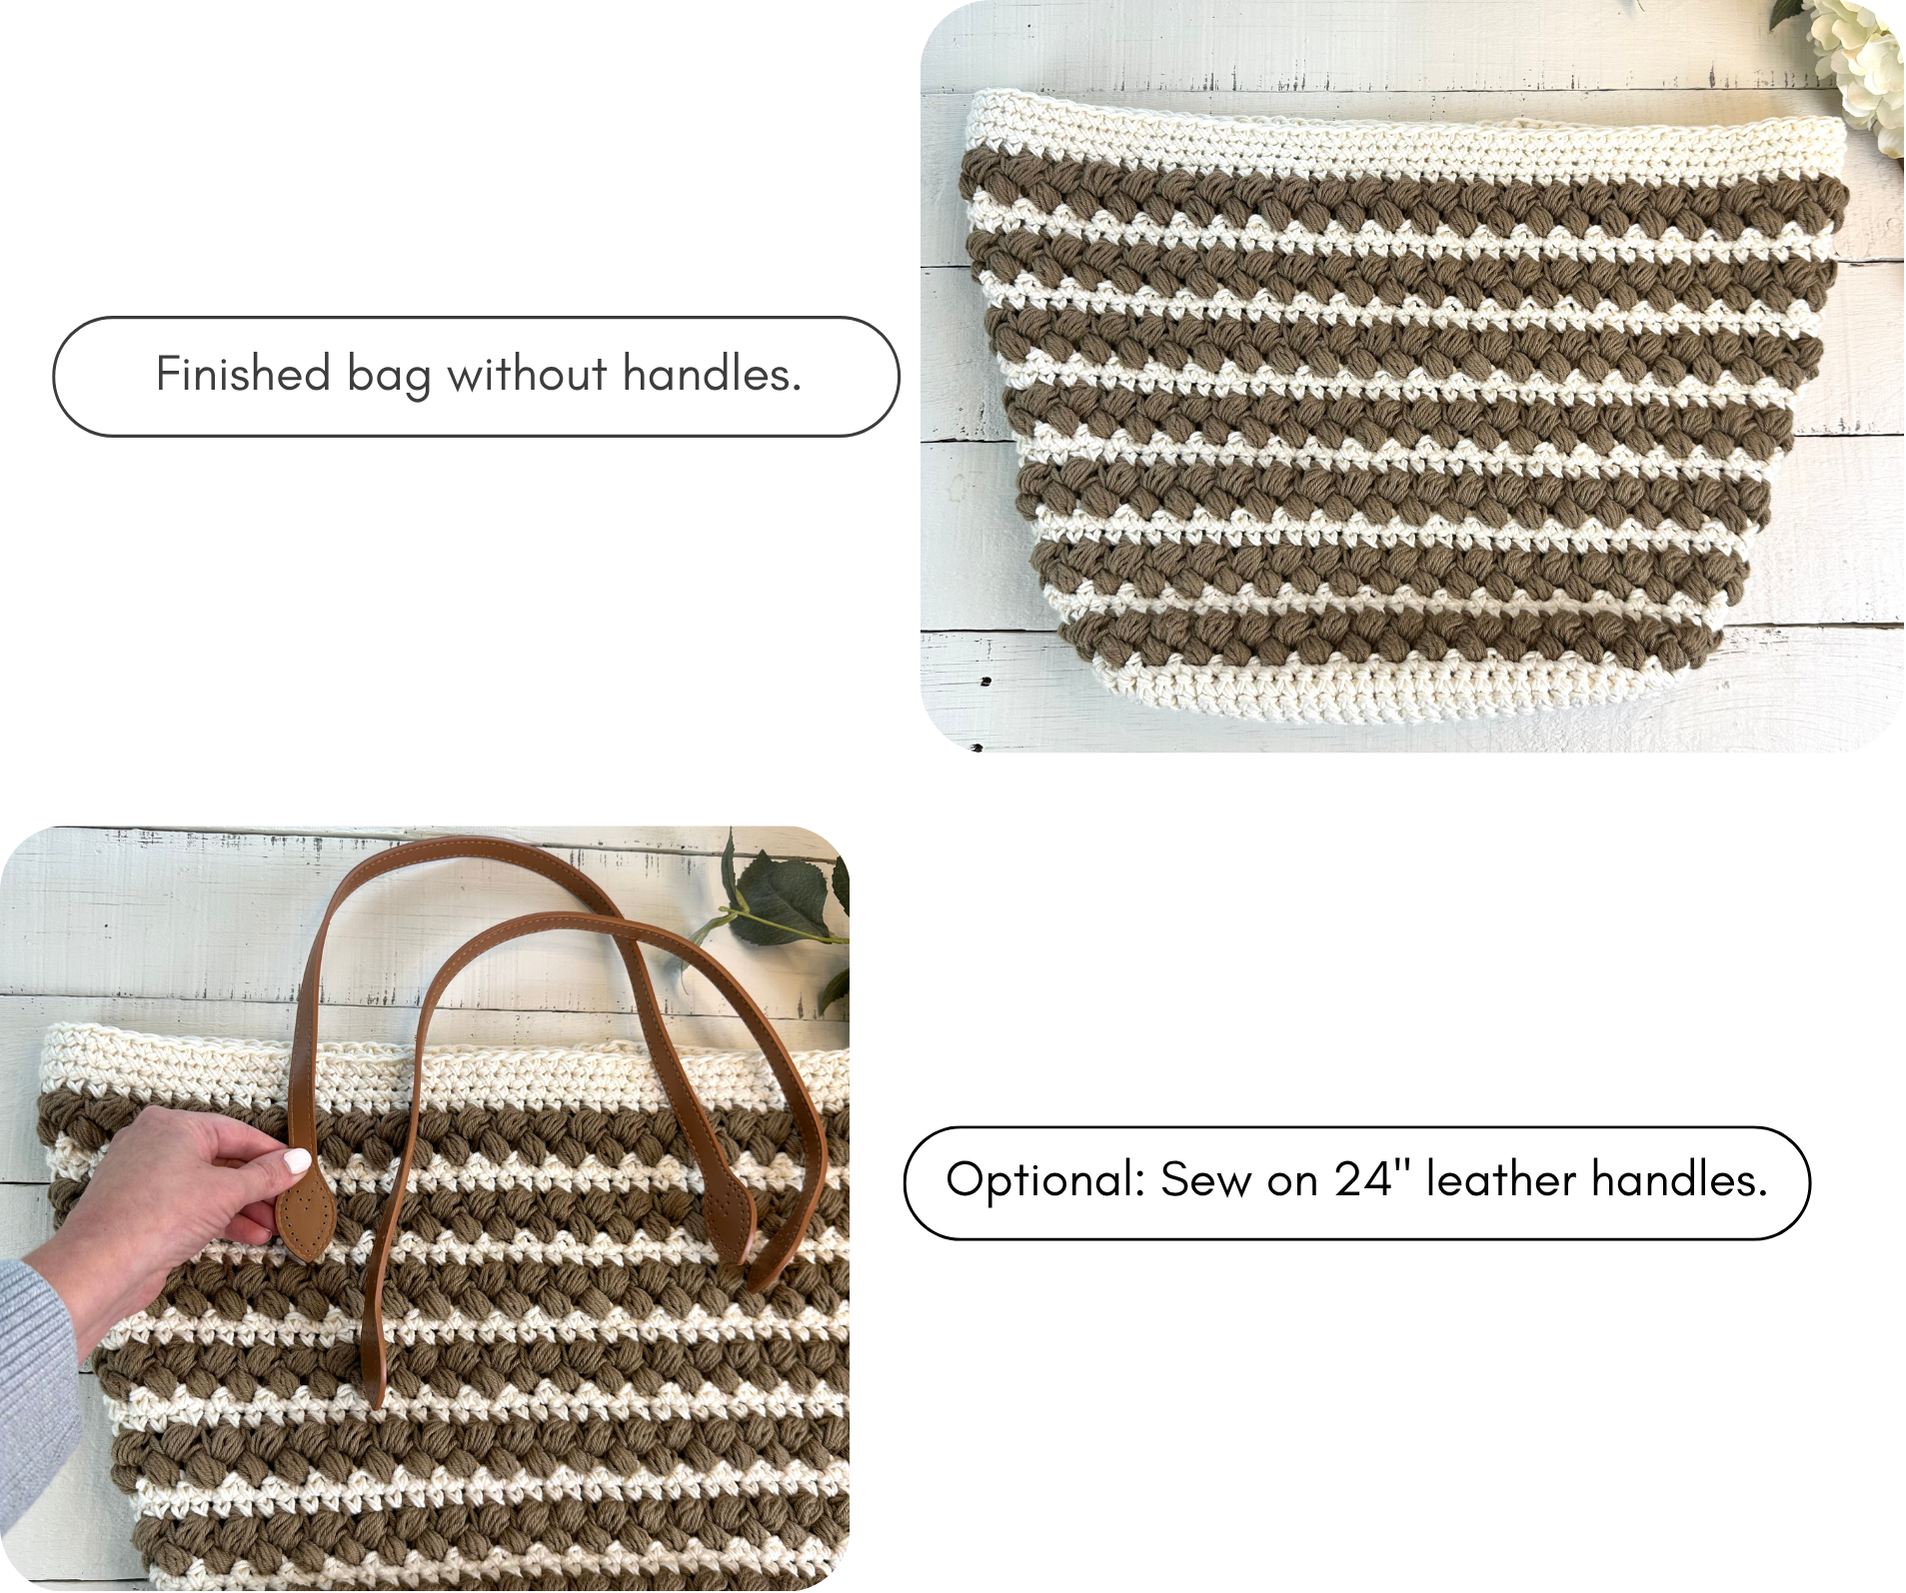
- The handles are made separately. They are worked in rows, then folded in half lengthwise and the row ends are joined to form a tube. Then they are sewn to the bag. If you prefer, you could use 24″ leather handles for less stretch.
- To work in the back bump of the chain, flip the chain over and work into the single bump on the back of the chain rather than in the two V-shaped loops on the front. More info here.
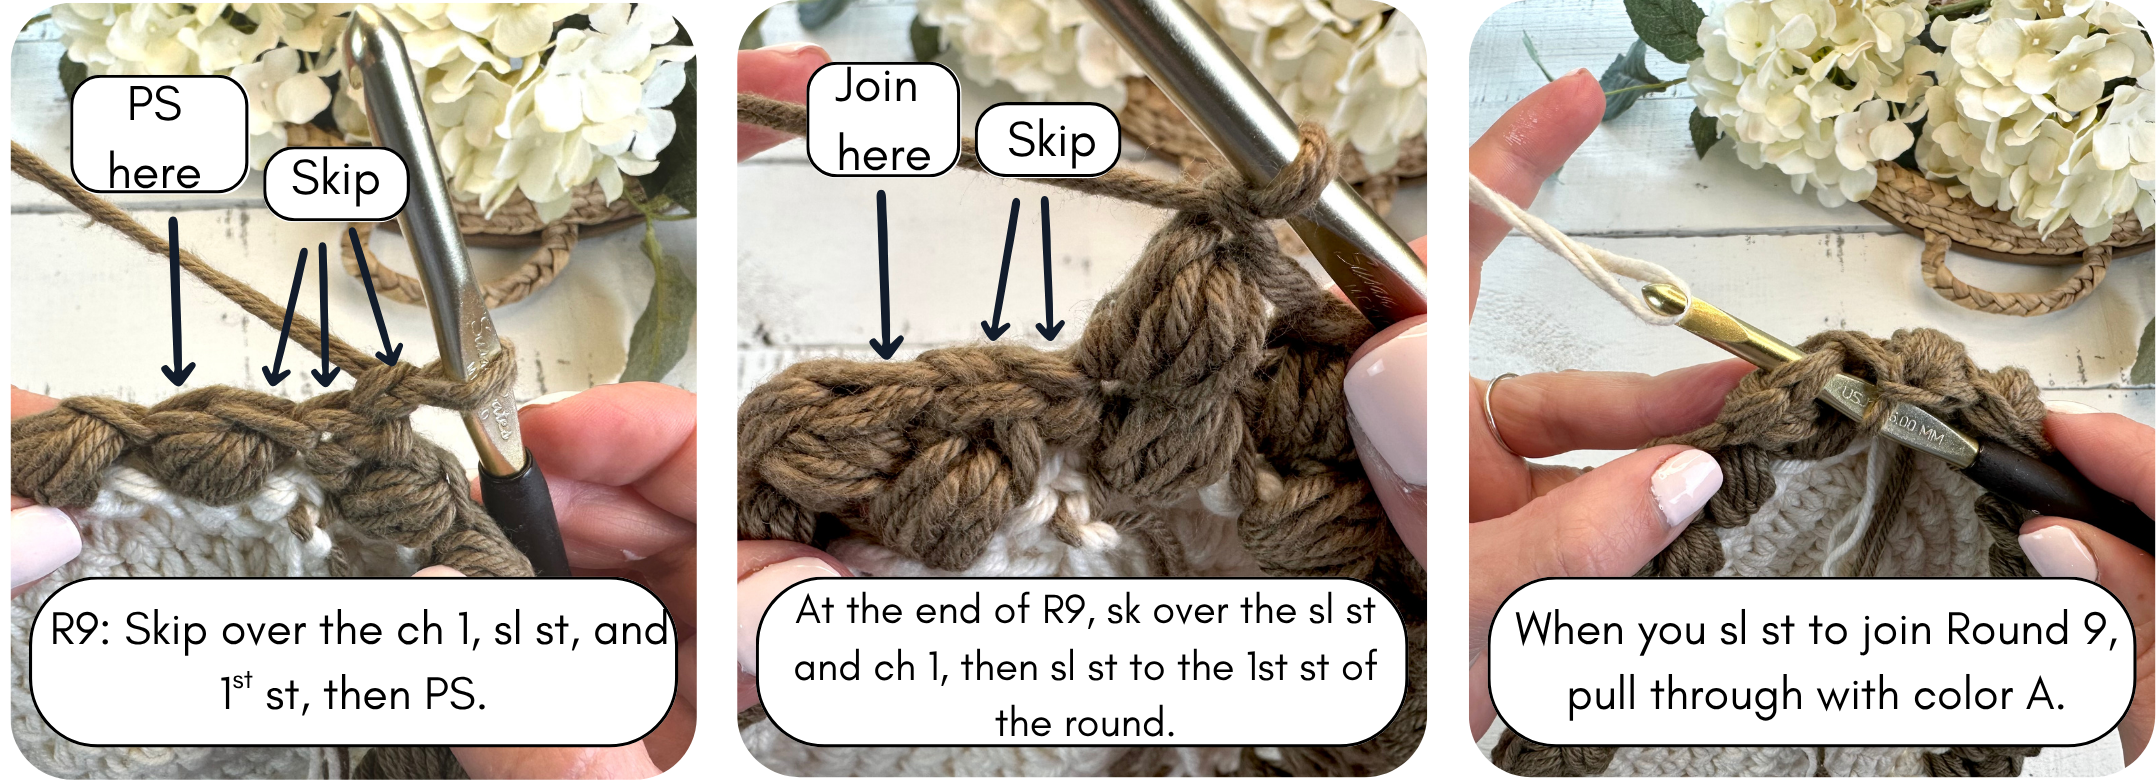
- All color changes in this pattern happen on the slip stitch at the end of the round. To change colors, insert your hook into the first stitch of the round to start the sl st, drop the “old” color (to the interior of the bag) and pull through the sl st with the “new” color. Continue with the new color. I like to tie the two ends together to secure.
- Pay close attention to the “Turn”/ ”Do not turn” instructions at the end of each round. This is critical to get the cross hatch braided pattern of the puff stitches.
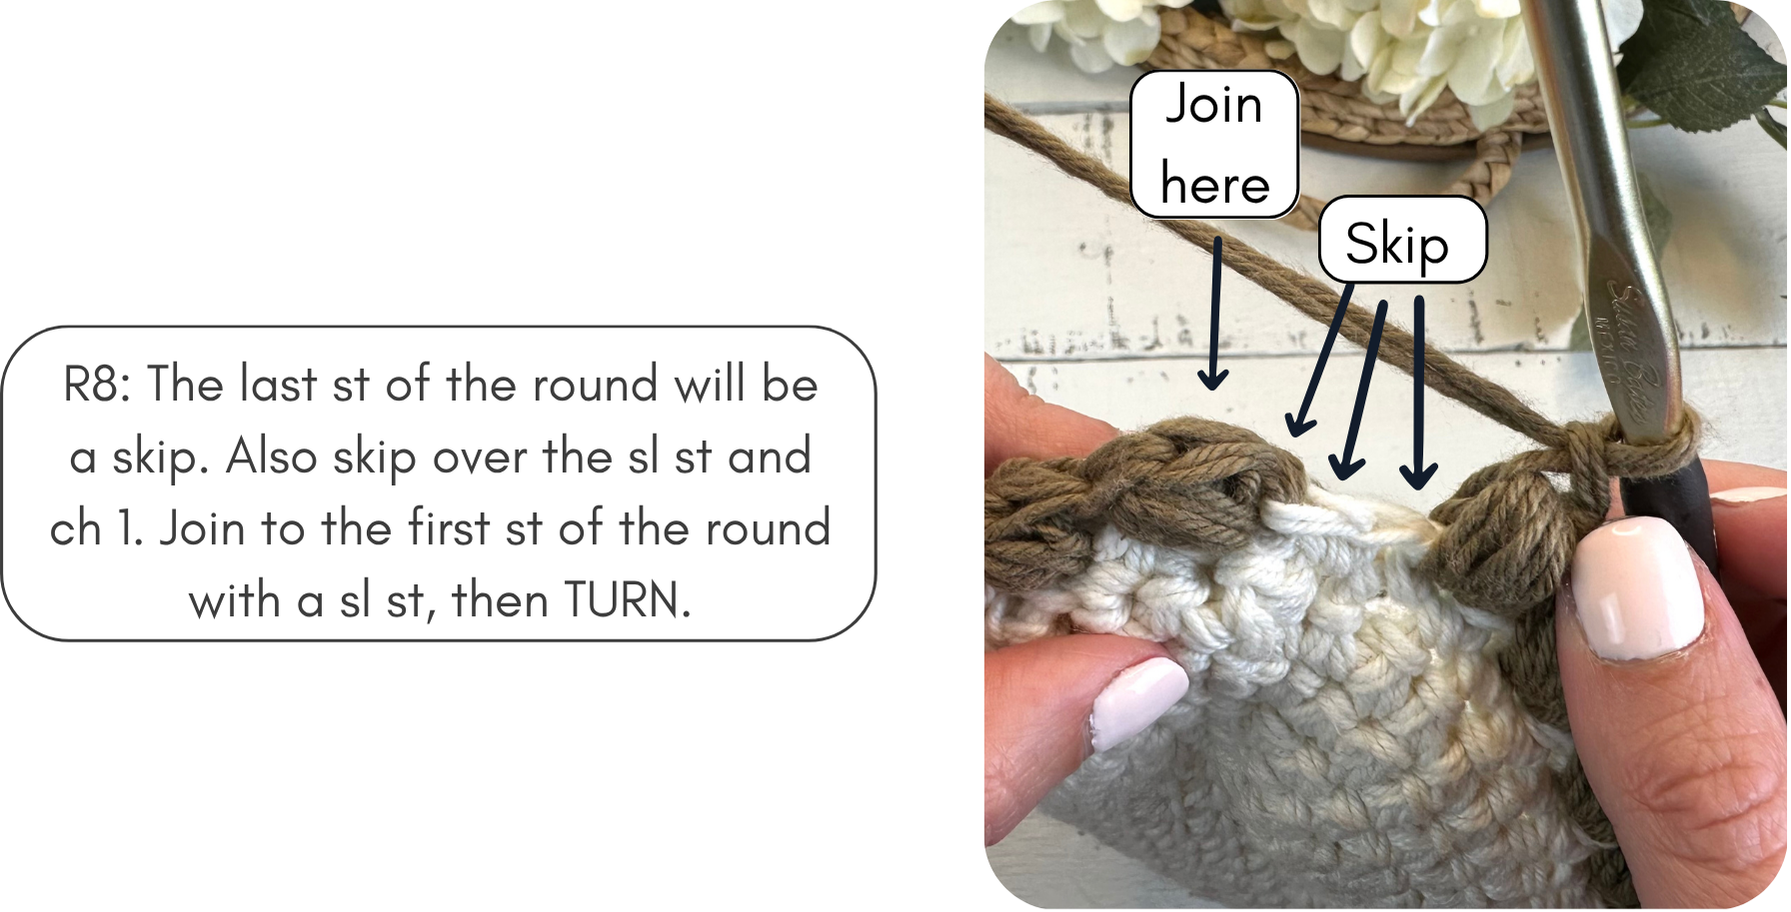
- The ch 1 at the beginning of each round does not count as a stitch. You should always skip over the ch 1 and the sl st used to join the rounds.
- Pattern is written in US crochet terms.
Special Stitches
Puff stitch (PS) – (do not yo) insert hook into stitch, yo and pull up a loop, *yo and insert hook into same st, yo and pull up a loop, repeat from * two more times. You should have 8 double-stranded loops on the hook. Yo and pull through all 8 loops. Ch 1 to close the stitch. Each PS counts as two stitches.
Abbreviations
- ch(s) = chain(s)
- ps = puff stitch
- rep = repeat
- sc = single crochet
- sk = skip
- sl st = slip stitch
- st(s) = stitch(es)
- yo = yarn over
Crochet Summer Tote Bag Pattern
Base (make 2)
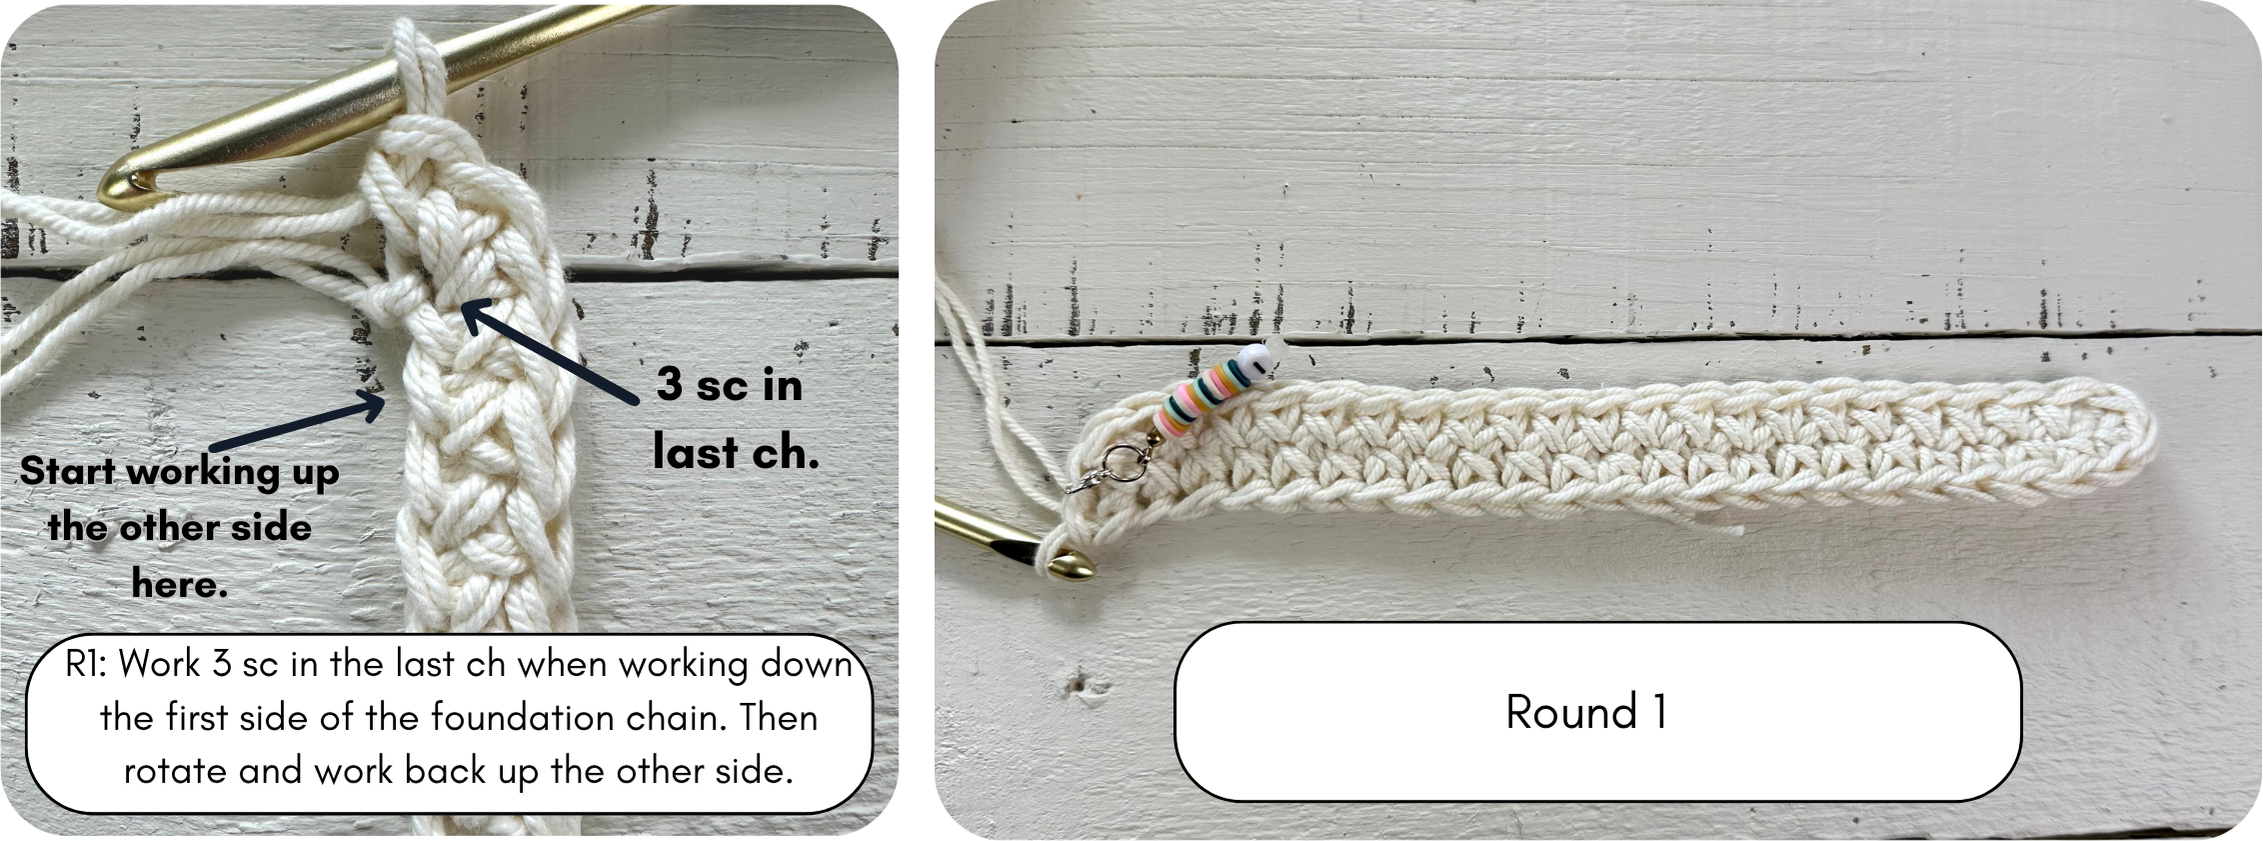
- the base is worked in an oval shape by working down one side of the foundation chain, then rotating and working back up the other side. It is worked in spiral rounds. We will place a stitch marker in the first stitch to keep track of the rounds.
Using color A (white) and holding two strands together, chain 23.
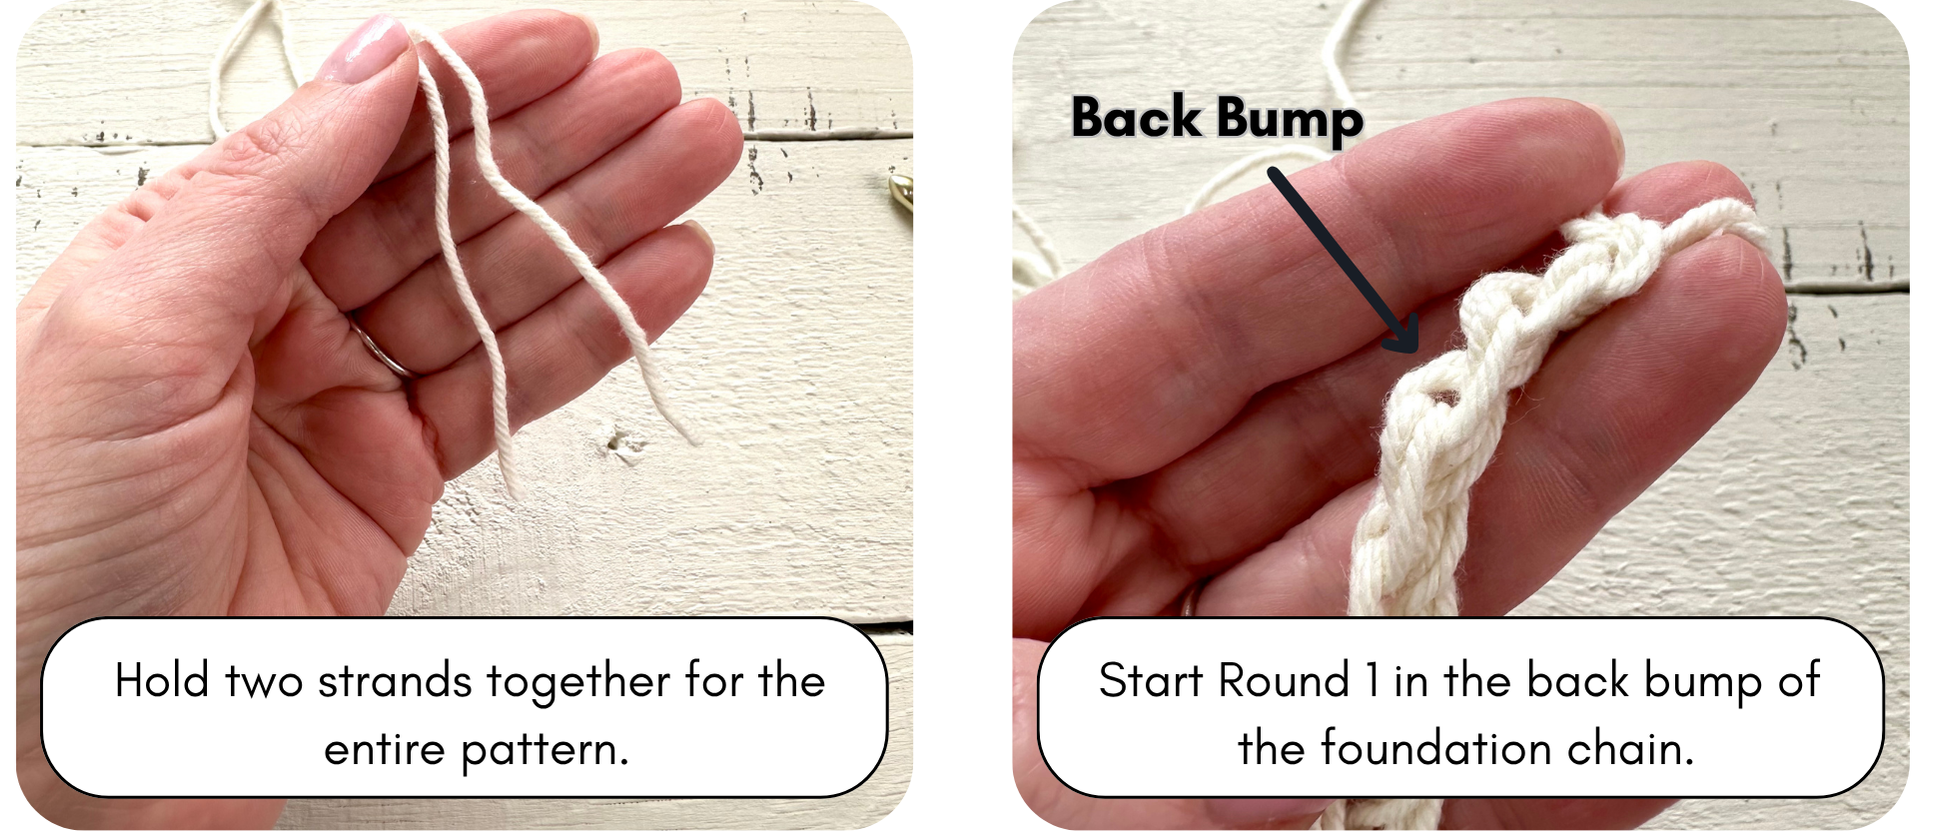
Round 1: (Working in the back bump of the chain) 1 sc in the 2nd ch from hook (place st marker in this sc) and in each ch until the last, 3 sc in the last ch,
rotate work so you are working back up the other side of the ch, 1 sc in each ch until the last, 2 sc in the last ch. Do not turn. (46 sc)
Round 2: 2 sc in the 1st st (move st marker to the first of these to mark the beginning of the round), 1 sc in the next 20 sts, 2 sc in each of the next 3 sts, 1 sc in the next 20 sts, 2 sc in each of the last 2 sts. Do not turn. (52 sc)
Round 3: 2 sc in the 1st st (move st marker), 1 sc in the next 23 sts, 2 sc in each of the next 3 sts, 1 sc in the next 23 sts, 2 sc in each of the last 2 sts. Do not turn. (58 sc)
Round 4: 2 sc in the 1st st (move st marker), 1 sc in the next 26 sts, 2 sc in each of the next 3 sts, 1 sc in the next 26 sts, 2 sc in each of the last 2 sts. Do not turn. (64 sc)
Round 5: 2 sc in the 1st st (move st marker), 1 sc in the next 29 sts, 2 sc in each of the next 3 sts, 1 sc in the next 29 sts, 2 sc in each of the last 2 sts. (70 sc)
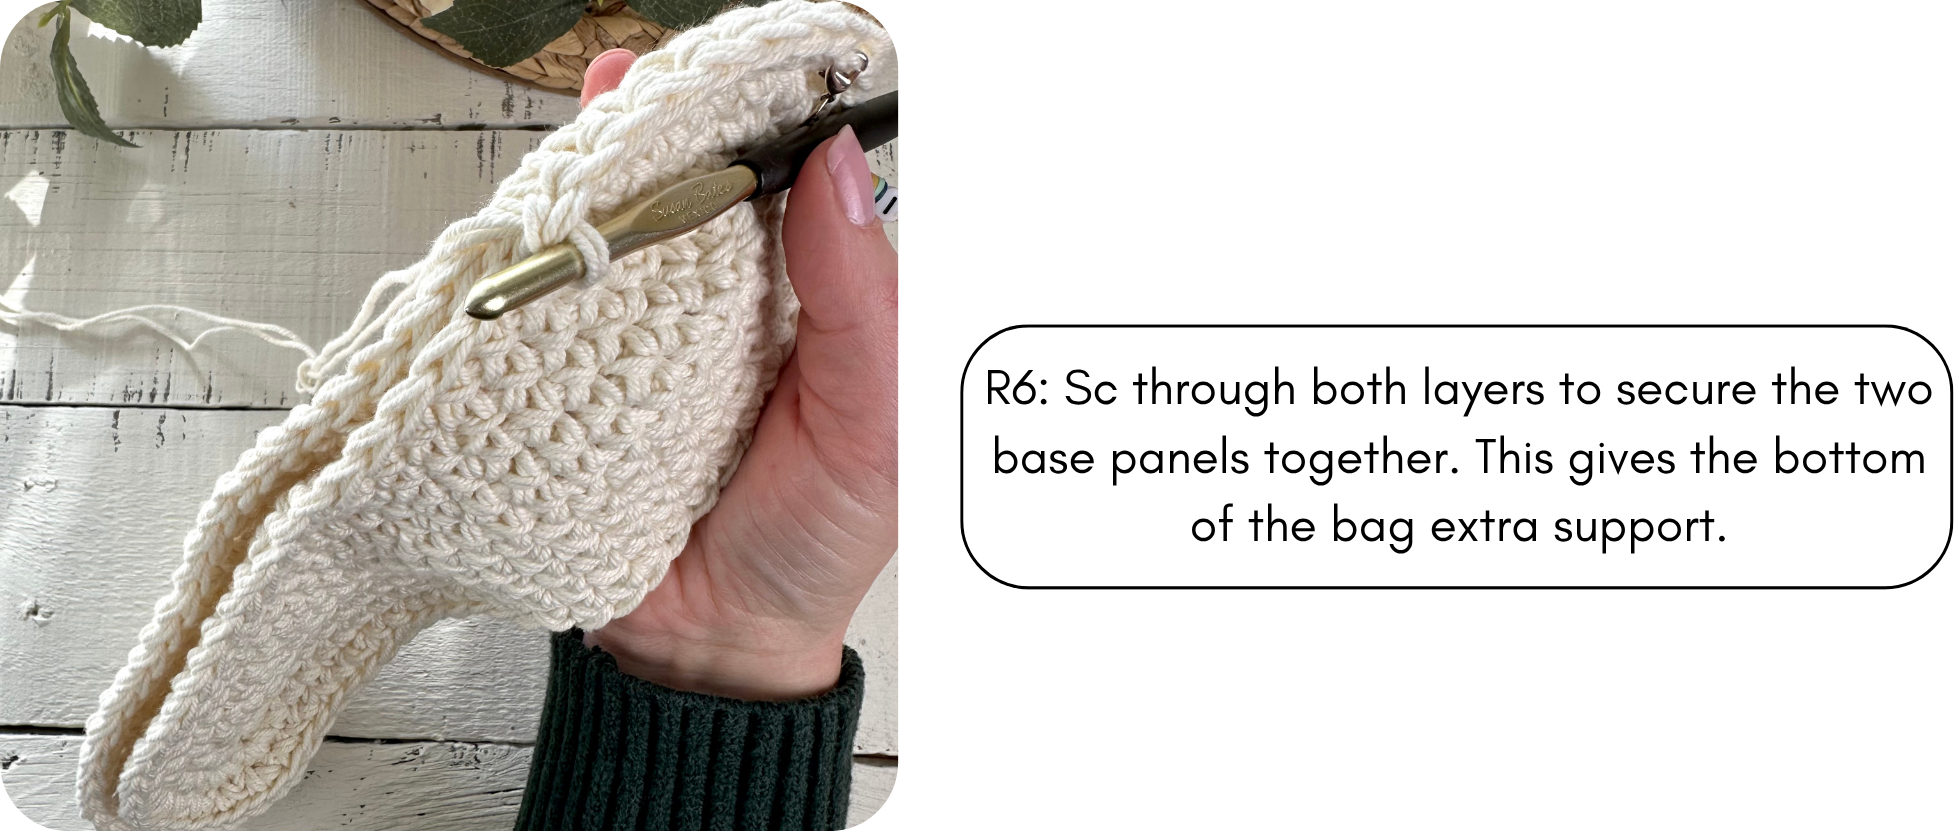
For the first panel, sl st to the first st to join the round and fasten off. Weave in ends.
Do not fasten off second panel.

Lay second base panel on top of the first.
Round 6: Working through both panels, 1 sc in each st around. Sl st to first st of the round to join (you no longer need the st marker). Ch 1, TURN your work. (70 sc)
Bag
The body of the bag is worked in joined rounds. Both colors of yarn are held double-stranded throughout.
Round 7: (Color A) (Skip over the sl st and ch 1) 1 sc in each st around. Sl st to first st of the round to join, switch to color B (brown) on the sl st. Ch 1, do not turn. (70 sc)

Round 8: You should be looking at the exterior of the bag. (Color B) Starting in the same st you just sl st’d into, *PS, sk next st, rep from * around (last st will be a sk). Sl st to first st to join. Ch 1, TURN your work. (35 PS, each PS = 2 sts, so 70 sts total)
Round 9: You should be looking at the interior of the bag. (Color B) (Skip over sl st and ch 1) *sk 1 st, PS in next st, rep from * around (last st will be a PS). Sl st to first st to join, switch to Color A (white) on the sl st. Ch 1, TURN your work. (35 PS, 70 sts total)
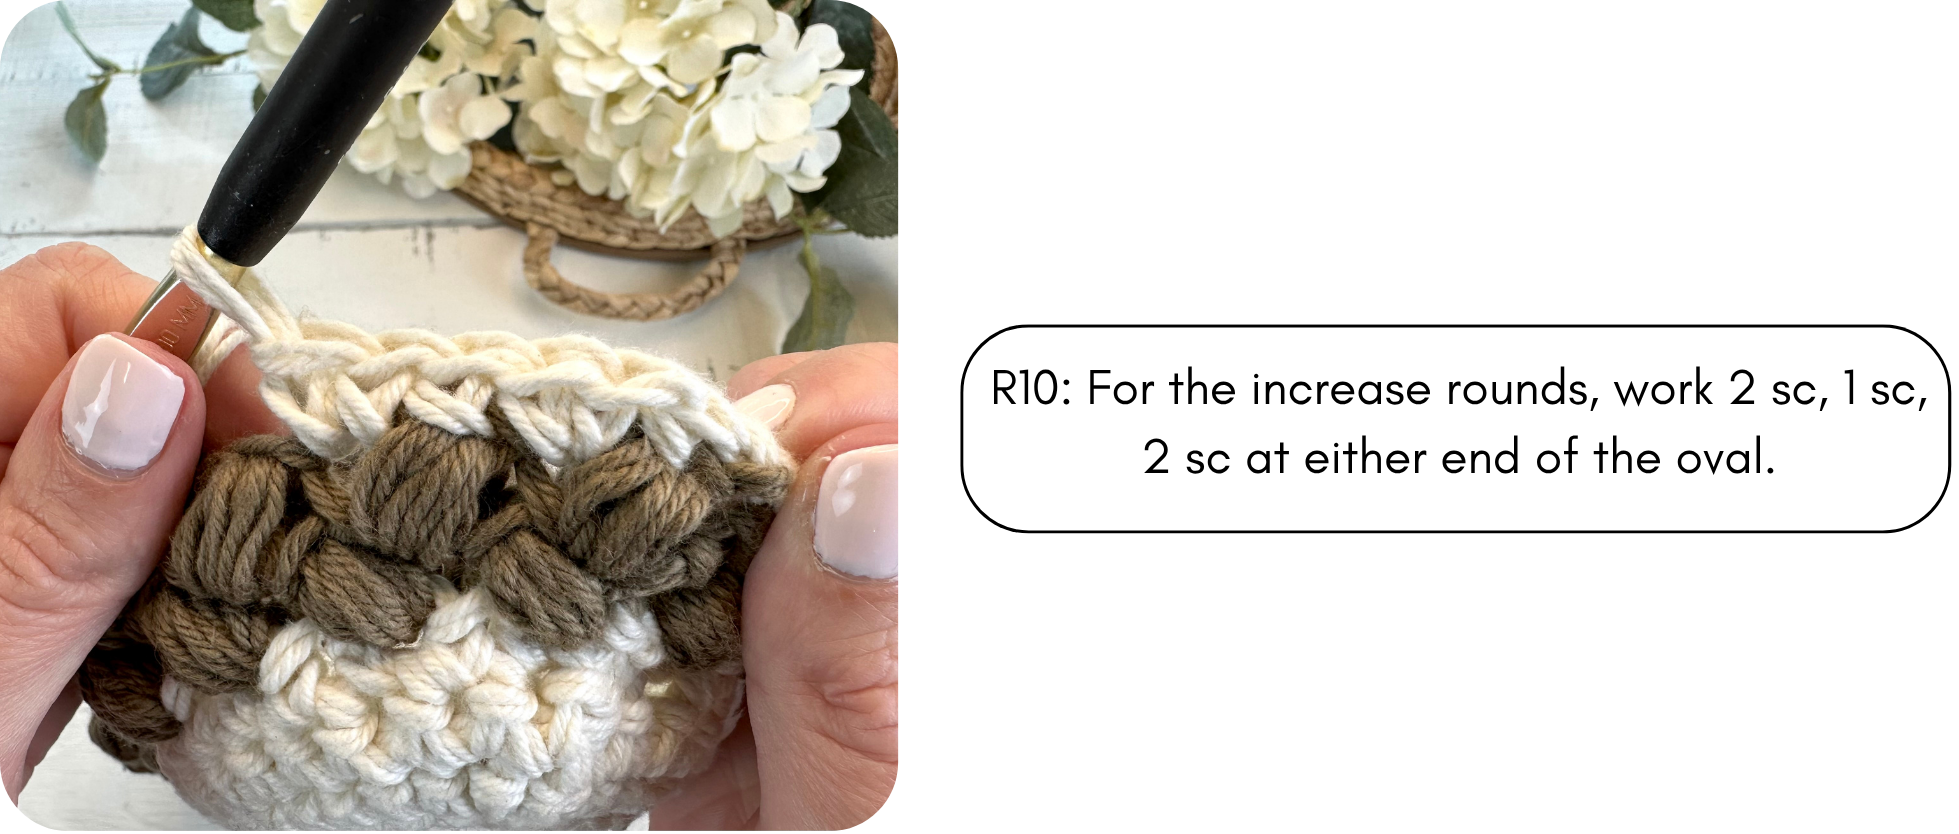
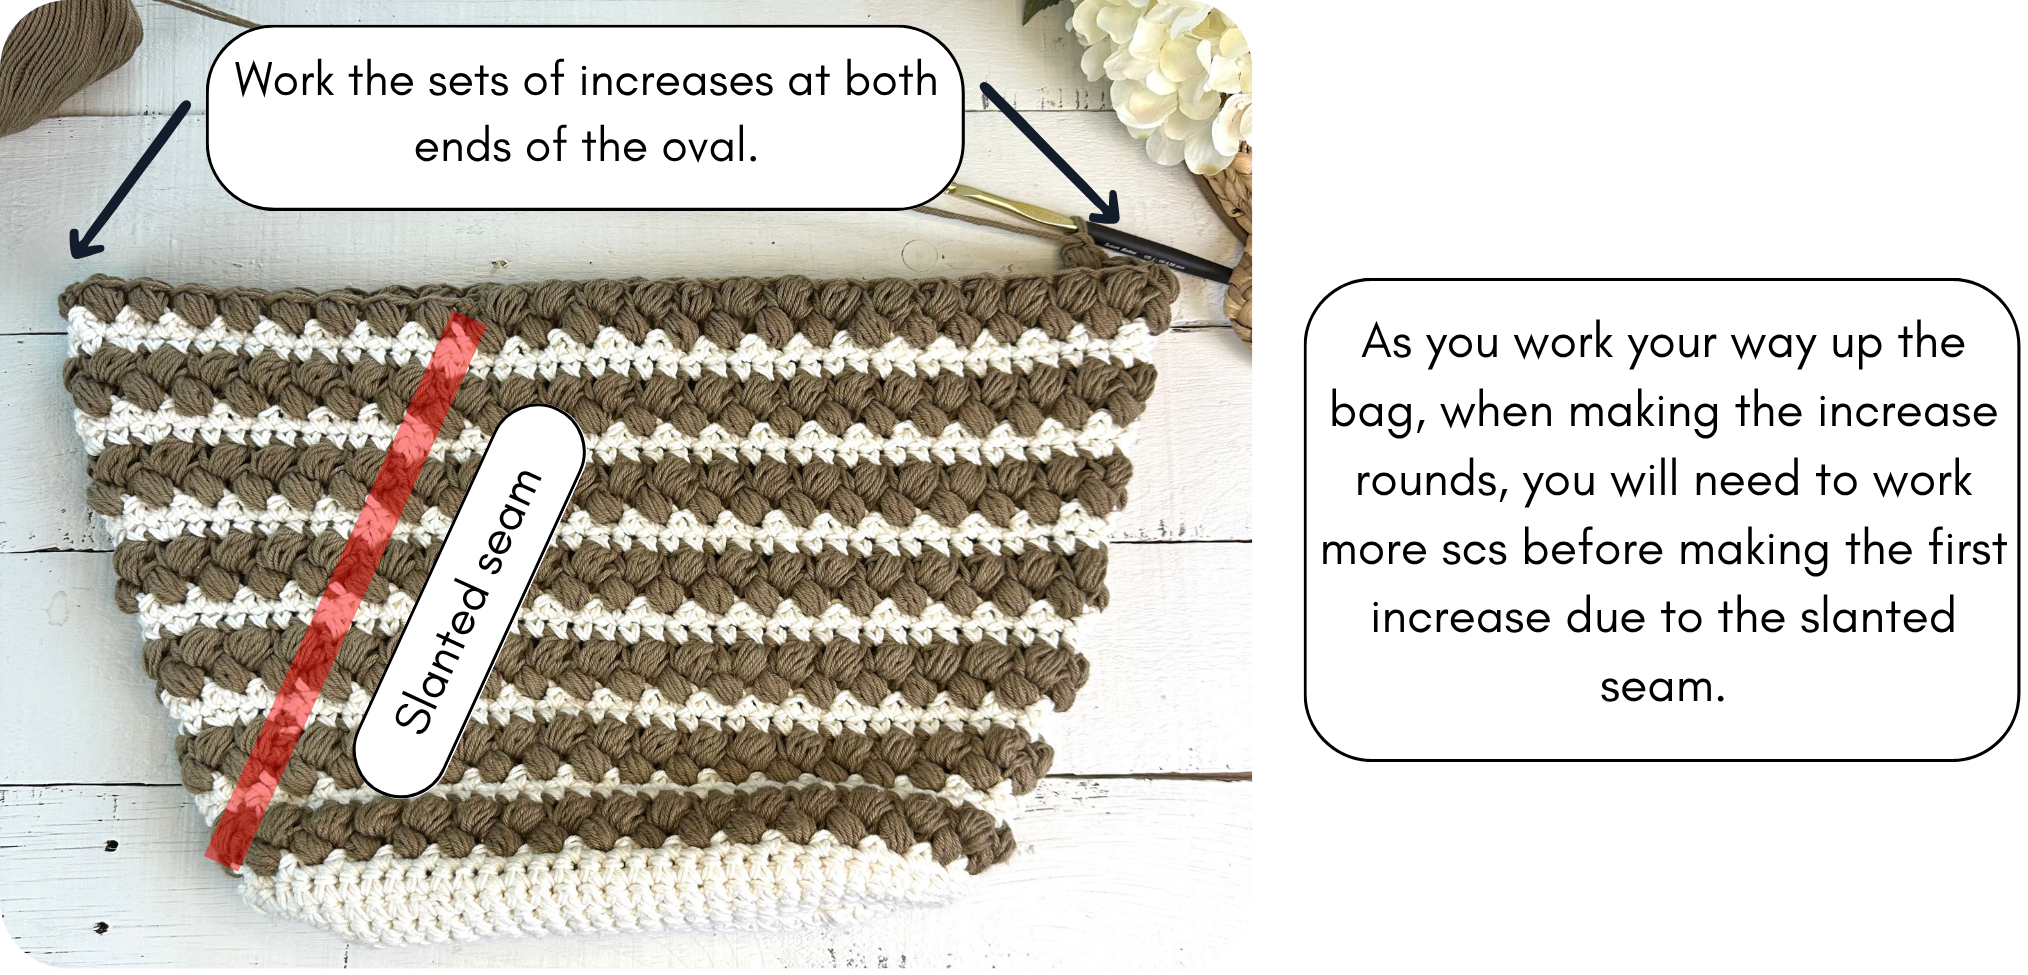
The first round of sc after the PS rounds will always be an increase round (an increase = 2 scs worked in 1 sp).You will work two increases at each end of the oval. Tip: Lay the bag flat, find the ends/tips of the oval. Place a st marker in the approx. center of each end. For the increase rounds, you will work an increase on either side of the st with the st marker. Move the st marker up as you go.
Round 10: You should be looking at the exterior of the bag. (Color A) (Skip over the sl st and ch 1) 1 sc in each st until you get to the first “end/tip” of the oval, 2 sc in next st, 1 sc in next, 2 sc in next, 1 sc in each st until you get to the second “end/tip” of the oval, 2 sc in next st, 1 sc in next, 2 sc in next, 1 sc in each of the remaining sts. Sl st to first st of the round to join. Ch 1, do not turn. (74 sc)
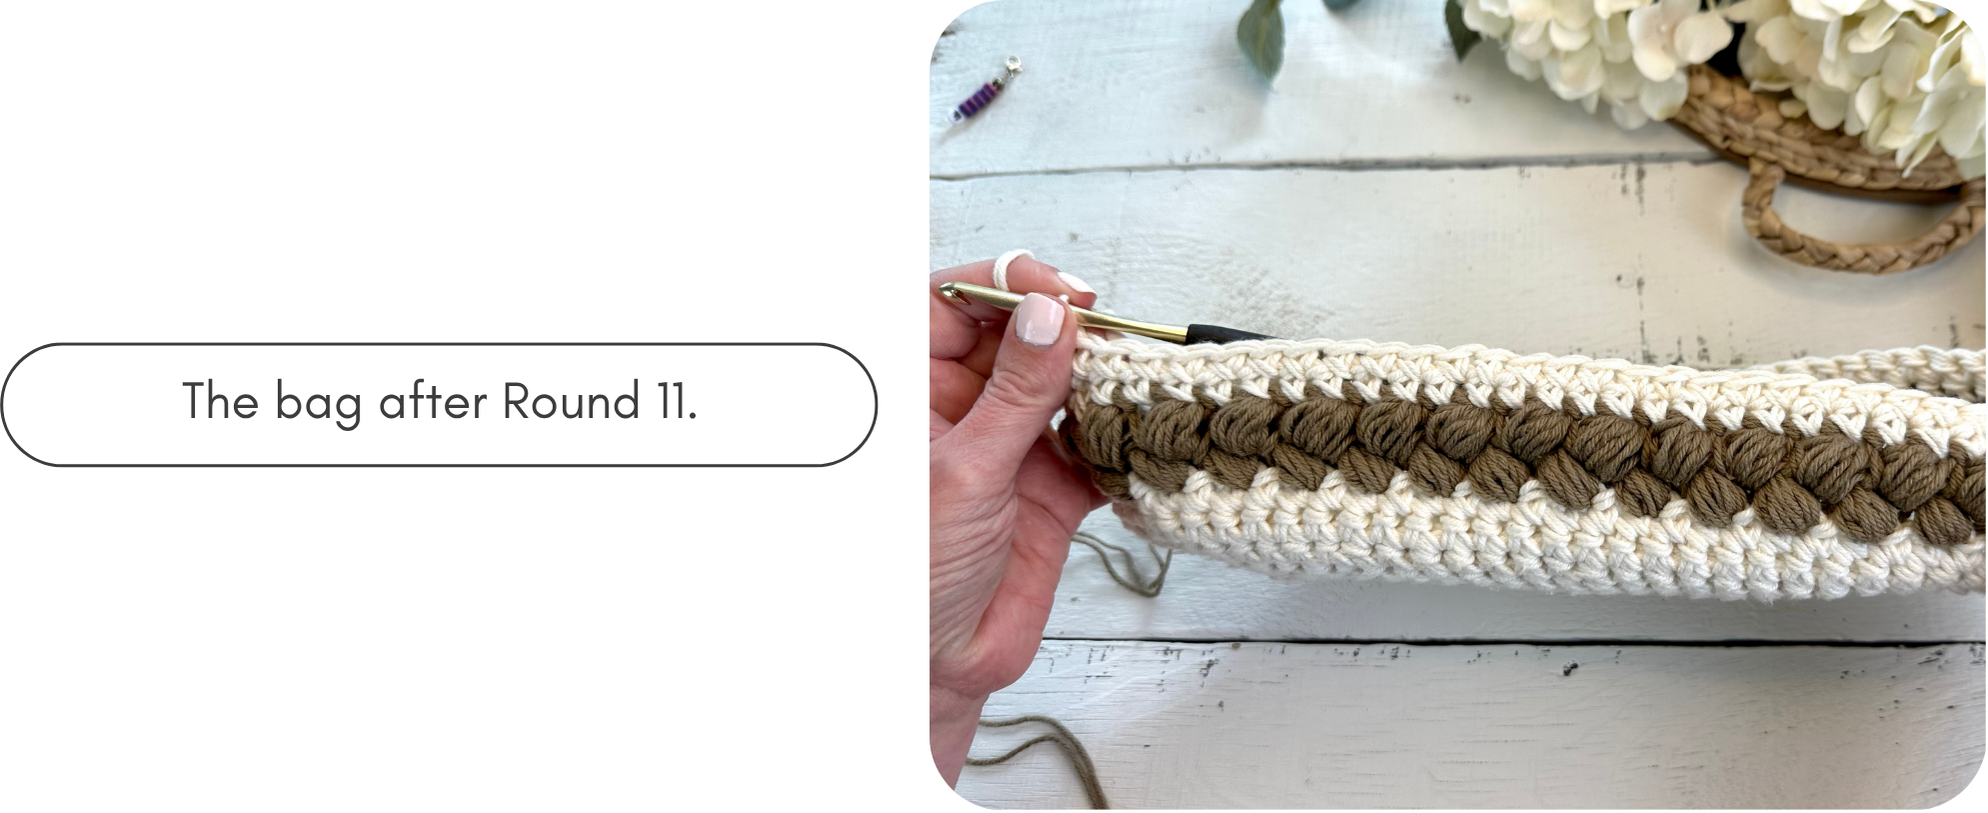
Round 11: You should be looking at the exterior of the bag. (Color A) Starting in the st you just sl st’d into, 1 sc in each st around. Sl st to first st of the round to join, switch to color B (brown) on the sl st. Ch 1, do not turn. (74 sc)
Round 12: Rep Round 8. (37 ps, 74 sts)
Round 13: Rep Round 9. (37 ps, 74 sts)
Round 14: Rep Round 10. (78 sc)
Tip: Due to the nature of crocheting in the round, you will notice your seam begin to slant slightly as your bag gets taller. This means that for the increase rounds (rep of Round 10), you will have to work more and more single crochets before you get to the end/tip of the oval where you will make your first increase.
Round 15: Rep Round 11. (78 sc)
Round 16: Rep Round 8. (39 ps, 78 sts)
Round 17: Rep Round 9. (39 ps, 78 sts)
Round 18: Rep Round 10. (82 sc)
Round 19: Rep Round 11. (82 sc)
Round 20: Rep Round 8. (41 ps, 82 sts)
Round 21: Rep Round 9. (41 ps, 82 sts)
Round 22: Rep Round 10. (86 sc)
Round 23: Rep Round 11. (86 sc)
Round 24: Rep Round 8. (43 ps, 86 sts)
Round 25: Rep Round 9. (43 ps, 86 sts)
Round 26: Rep Round 10. (90 sc)
Round 27: Rep Round 11. (90 sc)
Round 28: Rep Round 8. (45 ps, 90 sts)
Round 29: Rep Round 9. (45 ps, 90 sts)
Round 30: Rep Round 10. (94 sc)
Round 31: Rep Round 11. (94 sc)
Round 32: Rep Round 8. (47 ps, 94 sts)
Round 33: Rep Round 9. (47 ps, 94 sts)
Round 34: Rep Round 10. (98 sc)
Rounds 35 – 37: Rep Round 11. (98 sc)
Fasten off and weave in all ends.
Handles (make 2)
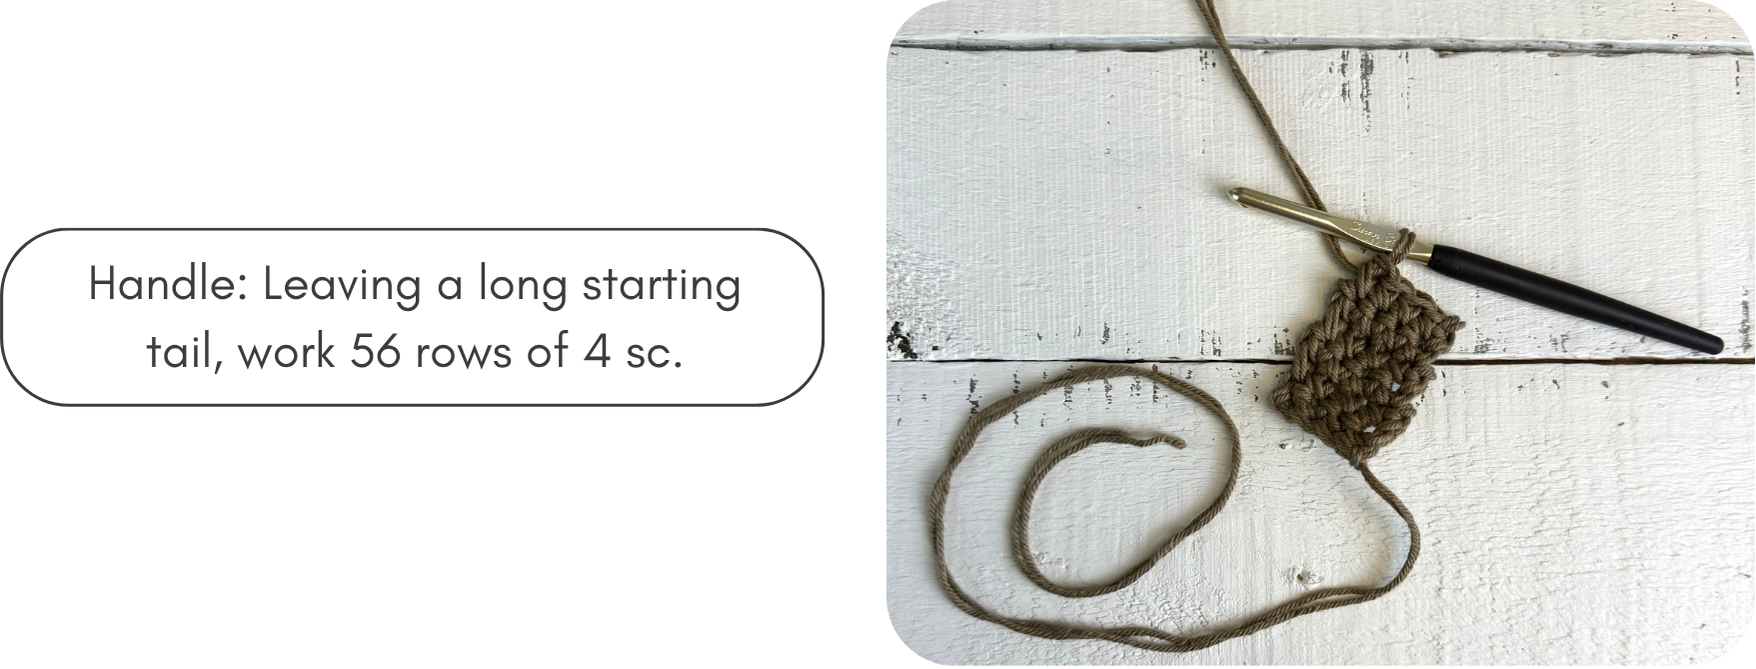
With color B and holding two strands together, leave a long starting tail and ch 5,
Row 1: 1 sc in 2nd ch from hook and in each ch. Ch 1, turn. (4 sc)
Rows 2 – 56: 1 sc in each st, ch 1, turn. (4 sc)
Leaving a long ending tail, fasten off. We will use the long tails at either end to sew the handle to the bag. To finish the handle:
- Fold handle in half lengthwise to form a tube.
- At one end, starting about 5 rows in, insert your hook through both row ends.
- Attach a length of color B (double stranded) with a sl st.
- Sc in that same space and, placing your stitches evenly, sc through both layers of row ends down the length of the handle until about 5 rows from the end.
- Fasten off and weave in the ends.

Attaching Handles to the crochet tote bag
- Lay bag flat and position one handle so that the two flat ends are on the sc rows at the top of the bag. Each side should be about 5″ in from the edge.
- Thread a yarn needle with one of the handle’s long tails and use it to sew the flat part of the handle to the bag.
- I like to sew in this pattern for a really secure attachment:
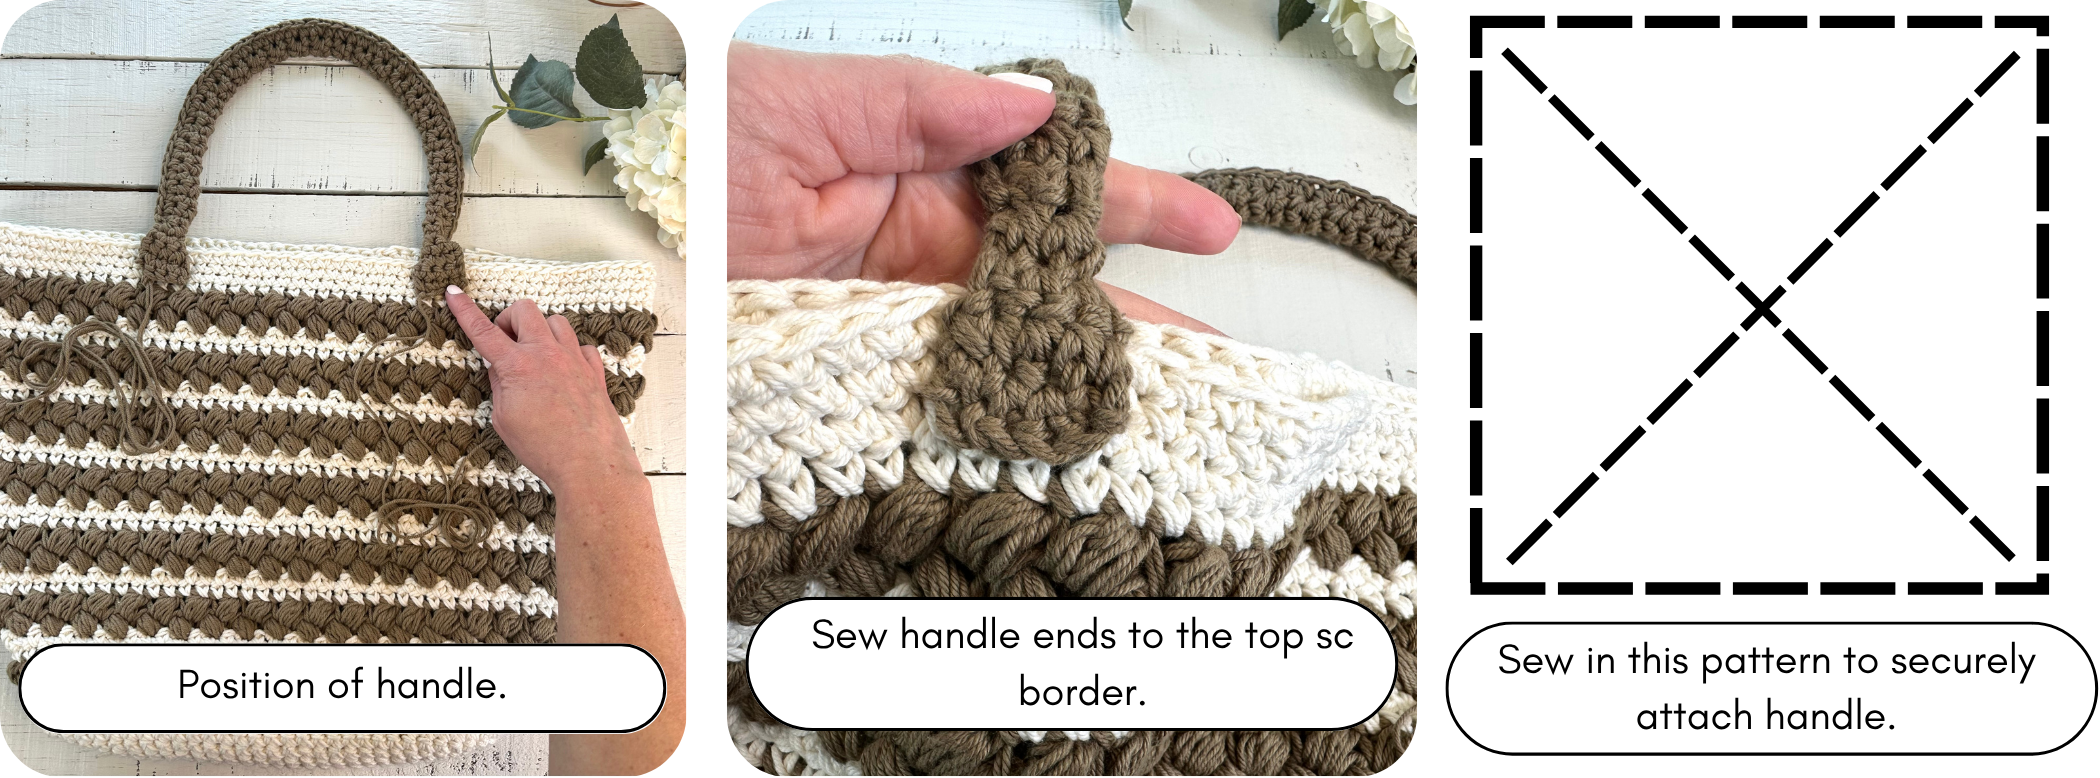
- Repeat for the other side of the handle. Trim ends.
- Repeat the whole process for the second handle.
- Your bag is finished! Enjoy!
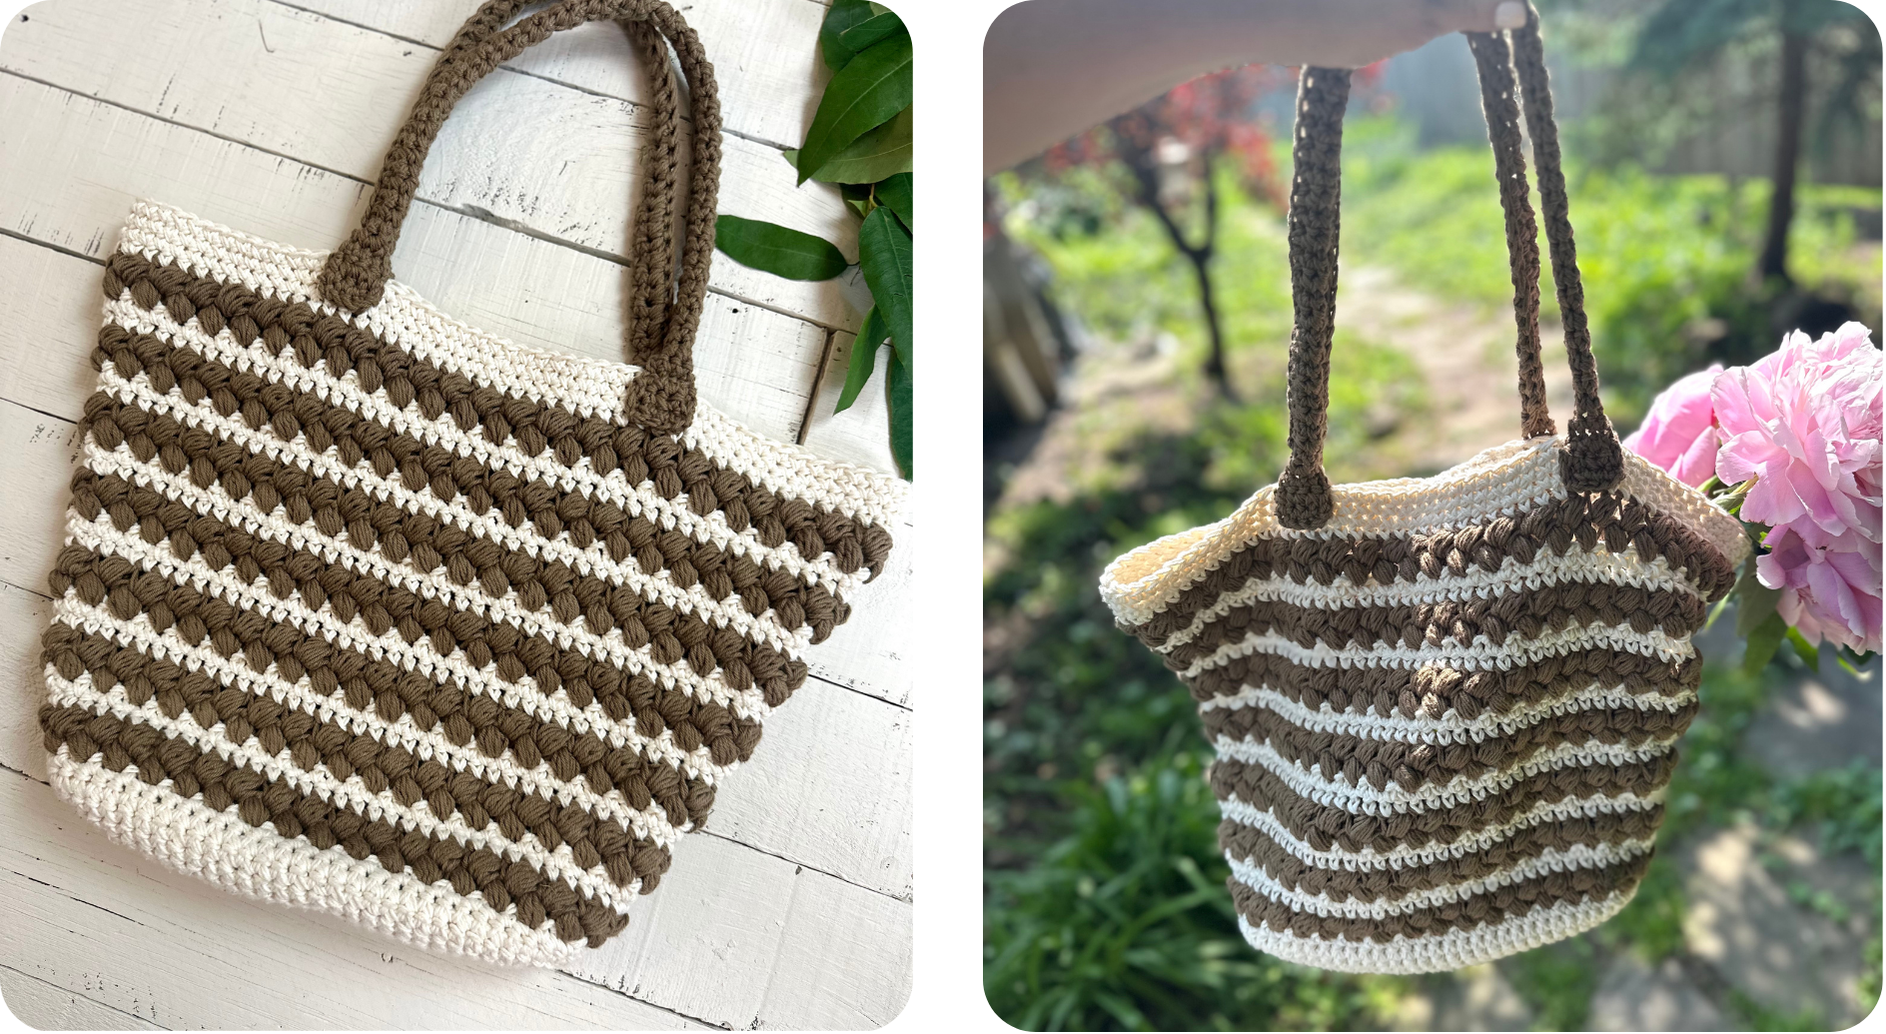
I hope you enjoyed crocheting this Braided Summer tote bag! Tag me on Instagram @theknottednest to share your project. You can find more project ideas and patterns in the Patterns Section here on the blog.
Happy making!