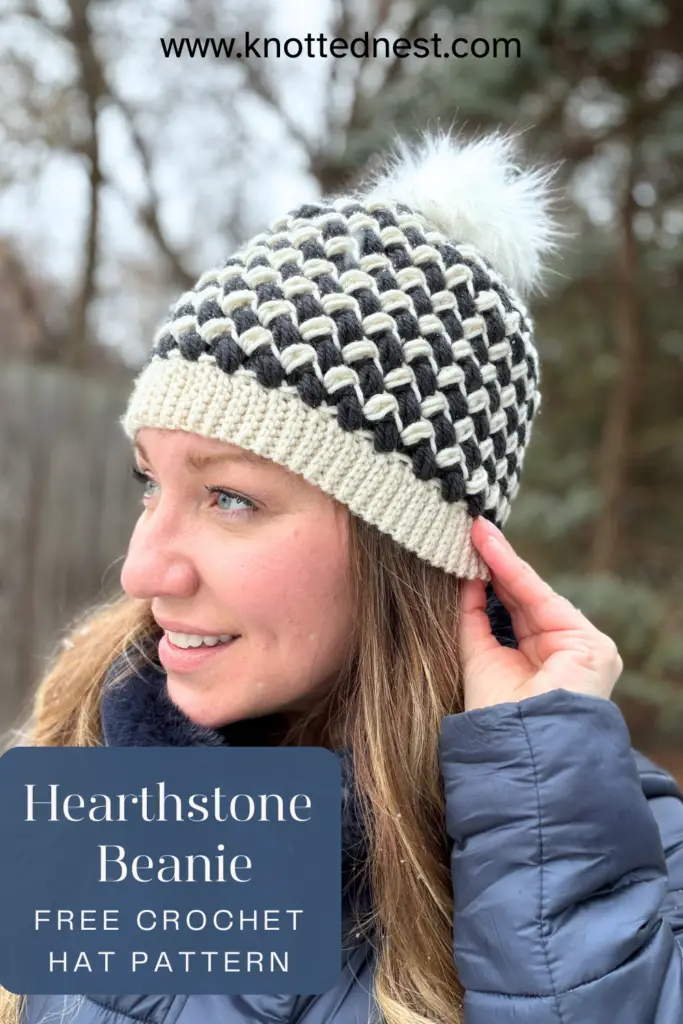
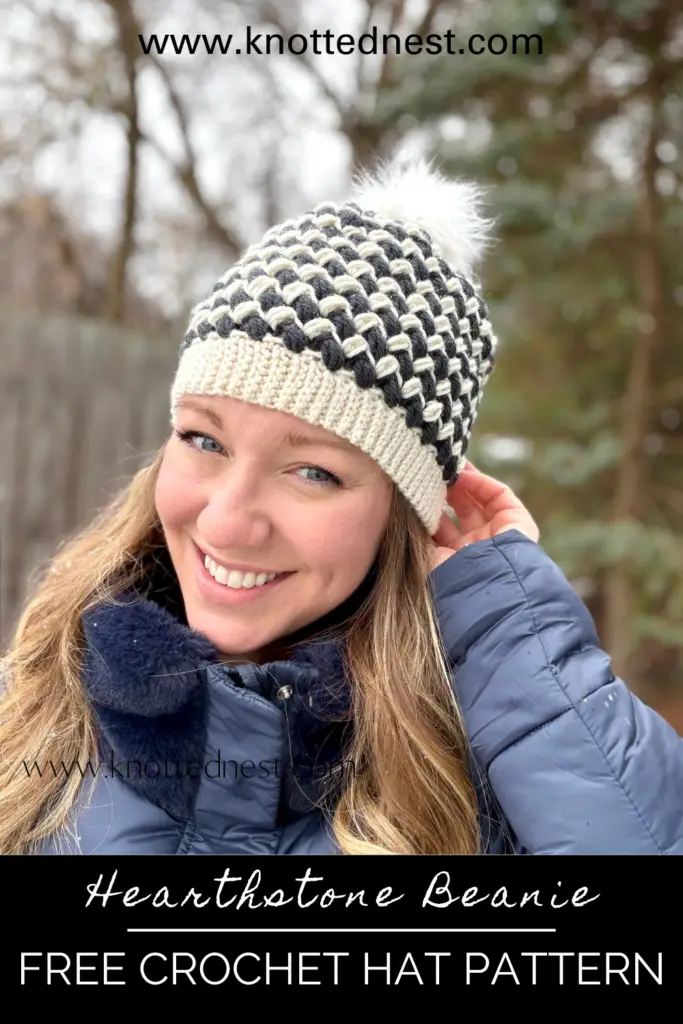
Hearthstone Beanie- Crochet Hat Free Pattern
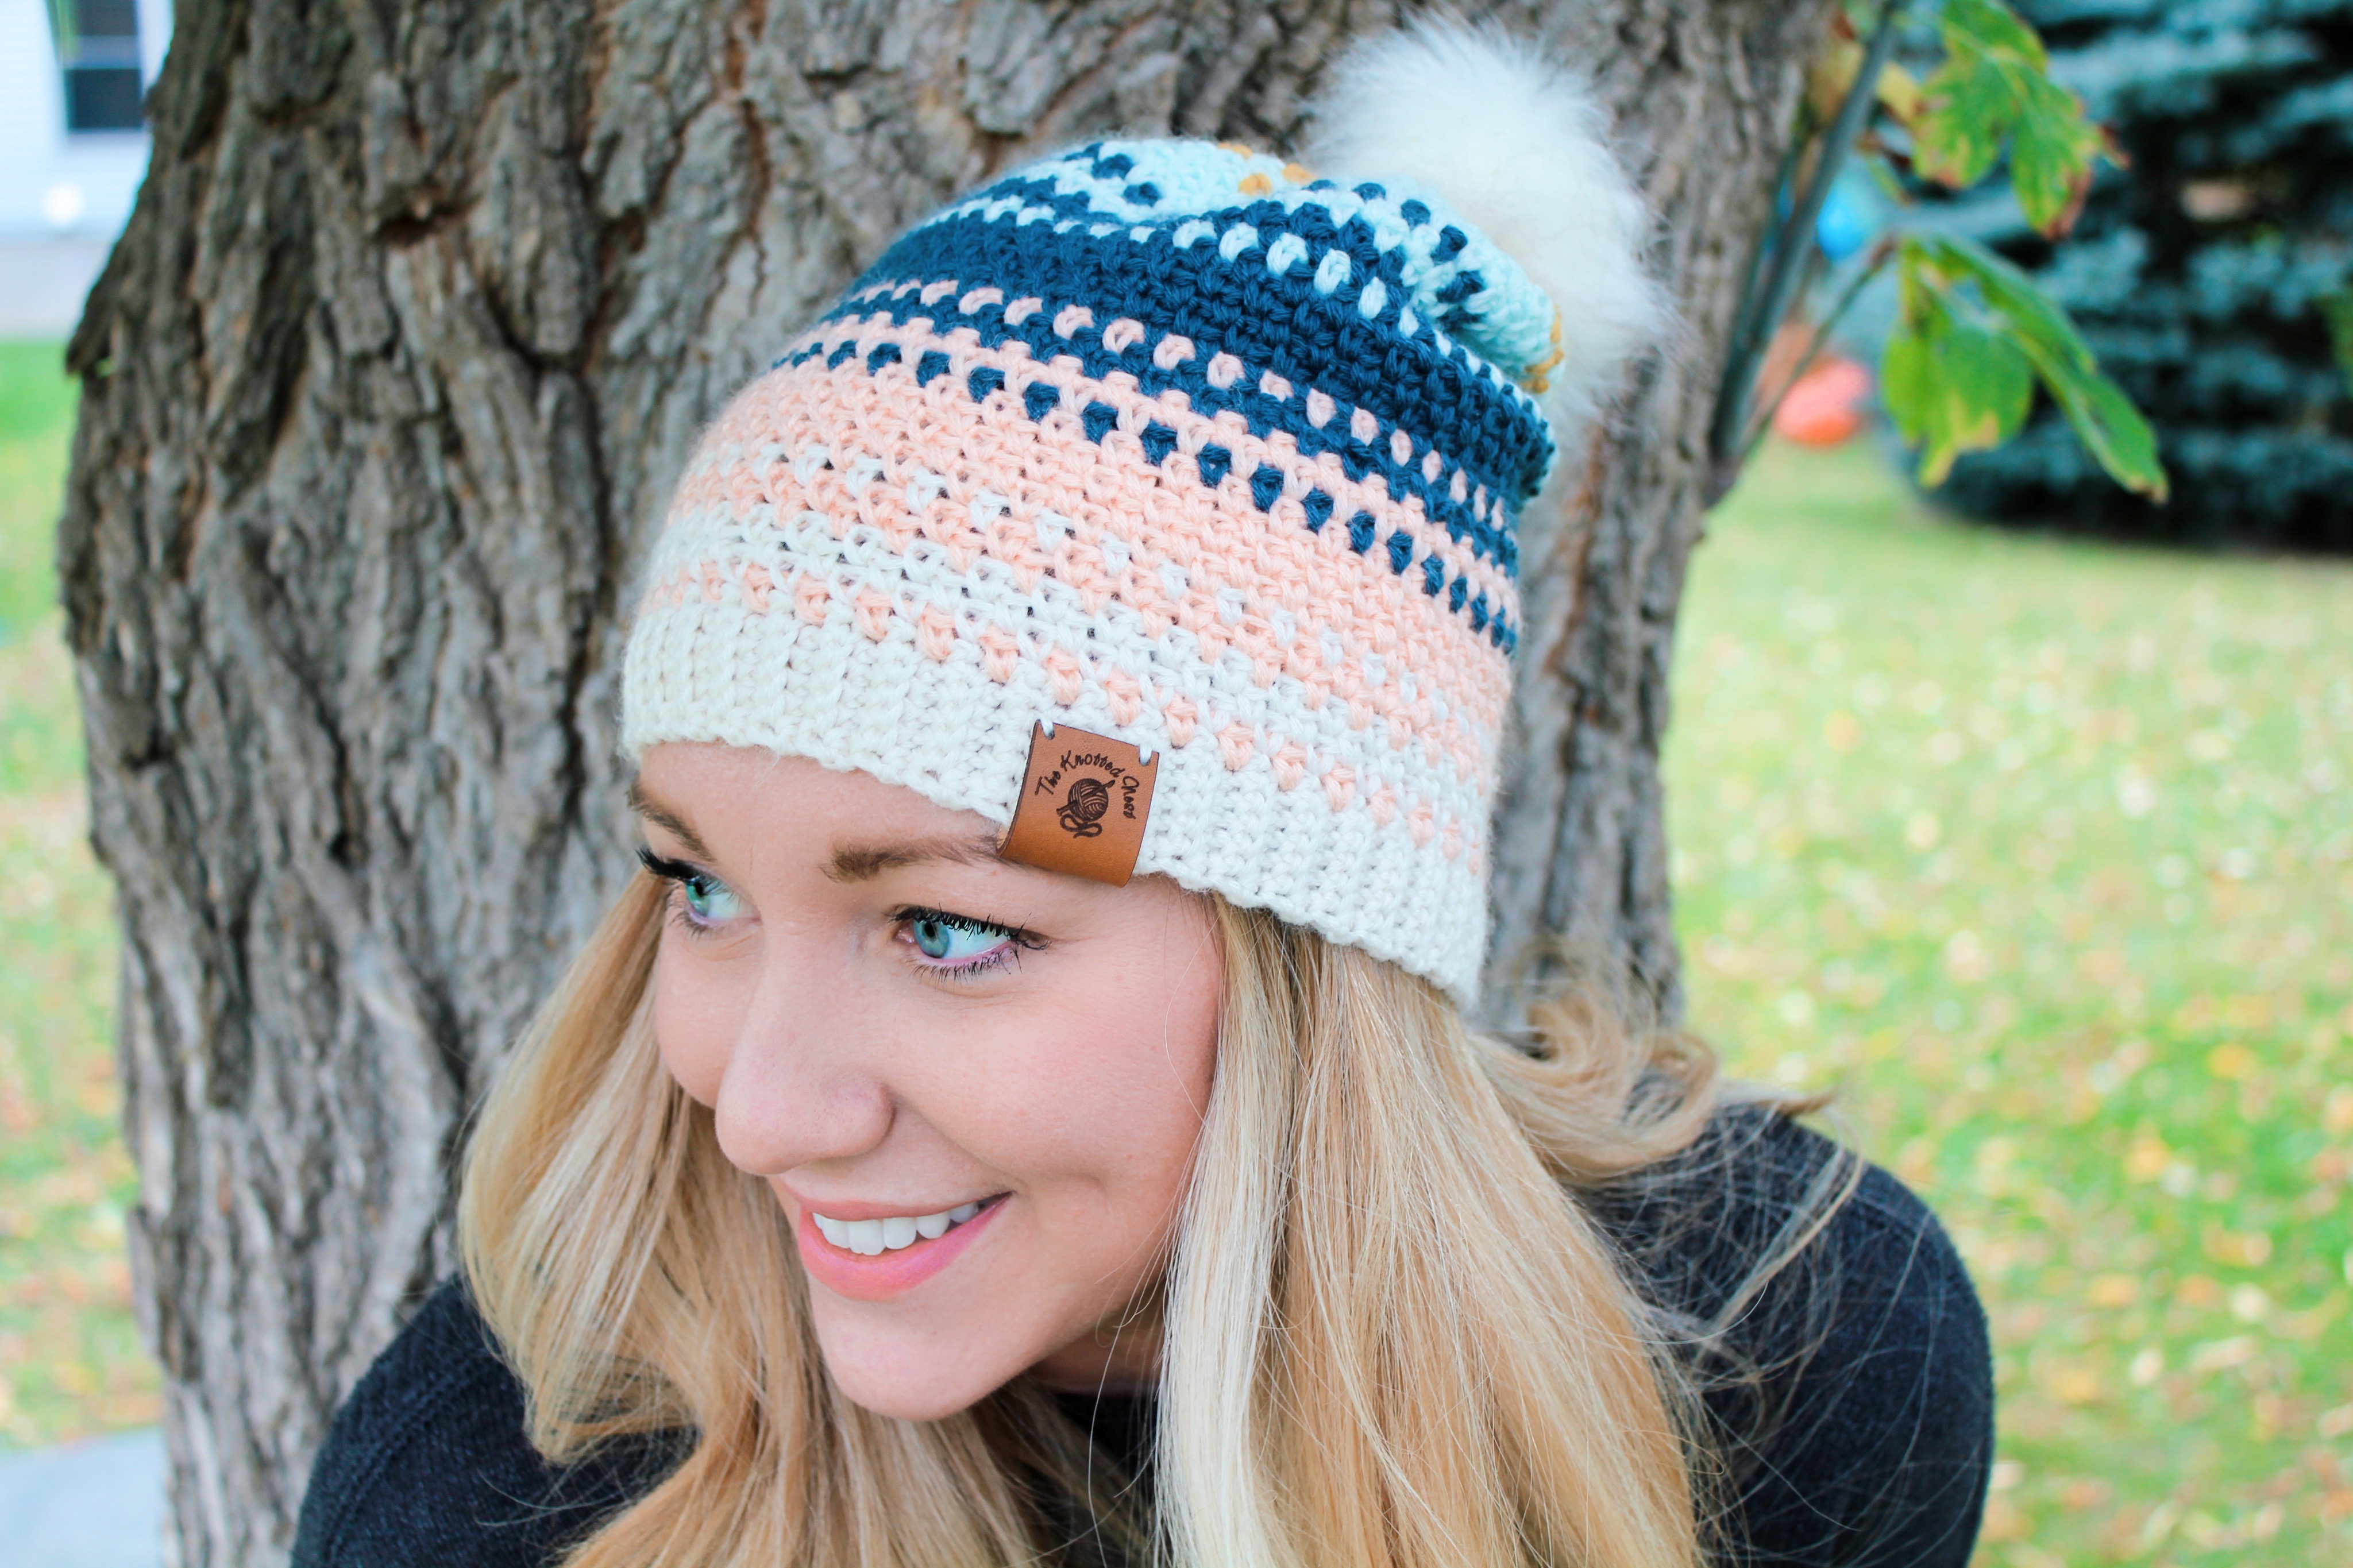
If you’re looking for a chunky crochet hat that is plush, ultra-textured, and cozy warm, look no further than the Hearthstone Beanie! This free bottom-up crochet beanie pattern features the easy and super squishy bean stitch and a modern knit-look slip stitch brim. Scroll down or click here: JUMP TO THE PATTERN for the free pattern or click to purchase an ad-free printable version from my Etsy or Ravelry shops.
Don’t have time to make it now? Pin this pattern for later!
This pattern may contain affiliate links, which means I may receive a small commission, at no extra cost to you, when you make a purchase. Please read my affiliate disclosure for more details.
About the Hearthstone Beanie
As someone who has been designing and selling crochet patterns for over 6 years, you would think I have a closet overflowing with crochet hats and beanies, right?? Well, you would be wrong. Haha! I tend to give away a lot of my makes and I have been wearing the same crocheted winter hat for the past 5 years (and it’s not even my own pattern!).
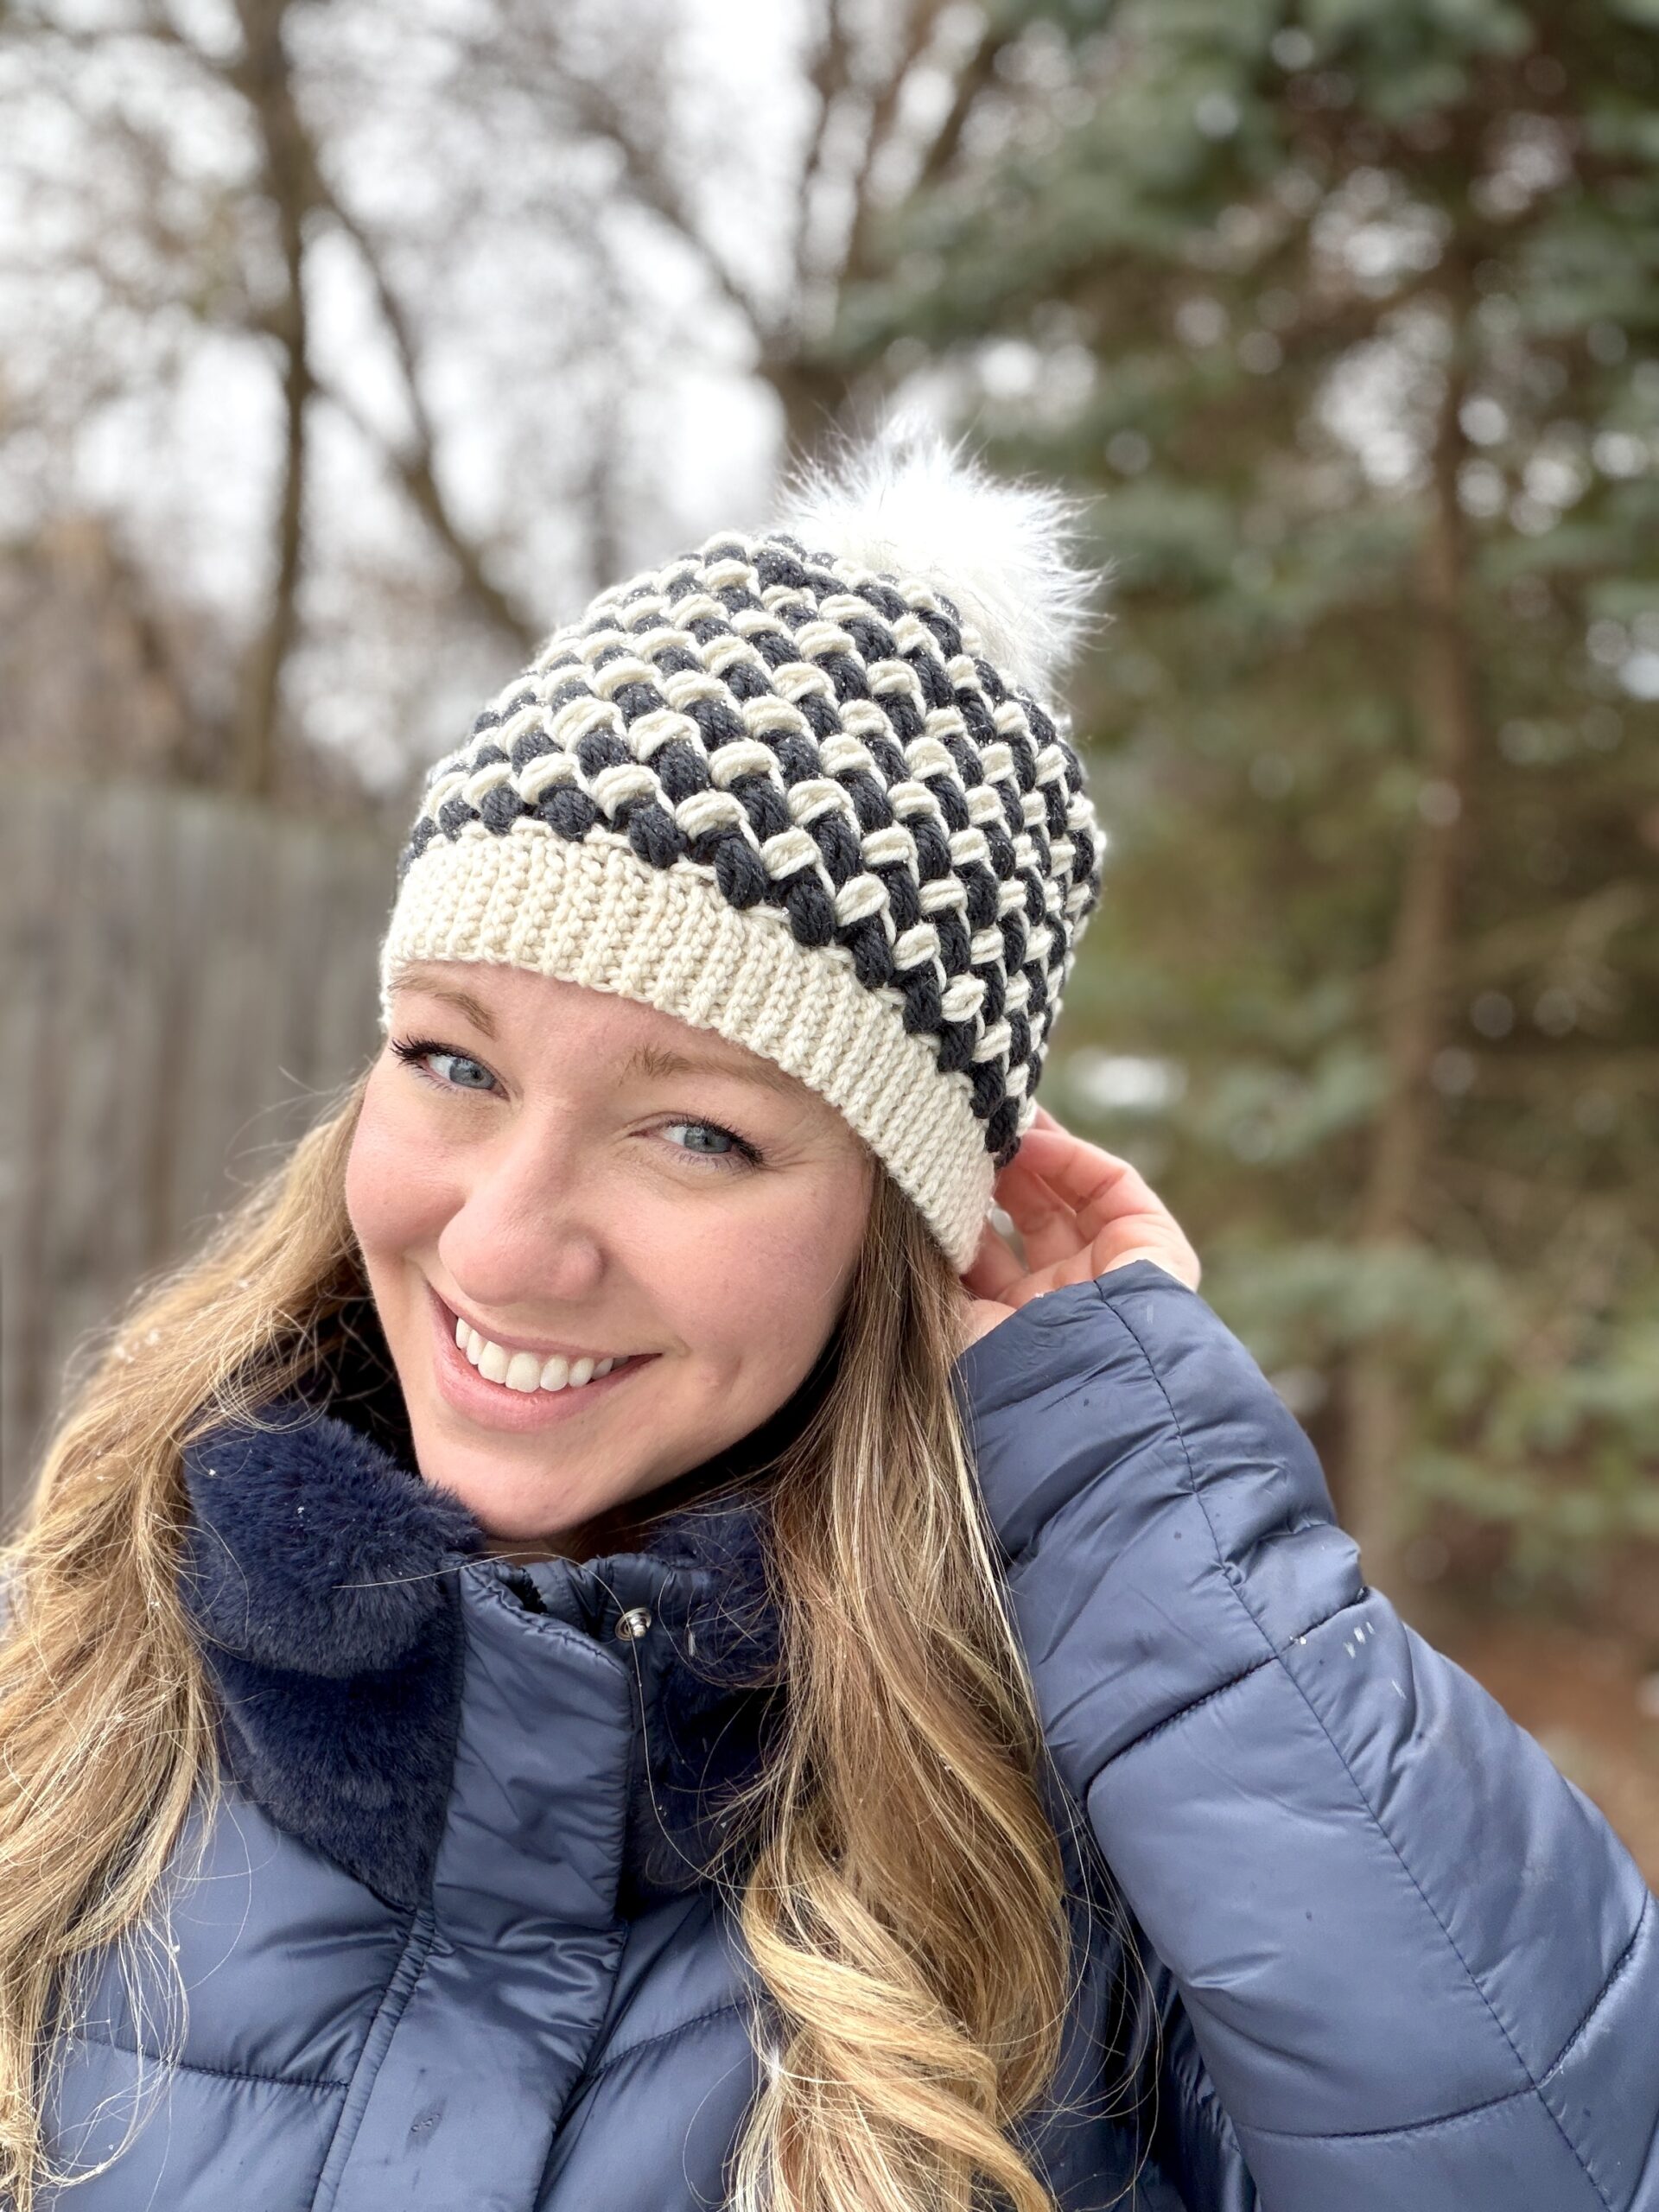
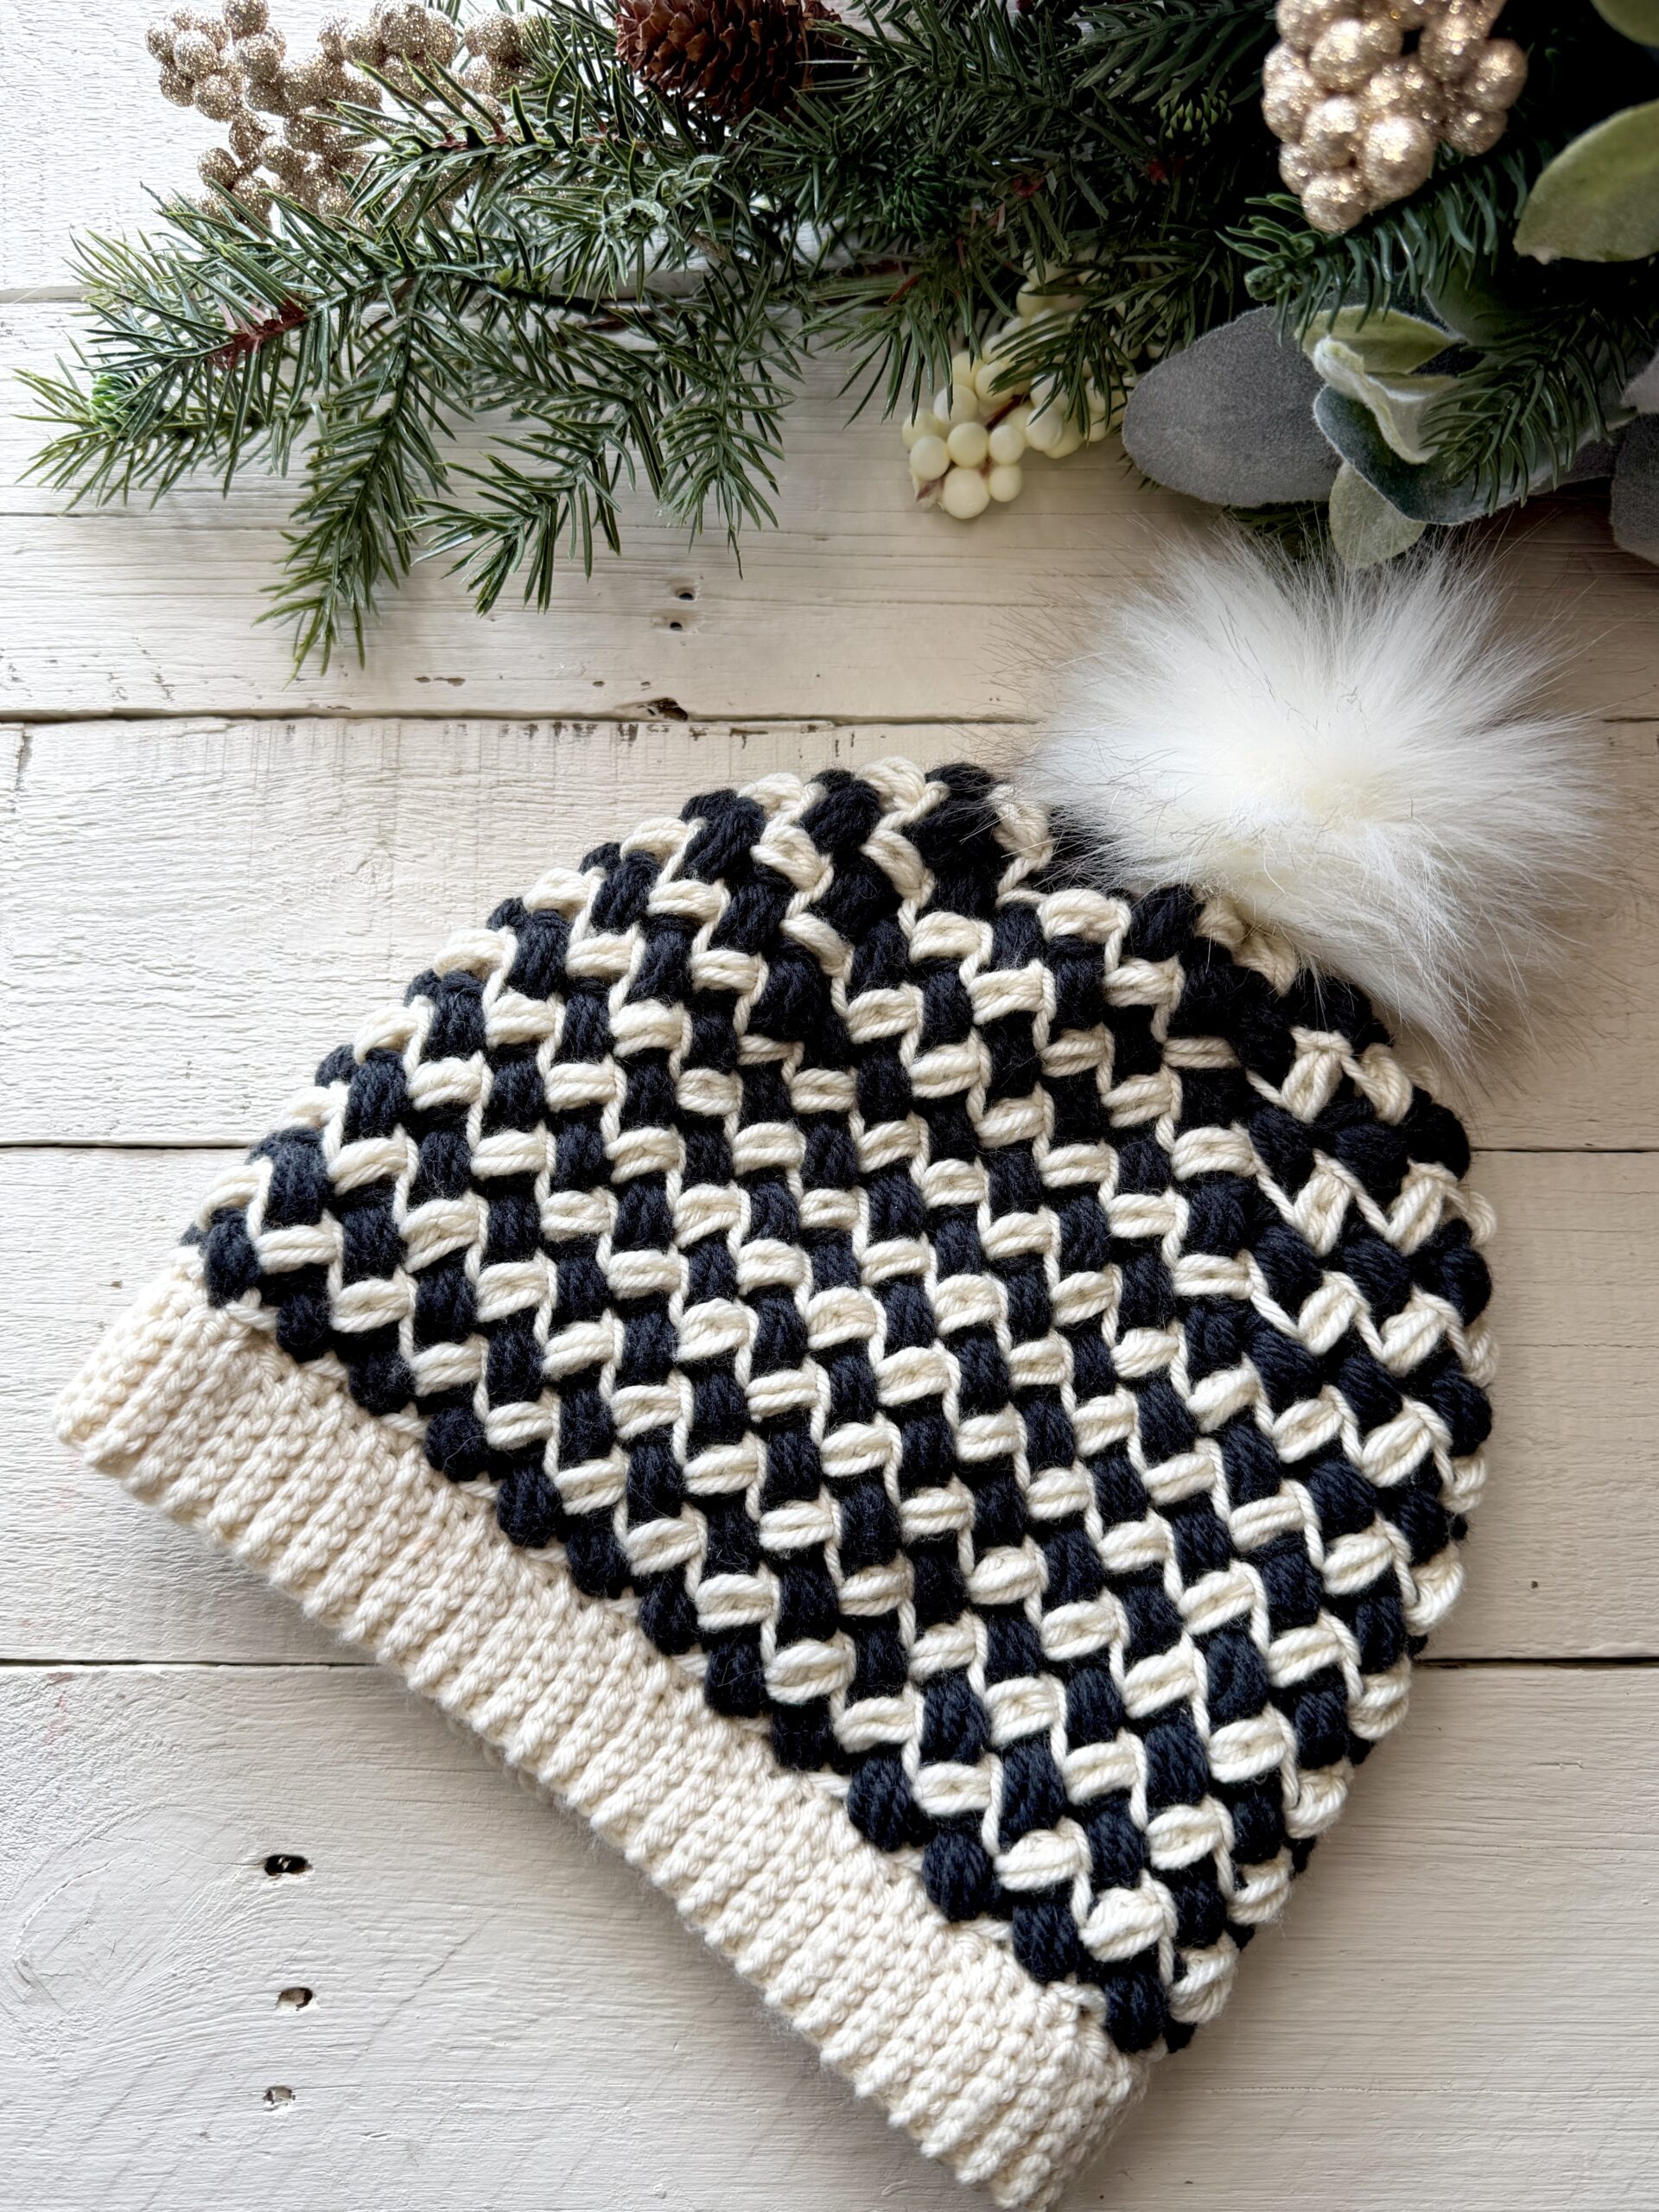
Well, last Christmas, my parents gifted me a beautiful new navy blue winter coat and I figured what better time to make myself a new matching hat. Introducing the Hearthstone Beanie (named that for no reason other than I like the way it sounds!):
Even though it’s been a few years since I published a new crochet hat pattern, I do have some oldies, but goodies in the archives. You can check them out in the Headwear Patterns section here on the blog.
Why You’ll Love This Textured Crochet Beanie
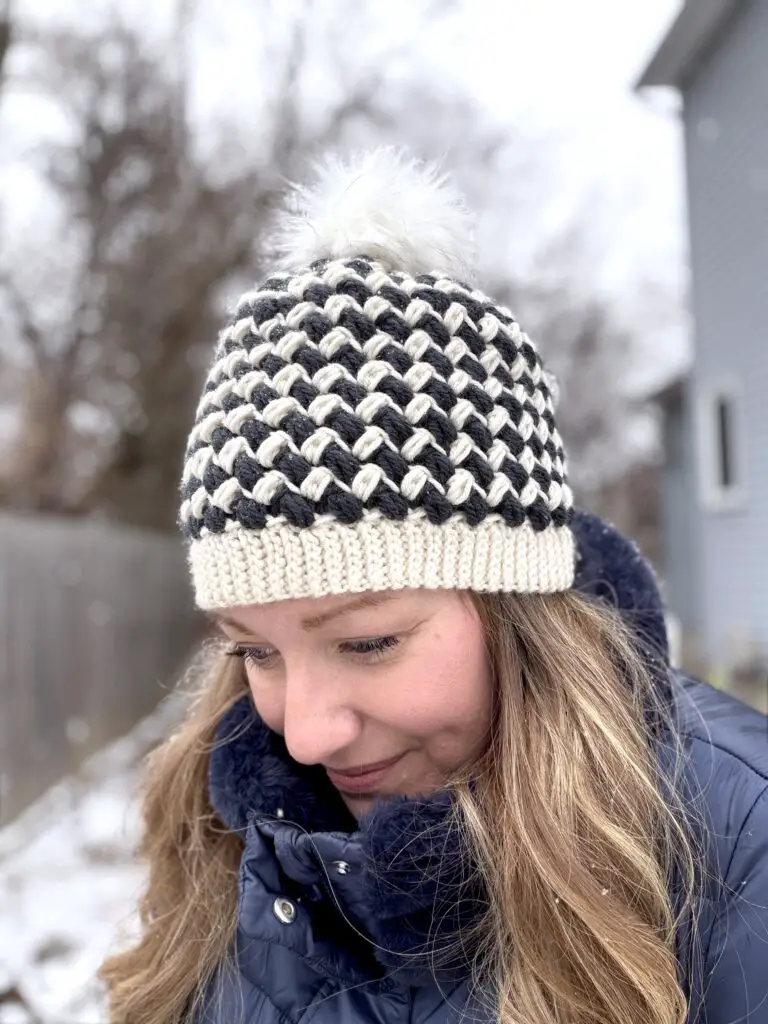
The Hearthstone Beanie combines a plush textured body with a clean faux knit brim, making it a warm winter hat that feels modern and polished without being fussy. Here are some quick details:
- Worked from the bottom up, with the brim crocheted first in rows, then the hat body is worked into the brim in rounds. (This makes it easier to get a custom fit!)
- Advanced beginner skill level – if you’re comfortable with basic stitches, but want to try a few new techniques, this pattern is perfect.
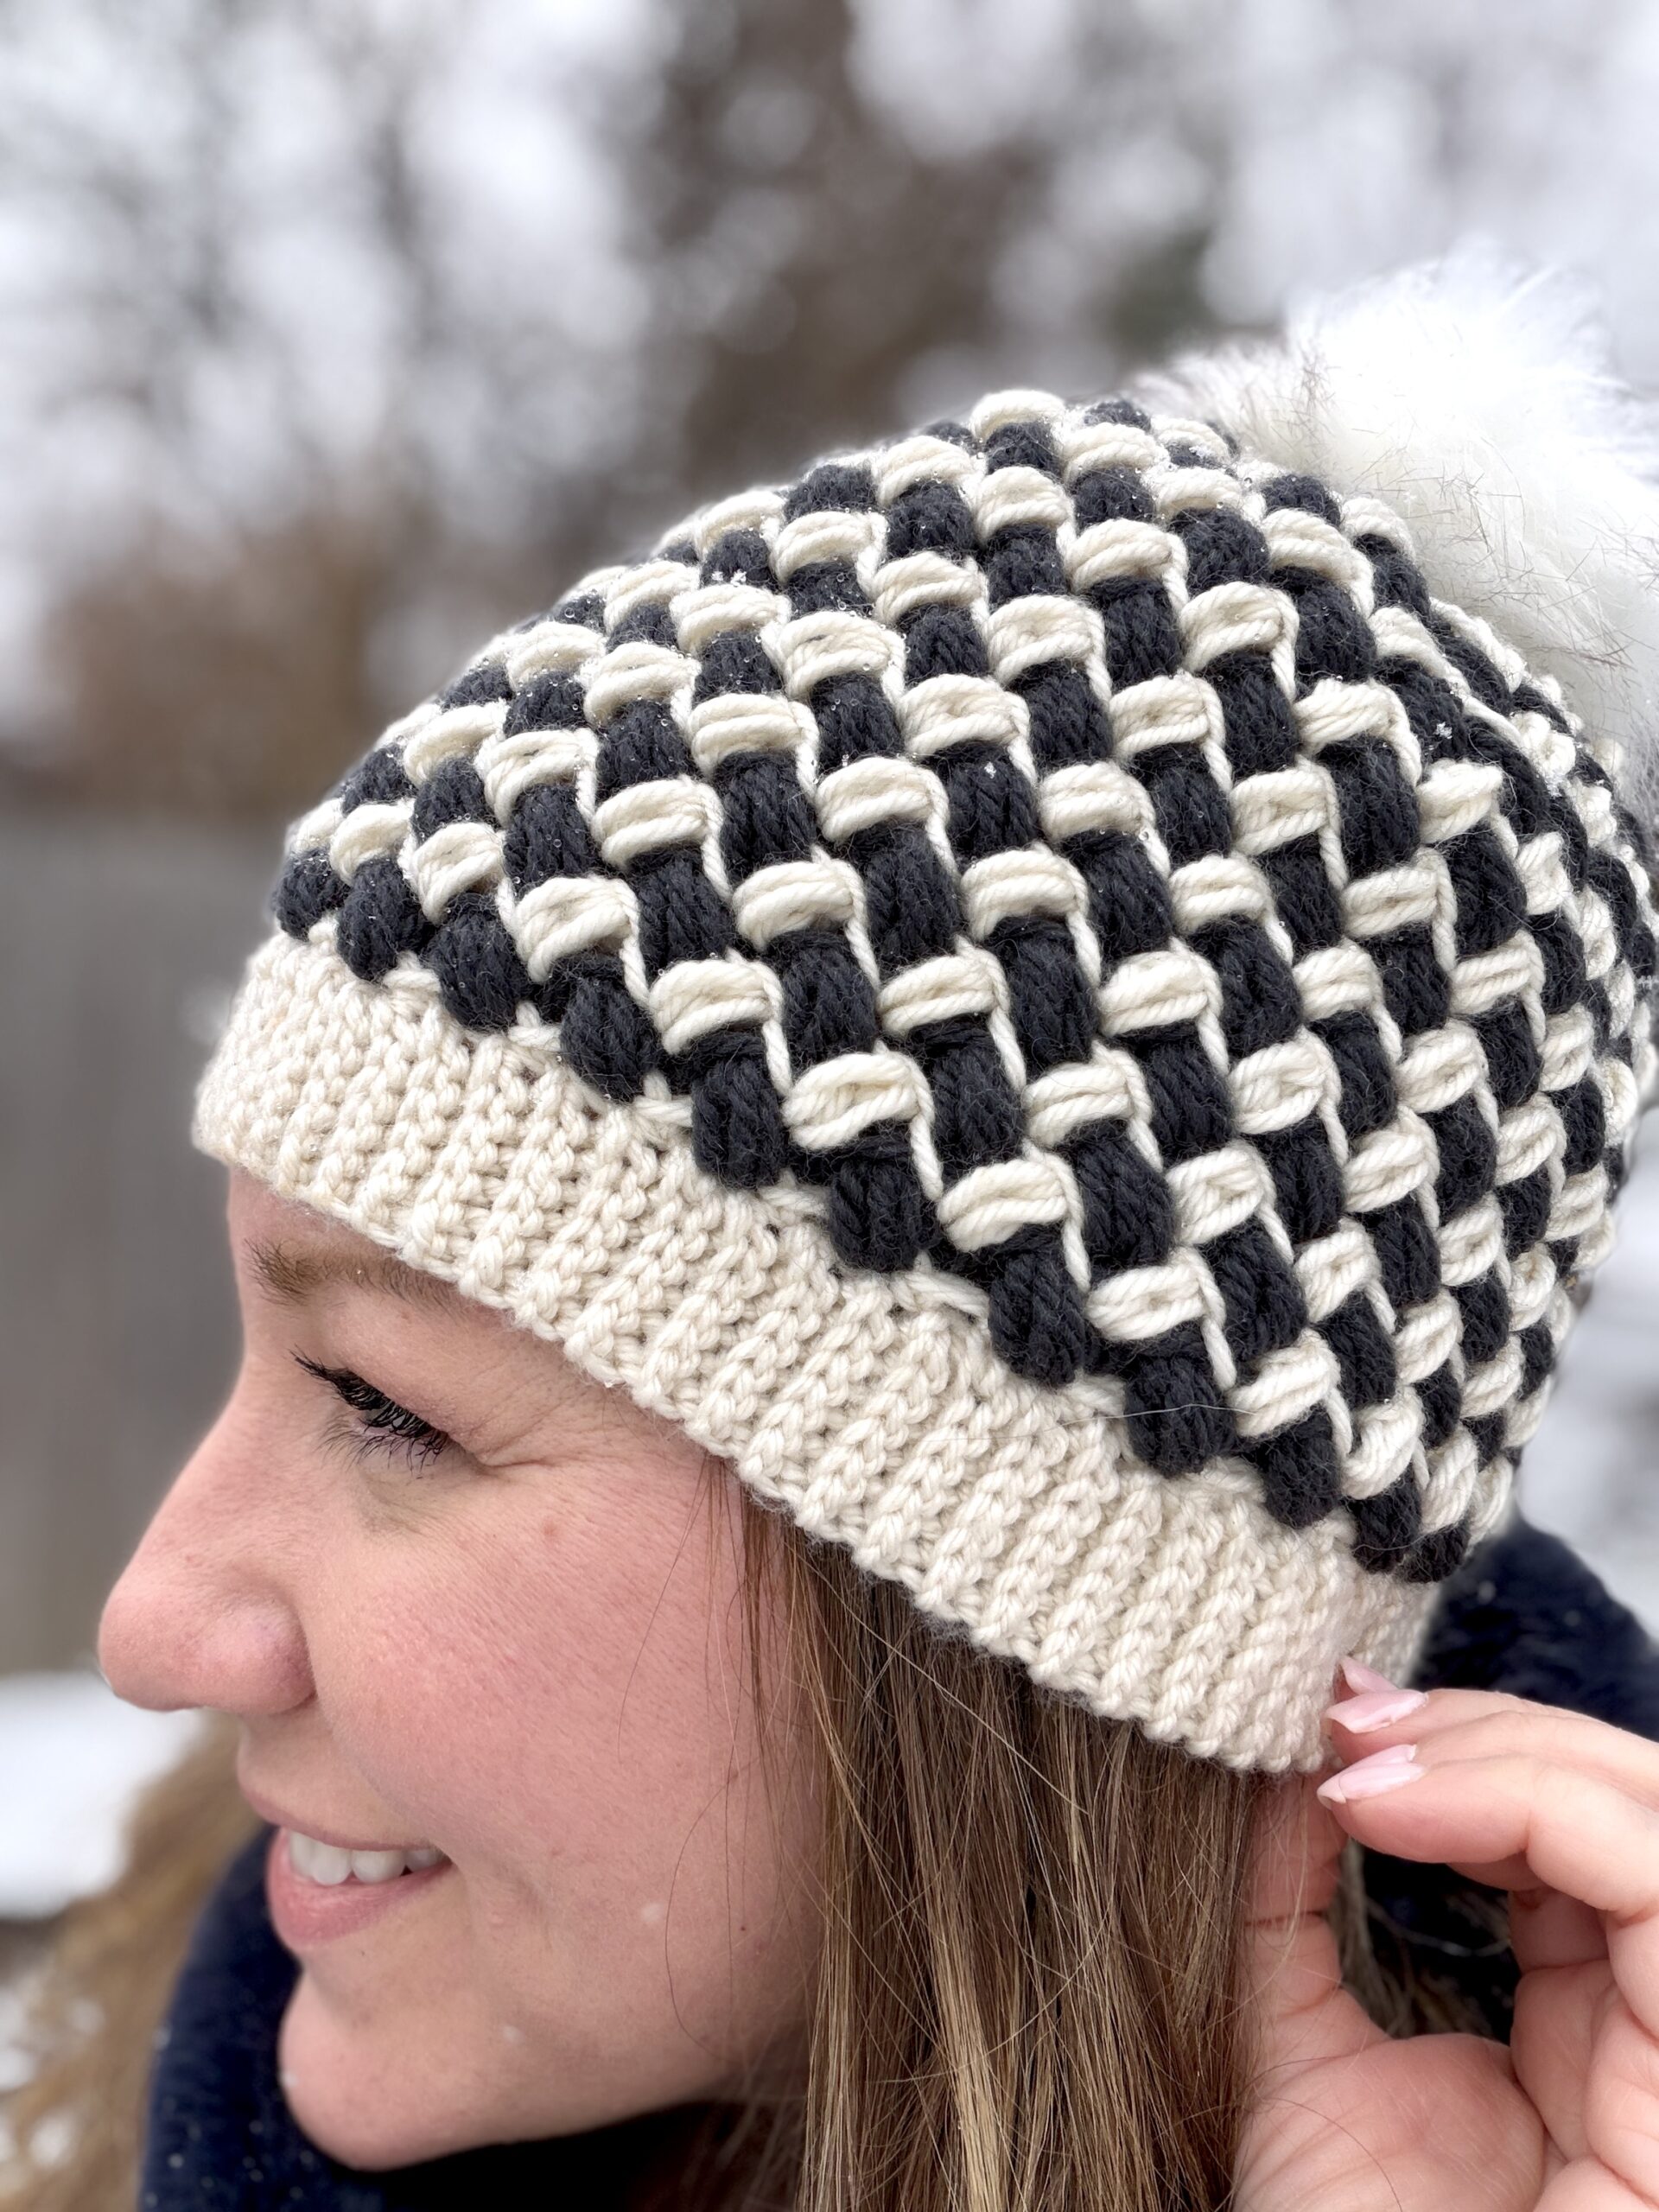
- Customizable – I used two alternating colors to get the zigzag look, but you can easily adapt to more colors or keep it simple with just a solid color.
- No complex shaping – the crown shaping is done by simply skipping over stitches rather than traditional decreasing.
- Uses worsted weight yarn and takes less than one skein per color.
- Adjustable sizing – instructions are included for sizes baby through adult.
Want to Print It?
If you prefer to work from a printed pattern, click the buttons below to purchase an ad-free, printable PDF of this pattern in my Etsy or Ravery shops.
FREE PATTERN – Hearthstone Beanie Crochet Hat
Skill Level
Advanced beginner: This pattern uses a special stitch (bean stitch) as well as alternating rows of colors, working in the back loop only, working in rows and in the round, and simple decreases. Instructions are included for all special stitches and techniques.
Materials
- Yarn:
- A total of about 300 yards worsted weight (size 4) yarn in two colors. I used Yarn Bee “Easygoing” (60% acrylic/40% polyamide, 3.5 oz/100 g, 175 yds/160 m per skein) in the color Frosting for the white (color A) and Lion Brand “Local Grown” in the color Mustang for the navy (color B).
- Hook: size H/8 (5.00mm)
- A faux fur pom pom.
- Yarn needle, scissors and a tape measure.
Dimensions/Sizing
Pattern is written for a medium adult size hat, but general instructions are given for adjusting the size (see chart). Sizing adjustments will be noted in bold throughout the pattern.
| Bottom-Up Hat Sizing by Age | If head circumference measures…. | …then make the brim of your hat… | …begin decreases when hat is this tall (measure from bottom of brim)… |
| Newborn – 3 months | 13-14 inches | 9-10 inches | 3 inches |
| 3-6 months | 14-15 inches | 10-11 inches | 3 inches |
| 6-12 months | 15.5-16.5 inches | 11.5-12.5 inches | 4 inches |
| 12-24 months | 16-18 inches | 12-14 inches | 4 inches |
| Child (3-10 years) | 19-21 inches | 15-17 inches | 5 inches |
| Teen/Small Adult | 21 inches | 17 inches | 5 inches |
| Medium Adult | 22 inches | 18 inches | 6 inches |
| Large Adult | 23 inches | 19 inches | 7 inches |
Gauge
6 BS x 11 rows = 4” square using Bean Stitch.
Notes
- This hat is worked from the bottom up with the brim worked first in rows and then joined to form a circle. You will then turn the brim 90 degrees and work into the sides of the brim rows to begin the body of the hat which is worked in joined rounds.
- Working in the back loop only (blo): When looking at the top of a stitch or chain, you’ll see two loops forming a small “V”; to work in the back loop only, insert your hook under just the loop farthest from you, leaving the front loop unworked.
- All color changes happen at the sl st used to join the rounds. To do this, begin sl st by inserting hook into the first stitch of the round, then pull through both sts with the new color. Drop unused color to the interior of the hat, we will pick it back up when we need it. Do not carry unused yarn.
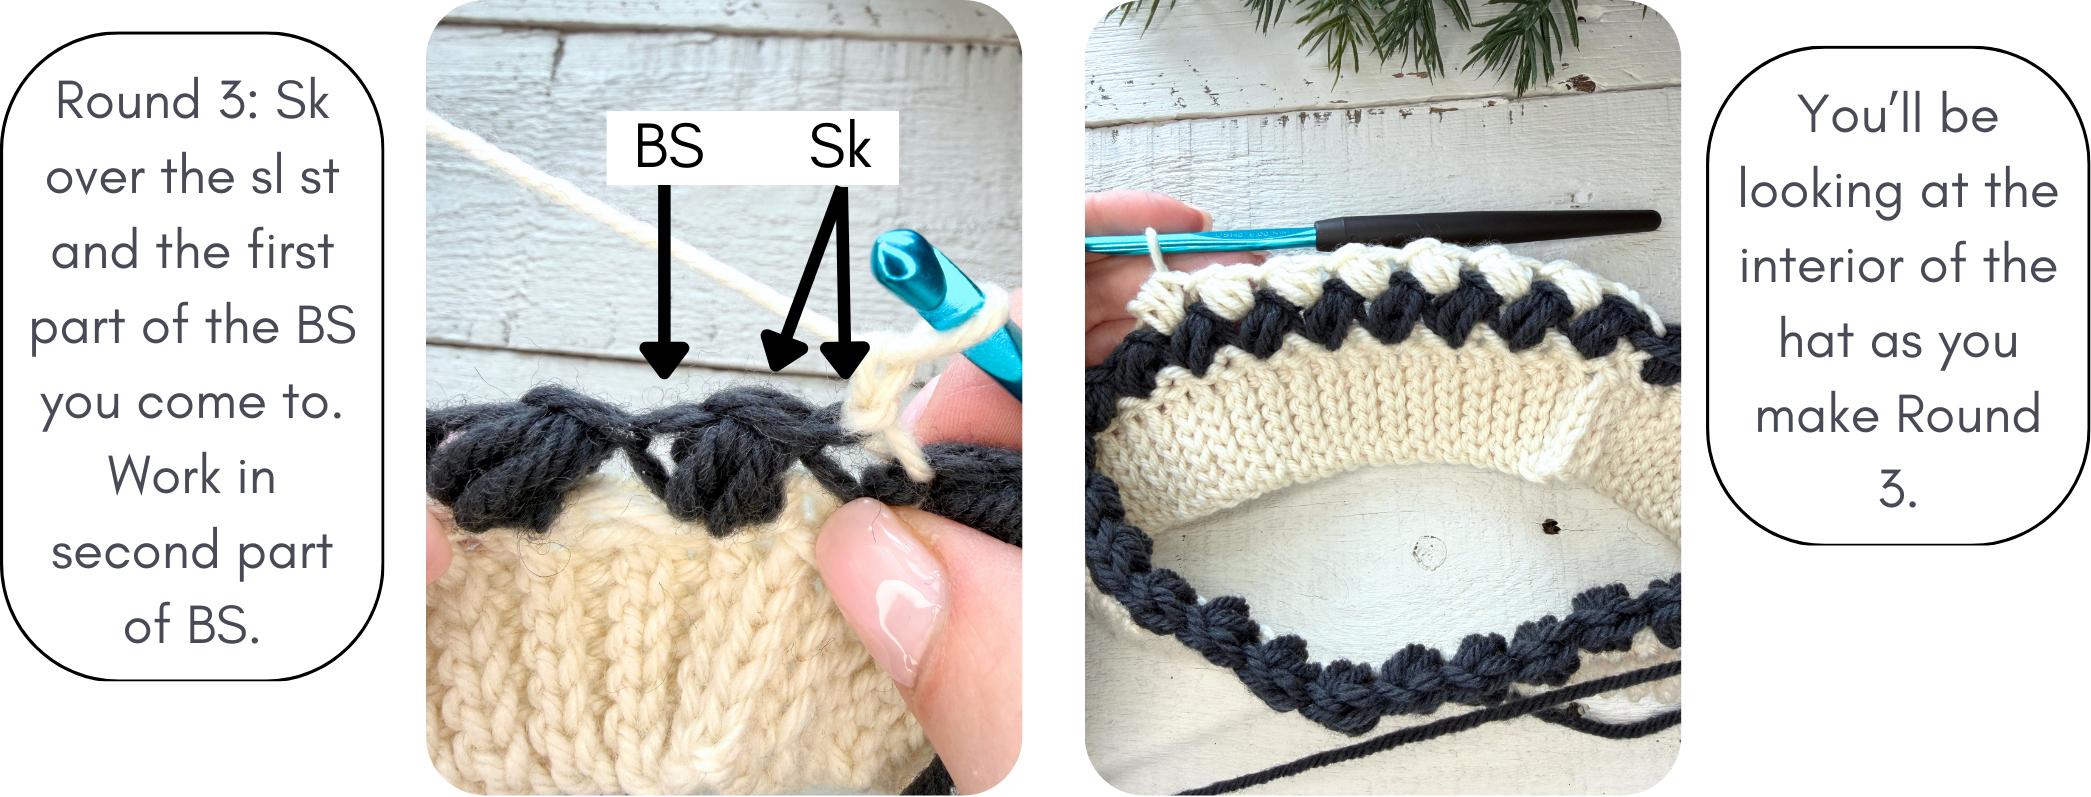
- For the body of the hat, you will turn your work after each bean stitch round. This means that you will be looking at the exterior of your hat when crocheting even rounds (color B), and looking at the interior of the hat when crocheting odd rounds (color A).
- The Ch 1 or Ch 2 at the beginning of each row/round does NOT count as a stitch.
- Pattern is written in US crochet terms.
Special Stitches
Bean stitch (BS): (do not yo) insert hook into stitch, yo and pull up a loop (2 loops on hook), yo, insert hook into the same stitch, yo and pull up another loop (4 loops on hook), yo, insert hook into the same stitch, yo and pull up another loop (6 loops on hook), yo and pull through all 6 loops. Ch 1 to close the stitch (this counts as part of the stitch, not a separate chain).
Abbreviations
- blo = back loop only
- blo-sl st = back loop only slip stitch
- BS = bean stitch
- ch = chain
- sc = single crochet
- sk = skip
- sl st = slip stitch
- st(s) = stitch(es)
- yo = yarn over
Hearthstone Beanie Free Pattern
Written for adult medium size, see sizing chart for adjustments.
Brim:
With color A, chain 7. (Tip: chain tightly to prevent the start of your brim from flaring),
Size adjustment: for sizes 12-24 months and younger, ch 5. Your stitch count will be 4 sl st per row.
Row 1: In the second ch from hook, loosely sl st in the blo, continue blo-sl st in each ch until the end. Ch 1, turn. (6 sl st)
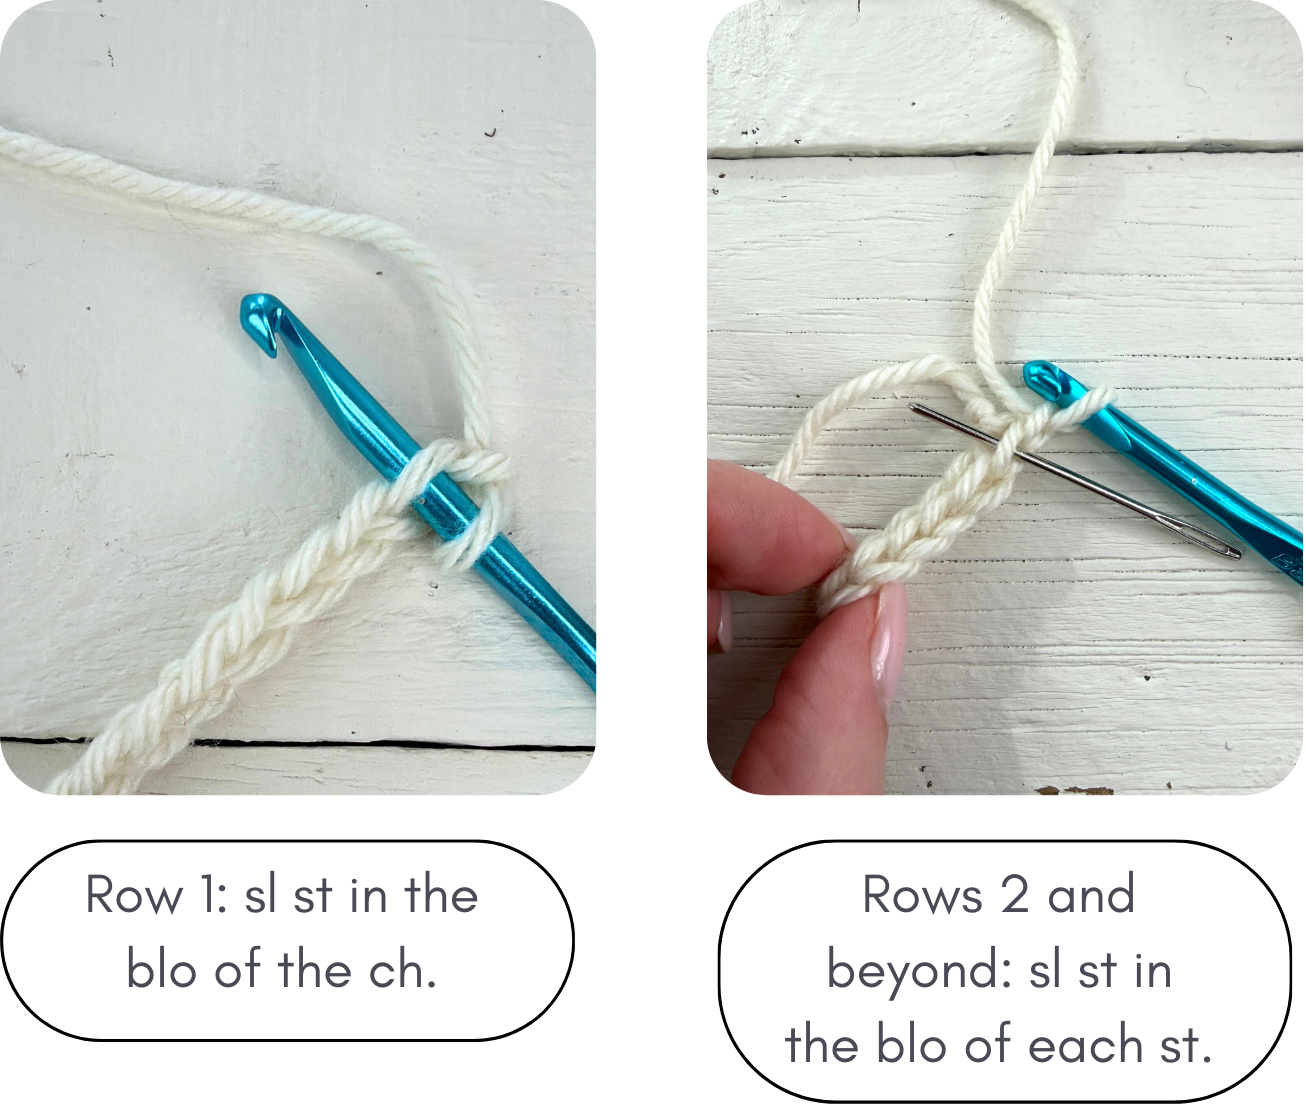
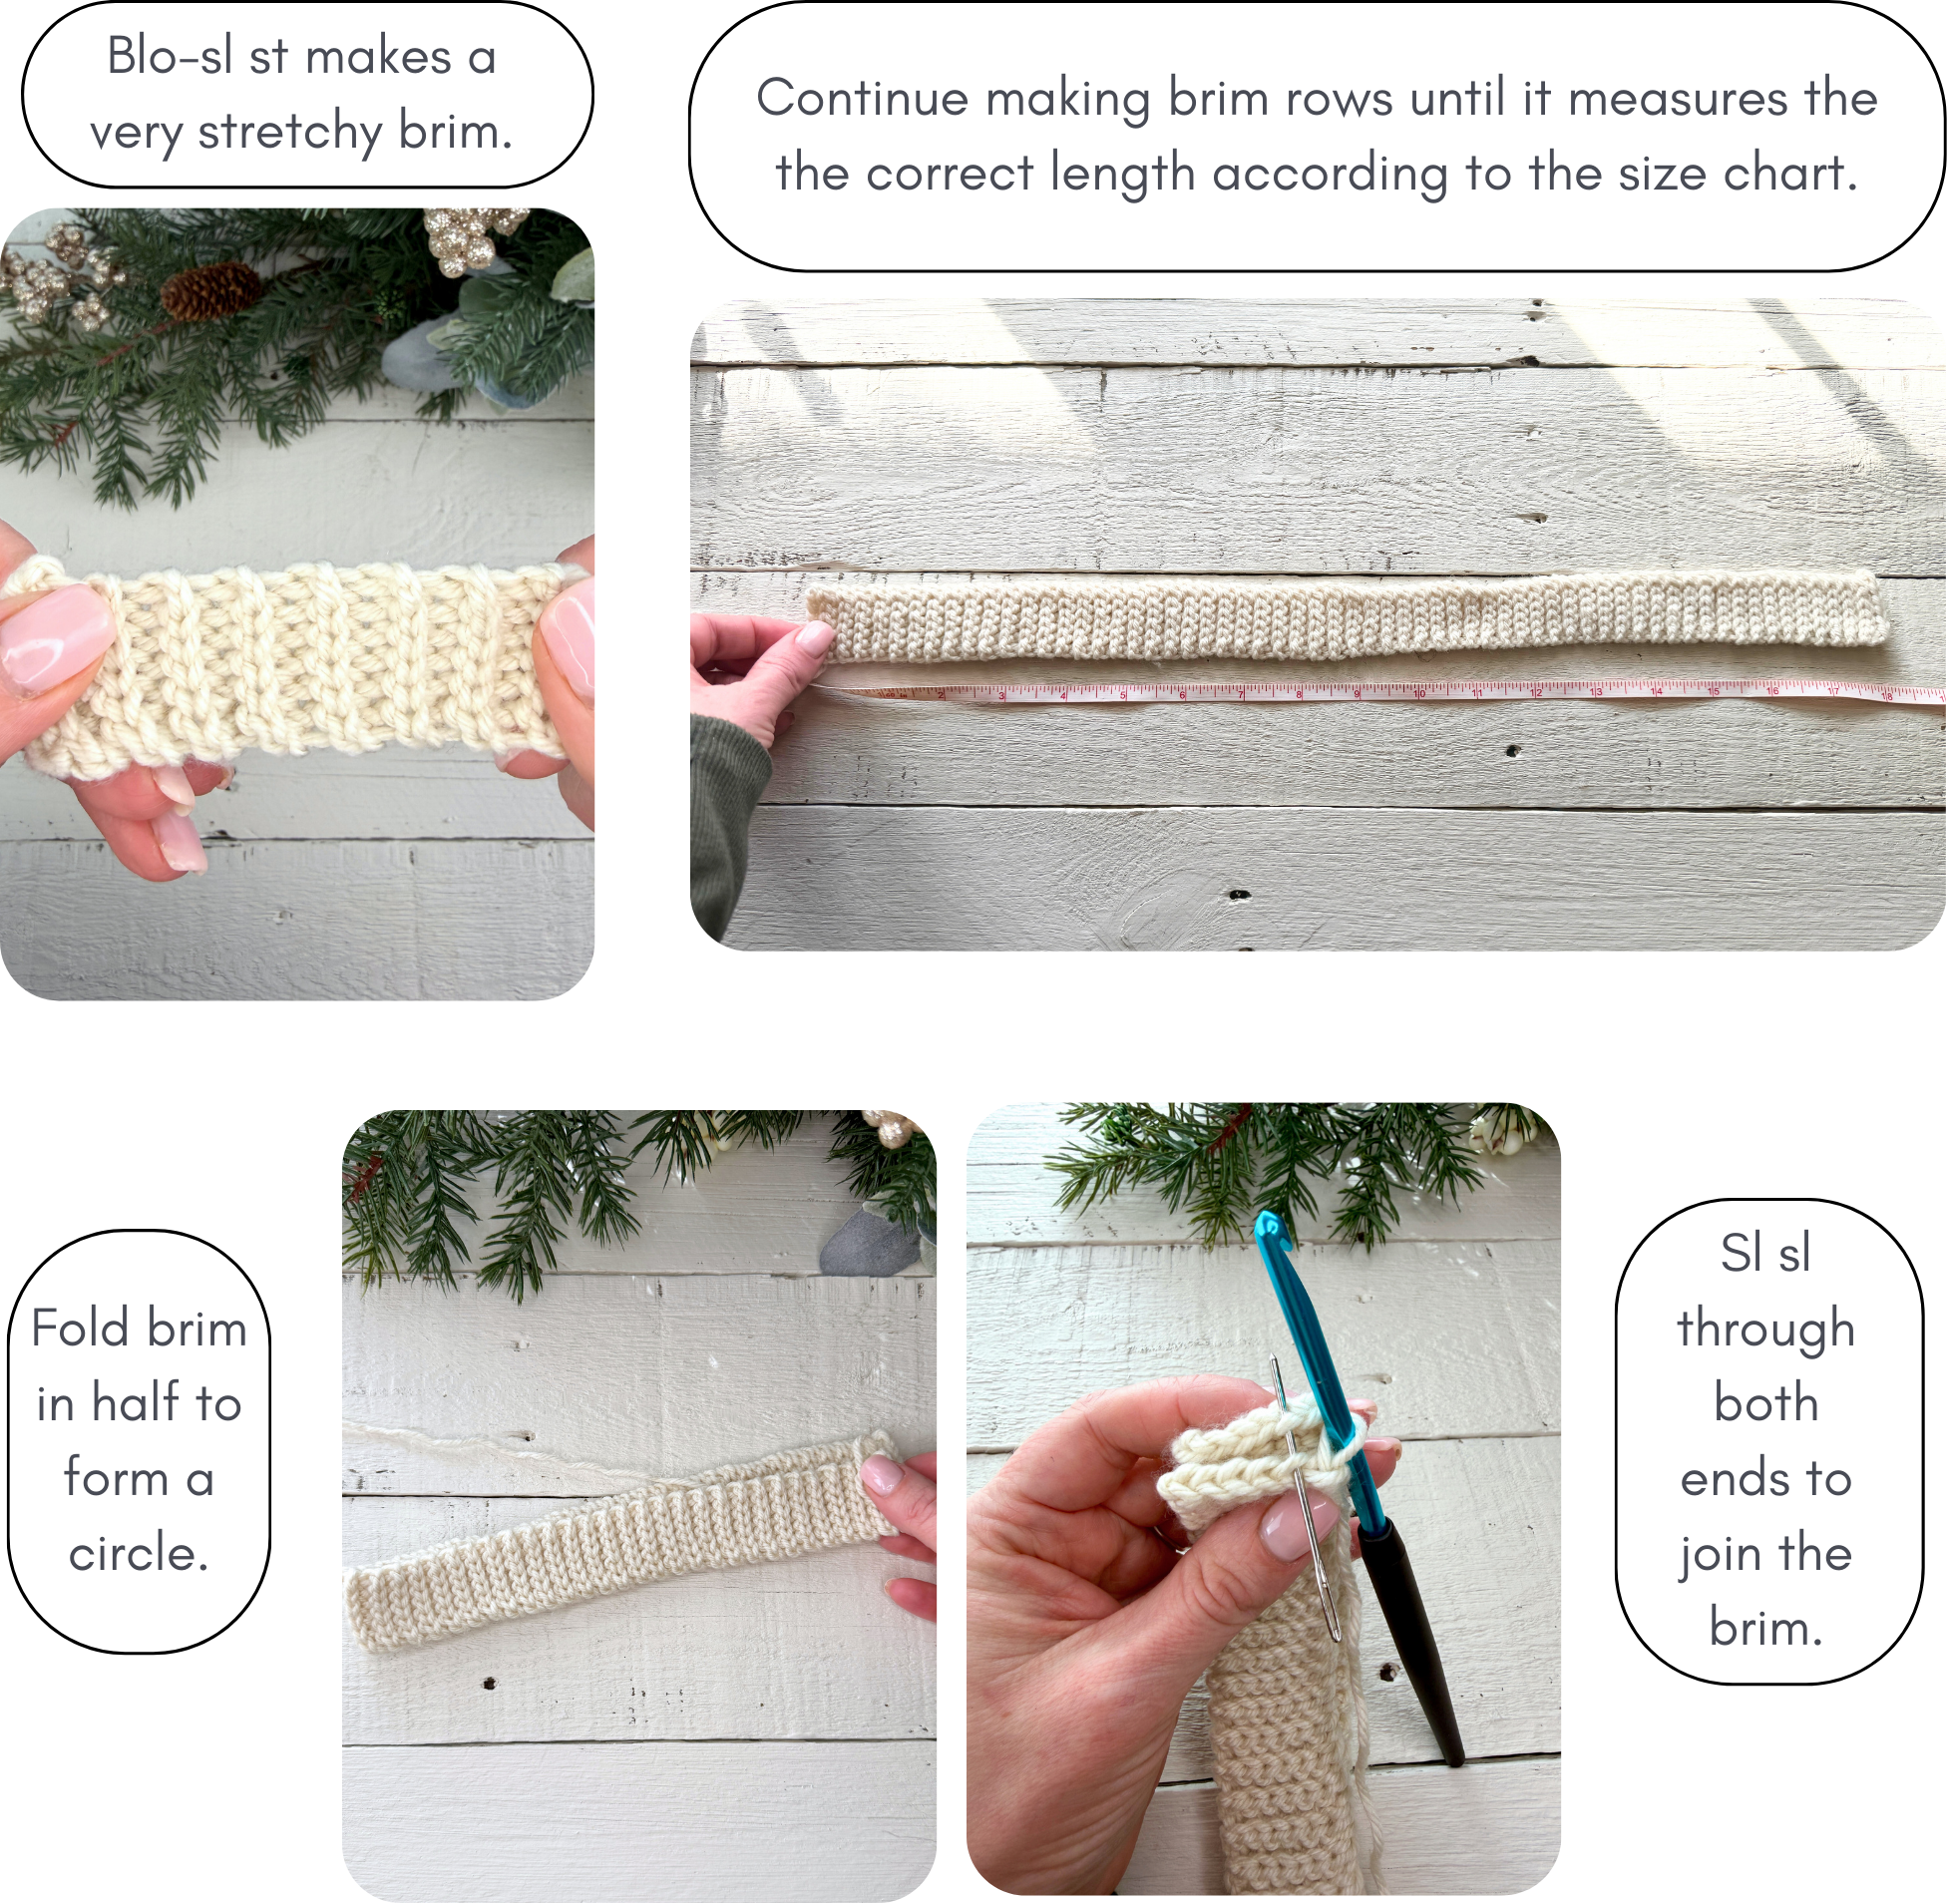
Rows 2 – 122: Blo-sl st in each st. Ch 1, turn. (6 sl st). Size adjustment: This should measure about 18″, see size chart for adjustments.
Tips for working the brim:
The last stitch in the row can be hard to spot, be sure you don’t skip it!
Be sure to work in the very first st for each row and check your stitch count at the end of each row to keep your edges even.
Keep these stitches LOOSE. Sl sts tighten up easily and working too tightly can cause the brim to narrow as you go.
Once your brim has reached the desired length, fold it in half and align the two ends.
Join the two ends by slip stitching through the back loop of the first end and the front loop of the second end for all 6 stitches. You should now have a circle that will become the brim of your hat.
Rotate the brim 90 degrees and position your work so that you will be working along the row edges (the side of the brim you are looking at will become the exterior, so make sure the seam where you joined the brim is on the inside).
Hat Body
(now we will switch to working in joined rounds)
Size adjustment: To make a different size hat, divide your total number of brim rows by 2.2 and round down to the nearest even number. This will be the number of scs you will need to make in Round 1.
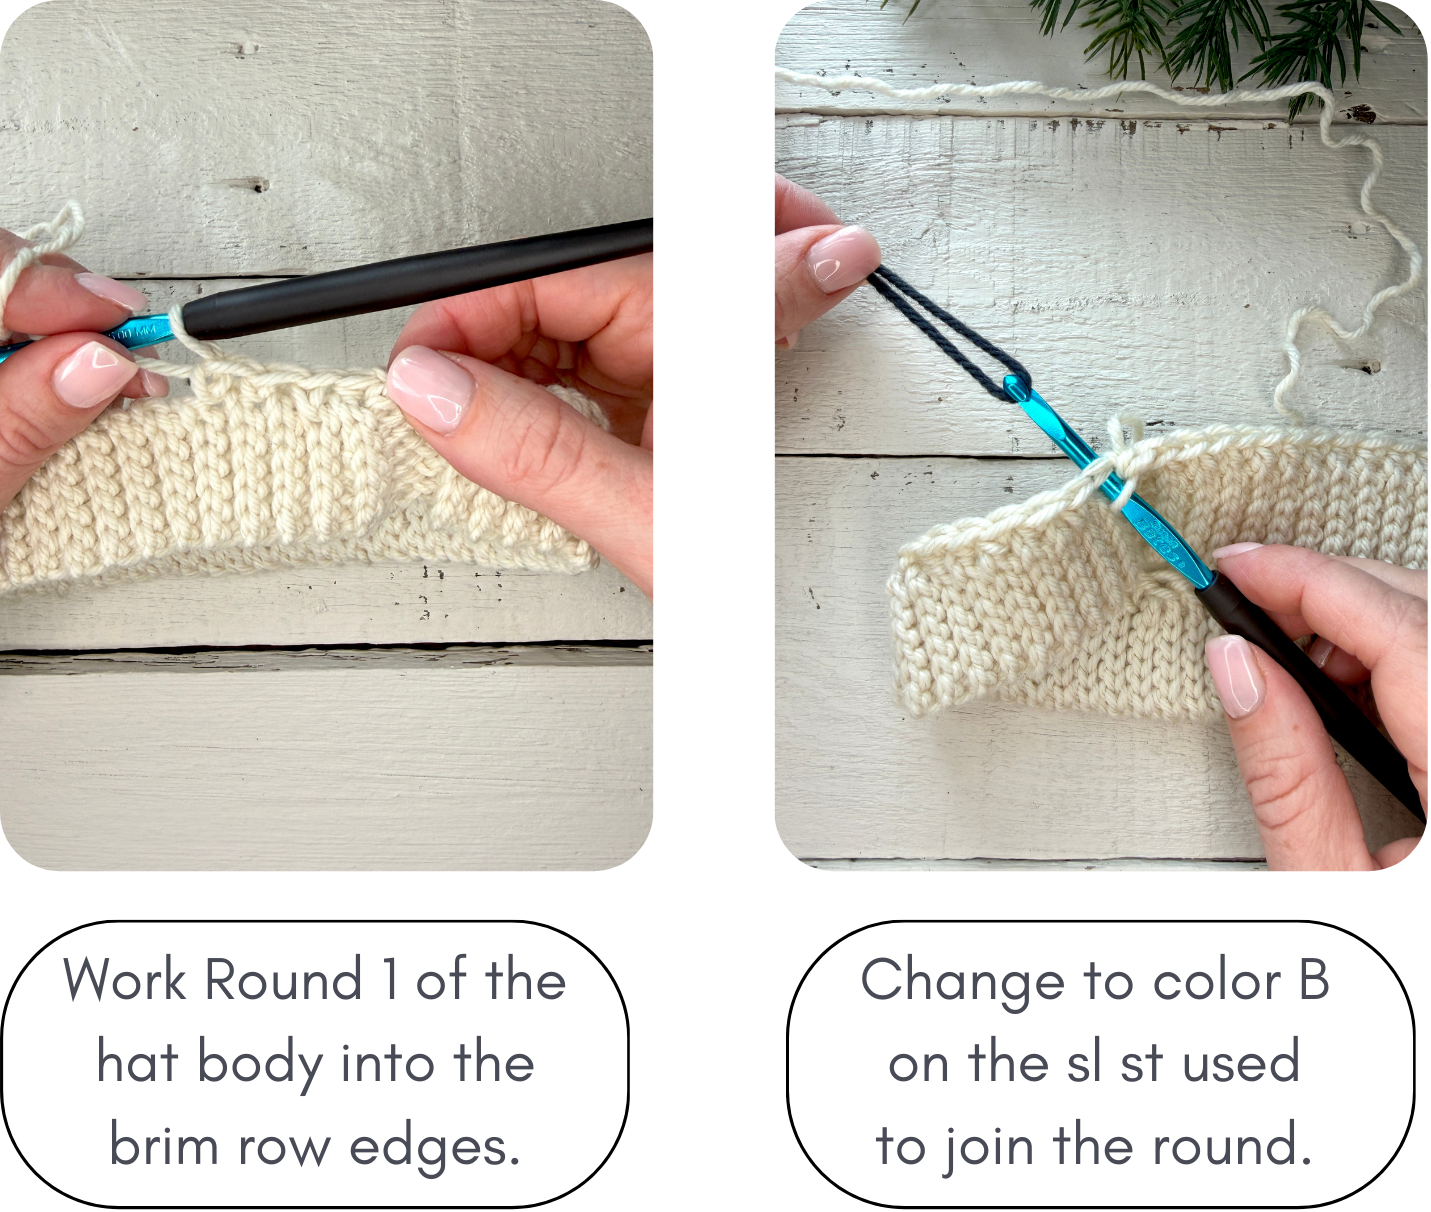
Round 1: Still using color A, ch 1. Work 56 sc evenly around, working in the edge of the brim rows. Sl st to join the round. Do not turn.
Tip: To help space the scs evenly, place 1 sc in each valley between the brim ridges, skipping over every 3rd or 4th valley. Additionally, you can place a st marker halfway around and make sure you you’ve made half the sts by that point (or you can even break it down by quarters).
Color change: At the end of Round 1, change to color B by pulling through the joining sl st with color B. Ch 1 with color B. Drop color A to the interior of the hat, do not cut. We will just pick it back up when we need it again.
Round 2: With color B, work a BS in the very first st (the same st you sl st’d into to join the round), *sk next st, BS in next. Repeat from * around. Sk the last st and join the round with a sl st into the first BS you made, switch to color A. Ch 2, TURN YOUR WORK. (28 BS)
Tip: When view from the top, each BS looks like two stitches because of the ch used to close the stitch. When joining the round, sl st into the “first” part of the st.

Round 3: With color A, sk over the sl st and the first part of the BS and work into the second part (see picture), BS in each st around. To join the round, sl st into the first BS you made, switch to color B on the sl st. Ch 2, TURN YOUR WORK. (28 BS)
Round 4: With color B, sk over the sl st and the first part of the BS and work into the second part, BS in each st around. To join the round, sl st into the first BS you made, switch to color A on the sl st. Ch 2, TURN YOUR WORK. (28 BS)
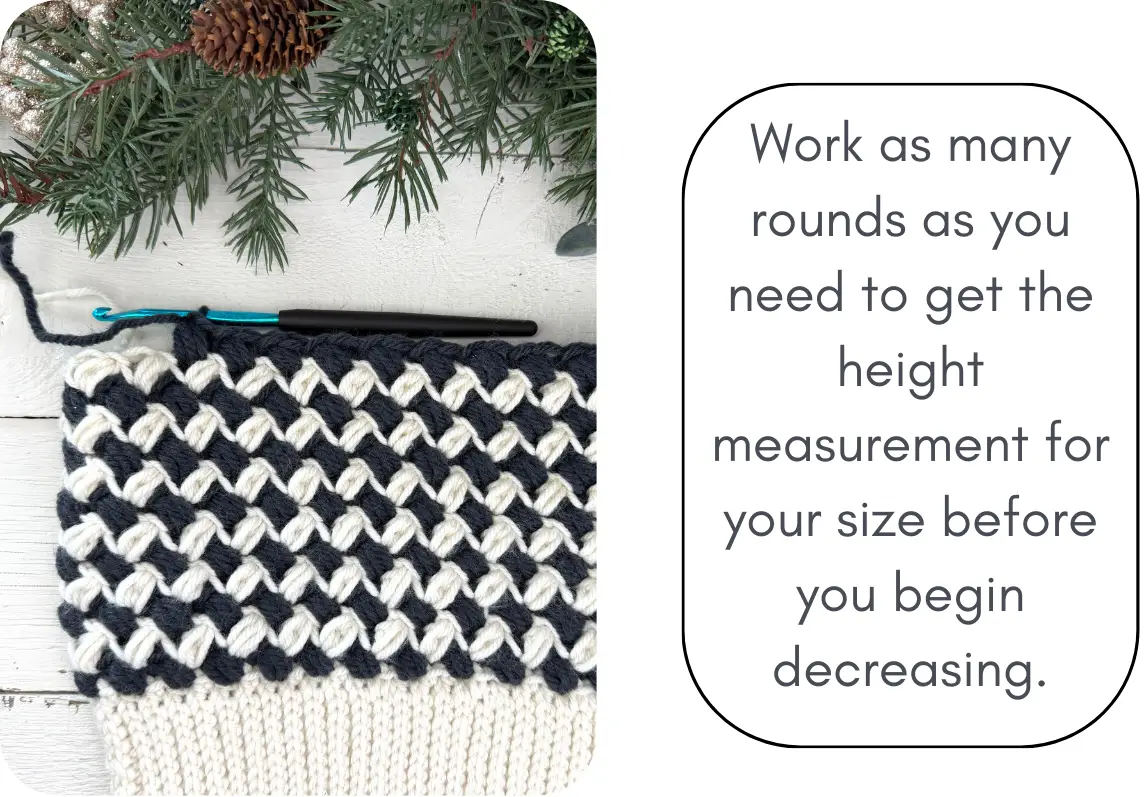
Rounds 5 – 14: Repeat Rounds 3 and 4. Size adjustment: This should measure about 6″ tall when measured from bottom of brim, see size chart for adjustments. For other sizes, make as many rounds as needed to match the height shown for your size (this height measurement includes the brim). Once you have reached the indicated height for your size, move on to the decrease round (Round 15).
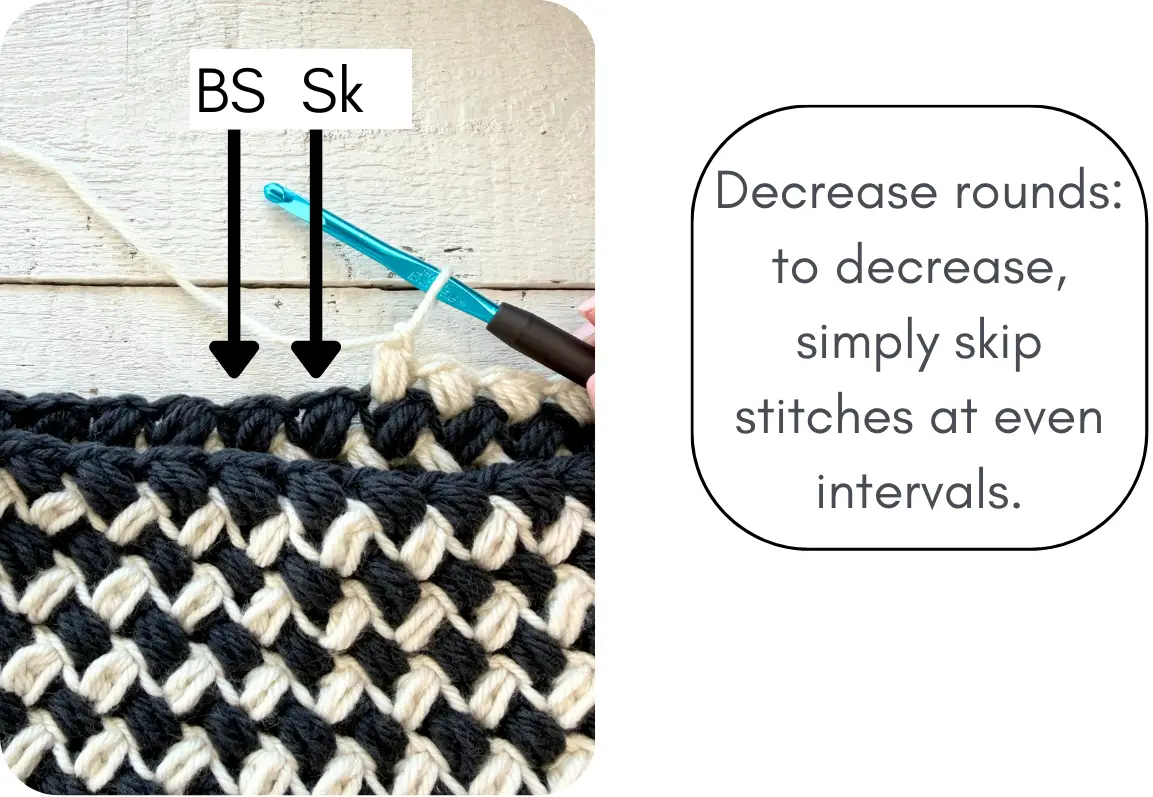
A note about decreasing – I tried many options for decreasing the bean stitch. In the end, I found that the least bulky, least visible option was to simply skip stitches at even intervals. When it says “skip next stitch” in the decrease rounds, it means to skip over the whole bean (i.e. both “parts”).
Round 15: (Decrease round) With color A, *BS in the first 6 sts, skip next stitch, repeat from * all the way around (the last st will be a sk). Sl st to the first BS to join and switch to color B. Ch 2, TURN. (24 BS)
Size adjustment: For other sizes, decrease evenly around the hat by skipping stitches at regular intervals. For adult sizes, skip 4-5 stitches per decrease round, for children and infant sizes, skip 3-4 stitches per decrease round. Work a regular round in between each decrease round. For the smaller sizes, you may only need to work 2-3 decrease rounds before it is small enough to close
Round 16: With color B, BS in each st, sl st to the first BS to join and switch to color A. Ch 2, TURN (24 BS)
Round 17: (Decrease round) With color A, *BS in the first 5 sts, sk next st, repeat from * all the way around. Sl st to the first BS to join and switch to color B. Ch 2, TURN. (20 BS)
Round 18: Repeat Round 16. (20 BS)
Round 19: (Decrease round) With color A, *BS in the first 4 sts, sk next st, repeat from * all the way around. Sl st to the first BS to join and switch to color B. Ch 2, TURN. (16 BS)
Round 20: Repeat Round 16. (16 BS)
Round 21: (Decrease round) With color A, *BS in the first 3 sts, sk next st, repeat from * all the way around. Sl st to the first BS to join. (12 BS)
Closing the top of the hat
- Cut yarn leaving a long tail for sewing. Cut off all other ends, and weave them in.
- Thread the long tail on to a tapestry needle and weave your needle in and out of the stitches on the top row, tugging your yarn as you go to cinch the top of the hat together. Pull tightly to close. Pass your needle back and forth over the closure a few times to keep it secure. Tie yarn securely, fasten off, and weave in ends.

- Use main color yarn to attach pom pom if desired. You’re finished!
I hope you enjoyed making the crochet Hearthstone Beanie pattern! Tag me on Instagram @theknottednest to share your project. You can find more project ideas and patterns in the Patterns Section here on the blog.
Happy making!