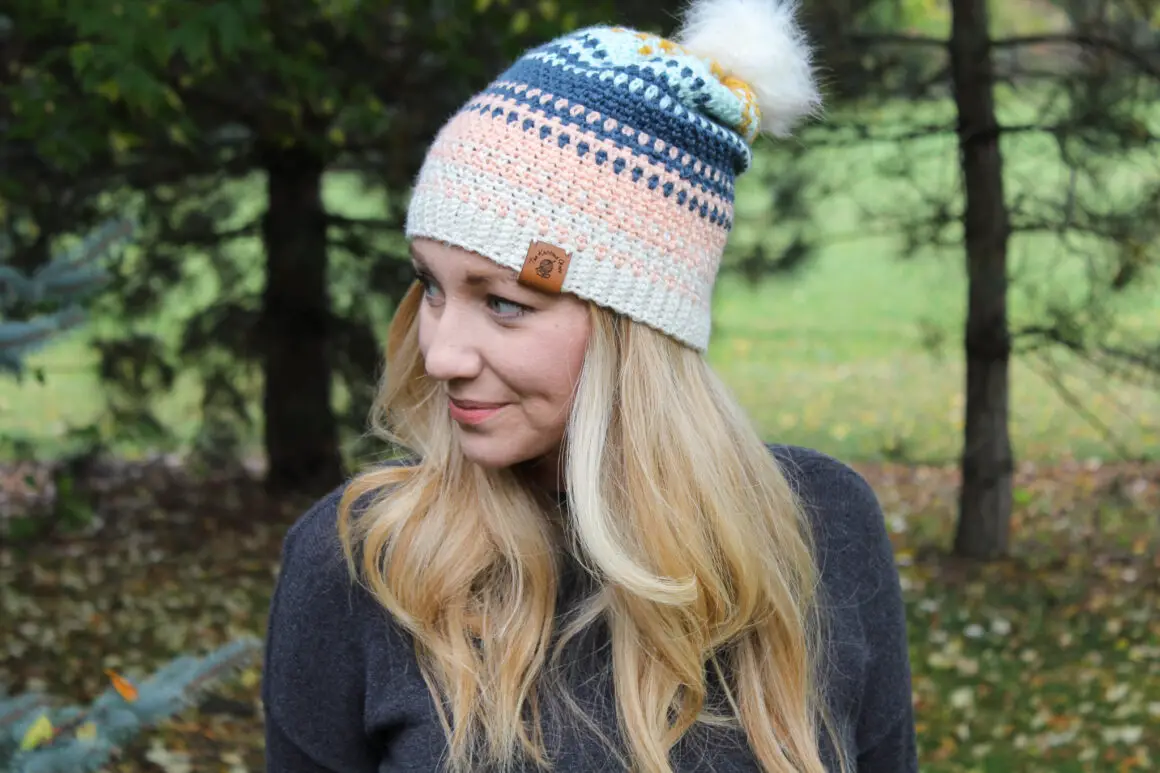
The Color Fade Beanie
Make yourself a unique and colorful fall hat with this Color Fade Beanie! This easy hat features simple stitches and gorgeous stripes for the perfect fall accessory.

Pin this post for later!
Scroll down for the FREE pattern or read on for more info about this gorgeous yarn and the easy hat construction.

The Yarn
Sometimes I have an idea for a project and I have to go hunting for the yarn, other times I spot some glorious yarn and a project immediately pops into my head. This color fade beanie was the latter!
Browsing my new Hobby Lobby, the absolutely gorgeous colors of their Yarn Bee Pigment + Fiber yarn collections caught my eye. Each collection comes with six balls of super fine yarn in perfectly coordinated color palettes. As soon as I saw it, I could totally picture a gradual color gradient and I knew I wanted to make something that would only take one set of yarn – color fade beanie it is!

There are six stunning color schemes to choose from (browse them all here!), but the mustard yellow, light blue, muted dark blue, light pink, and cream of the “Goodness Grapefruit” palette was calling my name.
Pigment + Fiber is a super fine weight yarn. For this pattern, I used two strands held together. If you wanted to substitute a heavier weight yarn, a single strand of DK weight should work for this pattern but check gauge.

Construction
The moss stitch is my go-to for interesting stripes and colorwork and I think it works perfectly for this hat. It’s an easy sc, ch repeat that works up fairly quickly and mindlessly (check out my Easy Crochet Dish Towel and Modern Farmhouse Dish Towel for more examples of moss stitch colorwork!).
The hat is worked from the bottom up to form a rectangle which is seamed and cinched at the top – no increasing or decreasing required! The Color Fade Beanie pattern is written for a small adult, but instructions are given for medium and large adult as well.
P.s. When I was researching crochet color fade techniques, I came across this absolutely stunning cardigan by Megan Makes Do using the exact same yarn! Her striping pattern was the inspiration for the one I used. Check it out, you could make a matching set!

Grab an ad-free printable PDF of this pattern on Etsy or Ravelry!
Color Fade Beanie Crochet Pattern
SKILL LEVEL
Easy – Level 2
MATERIALS
- Yarn: About 600 yards of super fine (1 weight) yarn in 5 colors. I used one Yarn Bee Pigment +Fiber yarn set in the color collection “Goodness Grapefruit” (note: I used 5 out of the 6 colors, omitting the lighter pink ball). This yarn comes in 5 other color set collections. DK weight yarn can also be used, but check gauge to ensure correct sizing.
- Size I (5.5mm) crochet hook for the brim. Size J (6.00mm) hook for the body of the hat. (I used my beautiful Furls hooks for this project, check them out here!)
- Yarn needle and scissors.
- (Optional) Faux Fur Pom Pom. I used these poms available on Amazon or you can make your own (find a tutorial in this post!)
DIMENSIONS
As written, hat measures 19” around at brim and is 9.5“ tall. Hat fits a small adult , but instructions are included for modifying size (Adult).
GAUGE
10 scs (& 10 chs) x 20 rows in 4” square using moss stitch.
NOTES
- This pattern uses two strands of superfine yarn held together throughout. You can either use one ball of yarn, pulling one end from the center of the ball and one from the outside, or rewind yarn into two equal balls to pull from.
- One strand of DK weight yarn can be substituted, but check gauge to ensure sizing.
- Color Key:
- Color A = Cream
- Color B = Pink
- Color C =Dark Navy Blue
- Color D = Light Blue
- Color E = Mustard
- Hat is worked from the bottom up. Brim is worked first, then you turn and work down the sides of the brim rows to start the body of the hat. Body is worked in rows to form a rectangle, then the sides are seamed to together and hat is cinched at the top.
- Body of the hat is done in the moss stitch (repeat of scs and chs). This stitch works up tightly so be sure to keep your stitches loose. Blocking finished hat is recommended to get the best slouch.
- Pattern is written for small adult, but see chart below to adjust sizing. If you adjust the size of the brim, be sure to end with an even number of brim rows. Proceed with the rest of the pattern as written (note: your stitch counts will be different).
- Sizing Chart:
| If your head circumference measures this… | …then make the brim of your hat this (using an even number of rows)… | |
| Teen/Small Adult | 21 inches | 19 inches |
| Medium Adult | 22 inches | 20 inches |
| Large Adult | 23 inches | 21 inches |
- Pattern written in US terms.
- Abbreviations
- ch = chain
- blo = back loop only
- sc =single crochet
- sk =skip
- st =stitch
Color Change Chart:

PATTERN
Brim (holding two strands of yarn together):
Ch 7 with color A and size I (5.5mm) hook.
Row 1: Sc in 2nd ch from hook and in each ch. <6 sc>
Row 2: Ch 1 , turn. Sc in BLO in each st. < 6 sc >
Tip: Sc in BOTH loops for the 1st and last sts of each row. This makes the ends of your rows a bit more sturdy.

Rows 3 – 92 (or any EVEN number of rows. Refer to sizing chart if you wish to change the size of your hat): Repeat Row 2. As written, brim should measure 19” long, unstretched.

Color change: On the final sc of Row 92, stop when two loops remain on the hook. Pull through with color B to finish the stitch . Cut color A leaving a 5” long tail. This is the color change technique that will be used for all color changes in the pattern. Refer to color change chart for help with stripe pattern.

Optional tip for weaving in color change ends: Wrap the tails of A and B around to the back of your work so that they lay on top of the row you are about to crochet into. Crochet over the tails when working this row. Then, for the NEXT row, when you reach the crocheted-over tails from the color change, insert your hook under the tails to work each SC. This creates a zig-zag path for the tails and should keep them nice and secure without having to weave them in later!

Body of hat (Holding two strands of yarn together throughout):
Turn the brim 90 degrees. You will now be working down the sides of the brim rows. Each Row end counts as a “stitch”. You will now switch to a size J (6.00mm) hook.
Ch 2 using color B and size J hook.

Row 1: Sk first st, sc in next st, [ch 1, sk 1, sc in next st], repeat inside [ ] across the row. Your last sc should be in the top of the final row end of the brim. On the last sc of the row, switch back to Color A using the technique described above. <46 sc & 45 ch>

Row 2: Ch 2, turn. Sc in the first ch-1 space from the previous row, [ch 1, sk over the next sc, sc in next ch-1 space]. Repeat inside [ ] to the end of the row. The last sc should be worked into the space between the turning ch 2 and the sc from the previous row. <46 sc, 45 chs>

*See Color Change Chart above for help with striping pattern.*
Row 3: Repeat Row 2 with color A. Change to color B on the last sc of Row 3.
Rows 4 – 5: Repeat Row 2 with color B. Change to color A on the last sc of Row 5.
Row 6: Repeat Row 2 with color A. Change to color B on the last sc of Row 6.
Rows 7 – 11: Repeat Row 2 with color B. Change to color C on the last sc of Row 11.
Row 12: Repeat Row 2 with color C. Change to color B on the last sc of Row 12.
Rows 13 -14: Repeat Row 2 with color B. Change to color C on the last sc of Row 14.
Rows 15 -16: Repeat Row 2 with color C. Change to color B on the last sc of Row 16.
Row 17: Repeat Row 2 with color B. Change to color C on the last sc of Row 17.
Rows 18 -22: Repeat Row 2 with color C. Change to color D on the last sc of Row 22.
Row 23: Repeat Row 2 with color D. Change to color C on the last sc of Row 23.
Rows 24 -25: Repeat Row 2 with color C. Change to color D on the last sc of Row 25.
Rows 26 -27: Repeat Row 2 with color D. Change to color C on the last sc of Row 27.
Row 28: Repeat Row 2 with color C. Change to color D on the last sc of Row 28.
Rows 29 – 33: Repeat Row 2 with color D. Change to color E on the last sc of Row 33.
Row 34: Repeat Row 2 with color E. Change to color D on the last sc of Row 34.
Rows 35 -36: Repeat Row 2 with color D. Change to color E on the last sc of Row 36.
Rows 37 – 38: Repeat Row 2 with color E. Change to color D on the last sc of Row 38.
Row 39: Repeat Row 2 with color D. Change to color E on the last sc of Row 39.
Rows 40 – 44: Repeat Row 2 with color E. Fasten off at the end of Row 44 leaving a 20” tail for cinching top of hat.

Assembly:
- You should now have a rectangle that measures approx. 19”x 10” (if following pattern as written).
- Fold rectangle in half matching the two smaller sides.

- Using a 30” two-stranded length of yarn (I used color A) and a yarn needle, sew the two smaller sides of the rectangle together. I used a mattress stitch because I think it hides the seam best. Pull it tight every inch or so as you stitch. Take care to line up the stripes which will also help hide the seam. Secure tightly and fasten off.

- Using the long tail you left at the end of Row 44 and a yarn needle, cinch the top of the hat by weaving the needle in and out of ch spaces of Row 44. Pull tightly every inch or so until the top opening is closed. Pass your needle back a forth a few times across the center and tie off tightly to secure. Do not cut yarn if attaching pom pom.


- Use the rest of your tail to attach a pom pom to the top of your hat if you desire.
- Block finished hat for optimal slouch (I love this steamer for blocking!).

I hope you enjoyed making the Color Fade Beanie pattern! Tag me on Instagram @theknottednest and use the hashtag #colorfadebeanie to share your project! Find more project ideas in the Patterns section here on the blog!
Happy making!


One Comment
Pingback: