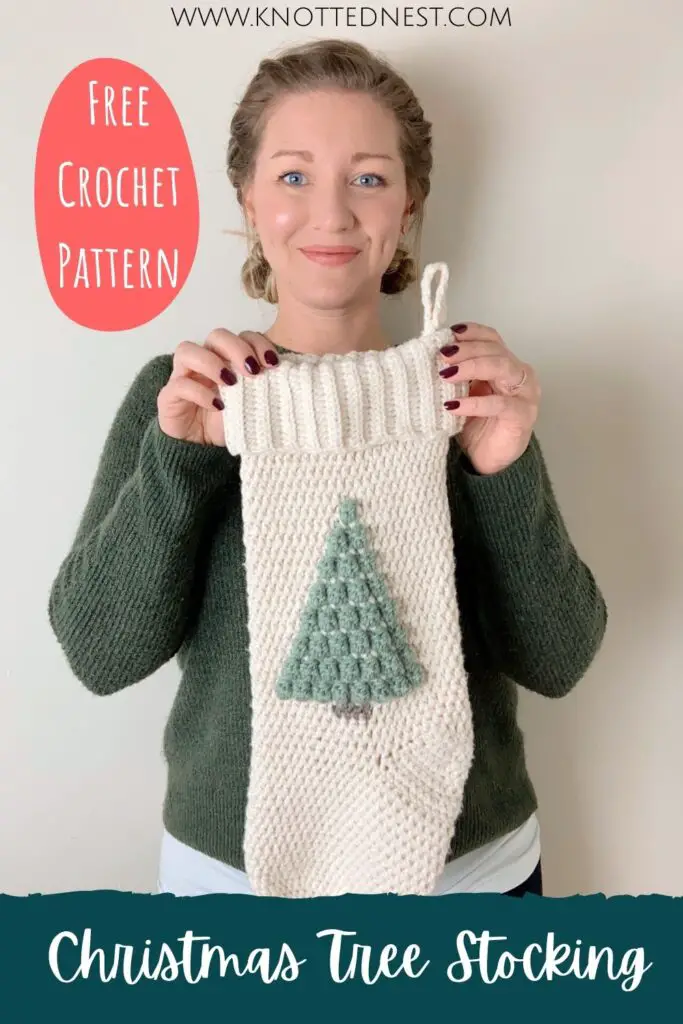
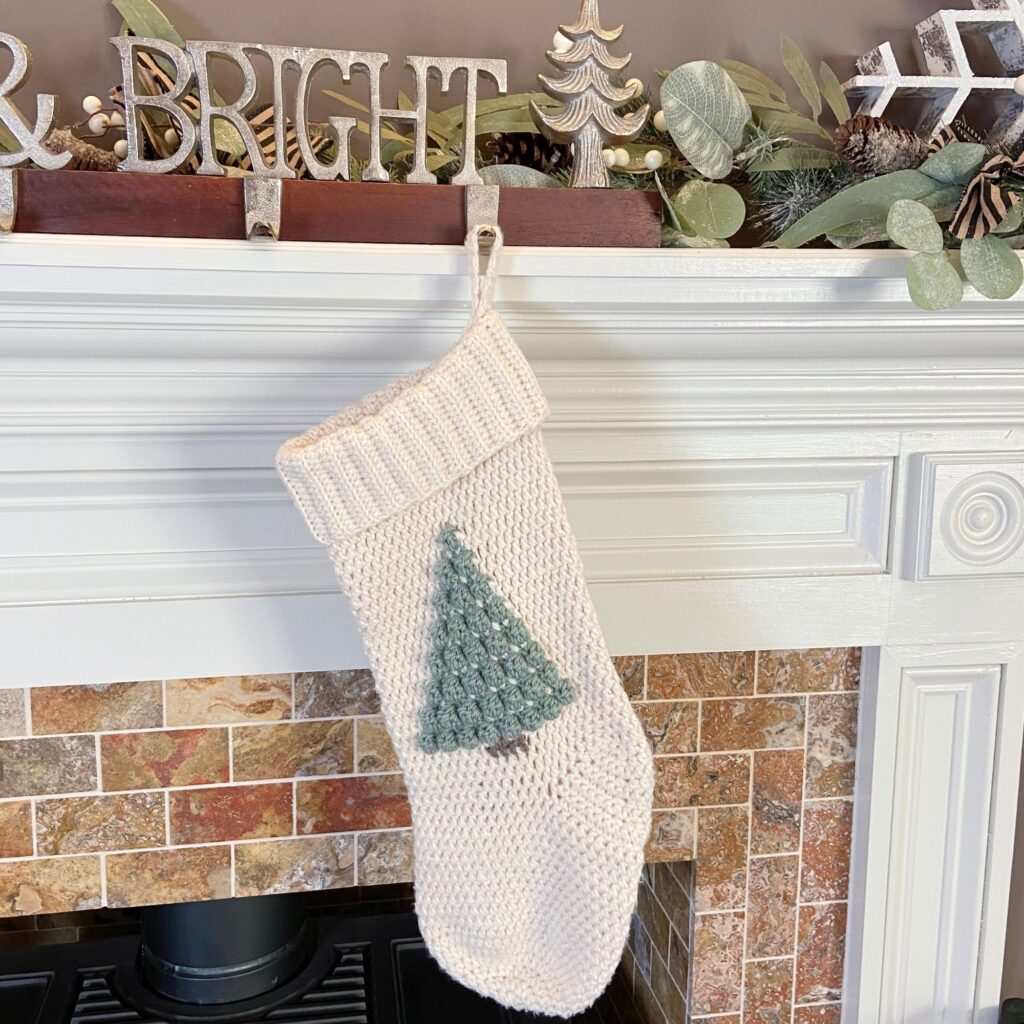
Christmas Tree Crochet Stocking Free Pattern
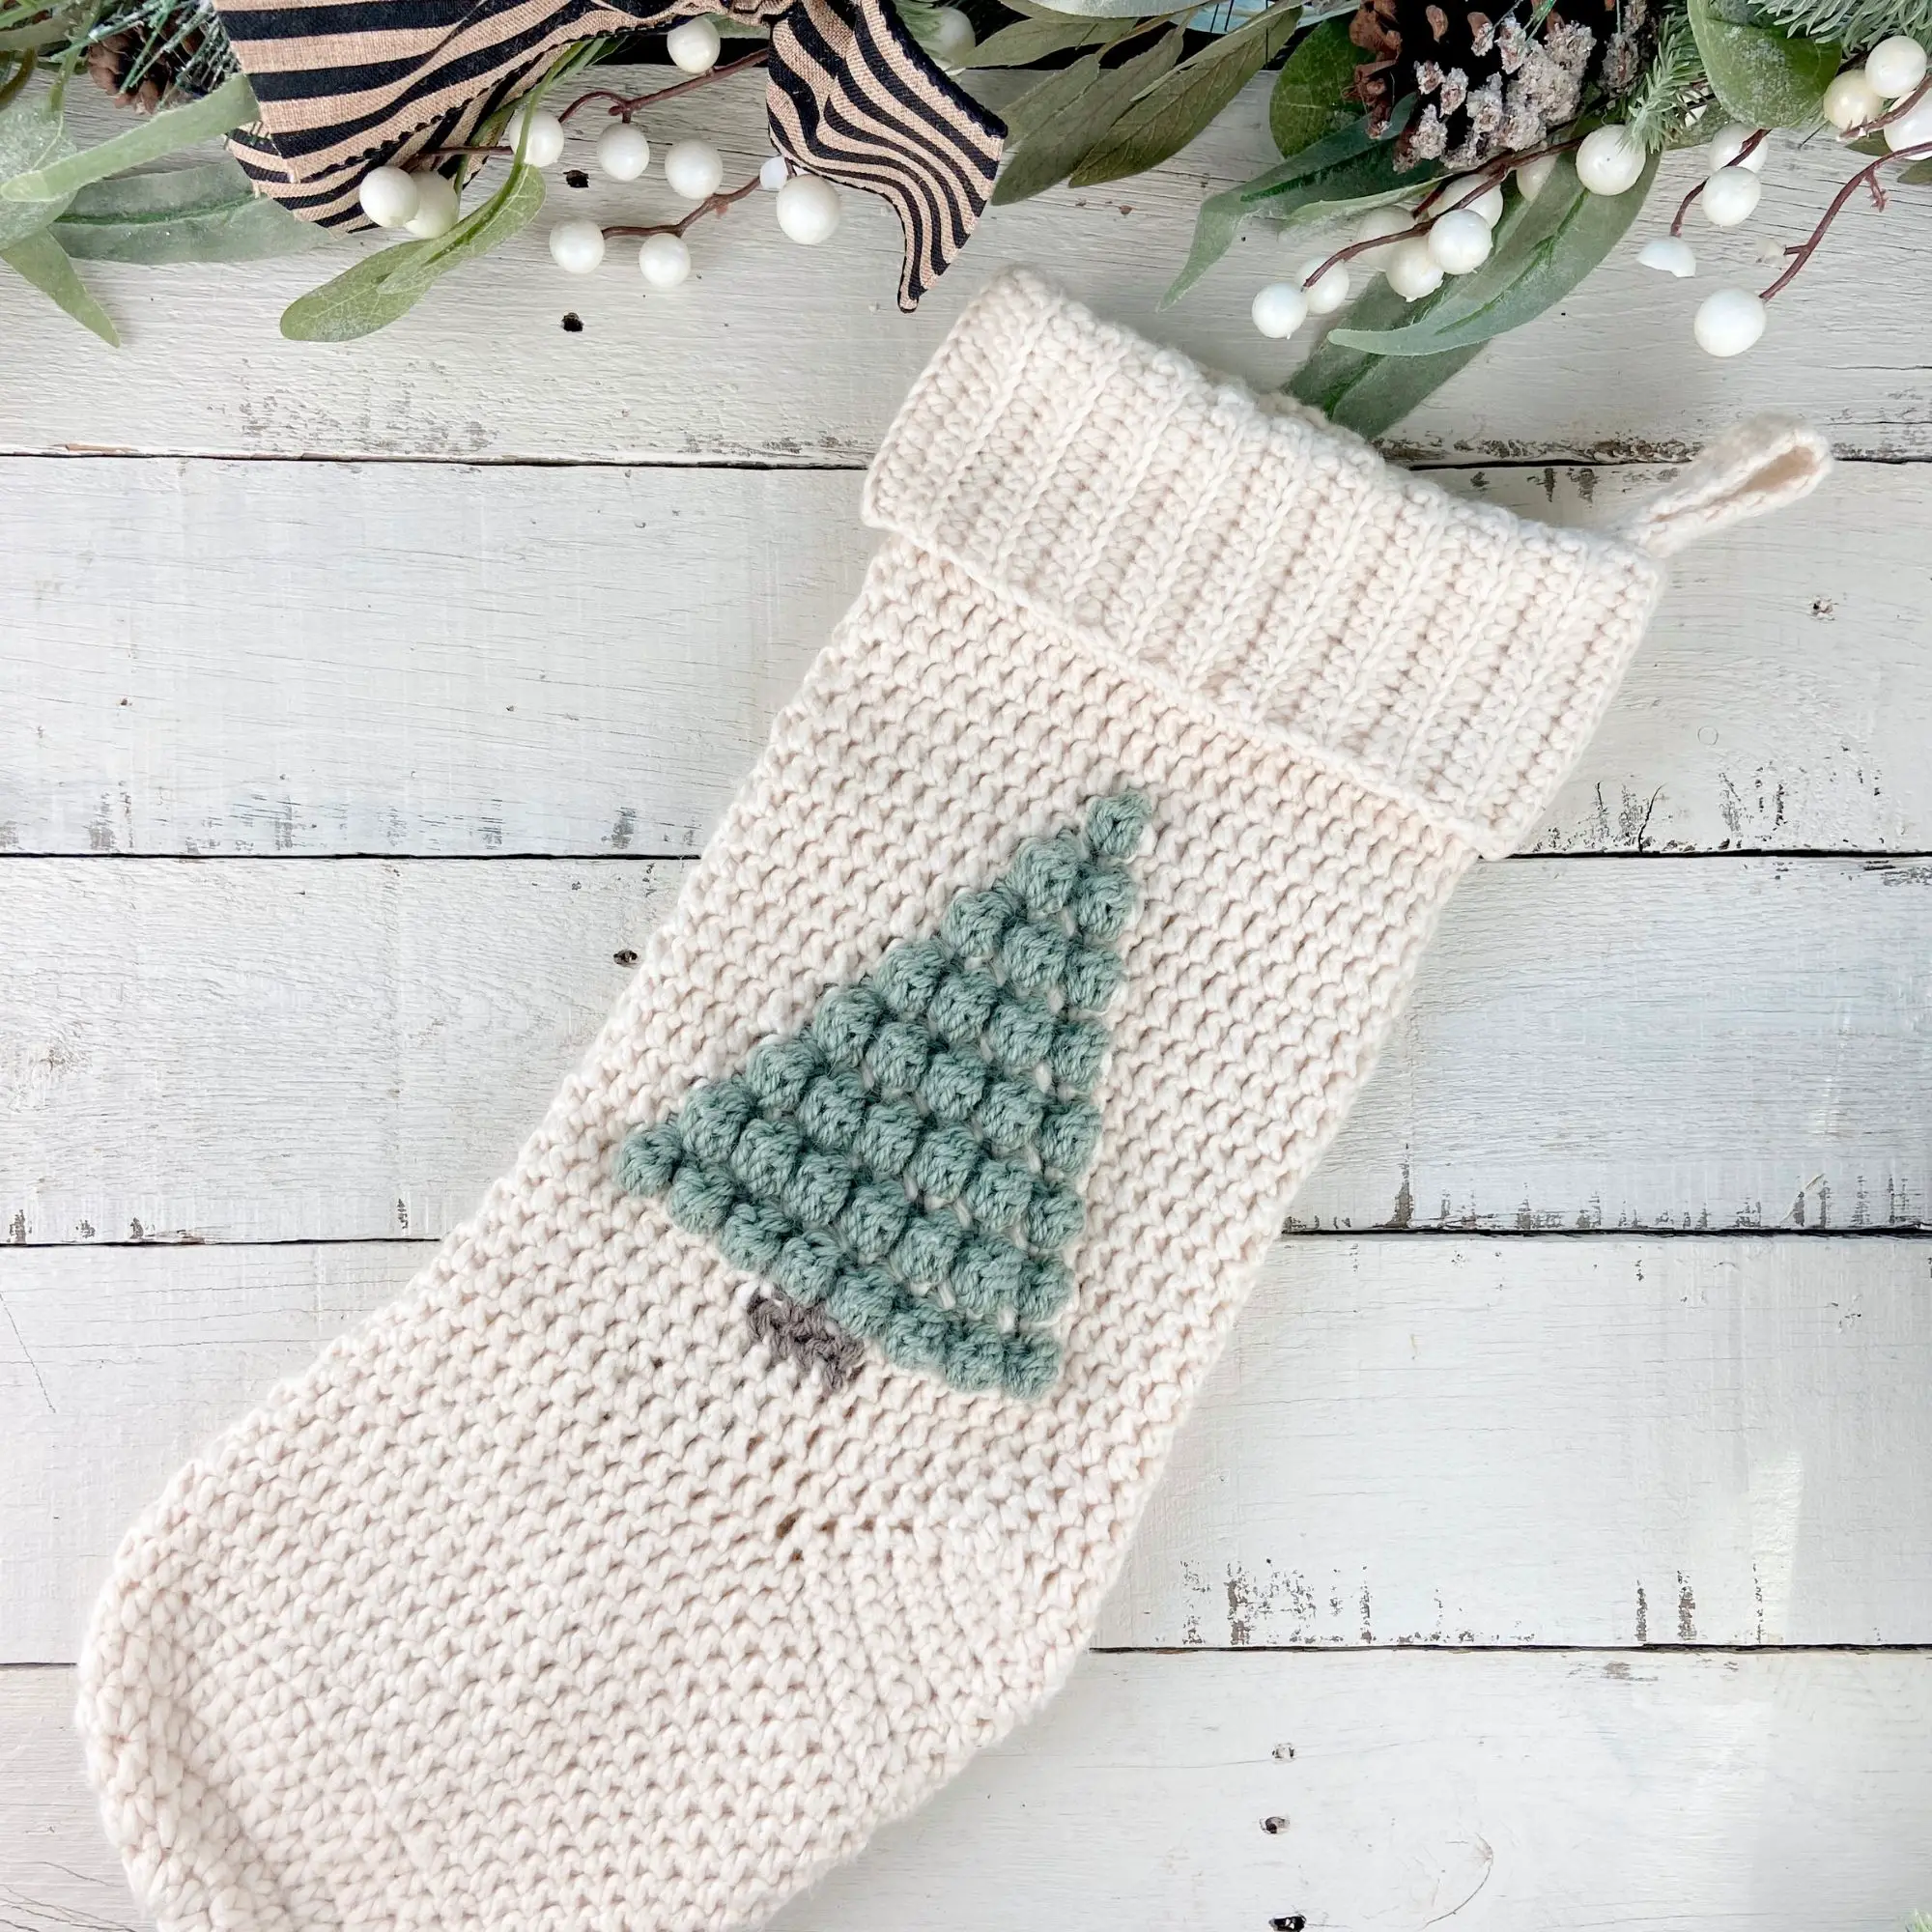
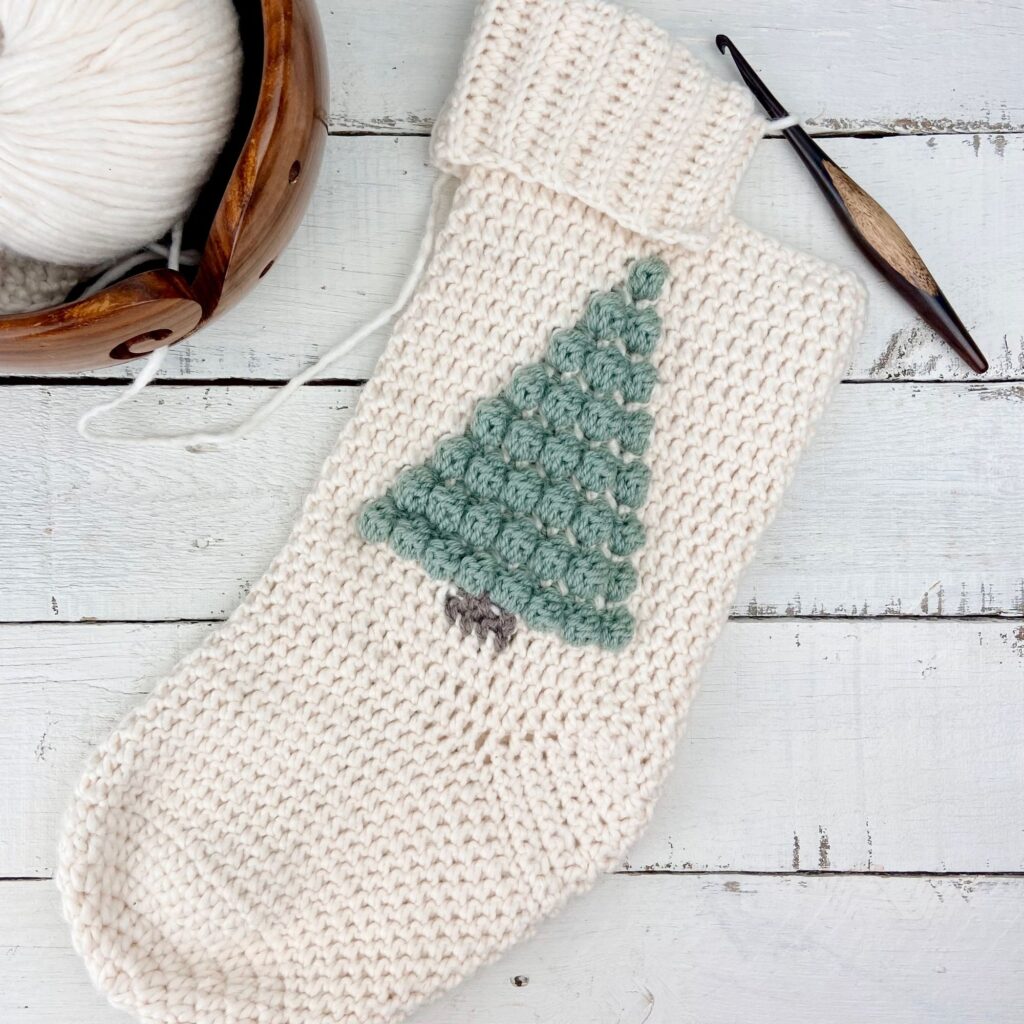
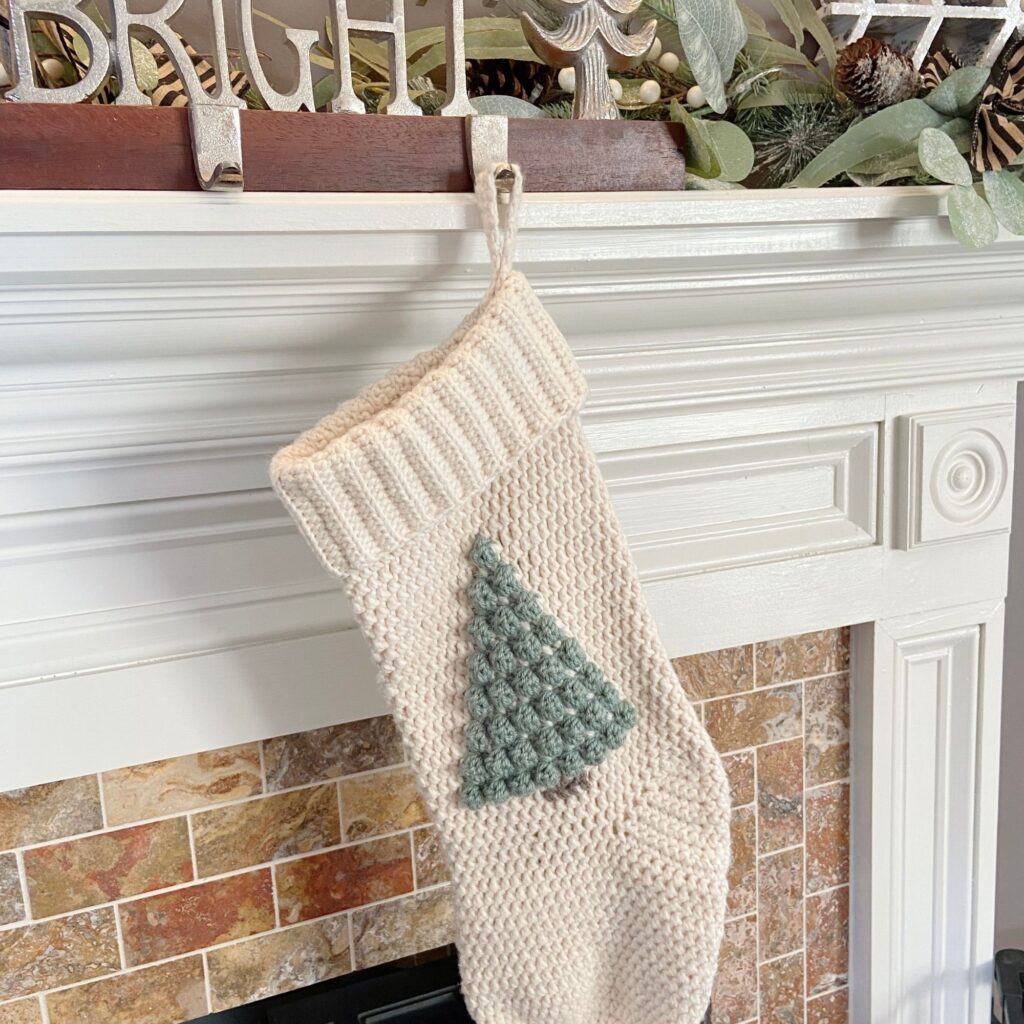
This rustic crochet stocking pattern features a scrumptiously textured bobble Christmas tree! This stocking will be a cozy, farmhouse inspired addition to your holiday decor.
Scroll down for the free pattern or read on to hear more about my inspiration for this pattern and the materials you will need to make one of your own!
Click here to pin this pattern for later!
Crochet Stocking Inspiration
If you’ve been following along on my blog for a bit, you might have recognized that this stocking design is sort of a spin-off of another recent design of mine – The Bobble Pumpkin Pillow.
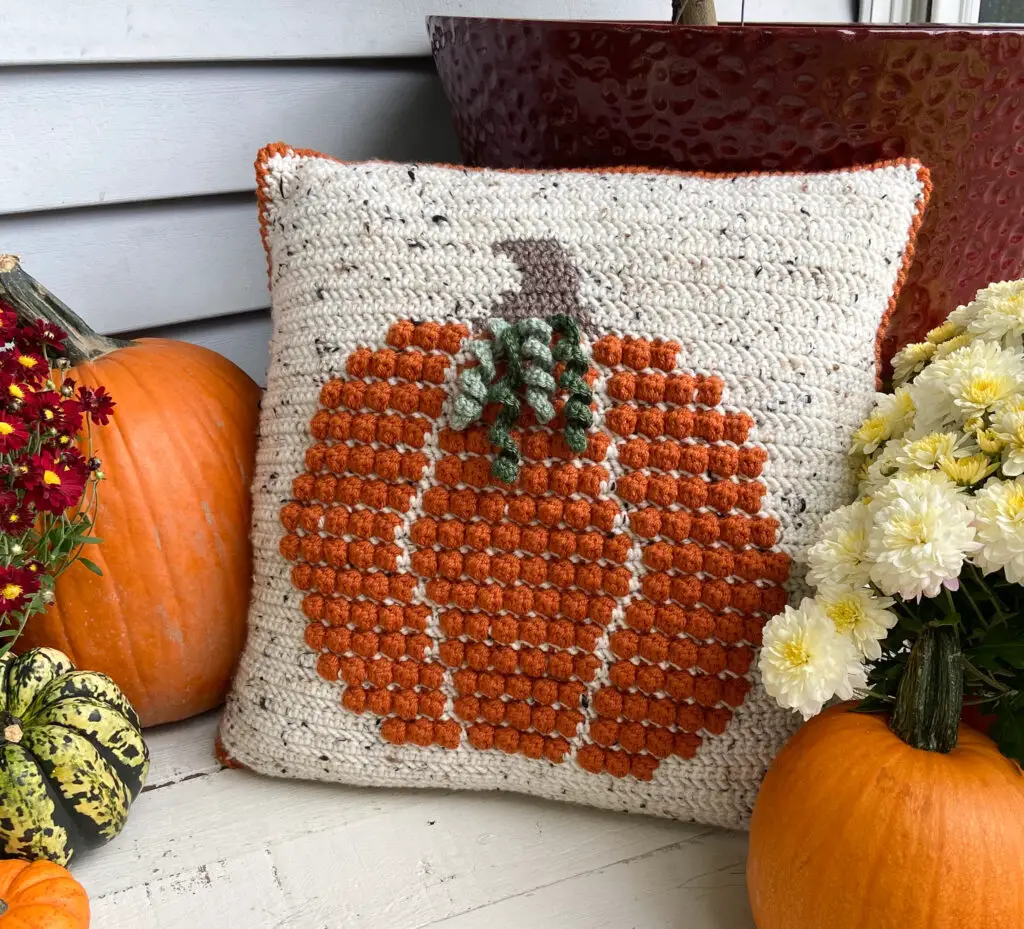
Check out the free Bobble Pumpkin Pillow pattern here!
I just love the textural contrast you get with 3D bobbles popping off the flat backdrop! And I think it’s so fun (and sometime frustrating…) to work out how to make shapes using different crochet stitches. Honestly, I’ve been crocheting for almost 20 years and I am still continuously amazed at what you can do with this craft!
Designing a crochet stocking has been on my bucket list for a LONG time. I remember having my first baby and having glorious ambitions of making crochet stockings for the whole family. That baby is now 10 years old and I’m just getting around to the Christmas stocking idea. Better late than never! I just think it is so special to add handmade touches to holidays and family traditions. It’s like a built in heirloom!
So, at some point in September, the crochet stocking idea and the bobble image idea fused in my brain and the Bobble Christmas Tree Stocking was born.
Design
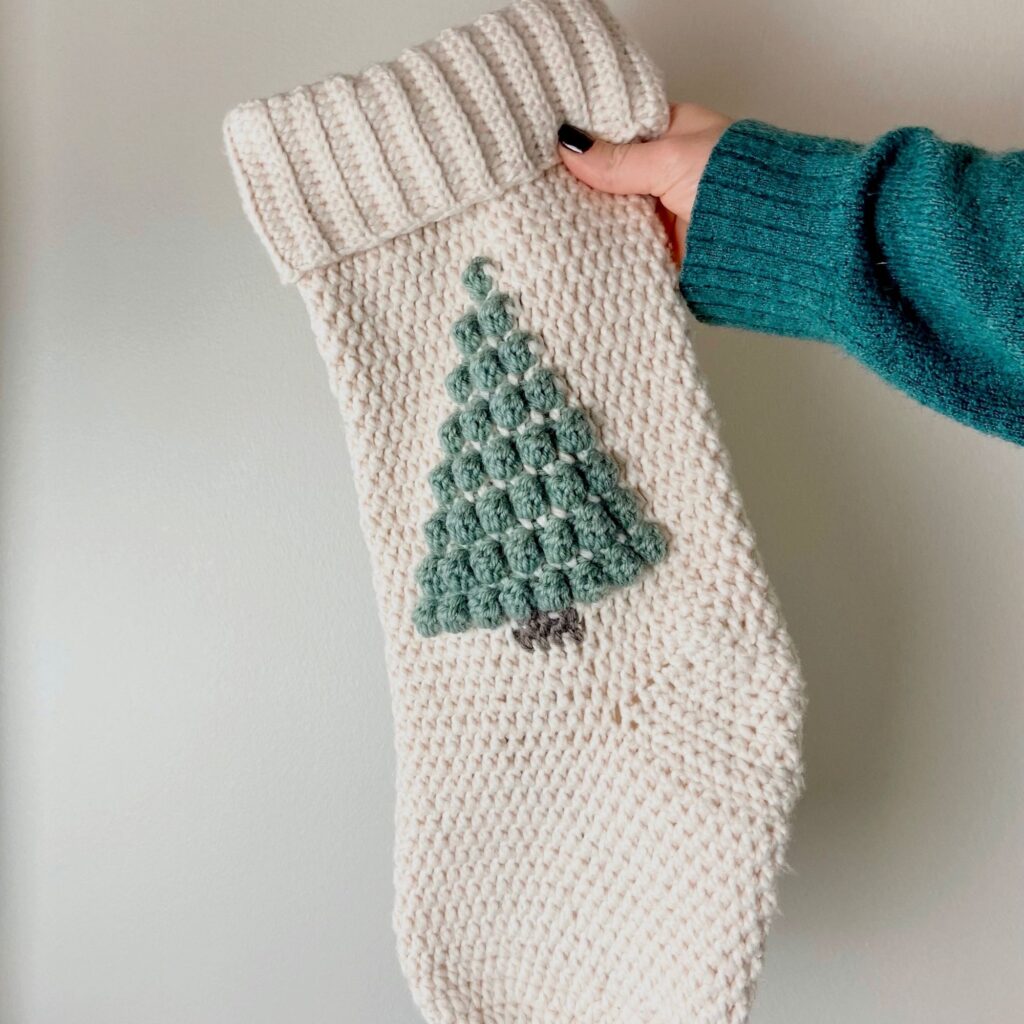
I wanted something with a simple stitch pattern and color scheme for the backdrop to really let the bobble texture be the star of the show. I kept the toe and heel the same color as the rest of the stocking to further highlight the tree design, but you could totally customize this how ever you want! I absolutely LOVE to see how makers change up my patterns to make something that speaks to them!
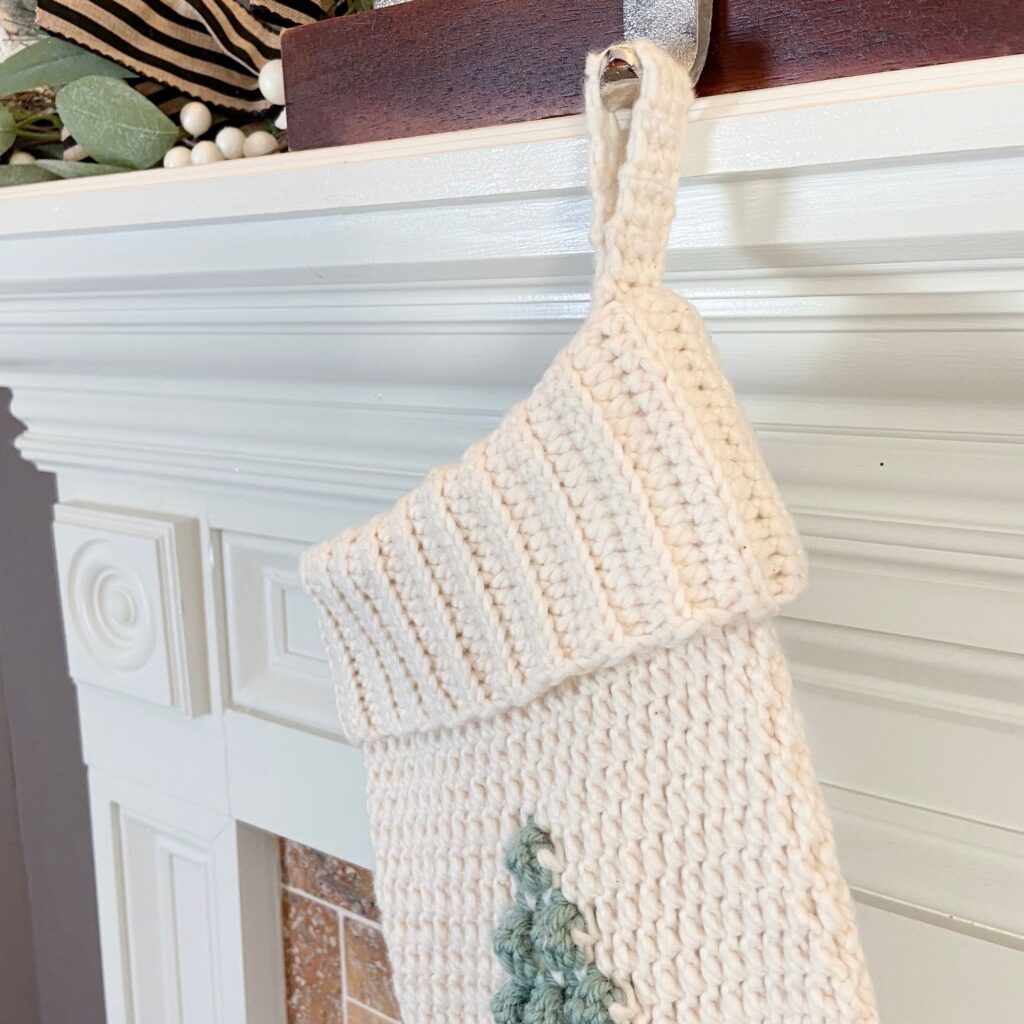
I finished the top of the stocking with a basic hdc-blo ribbing because it is my favorite ribbing of all time and I think it fits with the modern farmhouse style I was going for. Add a little single crochet hanging tab, and you’ve got a sweet, simple, and cozy stocking to treasure for years to come.
Yarn and Construction
I usually try to design my patterns to work with a wide variety of yarns, but this is one that is a little more specific.
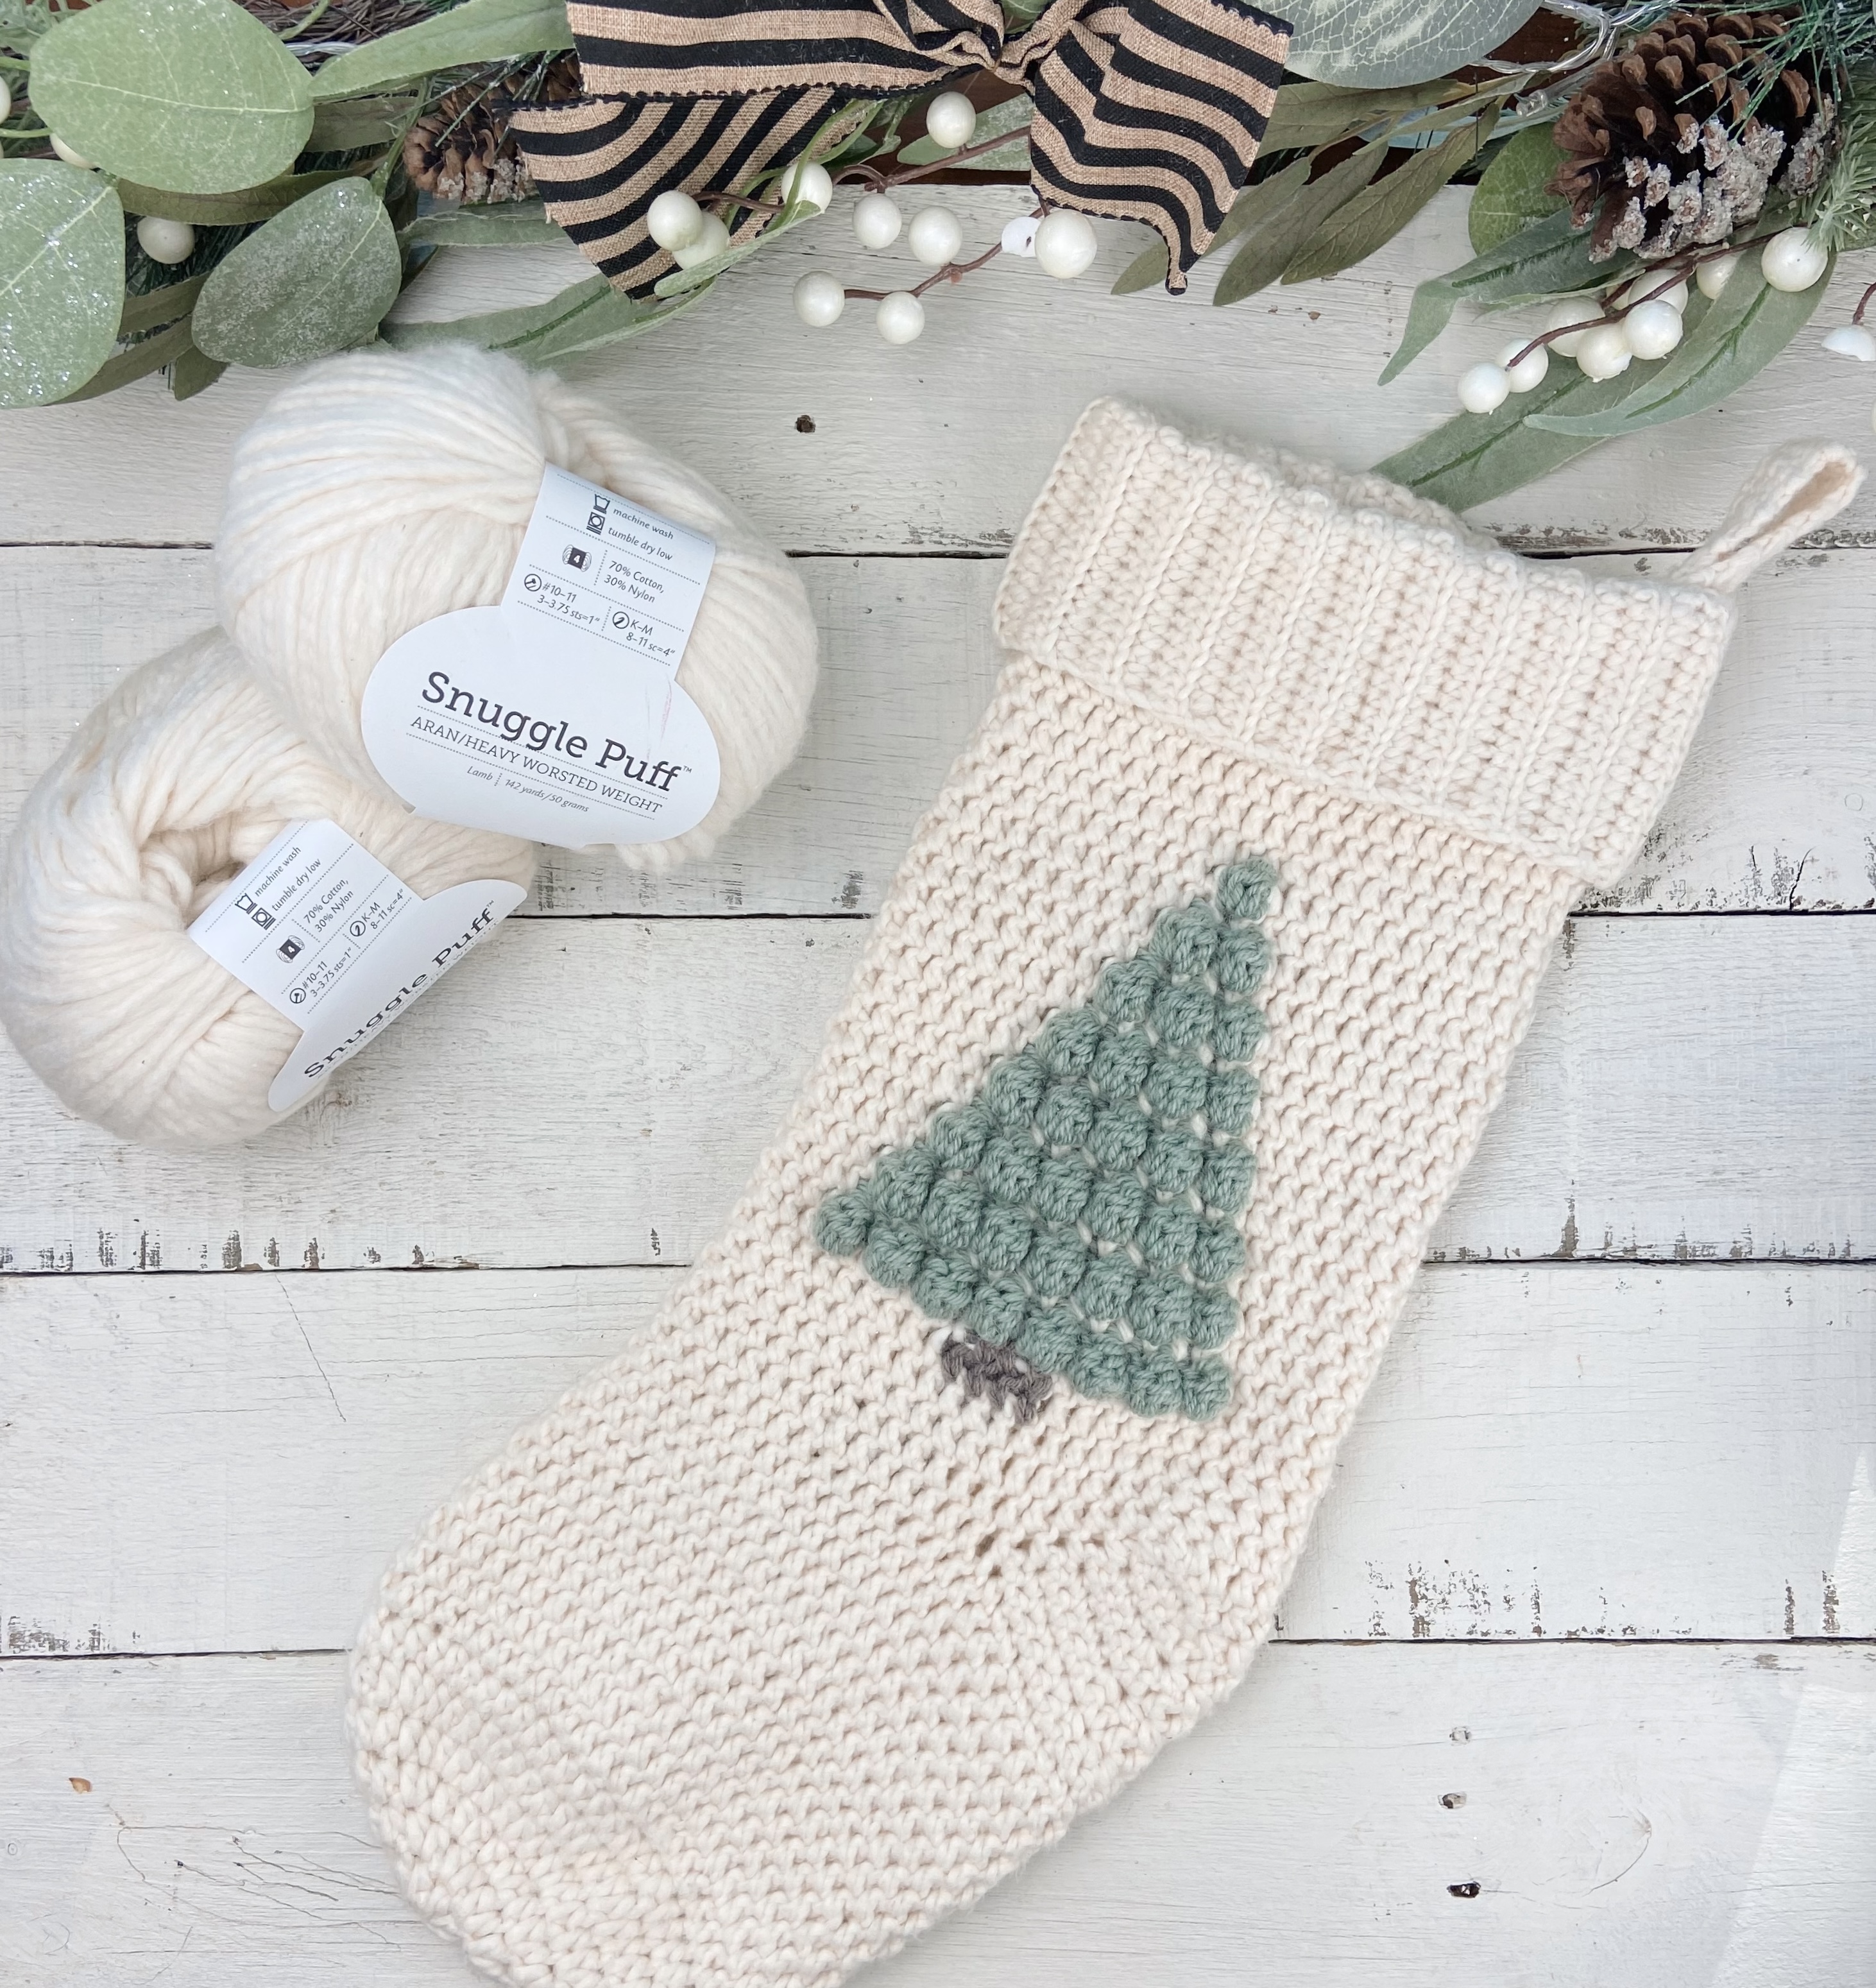
I used WeCrochet’s Snuggle Puff yarn for the main body of the crochet stocking and I recommend you use this yarn or something very similar to get the expected stocking size I have listed in the pattern. This is because Snuggle Puff (4 weight) is actually categorized as a “heavy” worsted weight yarn and using a regular worsted weight could result in a too-small stocking. If you have a thicker worsted you want to try, I recommend double checking your gauge to ensure your stocking will be big enough to hold all those Christmas goodies!
This pattern is rated as intermediate, but don’t let that deter you if you are a more casual crocheter – you can do this! The stocking is worked from the toe up, starting in rounds, then the heel flap is made working in rows, and rounds are resumed for the leg of the stocking. It sounds a bit confusing, but the pattern will walk you through it step-by-step! Written instructions as well as a chart are included for the color work portion. And then the cuff is worked separately and sl st’d to attach it to the top of the stocking. I would say the average crocheter could finish this crochet stocking in 2.5 – 3 hours. 2024 UPDATE: Pattern has been revised to be more user friendly for both right and left handed crocheters, including a chart for lefties!
I hope this crochet stocking pattern inspires you to make something handmade for the holidays this year!
You can find a printable PDF download version of the Christmas Tree Crochet Stocking pattern on Etsy and Ravelry!
A video tutorial is now available for this pattern!
Christmas Tree Crochet Stocking Free Pattern
Skill Level
Intermediate: this pattern requires color changes and uses a variety of stitch techniques, including bobbles, increases and decreases and working in the back loop only. You will need to be familiar with working in the round and working in rows.
MATERIALS
- Yarn:
- About 325 yards of worsted weight yarn (4) for the body of the stocking. I used just under 2.5 balls of WeCrochet’s “Snuggle Puff” (70% cotton/30% nylon, 142yds/50g per ball) in the color Lamb.
IMPORTANT NOTE: Although Snuggle Puff is listed as a 4 weight yarn, it is categorized as “Heavy Worsted Weight” so if you are using a thinner 4 weight yarn, please be sure to check your gauge. I do recommend using a thicker worsted yarn such as Red Heart, Caron Simple Soft, Caron Pound of Love or JoAnns Big Twist.
- About 50 yards of worsted weight yarn in a contrasting color for the tree bobbles. I used green scrap yarn. If your contrasting yarn is on the thinner side, you may want to consider holding two strands together or doing a dc5tog cluster for the bobbles (*See the Note in the under bobble stitch in the Stitch Explanation section for how to do this*)
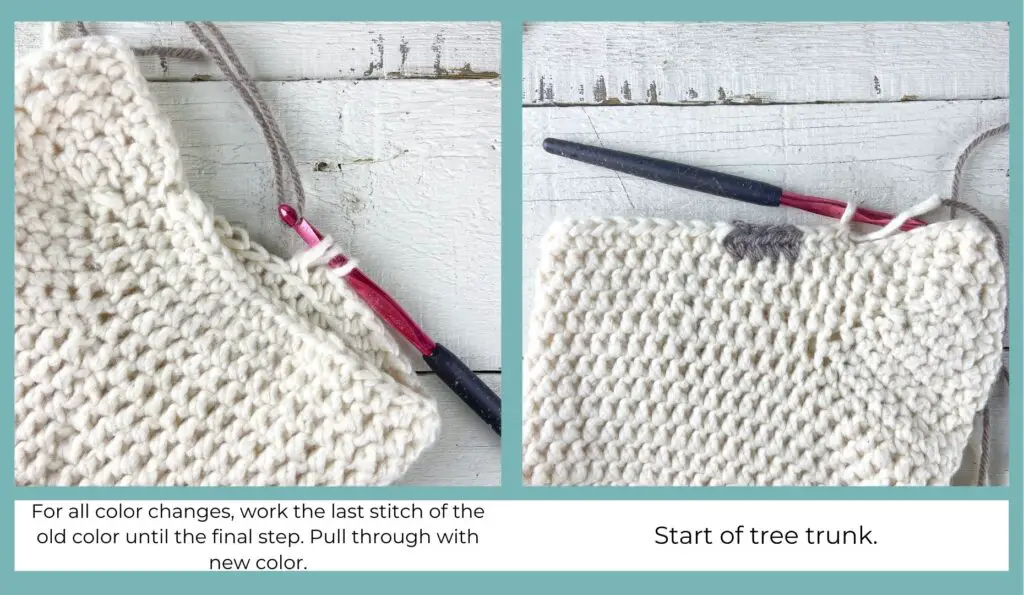
- You will also need a small amount (2-3 yards) of brown yarn for the tree trunk.
- Size I (5.50mm) and size G (4.00mm) crochet hooks.
- Scissors, Yarn needle
Measurements
The finished stocking is approximately 18” tall and 7” wide.
GAUGE
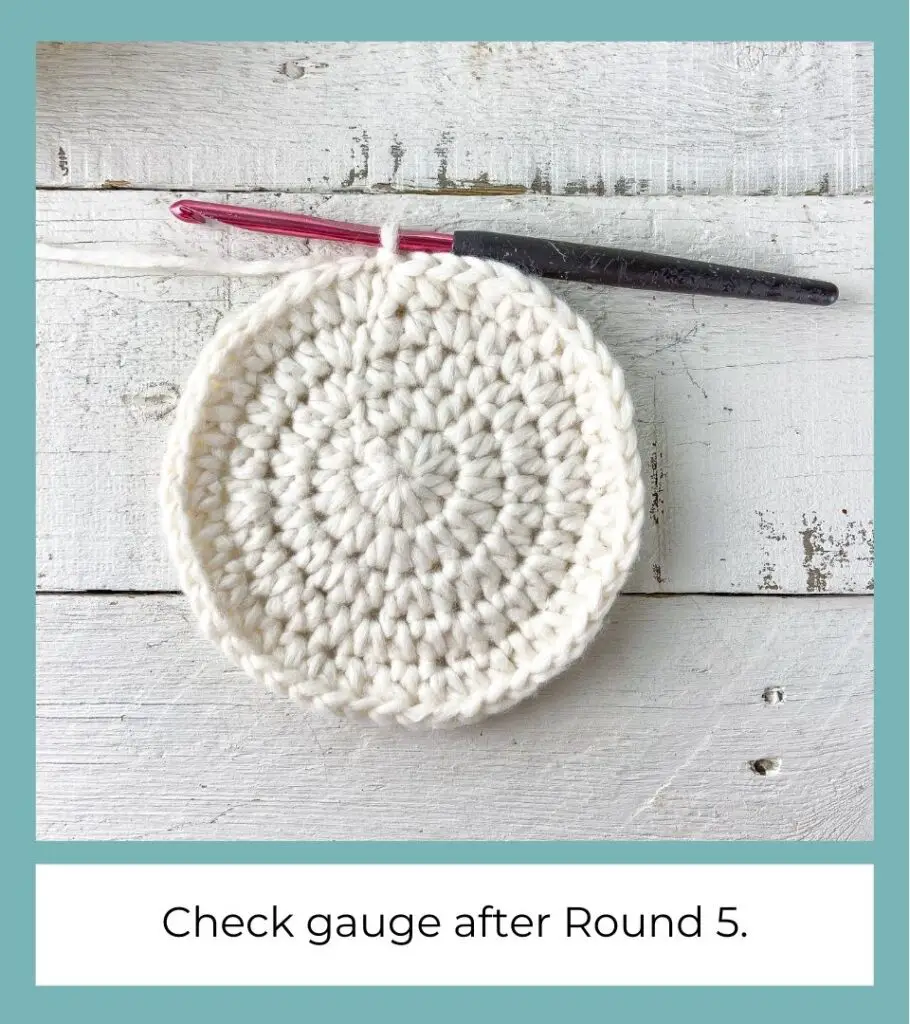
After Round 5, the diameter of the circle should measure 4.75”.
It’s ok if your circle measures a little bigger (your stocking will just end up slightly larger), but you don’t want this measurement to be any smaller than 4.75″. If your circle is too small, try going up a hook size or choosing a different yarn.
NOTES
- This stocking is worked in rounds from the toe up. The heel is worked in rows and then the leg continues in rounds. The ribbed cuff is worked separately in rows and then attached to the top of the leg.
- Some sections of this pattern differ depending on whether you are a right handed crocheter or left handed crocheter. Each section will be labeled.
- IMPORTANT!! The “turn/do not turn” directions are crucial for this pattern. Please pay close attention to the turning directions after every round/row.
- For all color changes: when working the last stitch of the “old” color, stop before the last “pull through” of the stitch (for sc there will be two loops left on the hook; for hdc there will be three loops; for bobble you will have five loops left on the hook), pull through with the “new” color and continue with the pattern. When instructed to “carry” the unused yarn, you will lay the unused color on top of the row you are working into and crochet over it.
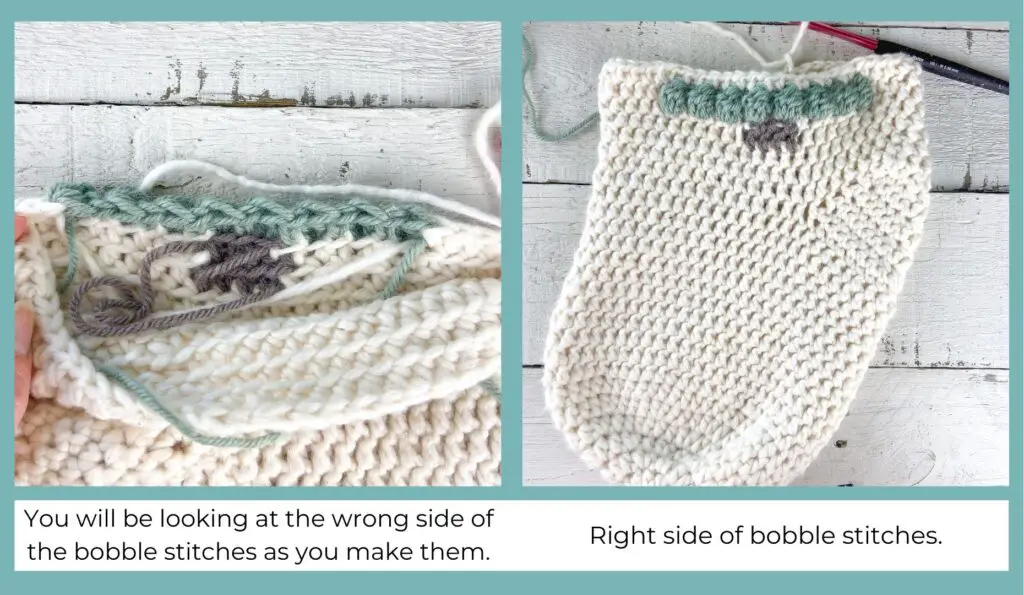
- Note that you will be looking at the “wrong side” of the bobbles when you are making them.
- Since the “wrong side” of the colorwork will be on the inside of the stocking, you do not need to cut/weave in the yarn when changing color. I dropped the yarn when not in use and carried it over the back of the work to pick up the next time I needed it. This is personal preference, feel free to cut and weave in if you would like a neater stocking interior.
- Tip: Roll a ball of the green yarn (about 40-50 yards) to use for the color work. To avoid tangles, keep the ball in the toe of the stocking when not in use.
- The ch 1 at the beginning of each round/row does NOT count as a stitch. The slip stitch used to join each round does NOT count as a stitch. You will skip over both of these stitches when working the next round.
- Notes about half double crochet (hdc):
- The hdc stitch has the typical “V” on top formed by the front loop and the back loop, but it also has a “3rd loop” (the loop nearest you, running parallel to the “front loop”). For most of the rounds, you will work into the front and back loop, as usual, ignoring the 3rd loop. For Rounds 2-6, I chose to work into the “3rd loop” and the front loop only (ignoring the back loop). This avoids the extra line that forms on your work if the 3rd loop is unused. This is personal preference, but it does make the finished piece look more uniform.
- The hdc stitch has a natural slant. To help offset this and keep the colorwork straight, we will start each round of the stocking leg with a hdc-dec and end each round with a hdc-inc. This will make your seam a little bulkier, but it will be on the back of your stocking. You can watch a helpful video here explaining how and why this is necessary for hdc in the round.
- Special Stitches:
- Bobble (bo) aka: dc4tog cluster – [Yarn over (YO) and insert hook into desired stitch, YO and pull through the stitch, now YO and pull through two loops] 4 times in same stitch. With 5 loops on hook, YO and pull through all 5 loops. Stitch is complete. Your next stitch will be a SC. Watch a video tutorial of this stitch here.
- *NOTE – if your yarn is on the thinner side, you may consider altering this stitch to create fuller bobbles. To do that: follow the bobble stitch explaination above, but work everything inside the [] 5 times instead of 4. You should have 6 loops on the hook. Pull through all 6 to finish the stitch.
- Increase (Inc) – work two stitches into the same stitch.
- Decrease (Dec) –
- For single crochet: insert your hook into the first st, yo and pull up a loop, insert hook into next st, yo and pull up a loop, yo and pull through all three loops.
- For half double crochet: yo and insert your hook into the first st, yo and pull up a loop, yo and insert hook into next st, yo and pull up a loop, yo and pull through all 5 loops.
- Pattern written in US terms.
- Abbreviations:
- blo = back loop only
- bo = bobble
- ch = chain
- dec = decrease
- hdc = half double crochet
- inc = increase
- sc =single crochet
- sl st = slip stitch
- st =stitch
- yo = yarn over
CROCHET STOCKING PATTERN
THE TOE AND HEEL PORTIONS OF THE PATTERN ARE THE SAME FOR RIGHT AND LEFT HANDED CROCHETERS
Toe:
With an I hook and white yarn (or your main color of choice), make a magic circle.
Round 1: 10 hdc in magic circle. Join to 1st hdc with sl st. Ch 1, do not turn. <10 hdc>
Tip: Be sure to work the first stitch of the new round into the same stitch you just slip stitched into.
Round 2: Hdc-inc in each stitch. Join with a sl st. Ch 1, do not turn. <20 hdc>
Round 3: Work [Hdc-inc in first st, 1 hdc in next st] 10 times. Join with a sl st. Ch 1, do not turn. <30hdc>
Round 4: Work [Hdc-inc in first st, 1 hdc in next 2 sts] 10 times. Join with a sl st. Ch 1, do not turn. <40hdc>
Round 5: Work [Hdc-inc in first st, 1 hdc in next 3 sts] 10 times. Join with a sl st. Ch 1, do not turn. <50hdc>
Stop here and check for gauge. The diameter of your circle after Round 5 should measure 4.75 inches. It’s ok if your circle measures slightly larger, you just don’t want it to be smaller.
Round 6: 1 hdc in each st. Join with a sl st. Ch 1. <50hdc>
IMPORTANT!! **TURN YOUR WORK**
Position your work so that you are looking at the interior of the stocking as you are making the stitches.
Rounds 7-18: 1 hdc in each st (Tip: for Round 7, place your first hdc in the 50th st of Round 6, NOT the sl st). Join with a sl st. Ch 1, do not turn. <50hdc>

IMPORTANT!! After Round 18, **TURN YOUR WORK** and continue to heel instructions. (This turn will ensure that your bobbles are on the correct side.)
Heel
The heel is made continuing with the I hook and white yarn, but we will now be working in rows. We will go back to rounds after the heel portion is complete. (TIP: If you would like the heel of your stocking to be a bit more defined, consider going up a hook size just for the heel portion, then go back down to your regular hook size for the remainder of the pattern.)
Row 1: Sc in the first st (not the sl st) and in the next 19 sts. Ch 1, turn your work. <20 sc>
Row 2: Sc in each st. Ch 1, turn. <20 sc>
Row 3: Sc in the first 6 sts, sc-dec, hdc in the next 4 sts, sc-dec, sc in the last 6 sts. Ch 1, turn. <18 sts>
Row 4: Sc in the first 7 sts, hdc in the next 4 sts, sc in the last 7 sts. Ch 1, turn. <18 sts>
Row 5: Sc in the first 5 sts, sc-dec, hdc in the next 4 sts, sc-dec, sc in the last 5 sts. Ch 1, turn. <16 sts>
Row 6: Sc in the first 6 sts, hdc in the next 4 sts, sc in the last 6 sts. Ch 1, turn. <16 sts>
Row 7: Sc in the first 4 sts, sc-dec, hdc in the next 4 sts, sc-dec, sc in the last 4 sts. Ch 1, turn. <14 sts>
Row 8: Sc in the first 5 sts, hdc in the next 4 sts, sc in the last 5 sts. Ch 1, turn. <14 sts>
Row 9: Sc in the first 3 sts, sc-dec, hdc in the next 4 sts, sc-dec, sc in the last 3 sts. Ch 1, turn. <12 sts>
Row 10: Sc in the first 2 sts, sc-dec, hdc in the next 4 sts, sc-dec, sc in the last 2 sts. Ch 1, DO NOT TURN. <10 sts>
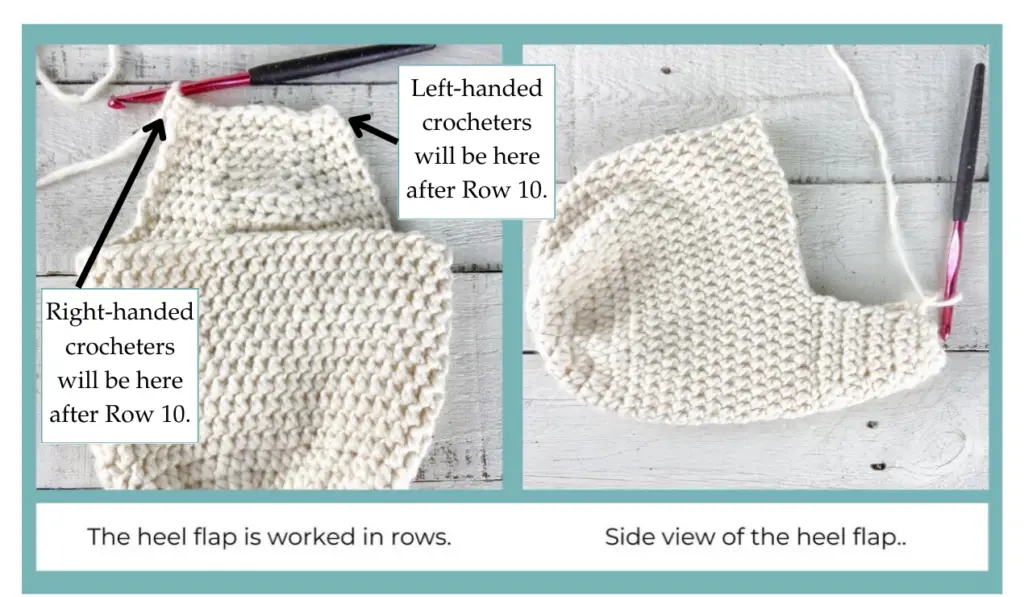
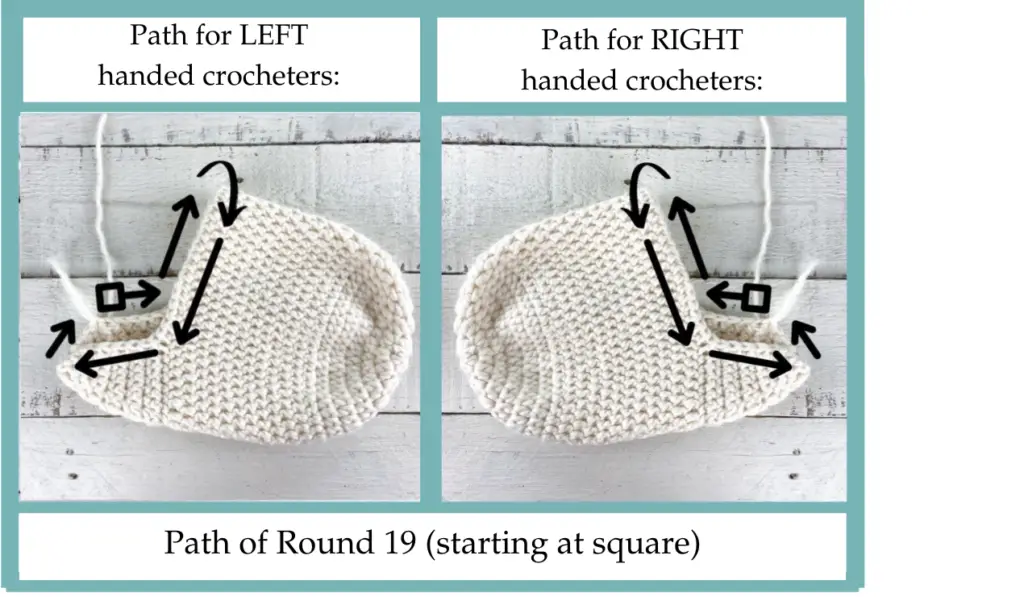
BOTH LEFT AND RIGHT HANDED CROCHETERS SHOULD FOLLOW THE SAME WRITTEN INSTRUCTIONS FOR ROUND 19, BUT NOTE THAT THE DIRECTION OF YOUR PATH WILL BE OPPOSITES (SEE PICTURE BELOW)
Leg of Stocking
Still using I hook and white yarn, we will resume working in rounds by crocheting around the heel flap and the unused sts of Round 18.
Round 19: Tilt your work so that you are working down the sides of the heel rows. Evenly space 5 hdc down the sides of the rows (about one every other row).
Tilt work so that you are working in the unused sts of Round 18. 1 Hdc in the next 30 sts.
Tilt work so that you are working back up the other side of the heel. Evenly space 5 hdc along the row ends.
Tilt work so that you are working across the Row 10 of the heel. 1 Hdc in the next 10 sts. Sl st to the first hdc of the round to join. Ch 1, DO NOT TURN. <50 hdc>
For the rest of the leg rounds, we will start each round with a hdc-dec and end each round with a hdc-inc. This will help to keep the color work portion of the stocking straight. Please see the Notes section of this pattern for more info on this technique.
ROUNDS 20 – 23 ARE THE SAME FOR BOTH LEFT AND RIGHT HANDED CROCHETERS.
Rounds 20 – 23: Hdc-dec over the first 2 sts (Be sure to work the first part of the hdc-dec into the same stitch you just slip stitched into.), work 1 hdc in the next 47 sts, hdc-inc in the last st. Join with a sl st. Ch 1, DO NOT TURN. <50 hdc>
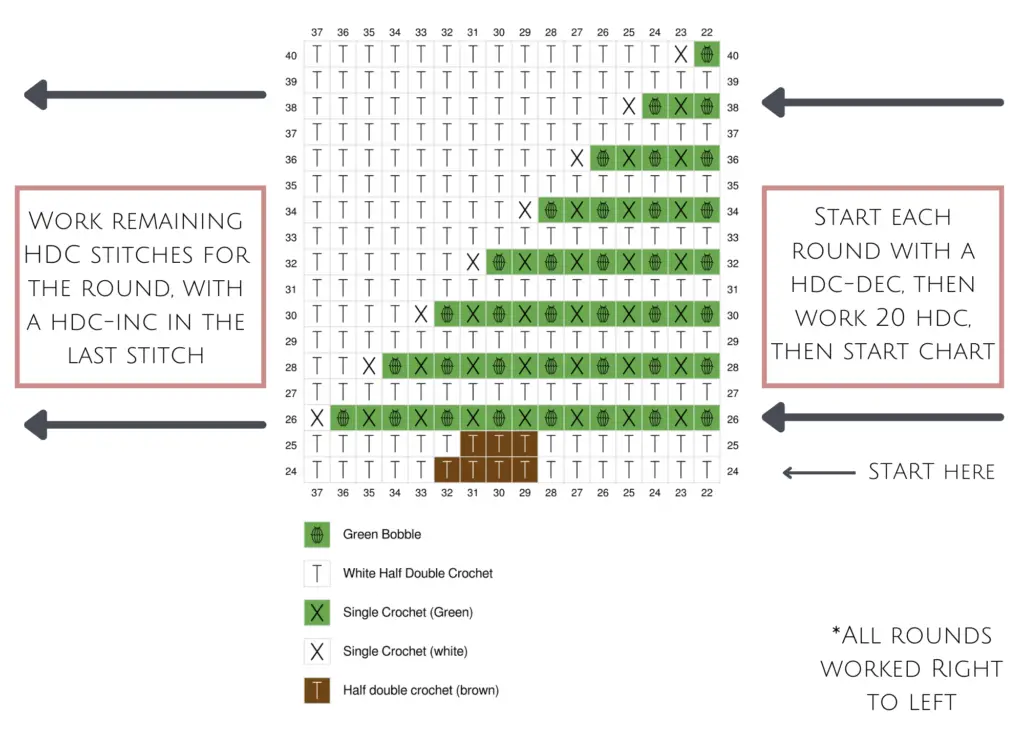
We will now begin the color work portion of the leg. The written instructions are below and you can use this chart to help guide you. You can see that even with the inc/dec technique, the color work pattern still has to be offset to account for the remaining slant. Don’t worry, it’ll all work out!
BOTH RIGHT AND LEFT HANDED CROCHETERS CAN FOLLOW ALONG WITH THE WRITTEN INSTRUCTIONS, BUT THERE ARE SEPARATE CHARTS FOR LEFT AND RIGHT HANDED CROCHETERS.
Right Handed Colorwork Chart
Left Handed Colorwork Chart
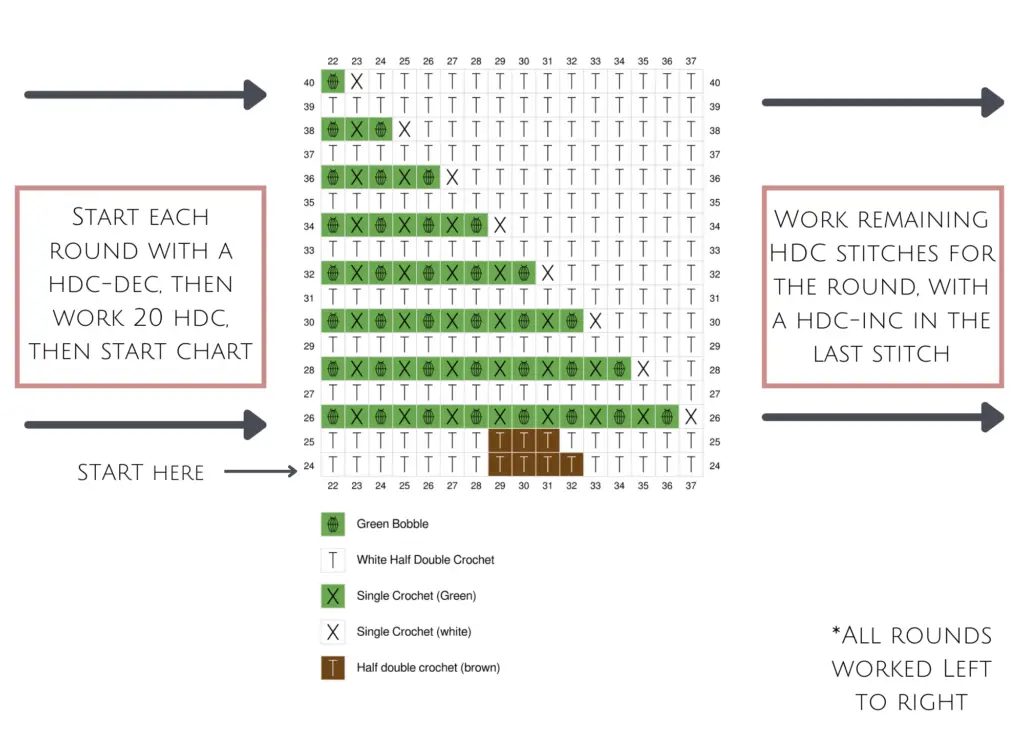
Round 24: Hdc-dec over the first 2 sts (Be sure to work the first part of the hdc-dec into the same stitch you just slip stitched into. Do this for the rest of the leg.), 1 hdc in the next 27 sts (on the last step of 27th hdc, pull through with brown), 1 hdc in the next 4 sts using brown (switch to white), hdc in the next 16 hdc using white, hdc-inc in the last st. Sl st to join. Ch 1, DO NOT TURN. <50 hdc>
Round 25: Hdc-dec over the first 2 sts, 1 hdc in the next 27 sts (switch to brown), 1 hdc in the next 3 sts using brown (switch to white), hdc in the next 17 hdc using white, hdc-inc in the last st. Sl st to join. Ch 1, DO NOT TURN. <50 hdc>
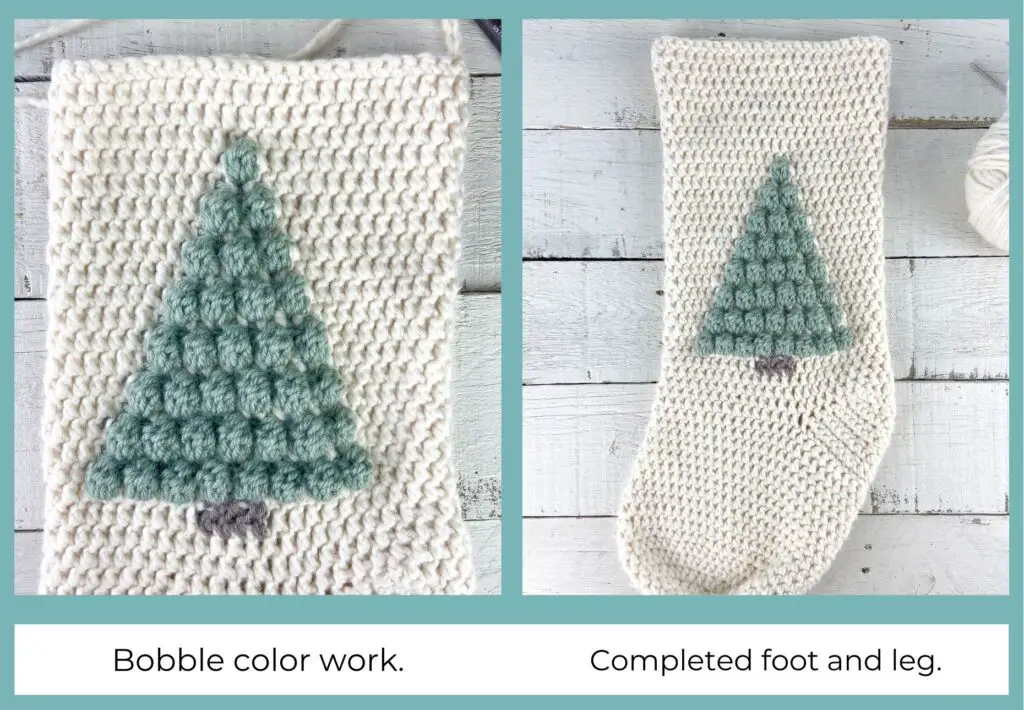
Round 26: Hdc-dec over the first 2 sts, 1 hdc in the next 20 sts (switch to green), work [bo in the next st, sc in next] 8 times (on the 8th bobble, pull through with white and work the last sc with white), 1 hdc in the next 11 sts, hdc-inc in the last st. Sl st to join. Ch 1, DO NOT TURN. <50 sts>
Round 27: Hdc-dec over first 2 sts, 1 hdc in the next 47 sts, hdc-inc in the last st. Sl st to join. Ch 1, DO NOT TURN. <50hdc>
Round 28: Hdc-dec over the first 2 sts, 1 hdc in the next 20 sts (switch to green), work [bo in the next st, sc in next] 7 times (on the 7th bobble, pull through with white and work the last sc with white), 1 hdc in the next 13 sts, hdc-inc in the last st. Sl st to join. Ch 1, DO NOT TURN. <50 sts>
Round 29: Hdc-dec over first 2 sts, 1 hdc in the next 47 sts, hdc-inc in the last st. Sl st to join. Ch 1, DO NOT TURN. <50hdc>
Round 30: Hdc-dec over the first 2 sts, 1 hdc in the next 20 sts (switch to green), work [bo in the next st, sc in next] 6 times (on the 6th bobble, pull through with white and work the last sc with white), 1 hdc in the next 15 sts, hdc-inc in the last st. Sl st to join. Ch 1, DO NOT TURN. <50 sts>
Round 31: Hdc-dec over first 2 sts, 1 hdc in the next 47 sts, hdc-inc in the last st. Sl st to join. Ch 1, DO NOT TURN. <50hdc>
Round 32: Hdc-dec over the first 2 sts, 1 hdc in the next 20 sts (switch to green), work [bo in the next st, sc in next] 5 times (on the 5th bobble, pull through with white and work the last sc with white), 1 hdc in the next 17 sts, hdc-inc in the last st. Sl st to join. Ch 1, DO NOT TURN. <50 sts>
Round 33: Hdc-dec over first 2 sts, 1 hdc in the next 47 sts, hdc-inc in the last st. Sl st to join. Ch 1, DO NOT TURN. <50hdc>
Round 34: Hdc-dec over the first 2 sts, 1 hdc in the next 20 sts (switch to green), work [bo in the next st, sc in next] 4 times (on the 4th bobble, pull through with white and work the last sc with white), 1 hdc in the next 19 sts, hdc-inc in the last st. Sl st to join. Ch 1, DO NOT TURN. <50 sts>
Round 35: Hdc-dec over first 2 sts, 1 hdc in the next 47 sts, hdc-inc in the last st. Sl st to join. Ch 1, DO NOT TURN. <50hdc>
Round 36: Hdc-dec over the first 2 sts, 1 hdc in the next 20 sts (switch to green), work [bo in the next st, sc in next] 3 times (on the 3rd bobble, pull through with white and work the last sc with white), 1 hdc in the next 21 sts, hdc-inc in the last st. Sl st to join. Ch 1, DO NOT TURN. <50 sts>
Round 37: Hdc-dec over first 2 sts, 1 hdc in the next 47 sts, hdc-inc in the last st. Sl st to join. Ch 1, DO NOT TURN. <50hdc>
Round 38: Hdc-dec over the first 2 sts, 1 hdc in the next 20 sts (switch to green), work [bo in the next st, sc in next] 2 times (on the 2nd bobble, pull through with white and work the last sc with white), 1 hdc in the next 23 sts, hdc-inc in the last st. Sl st to join. Ch 1, DO NOT TURN. <50 sts>
Round 39: Hdc-dec over first 2 sts, 1 hdc in the next 47 sts, hdc-inc in the last st. Sl st to join. Ch 1, DO NOT TURN. <50hdc>
Round 40: Hdc-dec over the first 2 sts, 1 hdc in the next 20 sts (switch to green), work [bo in the next st, sc in next] once (pull through the bobble with white and work the sc with white), 1 hdc in the next 25 sts, hdc-inc in the last st. Sl st to join. Ch 1, DO NOT TURN. <50 sts>
Rounds 41 – 49: Hdc-dec over first 2 sts, 1 hdc in the next 47 sts, hdc-inc in the last st. Sl st to join. Ch 1, DO NOT TURN. <50hdc>
Round 50: Sc in each st. Fasten off and weave in the end. <50 sc>
THE REST OF THE INSTRUCTIONS ARE THE SAME FOR BOTH LEFT AND RIGHT HANDED CROCHETERS.
Cuff
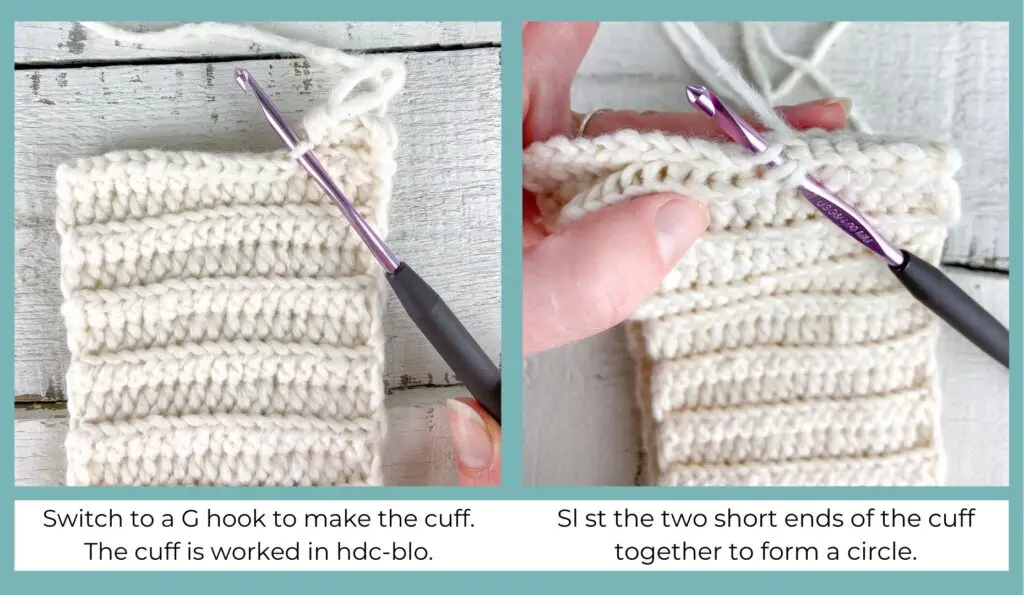
With G hook and white yarn, chain 19.
Row 1: Hdc in 2nd chain from hook and in each ch. Ch 1, turn. <18 hdc>
Rows 2 – 43: Hdc in the blo in each st. Ch 1, turn. <18hdc>
You should now have a long rectangle of ribbing. Fold it in half lengthwise and align the two short ends. To join the ribbing, insert your hook under the front loop of the row nearest you and the back loop of the row farthest from you and slip stitch through both. Continue slip stitching across until the two ends are joined. Do not cut yarn. <18 sl st>
Attaching Cuff
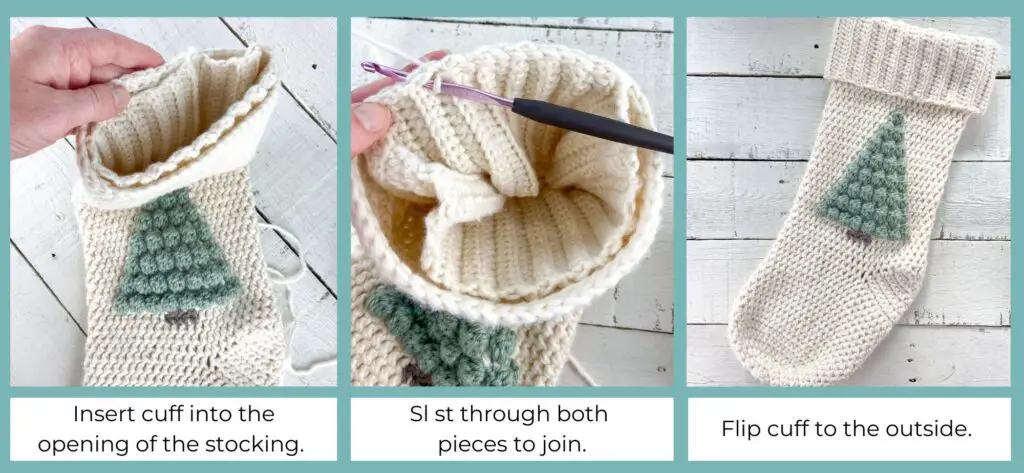
- Insert the circular cuff into the top opening of the crochet stocking, with the seam towards the back. The top of the cuff row ends should be flush with the top of the stocking leg.
- With the working yarn, ch 1 and sl st through the top of the cuff AND through the top row of the stocking leg (Note: you will be working through the ends of the cuff rows so you will need to choose your own spaces to insert your hook. Try to choose a spot at the end of each hdc row).
- Since we have 43 hdc row ends and 50 scs at the top of the stocking leg, you will need to skip 6-7 scs when joining. I tried to evenly space out the skipped scs.
- Continue sl st around to join the cuff to the stocking.
- Fasten off, weave in ends, and flip the cuff to the outside of the stocking.
Hanging Tab
With G hook and white yarn, ch 4.
Row 1: Sc in 2nd ch from hook and in each ch. Ch 1, turn. <3 sc>
Rows 2- 24: Sc in each st. Ch 1, turn. <3 sc>
At the end of Row 24, fasten off, leaving a 12” tail.
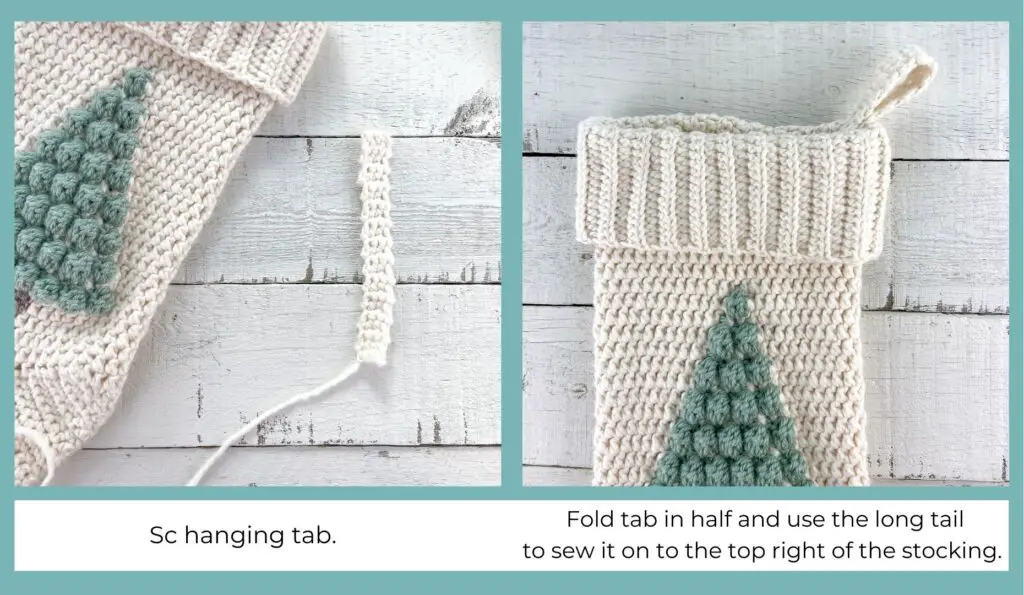
Fold the tab in half lengthwise and use the long tail and a yarn needle to sew the tab to the top of the stocking. Your crochet stocking is finished!
I hope you enjoyed this pattern! Tag me on Instagram @theknottednest to share your project. For more handmade Christmas decor, check out my Christmas Tree and Star Garland on the blog! Or you can find more project ideas and patterns from The Knotted Nest at www.knottednest.com.
Happy making!

COPYRIGHT The Bobble Christmas Tree Stocking pattern and photographs are property of The Knotted Nest and are for personal, non-commercial use only. You may not alter, share, or sell this pattern in any way. However you are welcome to sell the finished product you produce using this pattern. Please credit The Knotted Nest by including a link to the pattern listing if selling the finished piece online.
DISCLOSURE: This pattern may contain affiliate links, which means I may receive a small commission, at no extra cost to you, when you make a purchase. Please read my affiliate disclosure for more details.

One Comment
Suzy
Hi Nikki! I just love the Christmas tree stocking. I’m making it now and I am wondering about the green yarn. Did you cut it after each round or somehow carry it over? I don’t know how to do that so any tips would be appreciated! Beautiful work!