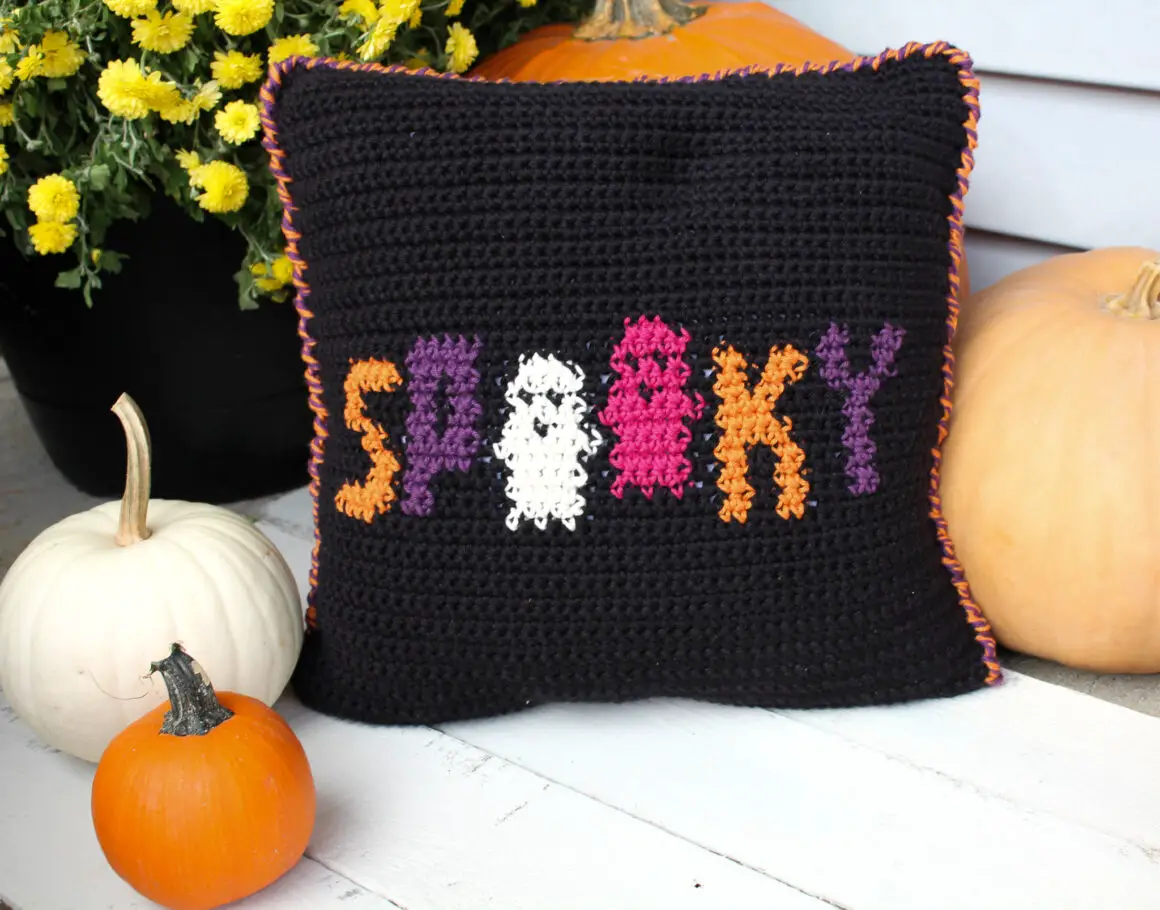
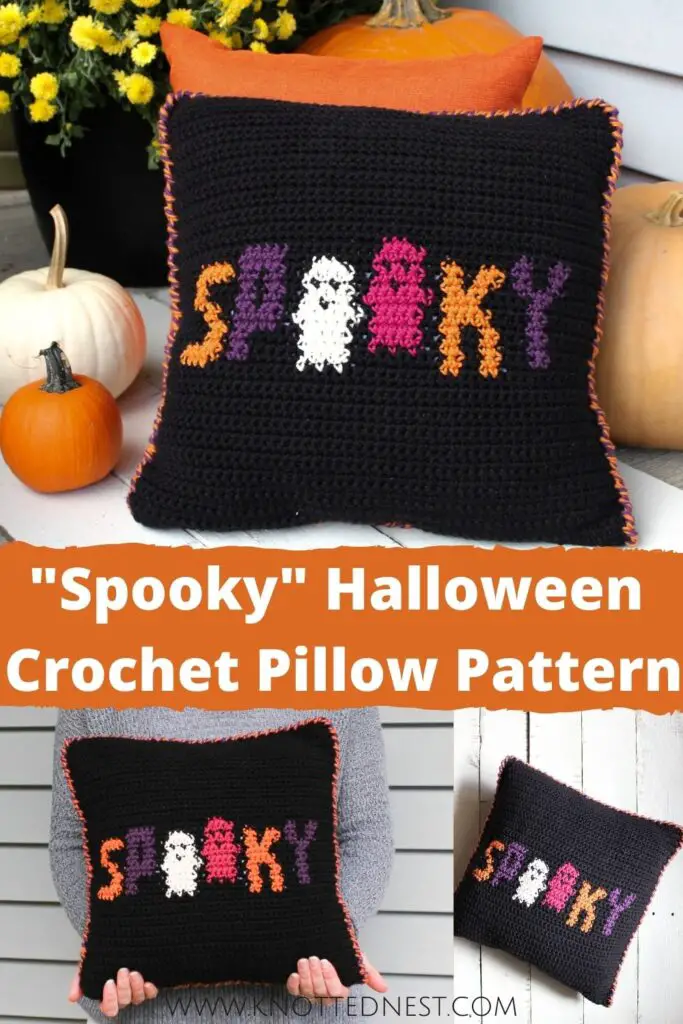
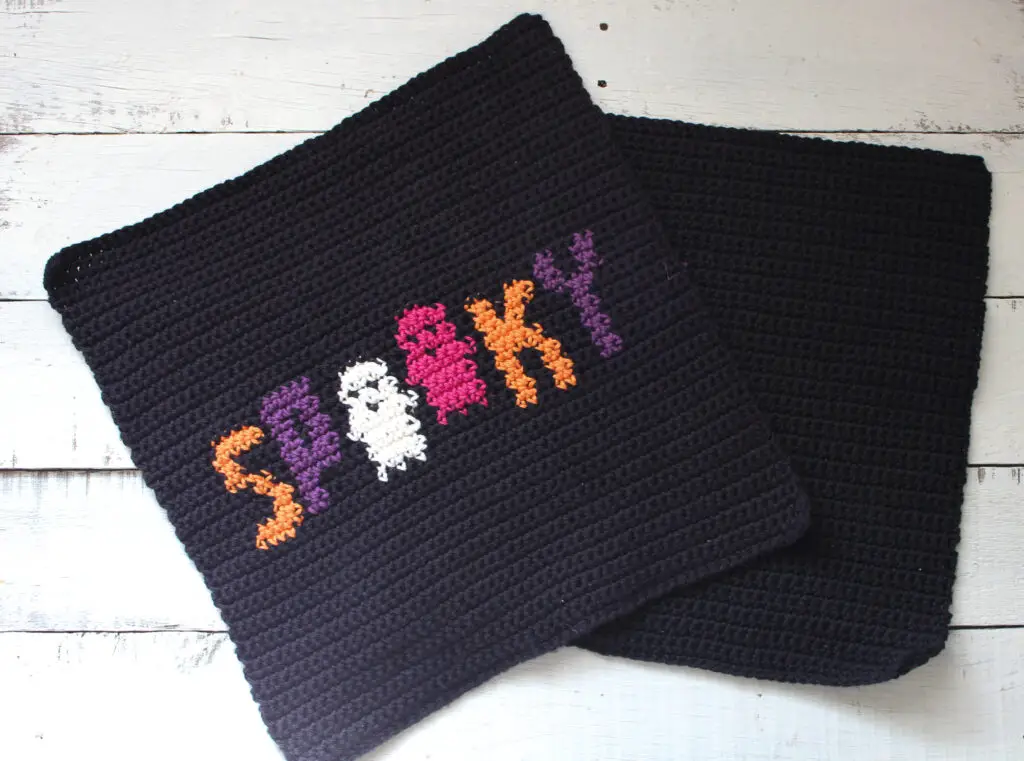
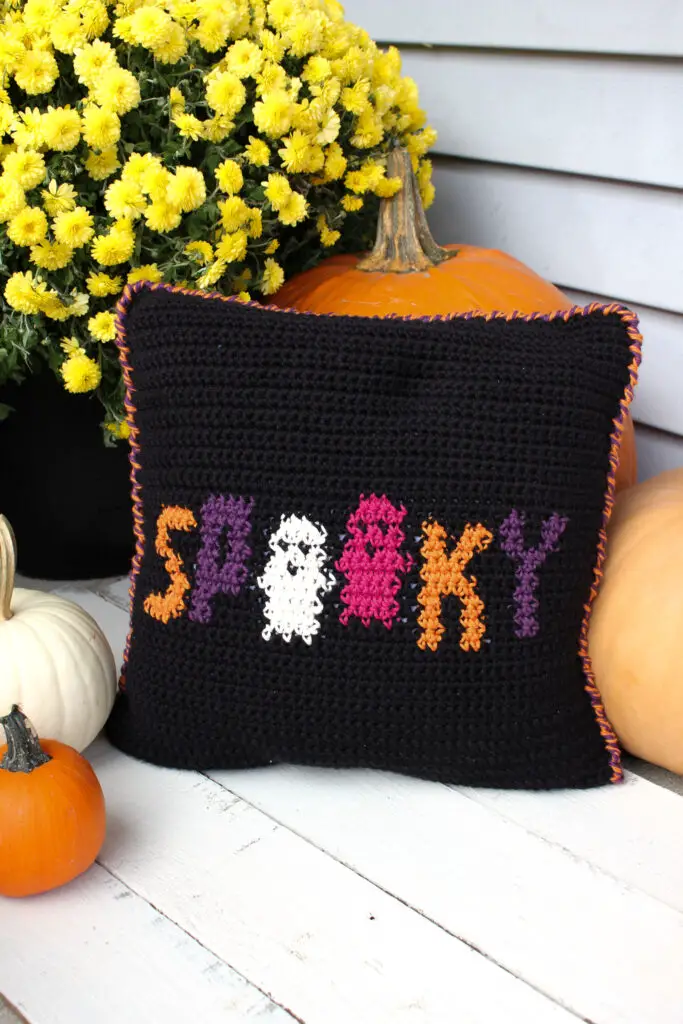
Spooky Halloween Crochet Pillow
The “Spooky” Halloween Crochet Pillow will be the best not-so-spooky Halloween decor you make this year!

Pin this post!
Scroll down to get the free pattern or read on to learn more about the design and yarn I used.
The Design
This design went through many transformations before coming to rest in its final form – a sweet little 14″ x 14″ pillow. At first, I thought the “Spooky”design would be a great wall hanging…then I had the bright idea to make it into a bag for trick-or-treating, but I didn’t have enough yarn to make one for all four of my T-or-T’ers. That won’t fly. SO, we finally settled on a “Spooky” Halloween crochet pillow that the whole family can enjoy!
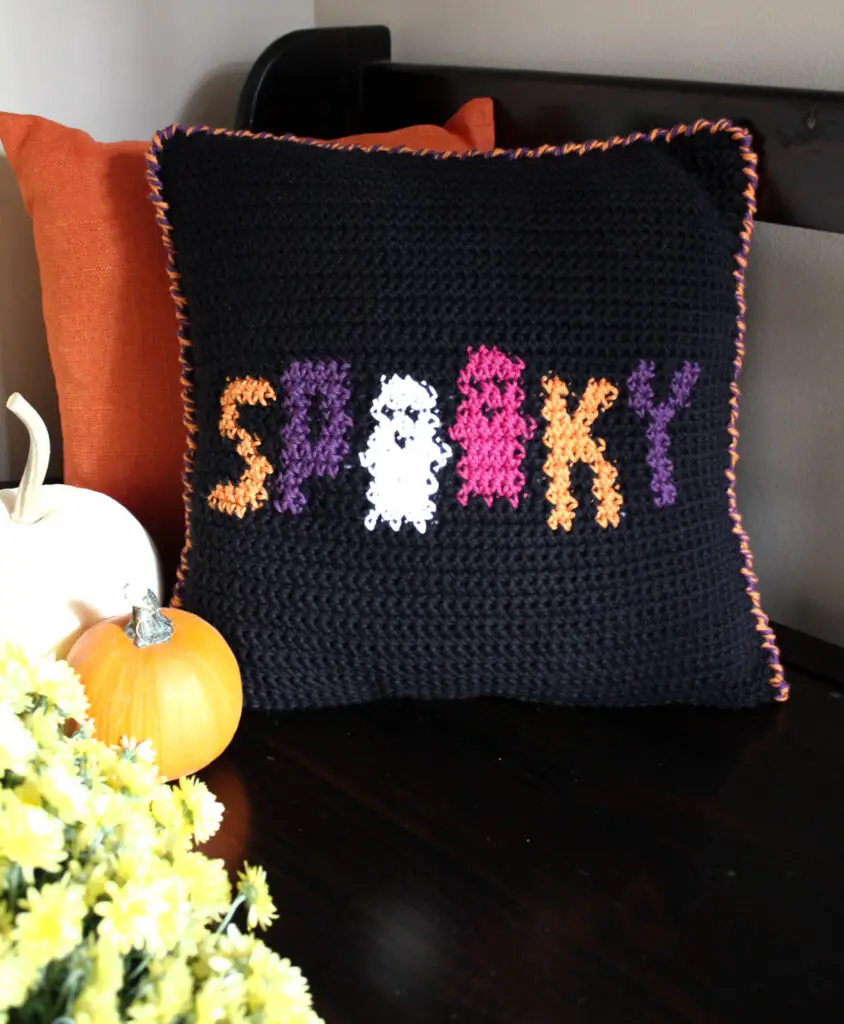
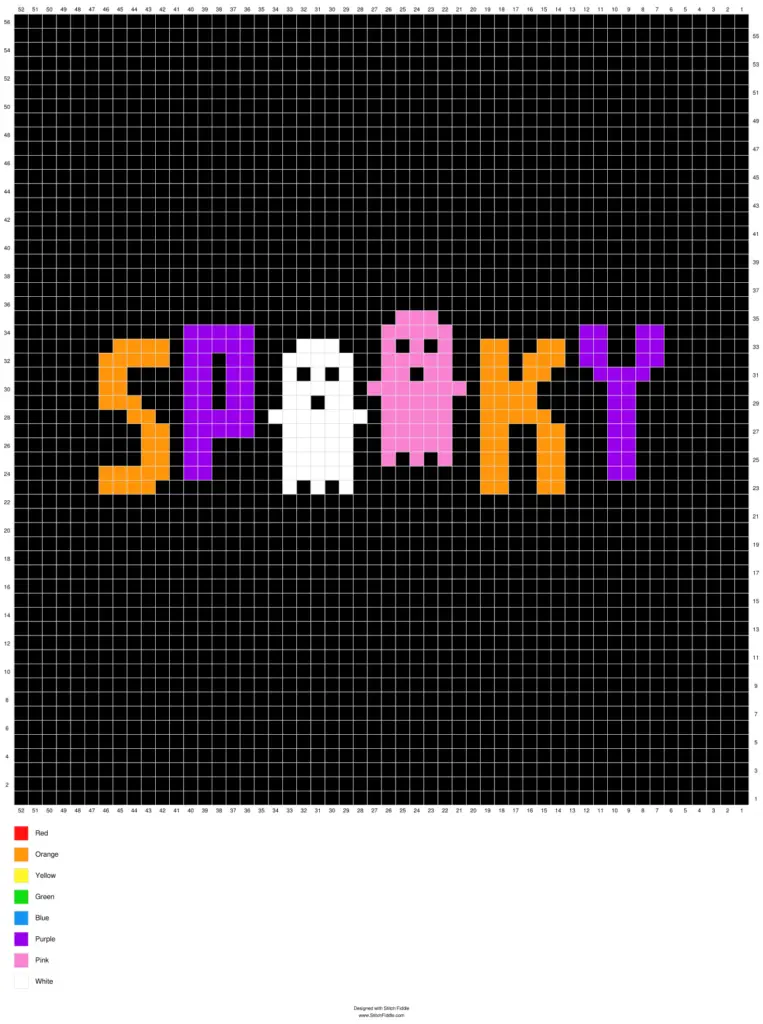
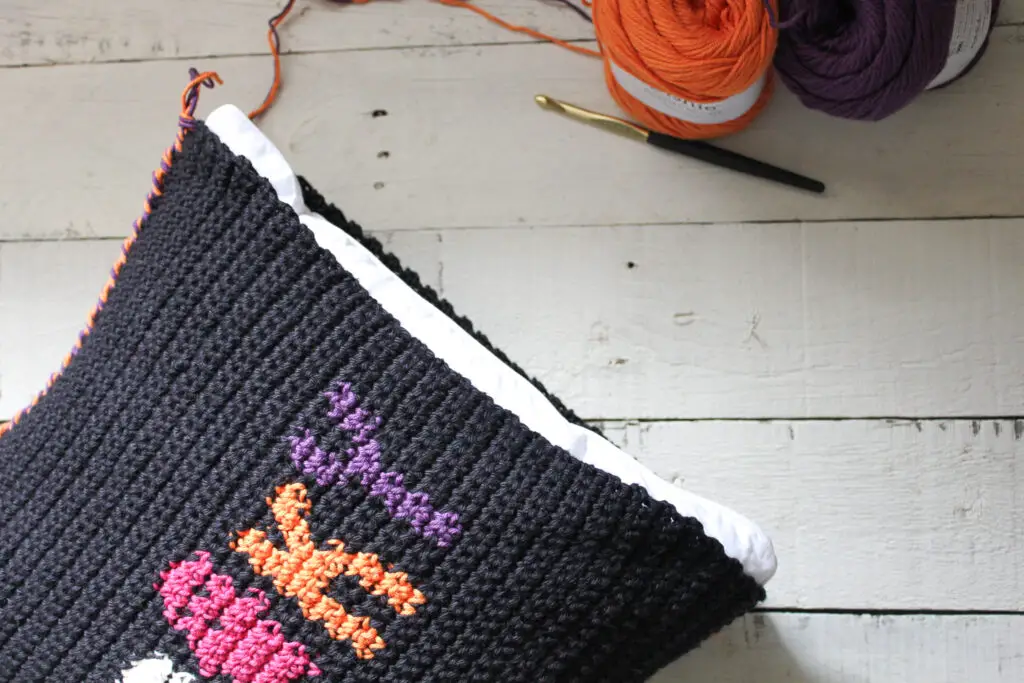
This pillow is made entirely of single crochets and is worked in two flat panels that are stitched together. If you’re new to colorwork, this pillow is a great place to start. A color change chart is included in the pattern, as well as detailed written instructions for how and when to change colors.
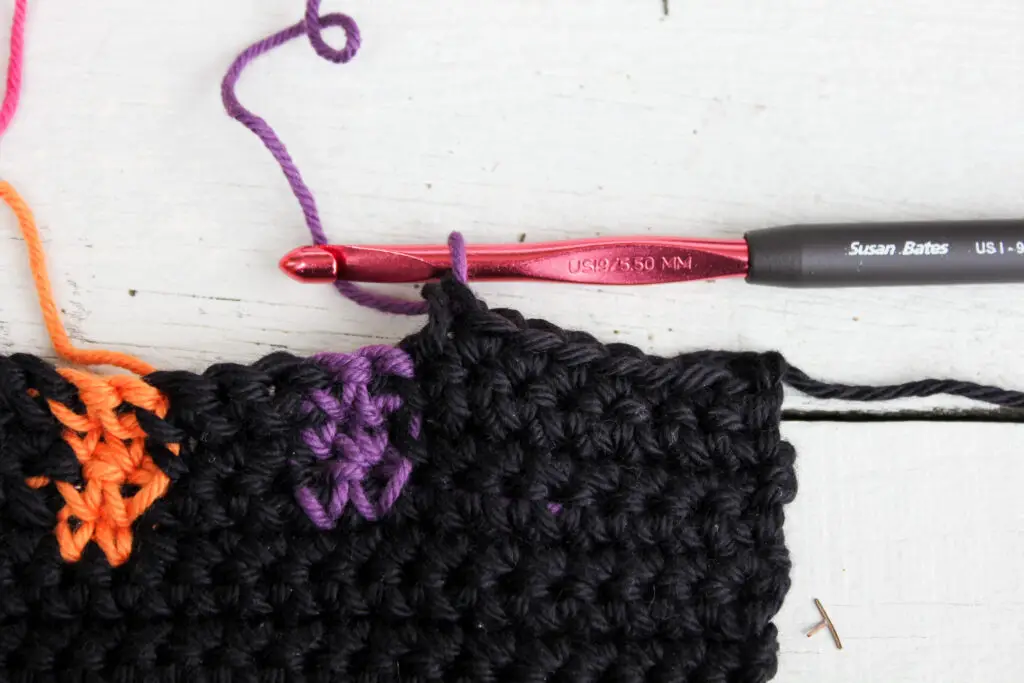
The finishing touch for this Halloween crochet pillow is a multi-colored boarder done with reverse single crochet (a.k.a. the crab stitch). You could absolutely use a standard single crochet for the boarder, but the RSC is a super easy way to add an interesting edging – it’s just a single crochet worked in the other direction!
The Yarn
When I sat down to swatch for this pillow design, I happened to have a healthy inventory of We Crochet’s Dishie cotton yarn on hand. Dishie is a cotton yarn, which I love to use for pillows, but any worsted weight yarn will work for this design. The advantage of Dishie is the crazy amount of colors it comes in (check them all out here!) so you can customize your pillow how ever you want!

For this Halloween crochet pillow, you will need five different colors of yarn – a main color and 4 accent colors. I went with fairly traditional Halloween colors, but the sky’s the limit with color options here! To make things easy (and avoid weaving in a million ends!) I suggest using bobbins for the accent colors.
Grab an ad-free printable PDF on Etsy or Ravelry!
I think it is so fun to add handmade items into your holiday decor and I hope you do too!
“Spooky” Halloween Crochet Pillow Pattern
SKILL LEVEL
Easy – Level 2. Requires colorwork and simple stitches.
MATERIALS
- Yarn: About 420 yards of worsted weight yarn (size 4) for the main color. About 30 -40 yards worsted weight yarn for each accent color. I used We Crochet’s Dishie yarn in:
- Black (Main Color [MC] – 3 balls)
- Tangerine (Color A – Orange)
- Swan (Color B – White)
- Mulberry (Color C – Purple)
- Begonia (Color D – Pink)
- Size I (5.5mm) hook for the front and back panel. (Optional: Size J (6.0mm) hook for the boarder.)
- 14” x 14” Pillow insert or other stuffing material.
- Yarn needle, scissors, and measuring tape.
- Popsicle sticks or similar to use for bobbins.
DIMENSIONS
Fits a 14” x 14” pillow insert.
GAUGE
16 sc x 17 rows in 4” square using single crochet.
NOTES
- This Halloween crochet pillow is made of two flat panels worked in single crochet stitches. The two panels are then stitched together around the pillow insert using the reverse single crochet (crab) stitch.
- Special stitch – Reverse Single Crochet (rsc) aka “crab stitch”: This stitch is made exactly the same as a regular sc, but worked in the reverse direction. So (for right handed crocheters), insert hook into the stitch to your RIGHT (would normally be the stitch to your left), yarn over and pull up a (tall) loop, yarn over and pull through both loops. See a more detailed tutorial of this stitch here.
- Keep stitches tight to avoid gaps in the finished color work.
- Ensure all ends are kept to the wrong side of the work as you go. Tip: if your starting tail is on the right, you are looking at the “wrong side” of your work.
- The Ch 1 turning chain does NOT count as a stitch.
- Pattern written in US terms.
- Abbreviations
- ch = chain
- RS = right side
- rsc = reverse single crochet
- sc =single crochet
- sl st = slip stitch
- st =stitch
- WS = wrong side
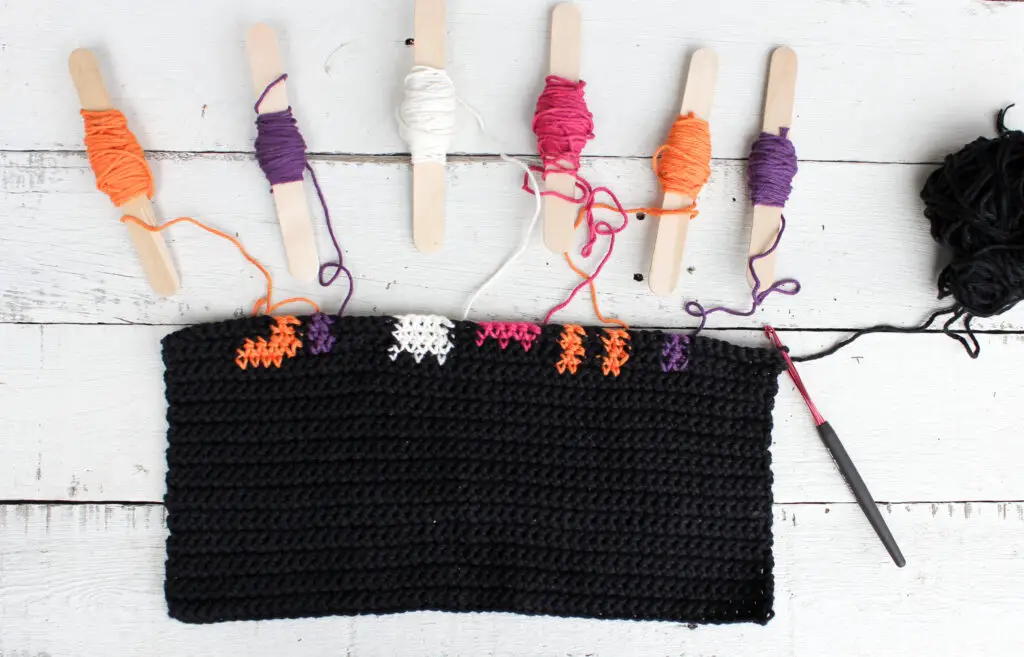
Preparing Yarn
- I recommend using a separate ball or bobbin of yarn for each of the colors of the SPOOKY letters/ghosts.
- A bobbin can be anything you can wind yarn around. I used large popsicle craft sticks but spare crochet hooks, clothes pins, or toilet paper rolls will also work.
- You will need approximately 8-10 yards of yarn for each bobbin. I did 2 orange bobbins, 2 purple, 1 pink, and 1 white.
- Wind each length of yarn around a separate bobbin and place in order near your work. Tip: keep bobbins on a tray so the whole thing can be easily rotated. This will help avoid strands getting tangled when you turn your work.
Notes on Colorwork
- Written instructions as well as a chart are provided for the colorwork portion of this pattern.
- For the this pattern, we will not “carry” unused yarn. You will pick up and use the accent colors only when working on the SPOOKY letters and drop the main color along the back until you are ready to use it again. Since you will not see the wrong side of the panel, we will just let the main color criss-cross behind the letters when not being used.
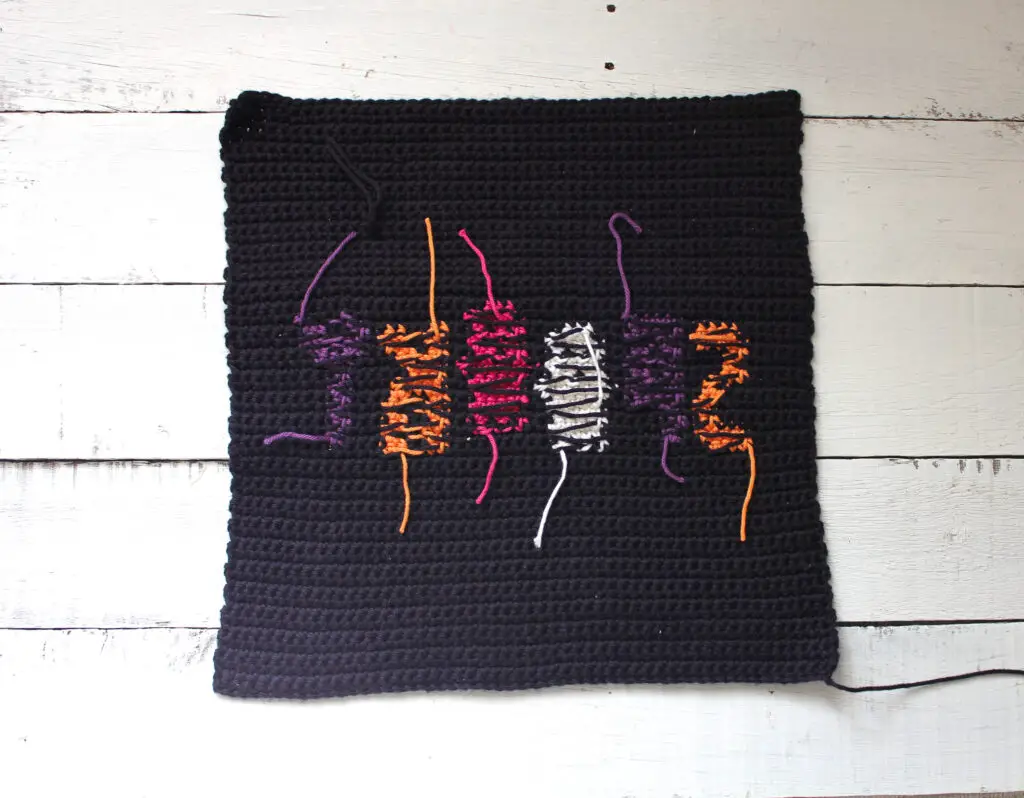
- Once you get to the main color again, you will drop the accent color (you don’t carry it to the end of the row). Since the rows are worked back and forth, the accent color will be right there when you need it again on the next row.
- How to Change Colors (for more help with colorwork, check out this very detailed tutorial by Jo to the World Creations):
- 1. On the last sc of current color, stop with two loops still on hook.
- 2. Put the new color on the hook and pull through with new color.
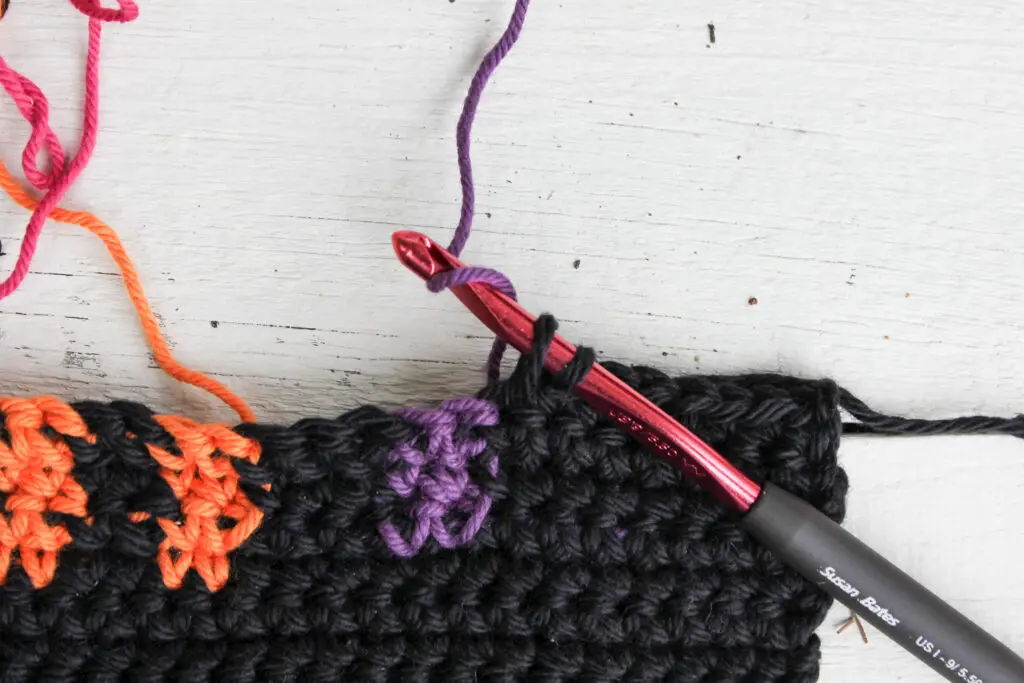
- 3. Leave the old color hanging (do not cut). Note: Be sure the old color hangs to the wrong side of your work.
- 4. Give the old color a tug to keep the stitch tight and proceed with new color.
- When you complete the color switch, it counts as a stitch with the old color, you are setting up the next stitch with the new color.
PATTERN
Front Panel:
Ch 53 with MC and size I (5.5mm) hook.
Row 1: Sc in 2nd ch from hook and in each ch. <52 sc>
Row 2: Ch 1 , turn. Sc in each st. < 52 sc >
Measure the length after Row 2. It should measure 13.5”, give or take 0.5”. If this measurement is off, try adjusting your tension or hook size.
Rows 3 – 22 Repeat Row 2.
***For Rows 23 – 35, you can use the graph below for the colorwork or follow along the written pattern for more detailed instructions.***
Tip: Remember to always drop your old color to the WS of your work when changing colors! The starting chain tail will be on your right when you are looking at the WS.
Row 23 (WS) : Ch 1, turn. With MC sc 13 (**Add one of the Orange (color A) bobbins), with Orange (A) sc 2, with MC sc 2, with Orange (A) sc 2,
With MC sc 9 (**Add White (color B) bobbin), with White (B) sc 1, with MC sc 1, with White (B) sc 1, with MC sc 1, with White (B) sc 1,
With MC sc 9 (**Add the other Orange (color A) bobbin), with Orange (A) sc 4, with MC sc 6.
Row 24: Ch 1, turn. With MC sc 6, with Orange (A) sc 5, with MC sc 1(**Add one of the Purple (color C) bobbins), with Purple (C) sc 2, with MC sc 5, with White (B) sc 5,
With MC sc 9, with Orange (A) sc 2, with MC sc 2, with Orange (A) sc 2,
With MC sc 3, (**Add the other Purple (color C) bobbin), with Purple (C) sc 2, with MC sc 8.
Row 25: Ch 1, turn. With MC sc 8, with Purple (C) sc 2, with MC sc 3, with Orange (A) sc 2, with MC sc 2, with Orange (A) sc 2,
With MC sc 2 (**Add Pink (Color D) bobbin), with Pink (D) sc 1, with MC sc 1, with Pink (D) sc 1, with MC sc 1, with Pink (D) sc 1,
With MC sc 2, with White (B) sc 5, with MC sc 5, with Purple (C) sc 2, with MC sc 1, with Orange (A) sc 2, with MC sc 9.
Row 26: Ch 1, turn. With MC sc 9, with Orange (A) sc 2, with MC sc 1, with Purple (C) sc 2,
With MC sc 5, with White (B) sc 5, with MC sc 2, with Pink (D) sc 5,
With MC sc 2, with Orange (A) sc 2, with MC sc 2, with Orange (A) sc 2, with MC sc 3, with Purple (C) sc 2, with MC sc 8.
Row 27: Ch 1, turn. With MC sc 8, with Purple (C) sc 2, with MC sc 3, with Orange (A) sc 2, with MC sc 2, with Orange (A) sc 2,
With MC sc 2, with Pink (D) sc 5, with MC sc 2, with White (B) sc 5,
With MC sc 2, with Purple (C) sc 5, with MC sc 1, with Orange (A) sc 2, with MC sc 9.
Row 28: Ch 1, turn. With MC sc 8, with Orange (A) sc 2, with MC sc 2, with Purple (C) sc 5, with MC sc 1,
With MC sc 1, with White (B) sc 7, with MC sc 1, with Pink (D) sc 5,
With MC sc 2, with Orange (A) sc 5, with MC sc 4, with Purple (C) sc 2, with MC sc 8.
Row 29: Ch 1, turn. With MC sc 8, with Purple (C) sc 2, with MC sc 5, with Orange (A) sc 4,
With MC sc 2, with Pink (D) sc 5, with MC sc 2, with White (B) sc 2, with MC sc 1, with White (B) sc 2,
With MC sc 2, with Purple (C) sc 2, with MC sc 1, with Purple (C) sc 2, with MC sc 3, with Orange (A) sc 3, with MC sc 6.
Row 30: Ch 1, turn. With MC sc 6, with Orange (A) sc 2, with MC sc 4, with Purple (C) sc 2, with MC sc 1, with Purple (C) sc 2,
With MC sc 2, with White (B) sc 5, with MC sc 1, with Pink (D) sc 7,
With MC sc 1, with Orange (A) sc 4, with MC sc 5, with Purple (C) sc 2, with MC sc 8.
Row 31: Ch 1, turn. With MC sc 7, with Purple (C) sc 4, with MC sc 3, with Orange (A) sc 2, with MC sc 1, with Orange (A) sc 2,
With MC sc 2, with Pink (D) sc 2, with MC sc 1, with Pink (D) sc 2, with MC sc 2, with White (B) sc 1, with MC sc 1, with White (B) sc 1, with MC sc 1, with White (B) sc 1,
With MC sc 2, with Purple (C) sc 2, with MC sc 1, with Purple (C) sc 2, with MC sc 4, with Orange (A) sc 2, with MC sc 6.
Row 32: Ch 1, turn. With MC sc 6, with Orange (A) sc 5, with MC sc 1, with Purple (C) sc 2, with MC sc 1, with Purple (C) sc 2,
With MC sc 2, with White (B) sc 5, with MC sc 2, with Pink (D) sc 5,
With MC sc 2, with Orange (A) sc 2, with MC sc 1, with Orange (A) sc 3, with MC sc 1, with Purple (C) sc 2, with MC sc 2, with Purple (C) sc 2, with MC sc 6.
Row 33: Ch 1, turn. With MC sc 6, with Purple (C) sc 2, with MC sc 2, with Purple (C) sc 2, with MC sc 1, with Orange (A) sc 2, with MC sc 2, with Orange (A) sc 2,
With MC sc 2, with Pink (D) sc 1, with MC sc 1, with Pink (D) sc 1, with MC sc 1, with Pink (D) sc 1, with MC sc 3, with White (B) sc 3,
With MC sc 3, with Purple (C) sc 5, with MC sc 1, with Orange (A) sc 4, with MC sc 7.
Row 34: Ch 1, turn. With MC sc 12, with Purple (C) sc 5, with MC sc 9, with Pink (D) sc 5,
With MC sc 9, with Purple (C) sc 2, with MC sc 2, with Purple (C) sc 2, with MC sc 6.
Row 35: Ch 1, turn. With MC sc 22, with Pink (D) sc 3, with MC sc 27.
Rows 36 – 56: With MC, repeat Row 2. Fasten off at the end of Row 56 and weave in end.
Back Panel:
Ch 53 using MC and size I hook.
Row 1: Sc in 2nd ch from hook and in each ch. <52 sc>
Row 2: Ch 1 , turn. Sc in each st. < 52 sc >
Tip: Measure the length after Row 2. It should measure 13.5”, give or take 0.5”. If this measurement is off, try adjusting your tension or hook size.
Rows 3 – 56 Repeat Row 2. Fasten off at the end of Row 56 and weave in end.
Assembly:
- You should now have two panels that measure approx. 13.5” x 13.5”.
- Align the two panels with the RS facing out.
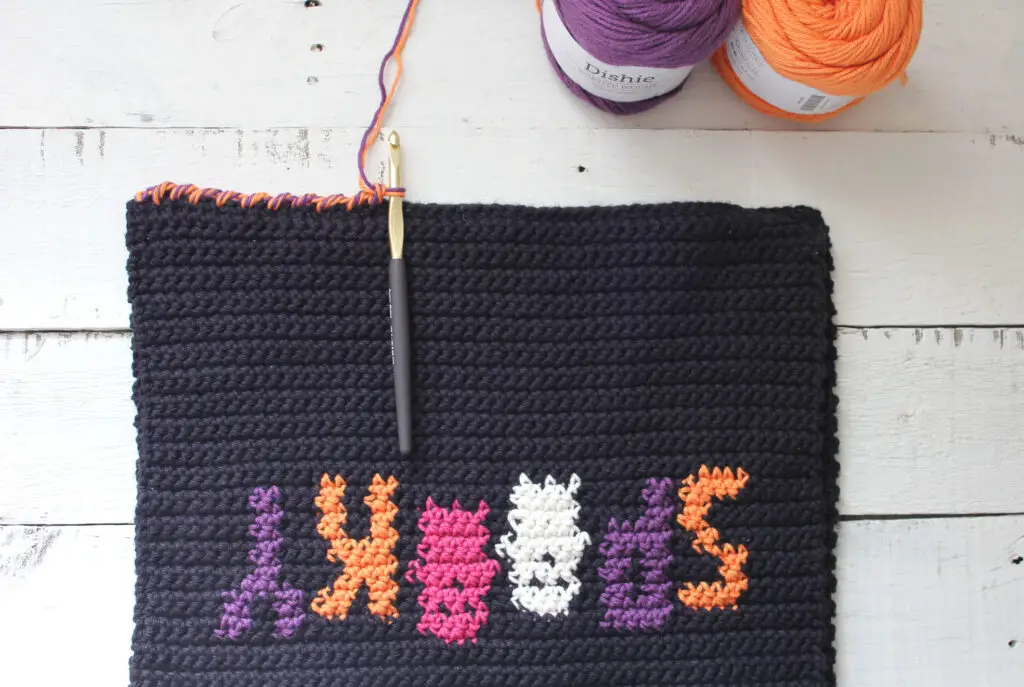
- Choose two accent colors (I used Orange and Purple) and a size J hook (this is optional, but a bigger hook does make working the boarder a little easier).
- Holding the two strands together, attach the boarder yarn at one of the bottom corners of the panels with a sl st.
- Begin rsc evenly around to join the two panels (pull your loop up tall and make stitches loose to keep edges from puckering). For me this worked out to be placing a rsc every other stitch on the top and bottom, and every other row on the sides. Stop after you have stitched together three sides and stuff with pillow insert or other stuffing.
- Continue rsc across the last side until you reach where you started. Sl st to the base of your first rsc to join, fasten off, weave in ends and your Spooky Halloween crochet pillow is done!
- Alternative border: You could use regular sc to join the two panels, working two scs at each corner and joining row with a sl st.
I hope you enjoyed this Halloween crochet pillow pattern! Tag me on Instagram @theknottednest and use the hashtag #spookypillow to share your project! Find more project ideas on the Patterns page here on the blog or check out my Grain Sack Pillow pattern if you’re looking for a year-round pillow design!
Happy making!

The Color Fade Beanie