
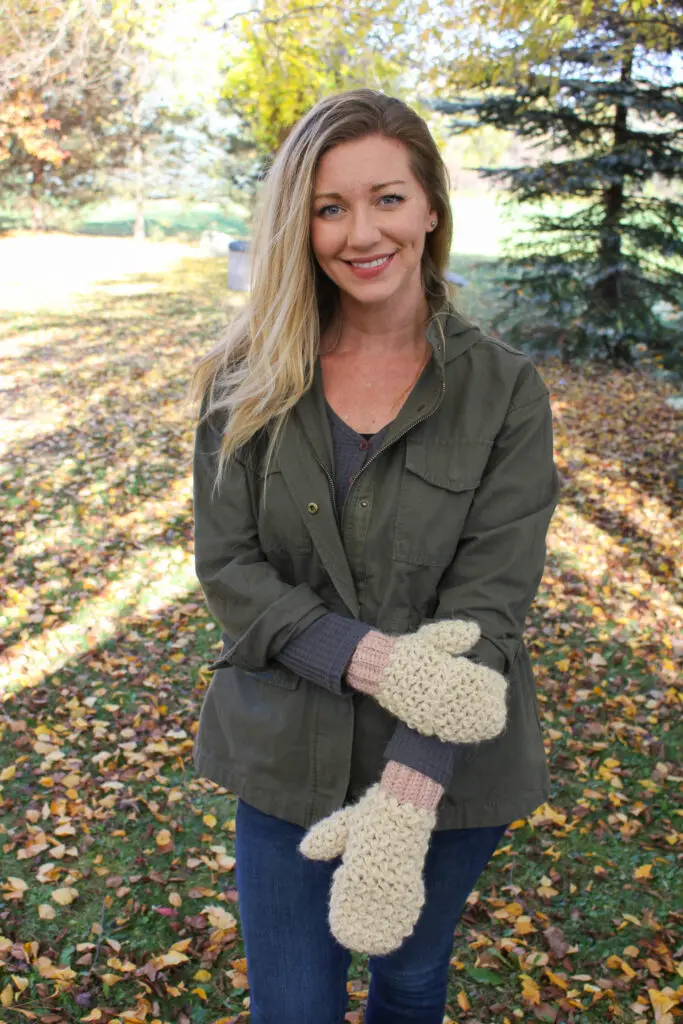
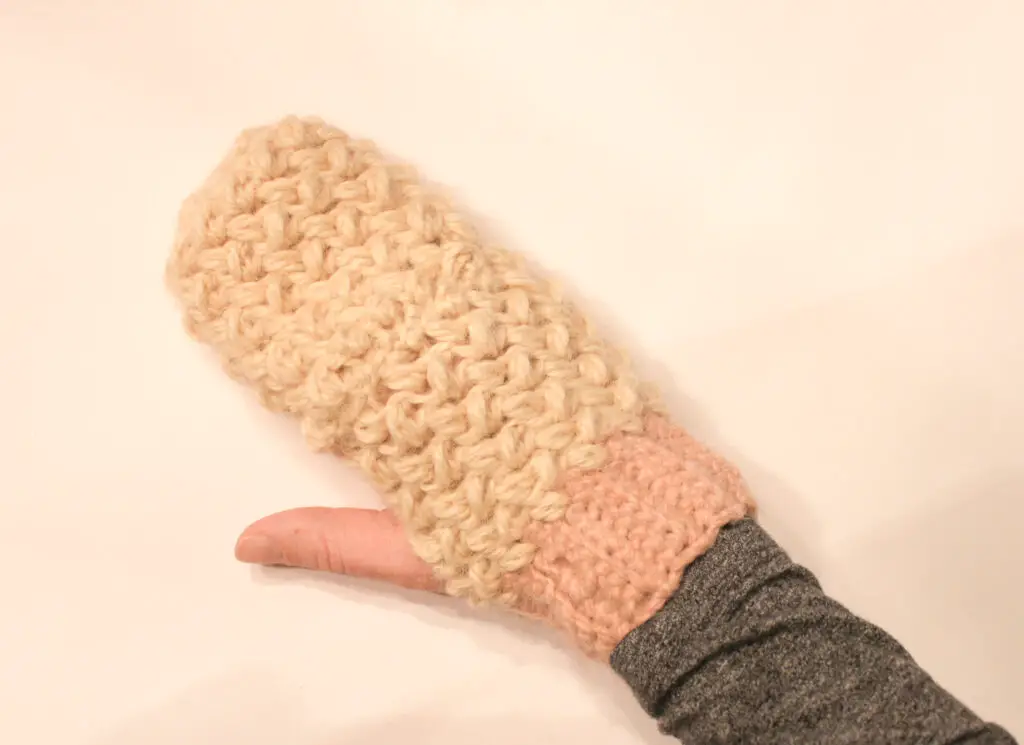
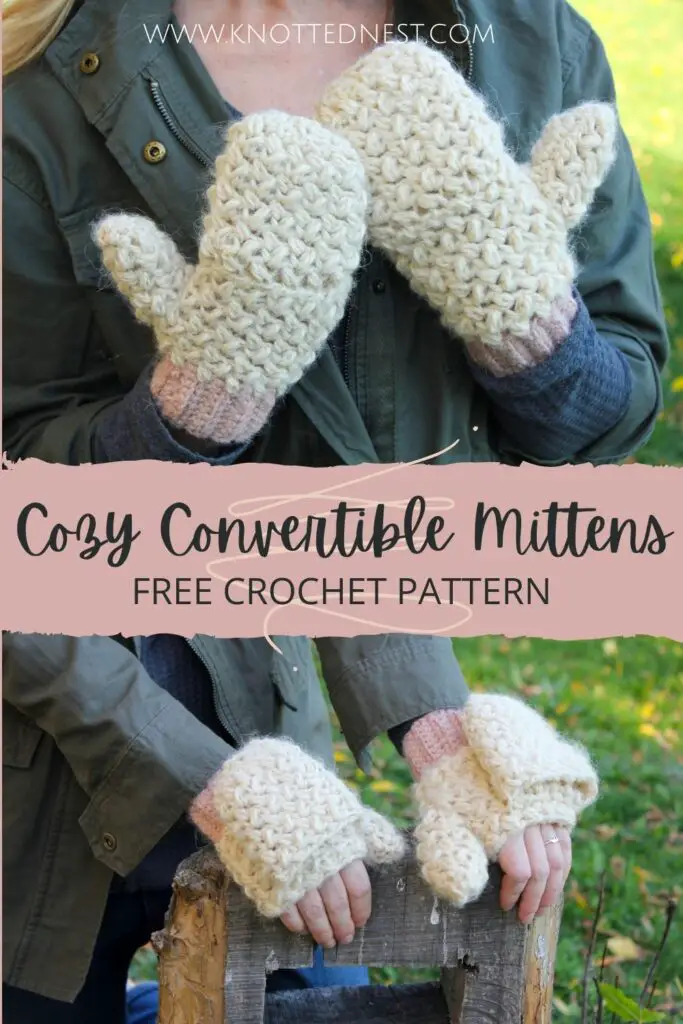
Cozy Convertible Mittens
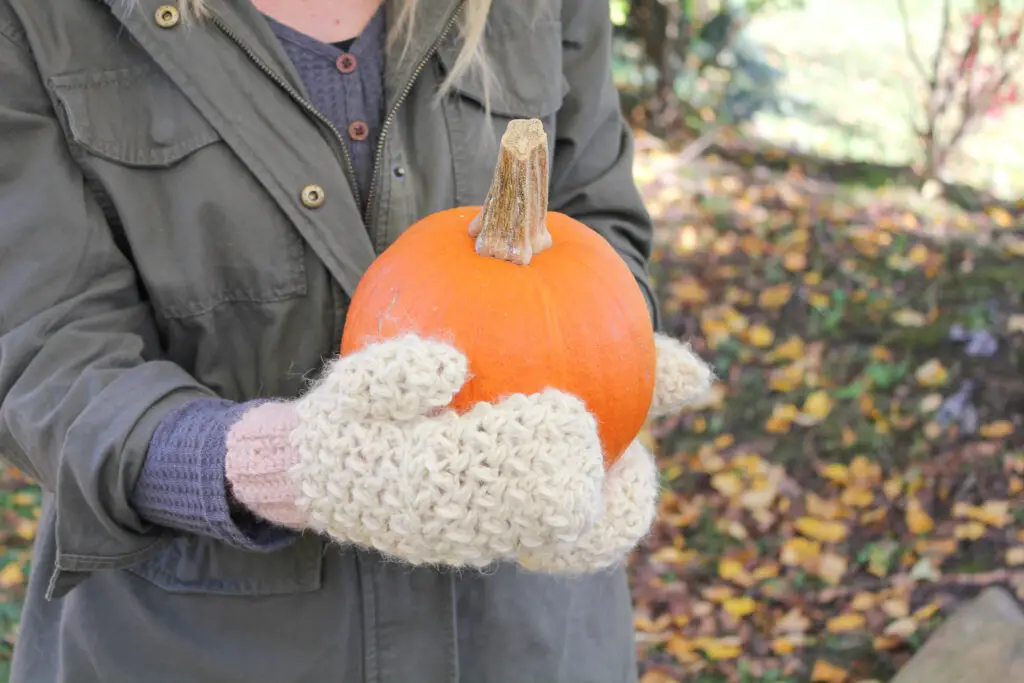
Think you can’t crochet mittens? Think again! These cozy convertible mittens are as easy as 1-2-3 and will be keeping you snuggly warm in no time! The best part? They are part of a set! Check out the matching Cozy Bean Hat here or if your more the ear warmer type, I’ve got you covered here!
Scroll down to get the free pattern or read on to hear more about the construction and yarn recs for these crochet mittens!
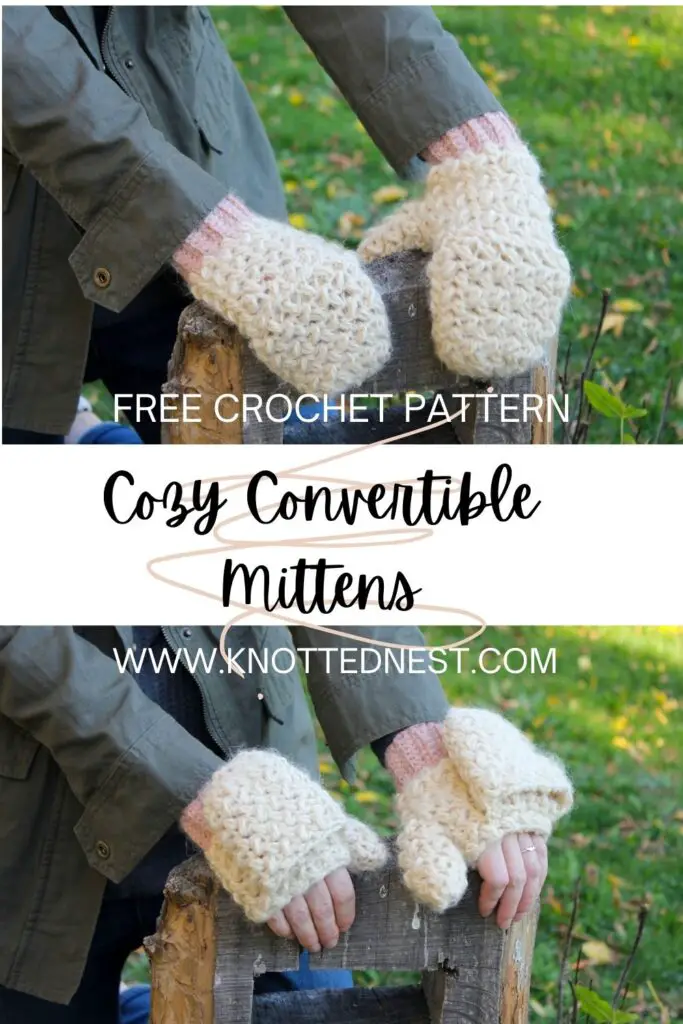
Pin the Cozy Crochet Mittens pattern for later!
The Inspiration
I’ve been a convertible mitten lover for years. When we moved to upstate NY, it became clear that thick warm mittens are a must in winter. But as a mama, I found myself taking off my gloves 7,048,395 times to dig for snacks or buckle car seats, etc., etc. Super annoying. I finally got myself a pair of convertible mittens and I haven’t looked back!
So, it seems obvious given my obsession with crochet that I would try to make myself some convertible mittens (glittens? is that a word? gloves + mittens? no? ok…). Honestly, the thought was a little intimidating. Getting the sizing right, making the two mittens match….but I REALLY wanted some crochet mittens! My solution was basically a set of fingerless gloves with a finger cover “lid” and a thumb, all worked in three flat panels. It worked out perfectly AND quickly (I finished the set in under two hours!).
The Construction
First, I find working in the round difficult in small pieces (amigurumi are scarce around here), so I knew I wanted to work the mittens in flat pieces. I also knew I wanted to keep the increasing/ decreasing to a minimum. I think I was able to accomplish both and still create some pretty sweet crochet mittens!
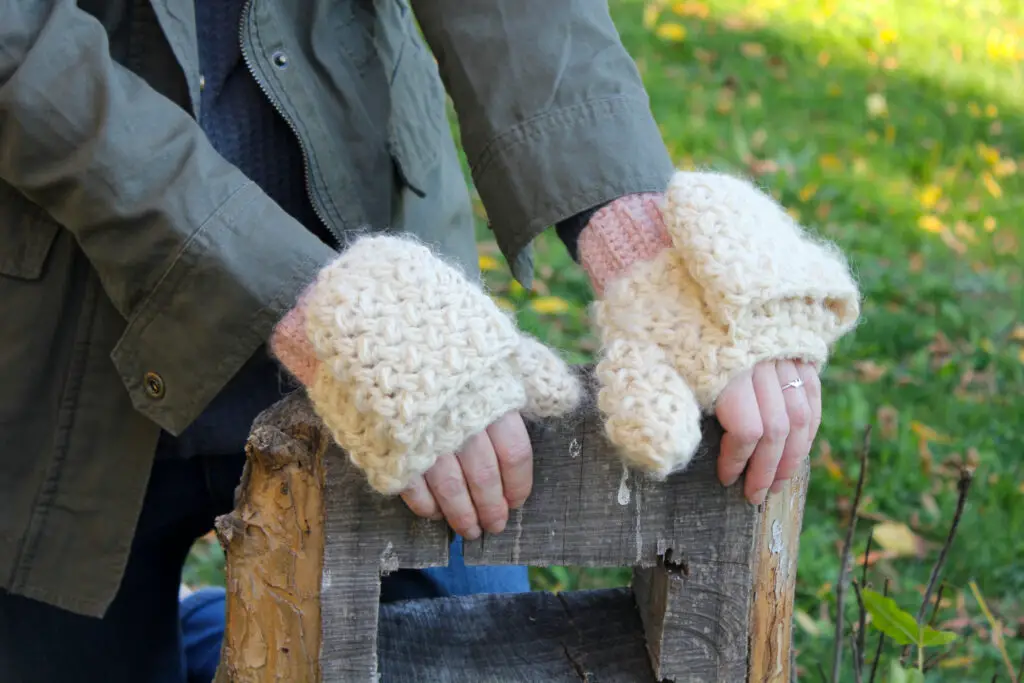
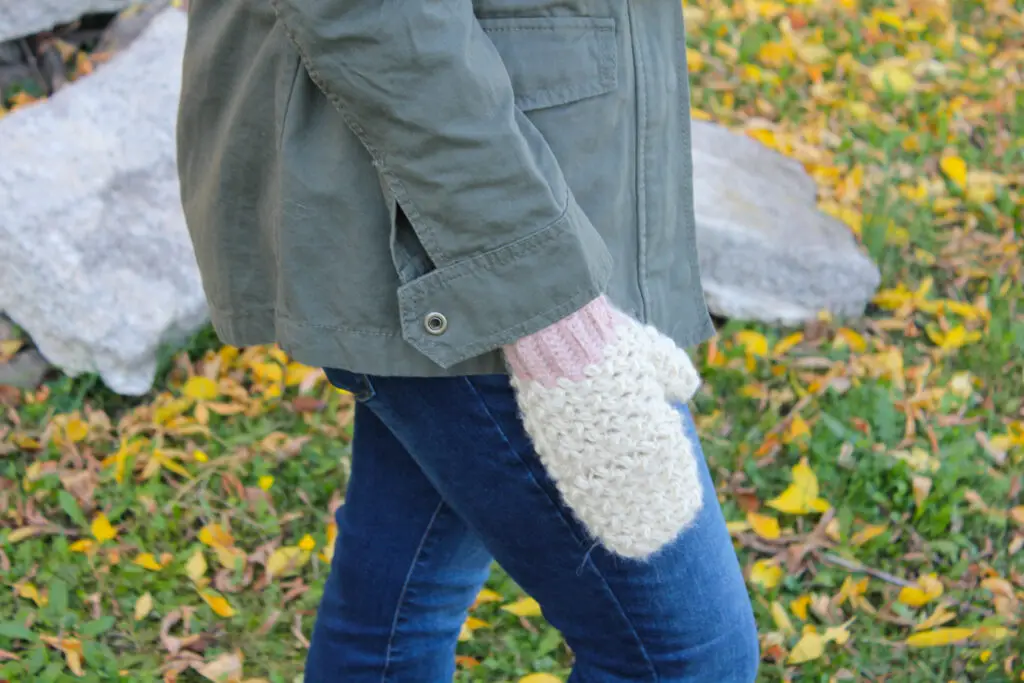
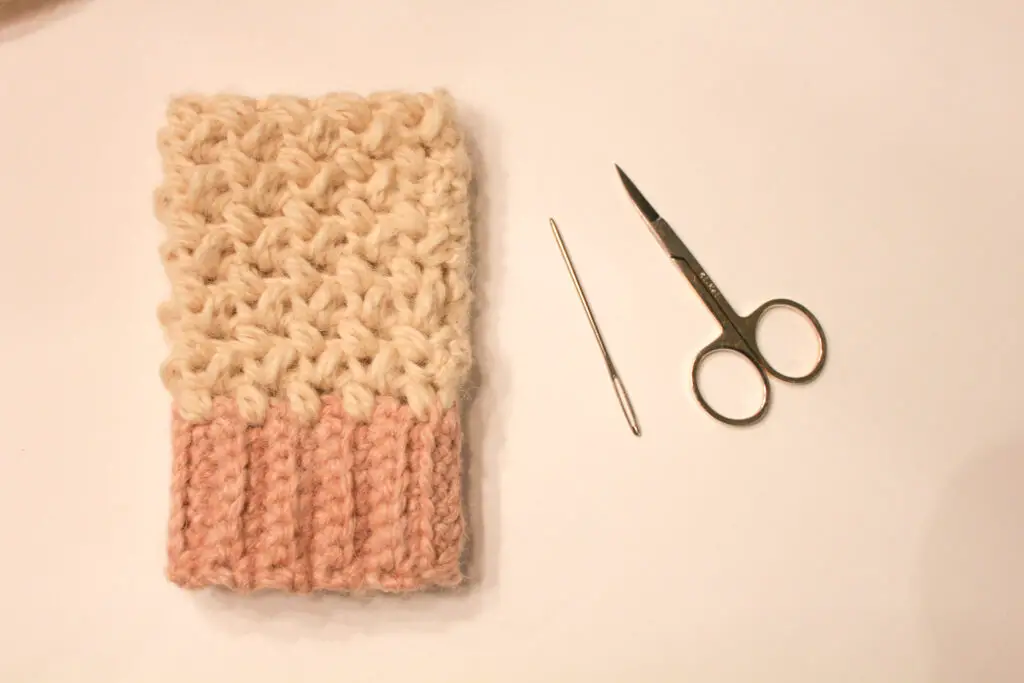
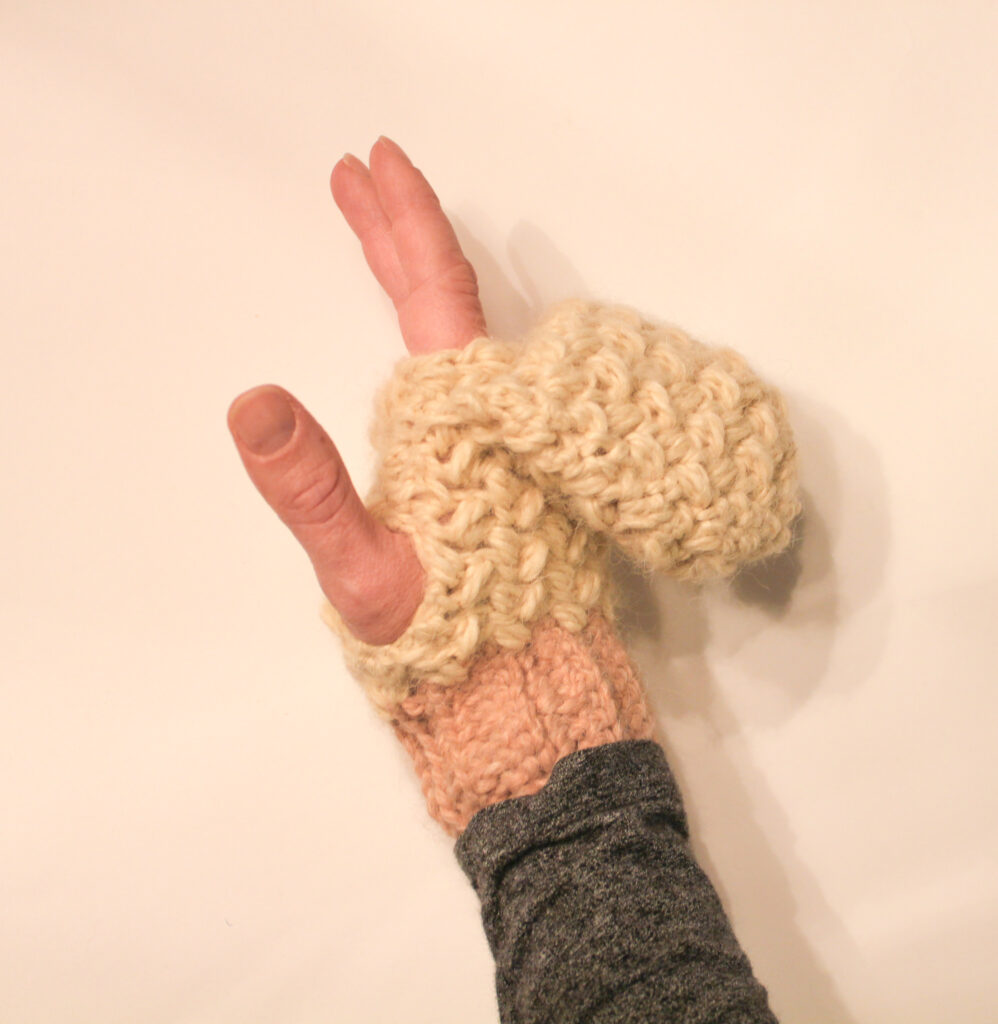
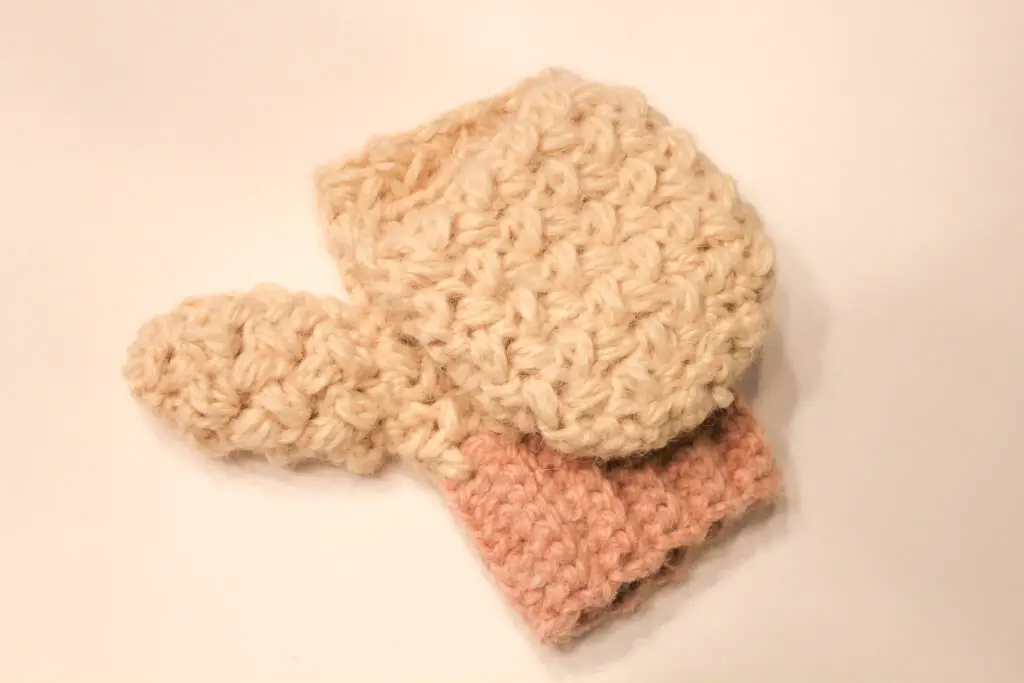
This pattern is worked in three flat pieces – the cuff/body, the finger cover, and the thumb – with only two rows of single crochet decreases in the whole mitten. AND the two sides are worked exactly the same with the exception of where the finger cover gets attached, so no need to worry about different patterns for right hand versus left.
The Yarn
I used Yarn Bee’s Alpaca Twist for my convertible crochet mittens. It is rated as worsted weight (size 4), but it definitely falls more to the bulky side of worsted. If you can get your hands on some Alpaca Twist, I wholeheartedly recommend it for these mittens! It’s super soft, super warm, and has just a bit of a “fuzz halo” that really ups the cozy factor.
If you’re looking to substitute yarn, I would pick something like WeCrochet’s City Tweed Aran or WC’s Snuggle Puff Cotton (a plant based option), to get that same bulky, cozy feel for these crochet mittens.
Don’t forget to pair your new mittens with the matching Cozy Bean Crochet Hat to stay cozy all winter long!
Hope you love them!
Grab an ad-free, printable PDF of this pattern on Etsy or Ravelry!
Or snag the pattern bundle on Etsy to get both the hat and mittens patterns at a discount!
Cozy Convertible Crochet Mittens Pattern
SKILL LEVEL
Easy – Level 2. Requires some decreasing and sewing.
MATERIALS
- Yarn: About 160 yards (80yds/mitten) of worsted weight yarn (size 4). I used Yarn Bee Alpaca Twist (shown in Ecru (main color) and Blush (contrasting color)). This yarn is on the bulkier side for worsted weight, so keep that in mind if you substitute yarn. Some suggestions for substitutions are We Crochet’s City Tweed Aran yarn or WC’s Snuggle Puff Cotton.
- Size I (5.5mm) hook for the cuff. Size J (6.00mm) hook for the rest of the mitten.
- Yarn (tapestry) needle, scissors, and measuring tape.
- (Optional) Stitch markers.
DIMENSIONS
One size – adult (women). Finished mitten measures approximately 9.5“ tall.
GAUGE
16 sts x 17 rows in 4” square using the mini-bean stitch.
Cuff should measure 6.25″ – 6.5″ long.
NOTES
- These mittens are made in three flat panels (worked in rows) – the cuff and mitten body, the finger cover, and the thumb cover- which are then seamed together.
- To help keep the two mittens similar in size, I recommend making each component at the same time (i.e. make both mitten bodies, then both finger covers, etc.) rather than finishing one mitten entirely before starting on the next.
- The cuff is made first, then it is turned 90º and the body of the mitten is worked into the ends of the cuff rows.
- Special stitches:
- Mini Bean (MB) (aka Elizabeth Stitch): Insert hook into next st, yo and pull up a loop, yo and insert hook into same st, yo and pull up a loop (you should now have four loops on your hook), yo and pull through all four loops on hook. Ch 1 to close the stitch. This counts as part of the stitch, not a separate chain. See a helpful video tutorial of this stitch here.
- Single Crochet Decrease (sc dec): Insert hook into the first stitch, yo and pull up a loop, insert hook into NEXT stitch, yo and pull up a loop (3 loops on hook), yo and pull through all 3 loops.
- Techniques used for seaming:
- Mattress stitch – Line up the rows/stitches of the two pieces to be seamed. Using a yarn needle and corresponding color of yarn, insert needle into the first stitch from the inside/bottom of the seam out. Pull through. Then insert into the corresponding stitch on the 2nd piece from the inside out. Continue sewing in this way as if you were lacing a shoe. Give your yarn a tug every inch or so to keep the seam tight. See a video of this technique here.
- Whip stitch – Line up the row/stitches of the two pieces to be seamed. Using a yarn needle and corresponding yarn, insert needle into the first stitch of the 1st piece from the outside of the seam in, and continue through to the first stitch of the 2nd piece. Pull through. Bring your needle back around to the 1st piece and insert into the next stitch, then through to the next stitch of the 2nd piece. This creates a loop of yarn over the two pieces. You will continue sewing in this way down the seam, always inserting your needle on the same side. Pull tight as you go. See a video of this technique here.
- The Ch 1 turning chain used throughout does NOT count as a stitch.
- Pattern written in US terms.
- Abbreviations
- blo = back loop only
- ch = chain
- MB = mini bean stitch*
- sc =single crochet
- sc dec = single crochet decrease*
- sk = skip
- st =stitch
- yo = yarn over
*see above for description
PATTERN
Cuff (make 2):
Ch 9 with contrasting color and size I (5.5mm) hook.
Row 1: Sc in 2nd ch from hook and in each ch. <8 sc>
Row 2: Ch 1 , turn. Sc in BLO in each st. < 8 sc >
Tip: Work the sc under both loops of the 1st and last st of the row to keep the ends sturdy.
Rows 3 – 23: Repeat Row 2. (Cuff should measure about 6.25″ – 6.5″)
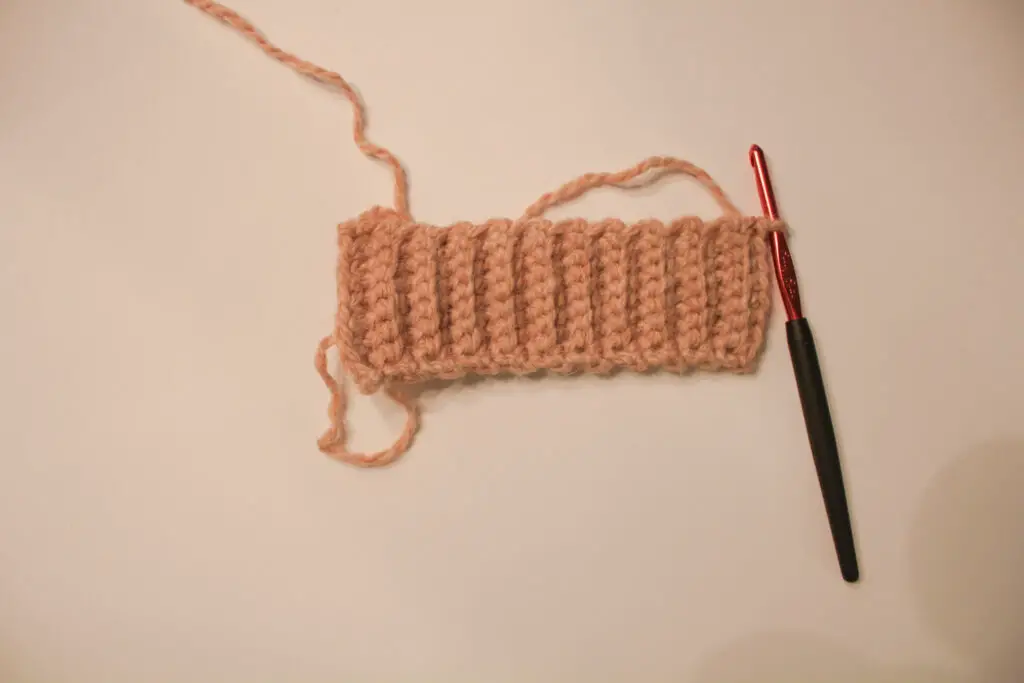
Color change: On the final sc of Row 23, stop when two loops remain on the hook. Pull through with main color to finish the stitch. You will now be working with the main color. Cut contrasting color, leaving an 8” tail for sewing.
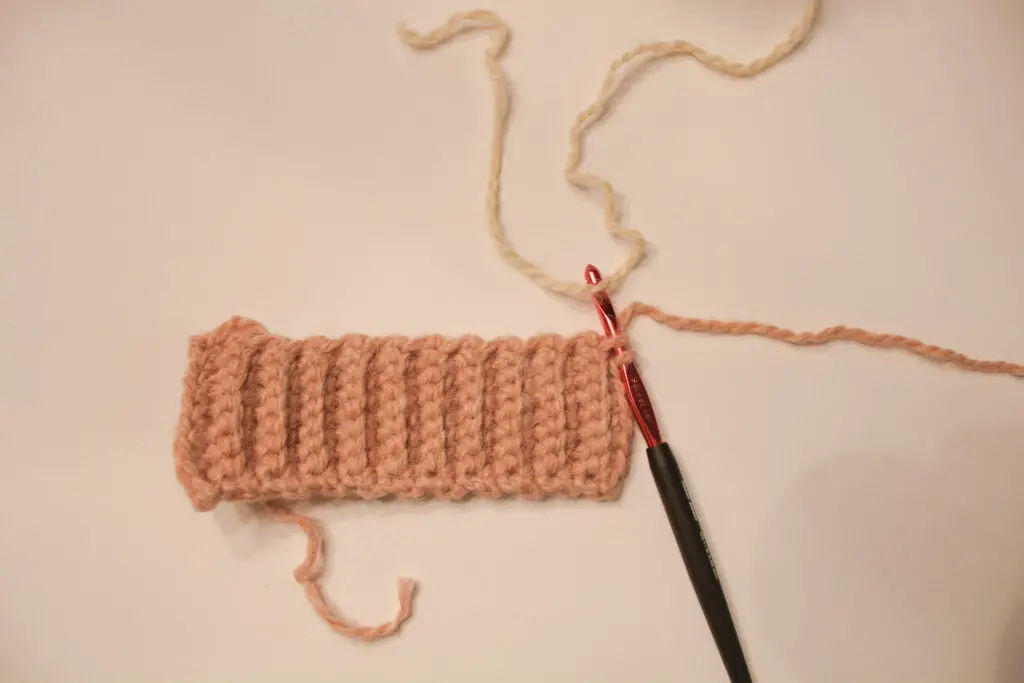
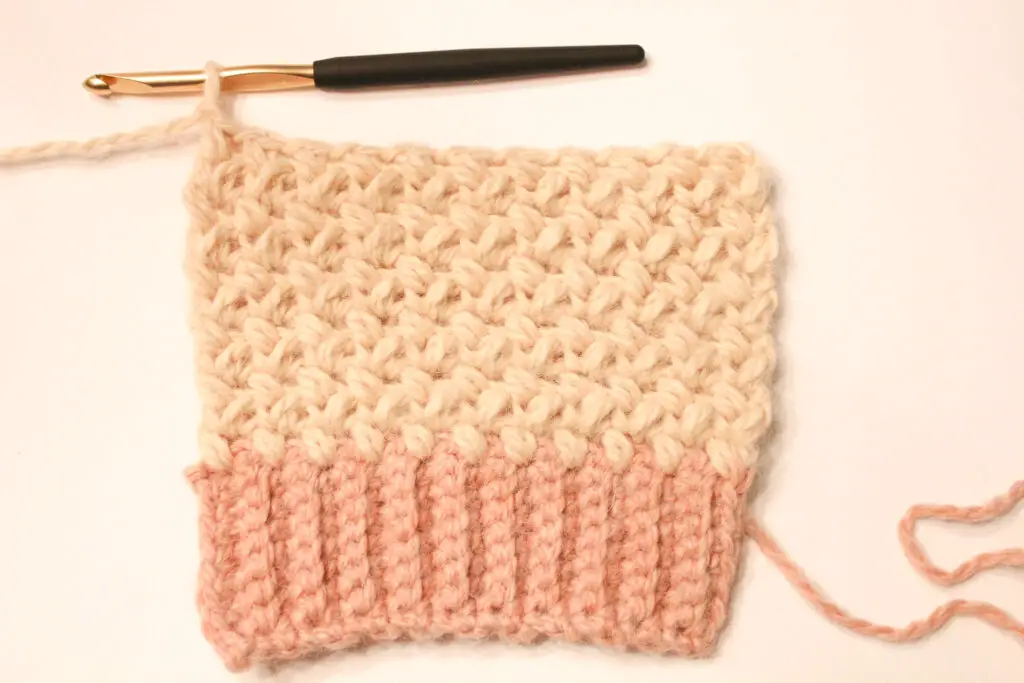
Mitten Body (make 2):
Turn the cuff 90 degrees. You will now be working down the sides of the cuff rows. Each Row end counts as a “stitch”. Switch to a size J (6.00mm) hook.
Row 1: Ch 1. MB in to the 1st “st” (cuff row end), [sk 1, MB], repeat inside [ ] until the end of the row. Final MB should be worked in the last row end. <12 MB>
Row 2: Ch 1 (this will look like a ch 2 because of the ch 1 used to close the previous MB), turn. MB in the first stitch.
You will insert your hook into the little “V” that is naturally formed on the MB in the row below (See picture below for help with where to insert your hook), MB in each st across.
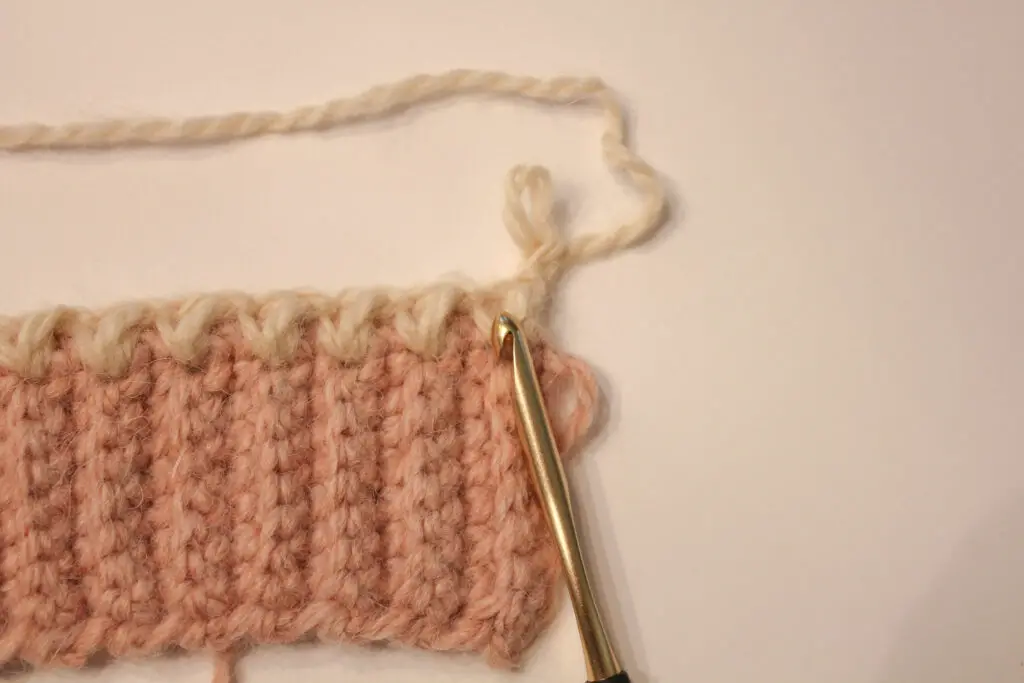
Final MB should be worked in the top of the last MB from the row below. <12 MB>
Rows 3 – 11: Repeat Row 2.
Fasten off and leave an 8” tail.
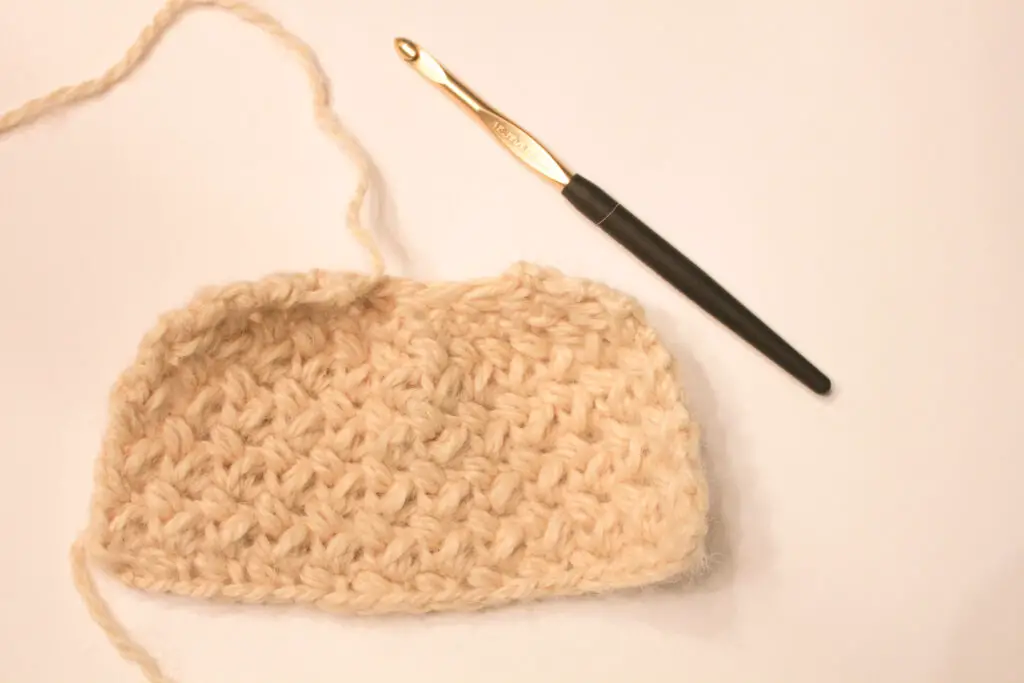
Finger Cover (make 2): (Main Color and size J hook)
Ch 25 loosely.
Row 1: MB in the 3rd ch from hook, [sk next ch, MB in next], repeat inside [ ] across chain, ending with a MB in last ch. <12 MB>
Row 2: Ch 1, turn. MB in 1st st and in each st across. <12 MB>
Row 3 – 9: Repeat Row 2
Row 10: Ch 1, turn. Sc in each st (in the same spot as usual, the piece with begin to curl in). <12 sc>
Row 11: Ch 1, turn. (Sc dec) 6 times. <6 sc >
Fasten off and cut yarn leaving an 15” tail.
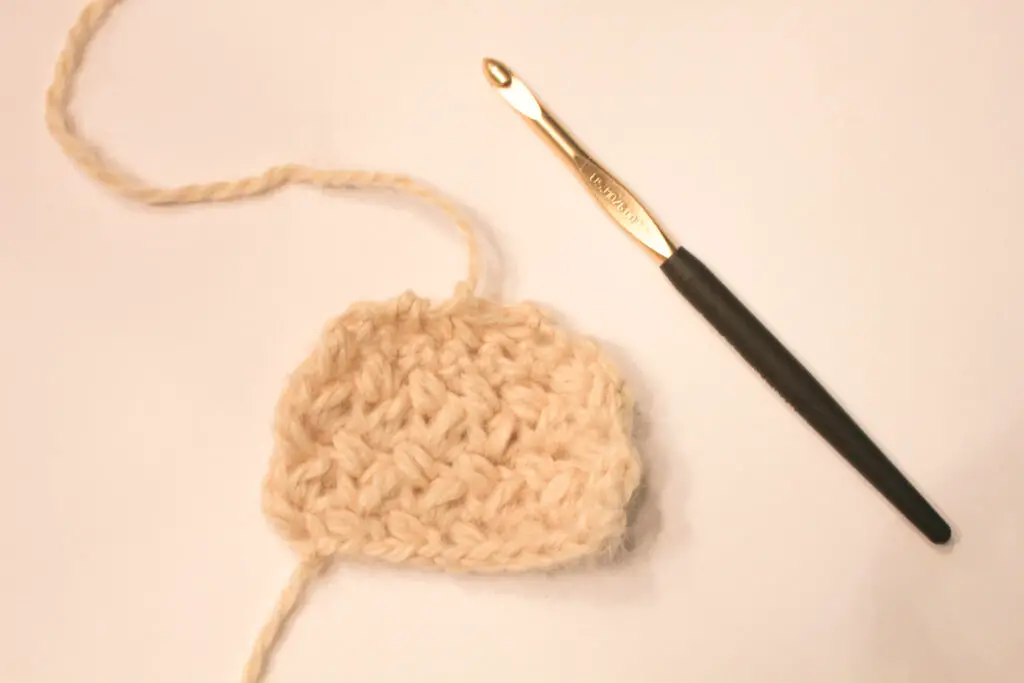
Thumb cover (make 2): (Main color and size J hook)
Ch 13 loosely.
Row 1: MB in 3rd ch from hook [sk next ch, MB in next], repeat inside [ ] across chain. <6MB>
Row 2: Ch 1, turn. MB in each st. <6MB>
Row 3 -5: Repeat Row 2.
Row 6: Ch 1, turn. Sc in each st. <6 sc>
Row 7: Ch 1, turn. (Sc dec) 3 times. <3 sc>
Fasten off, leaving a 10” tail.
Assembly
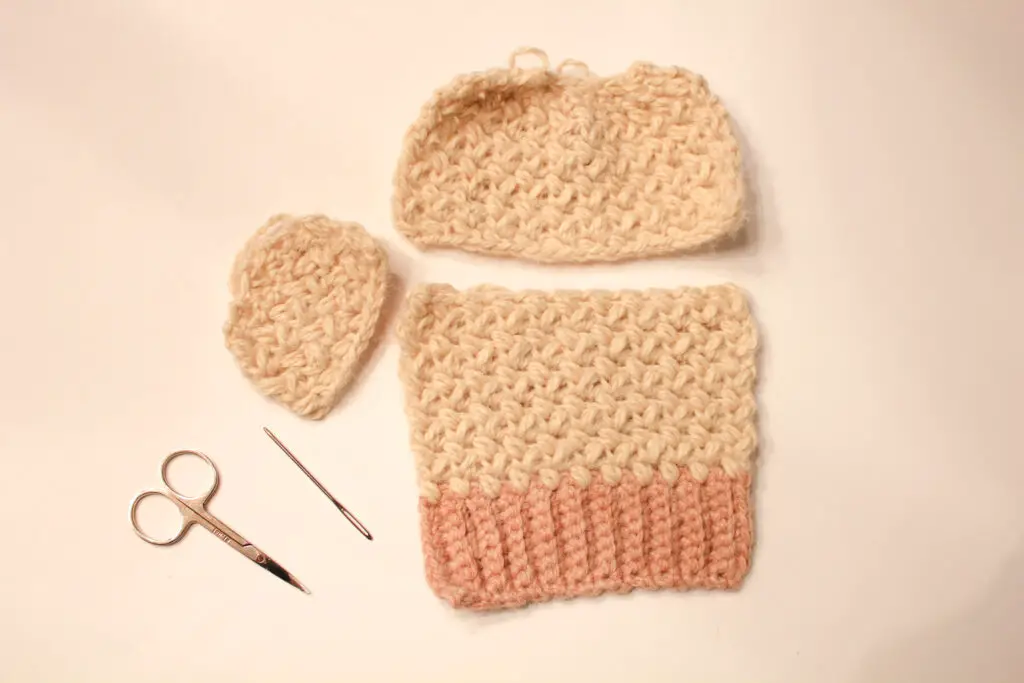
Mitten Body:
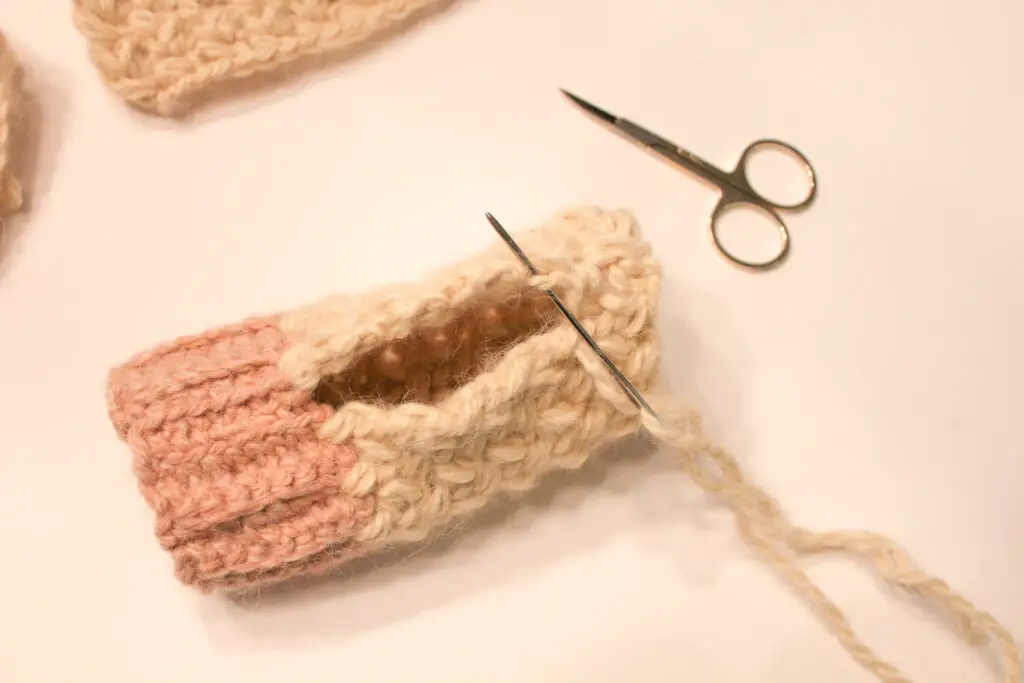
- Fold over mitten body and line up the ends of the cuff and ends of MB rows.
- Thread a yarn needle with the long tail we left of the contrasting color, and use the mattress stitch (see Notes for help with seaming) to sew the cuff ends together. Secure, fasten off, and weave in ends.
- Thread your yarn needle with an 8” length of main color yarn. Attach right above the cuff and use the mattress stitch to sew the mitten body together for about 1 – 1.5”.Tip: try on mitten to determine how far to sew. You want to sew up to the bottom joint of your thumb. Secure, fasten off, and weave in ends.
- Thread yarn needle with the long tail left when we finished the mitten body. Starting at the top, use the mattress stitch to sew down about 1.5 – 2”. Tip: Again, trying on the mitten is helpful when determining how far to sew. Here, you should sew down until about the middle of the webbing between your thumb and index finger. This should create a thumb hole opening about 1” – 1.5” long. Secure, fasten off, and weave in ends.
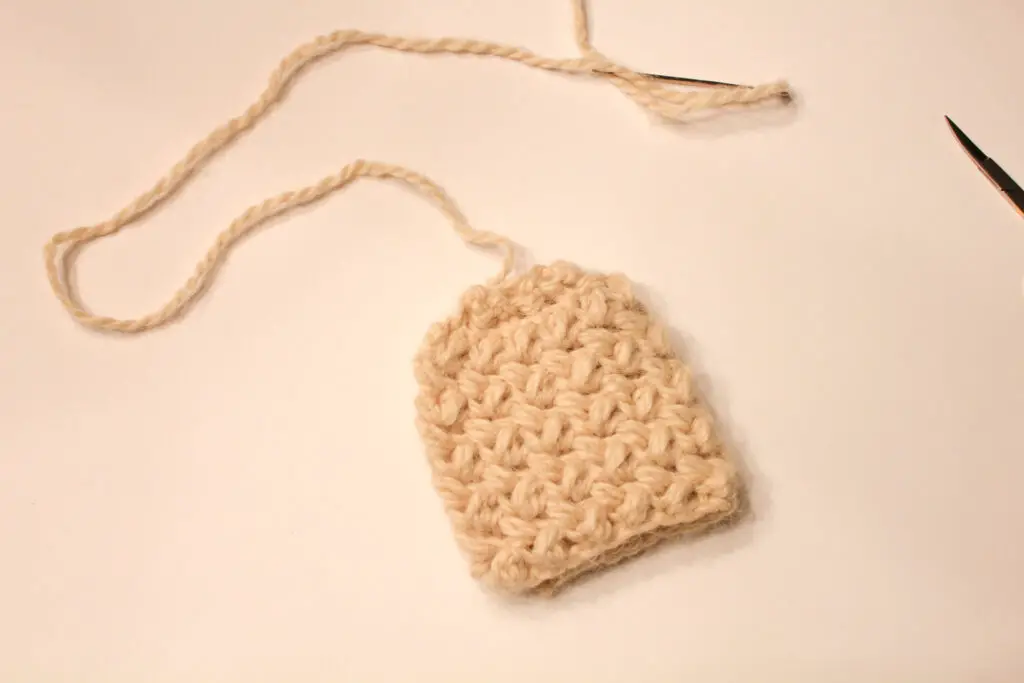
Finger Cover:
- Fold over finger cover and line up rows. Thread yarn needle with long tail we left earlier.
- Use the mattress stitch to sew the two sides together. Stop when you get down to the base of the finger cover (where the starting ch is), but do not fasten off.
- Attaching finger cover to mitten body [Note: Attach finger cover with the thumb hole facing the right for the left mitten and thumb hold facing left for the right mitten.] Locate the top of Row 9 on the mitten body. If you like, use stitch markers to hold the finger cover in place while you sew. Using a whip stitch, attach the base of the finger cover to the mitten body. Sew about halfway around the circle of the finger cover base to create a “hinge”. Secure, fasten off, and weave in ends.
Thumb cover:
- Fold over thumb cover and line up rows. Thread your yarn needle with long tail we left earlier.
- Use the mattress stitch to sew the sides of the thumb cover together. Stop at the base, but do not fasten off.
- Line up thumb cover with thumb opening on mitten body (trying on is helpful here too). Use a whip stitch to attach thumb cover to mitten body Secure, fasten off, and weave in ends. Repeat for the second mitten and you’re done!
I hope you enjoyed this pattern! Tag me on Instagram @theknottednest and use the hashtag #cozyconvertiblemittens to share your project! Find more project ideas in the Patterns section here on the blog or check out my Alpine Hygge Beanie or Dreaming of Spring Triangle Scarf for more cozy winter accessories!
Happy making!


Spooky Halloween Crochet Pillow

2 Comments
Pingback:
Pingback: