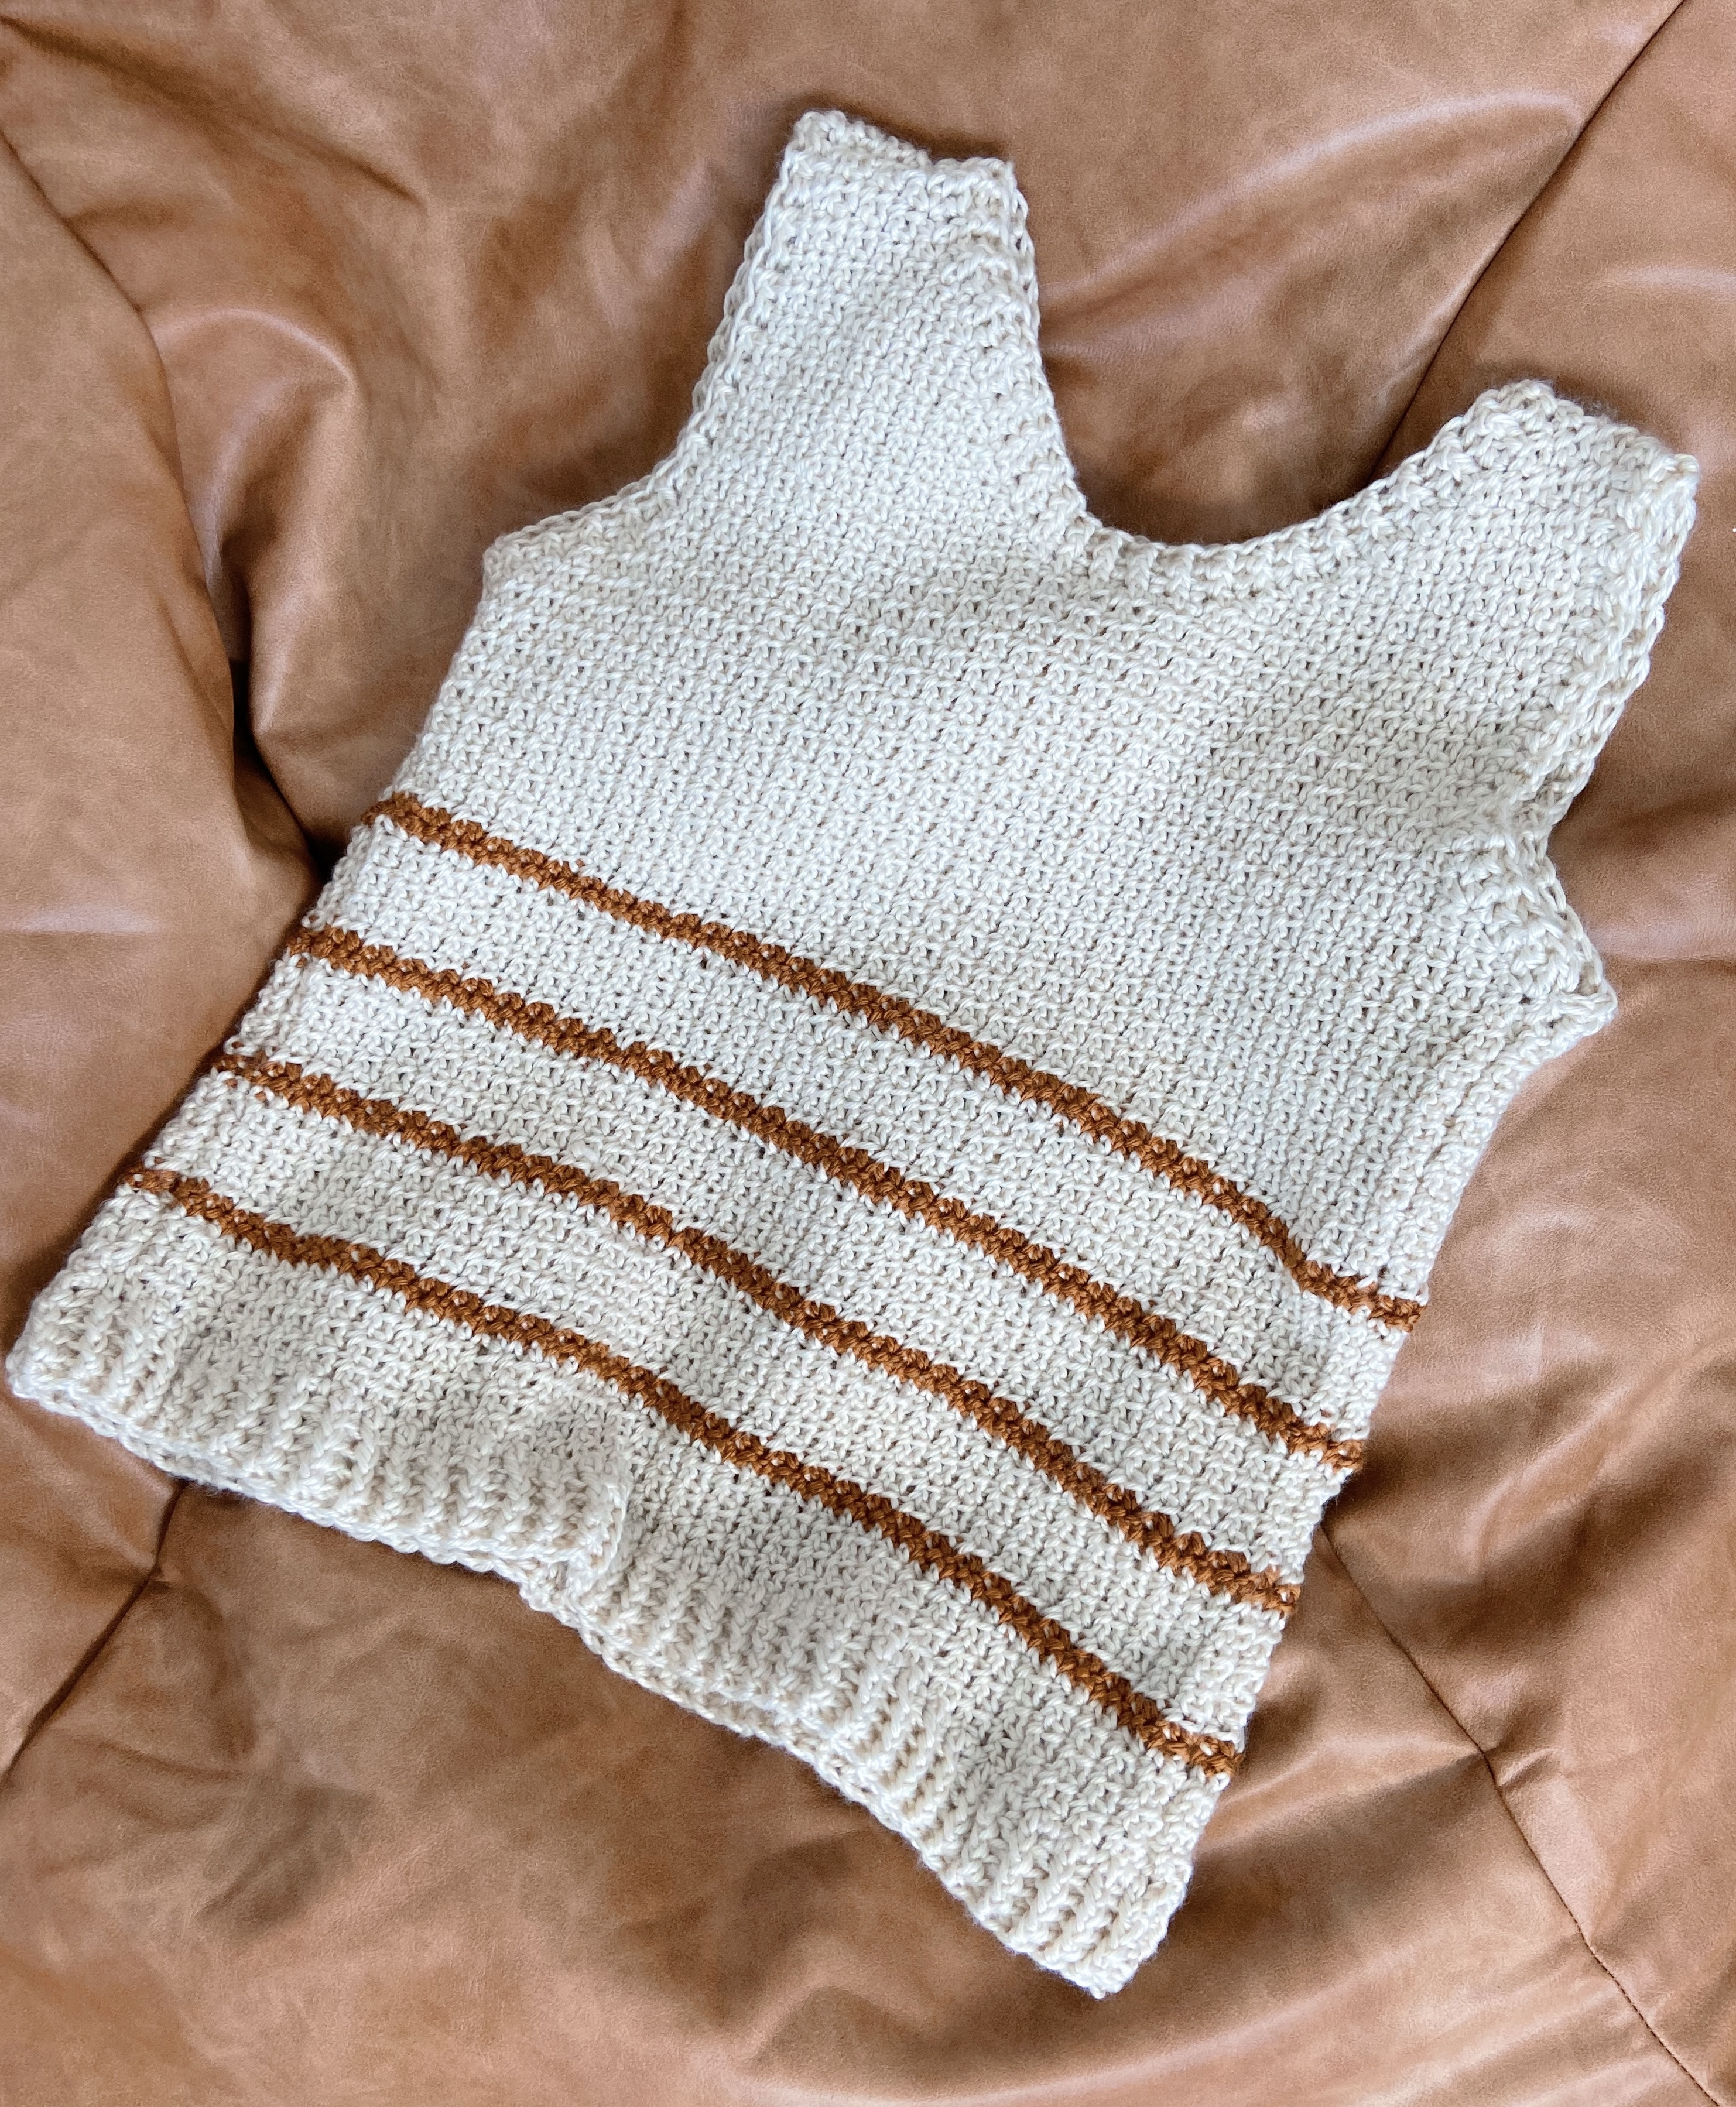
Wander Striped Crochet Tank Top Free Pattern
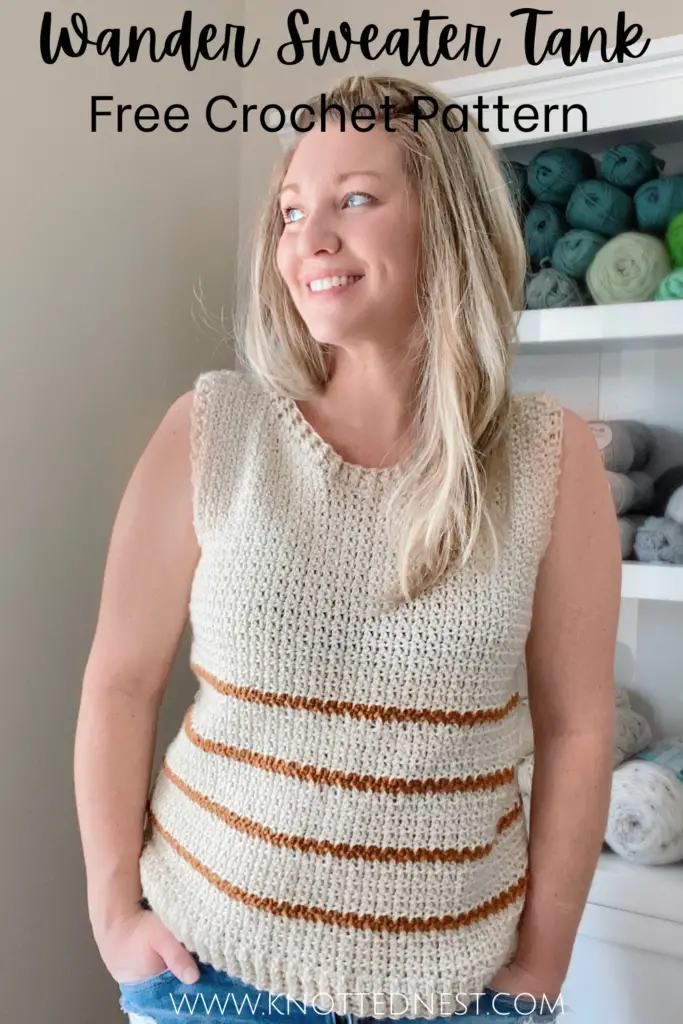
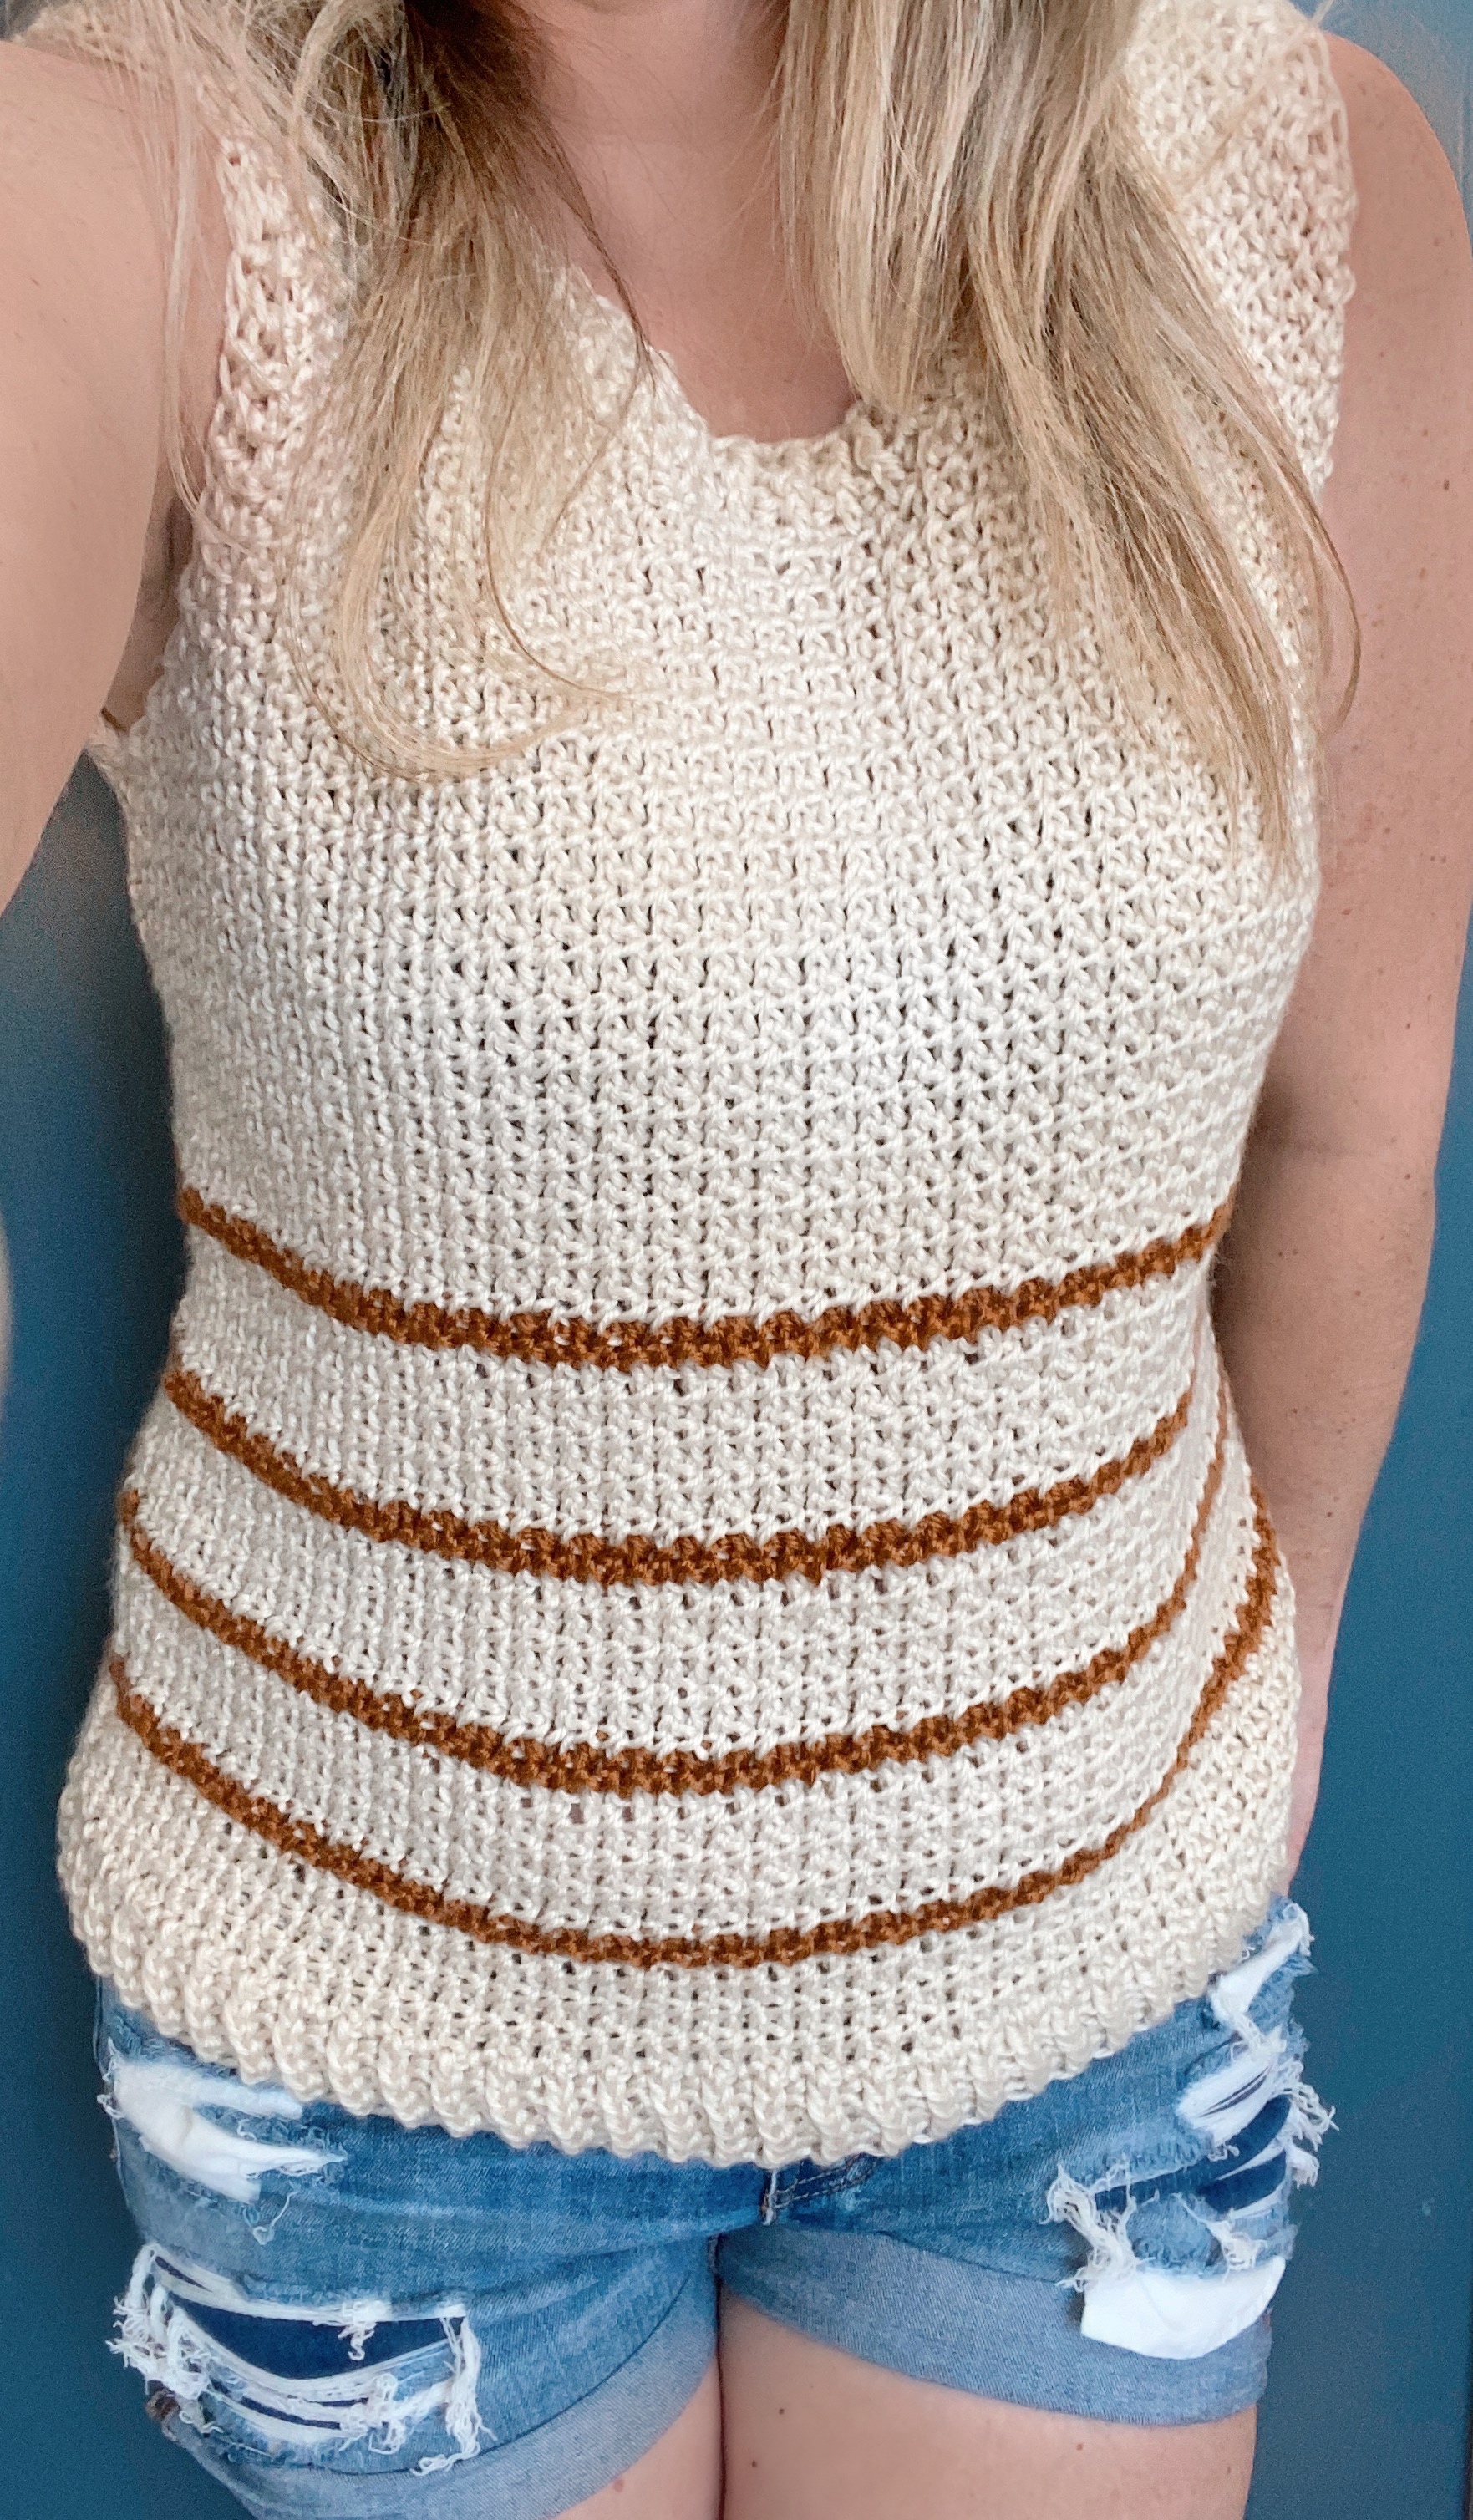
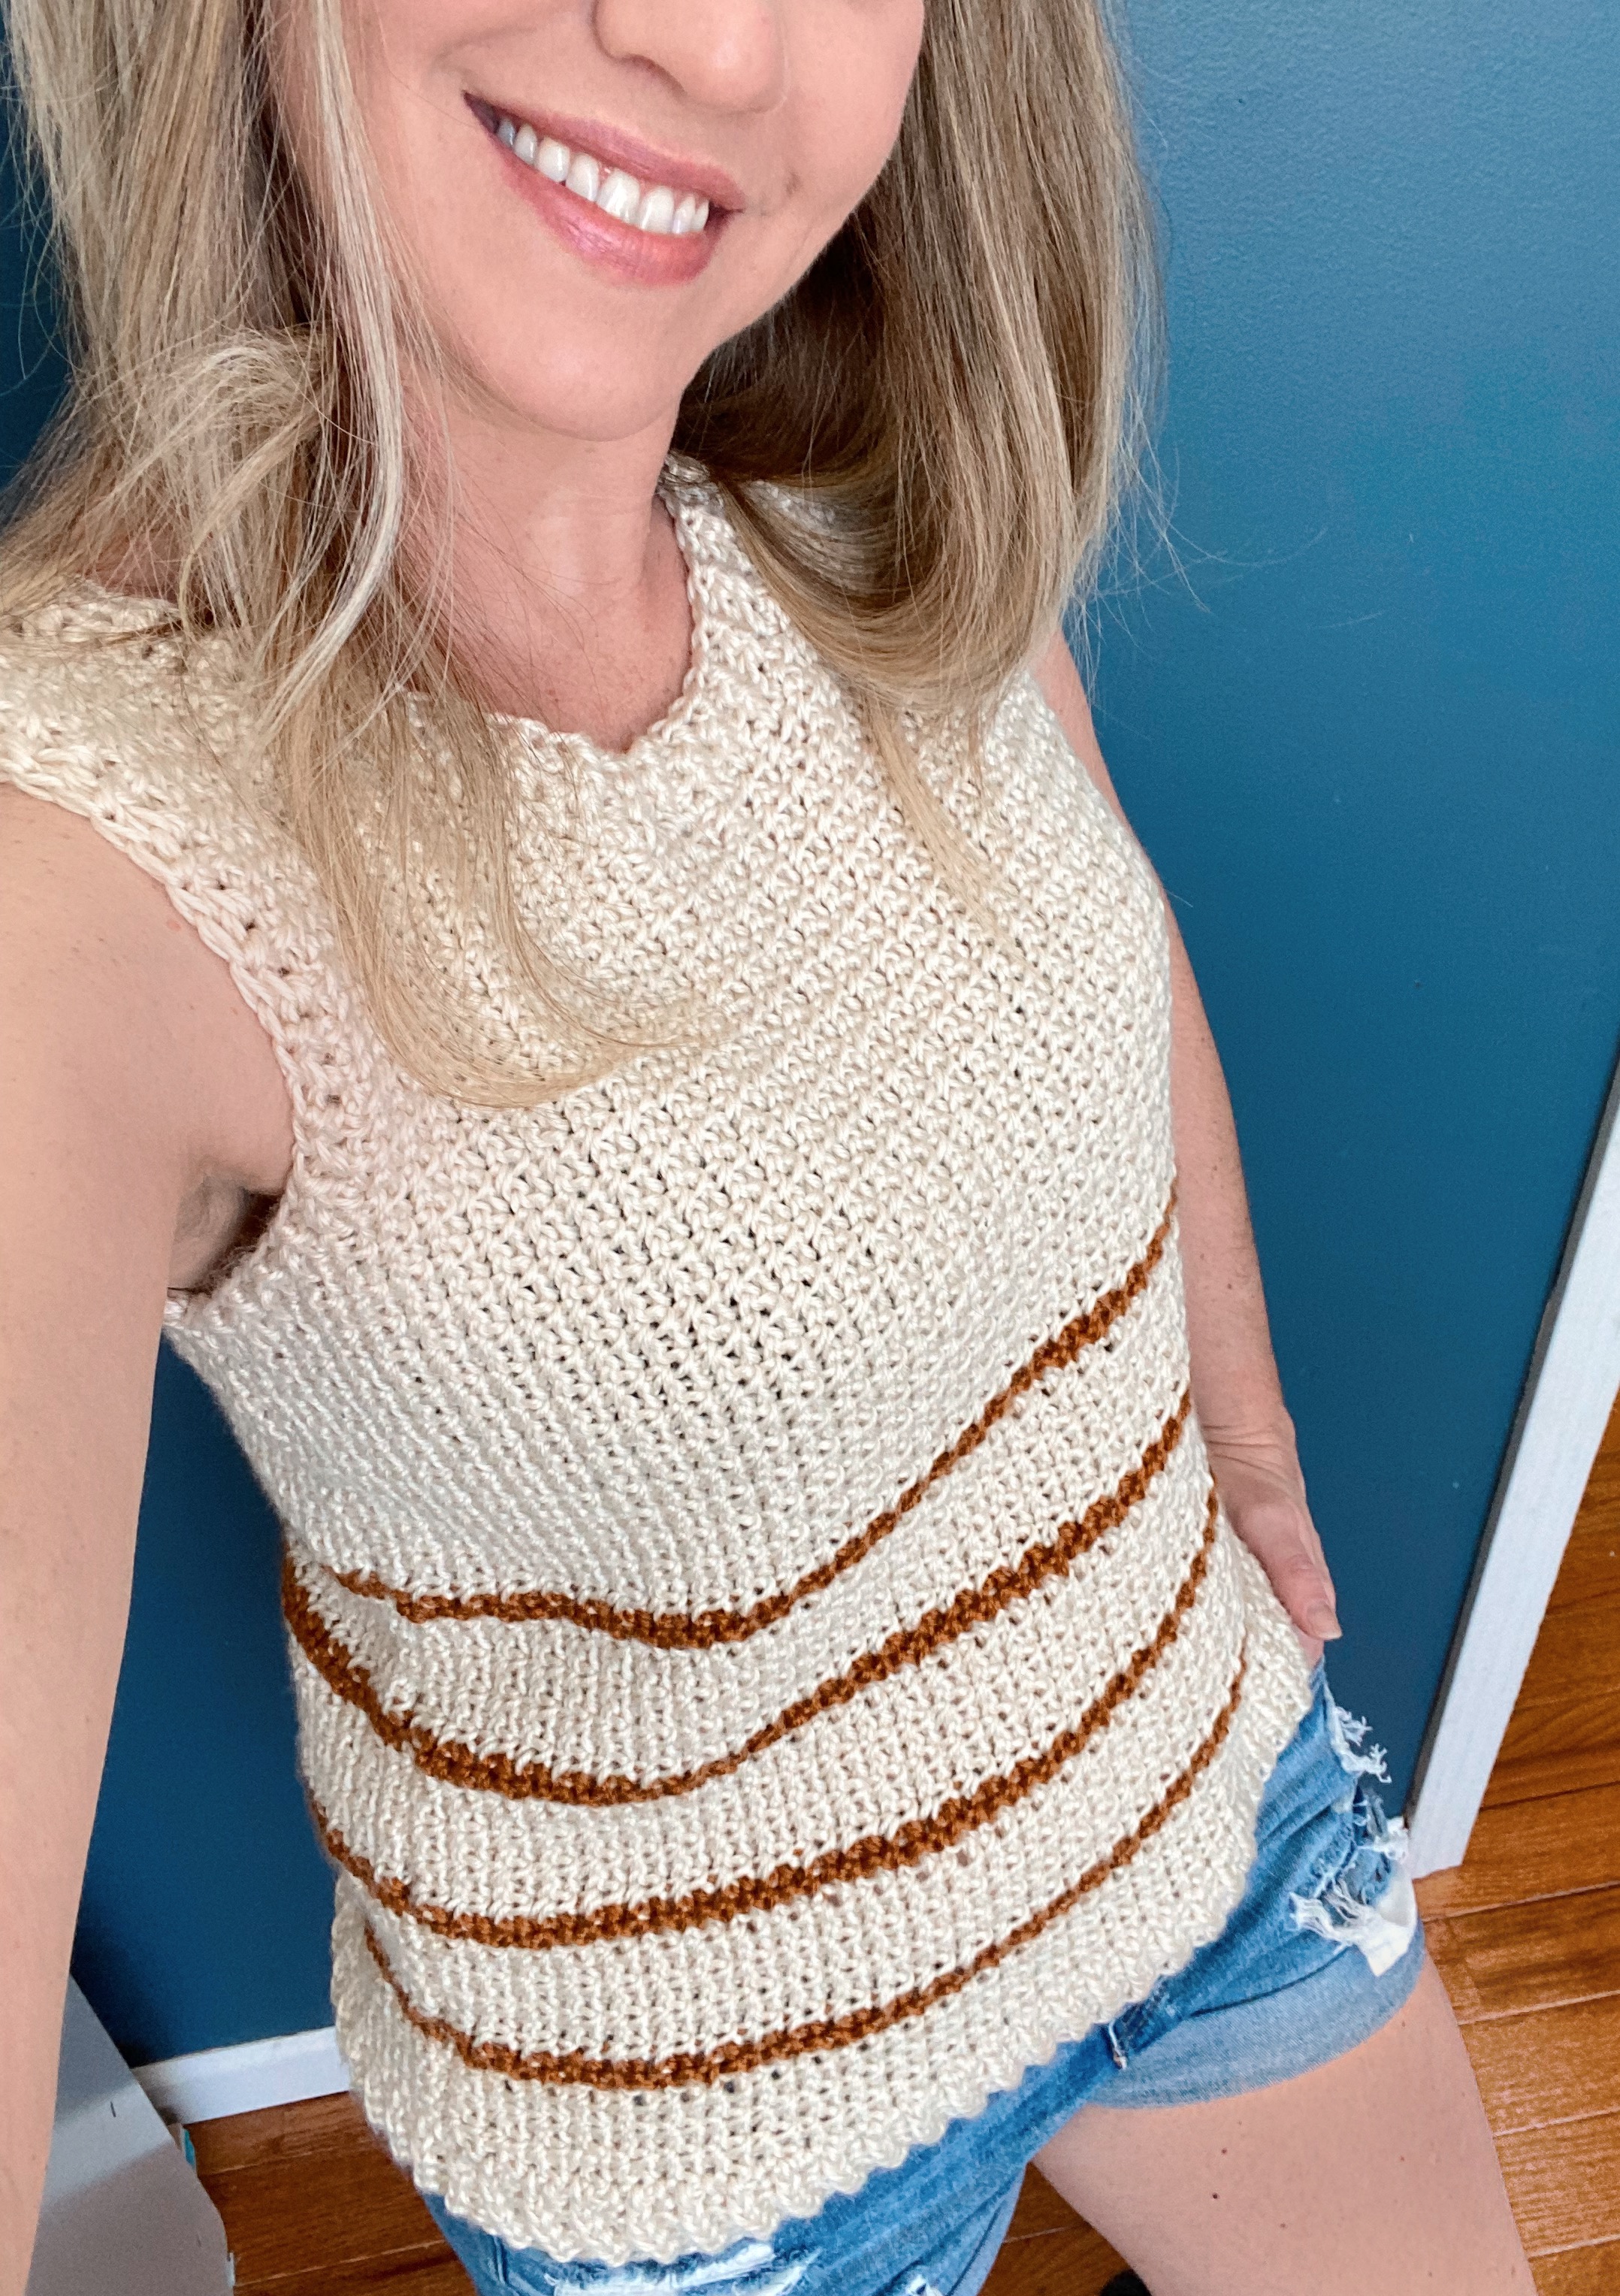
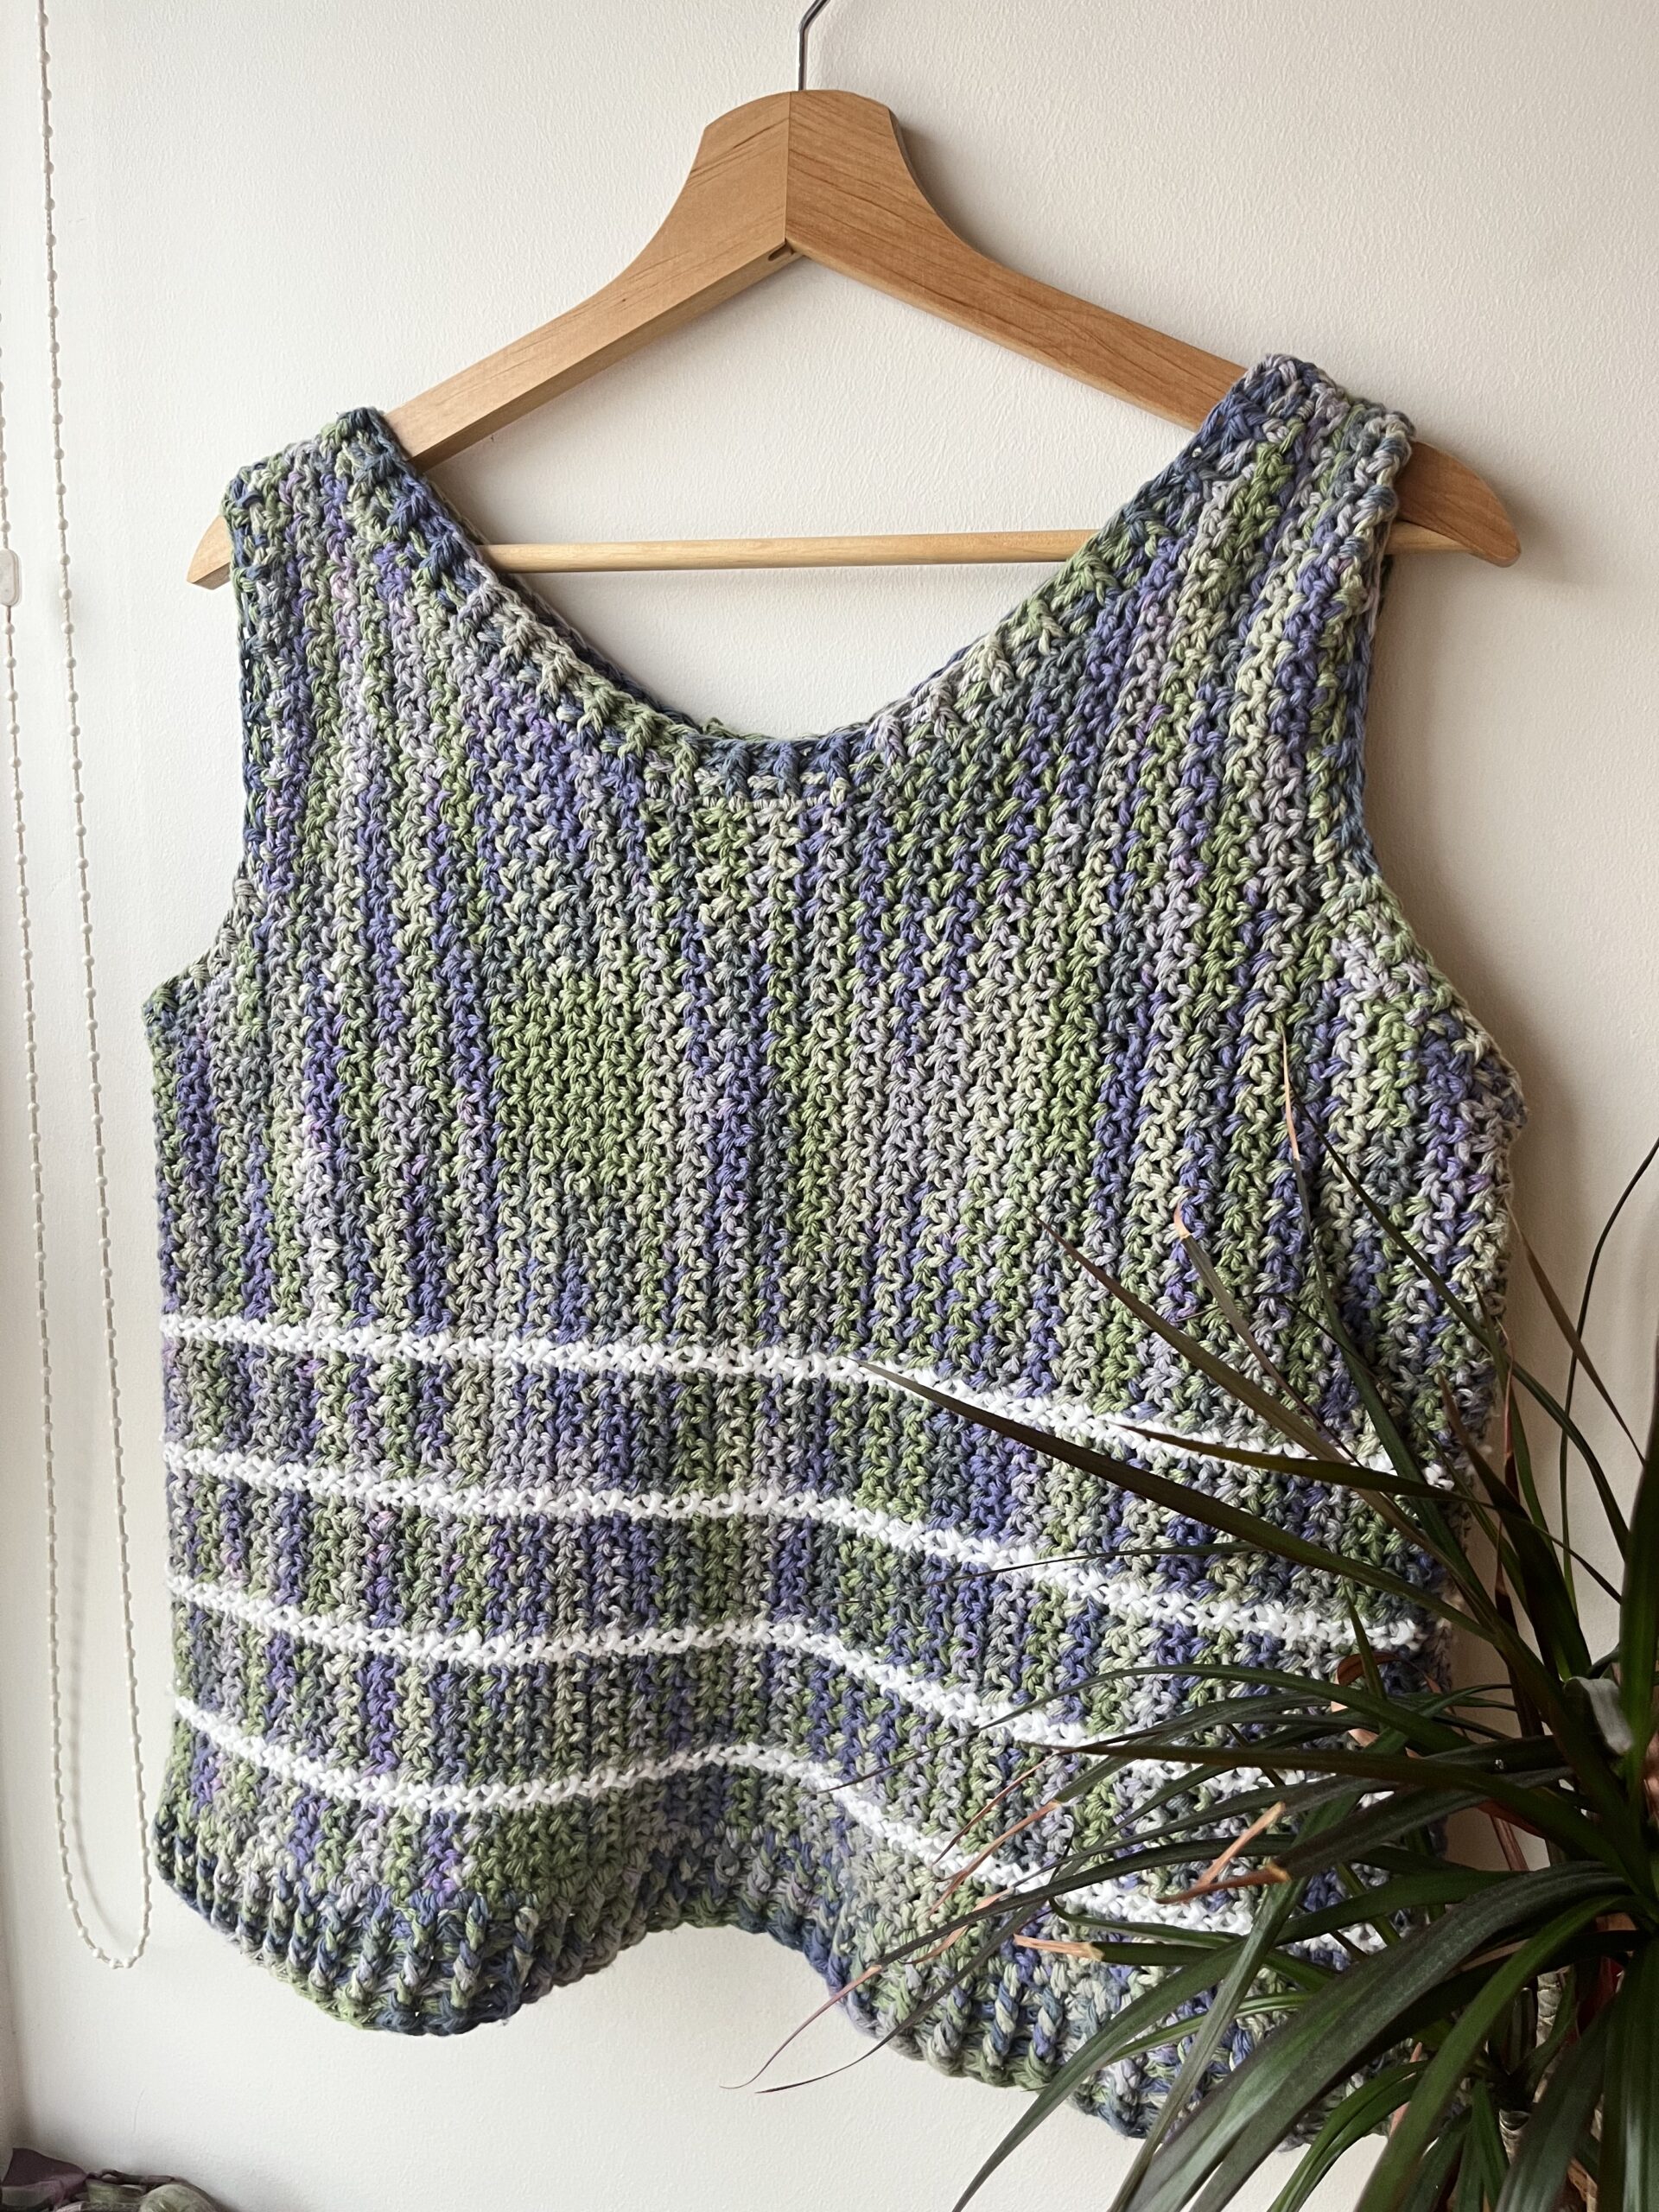
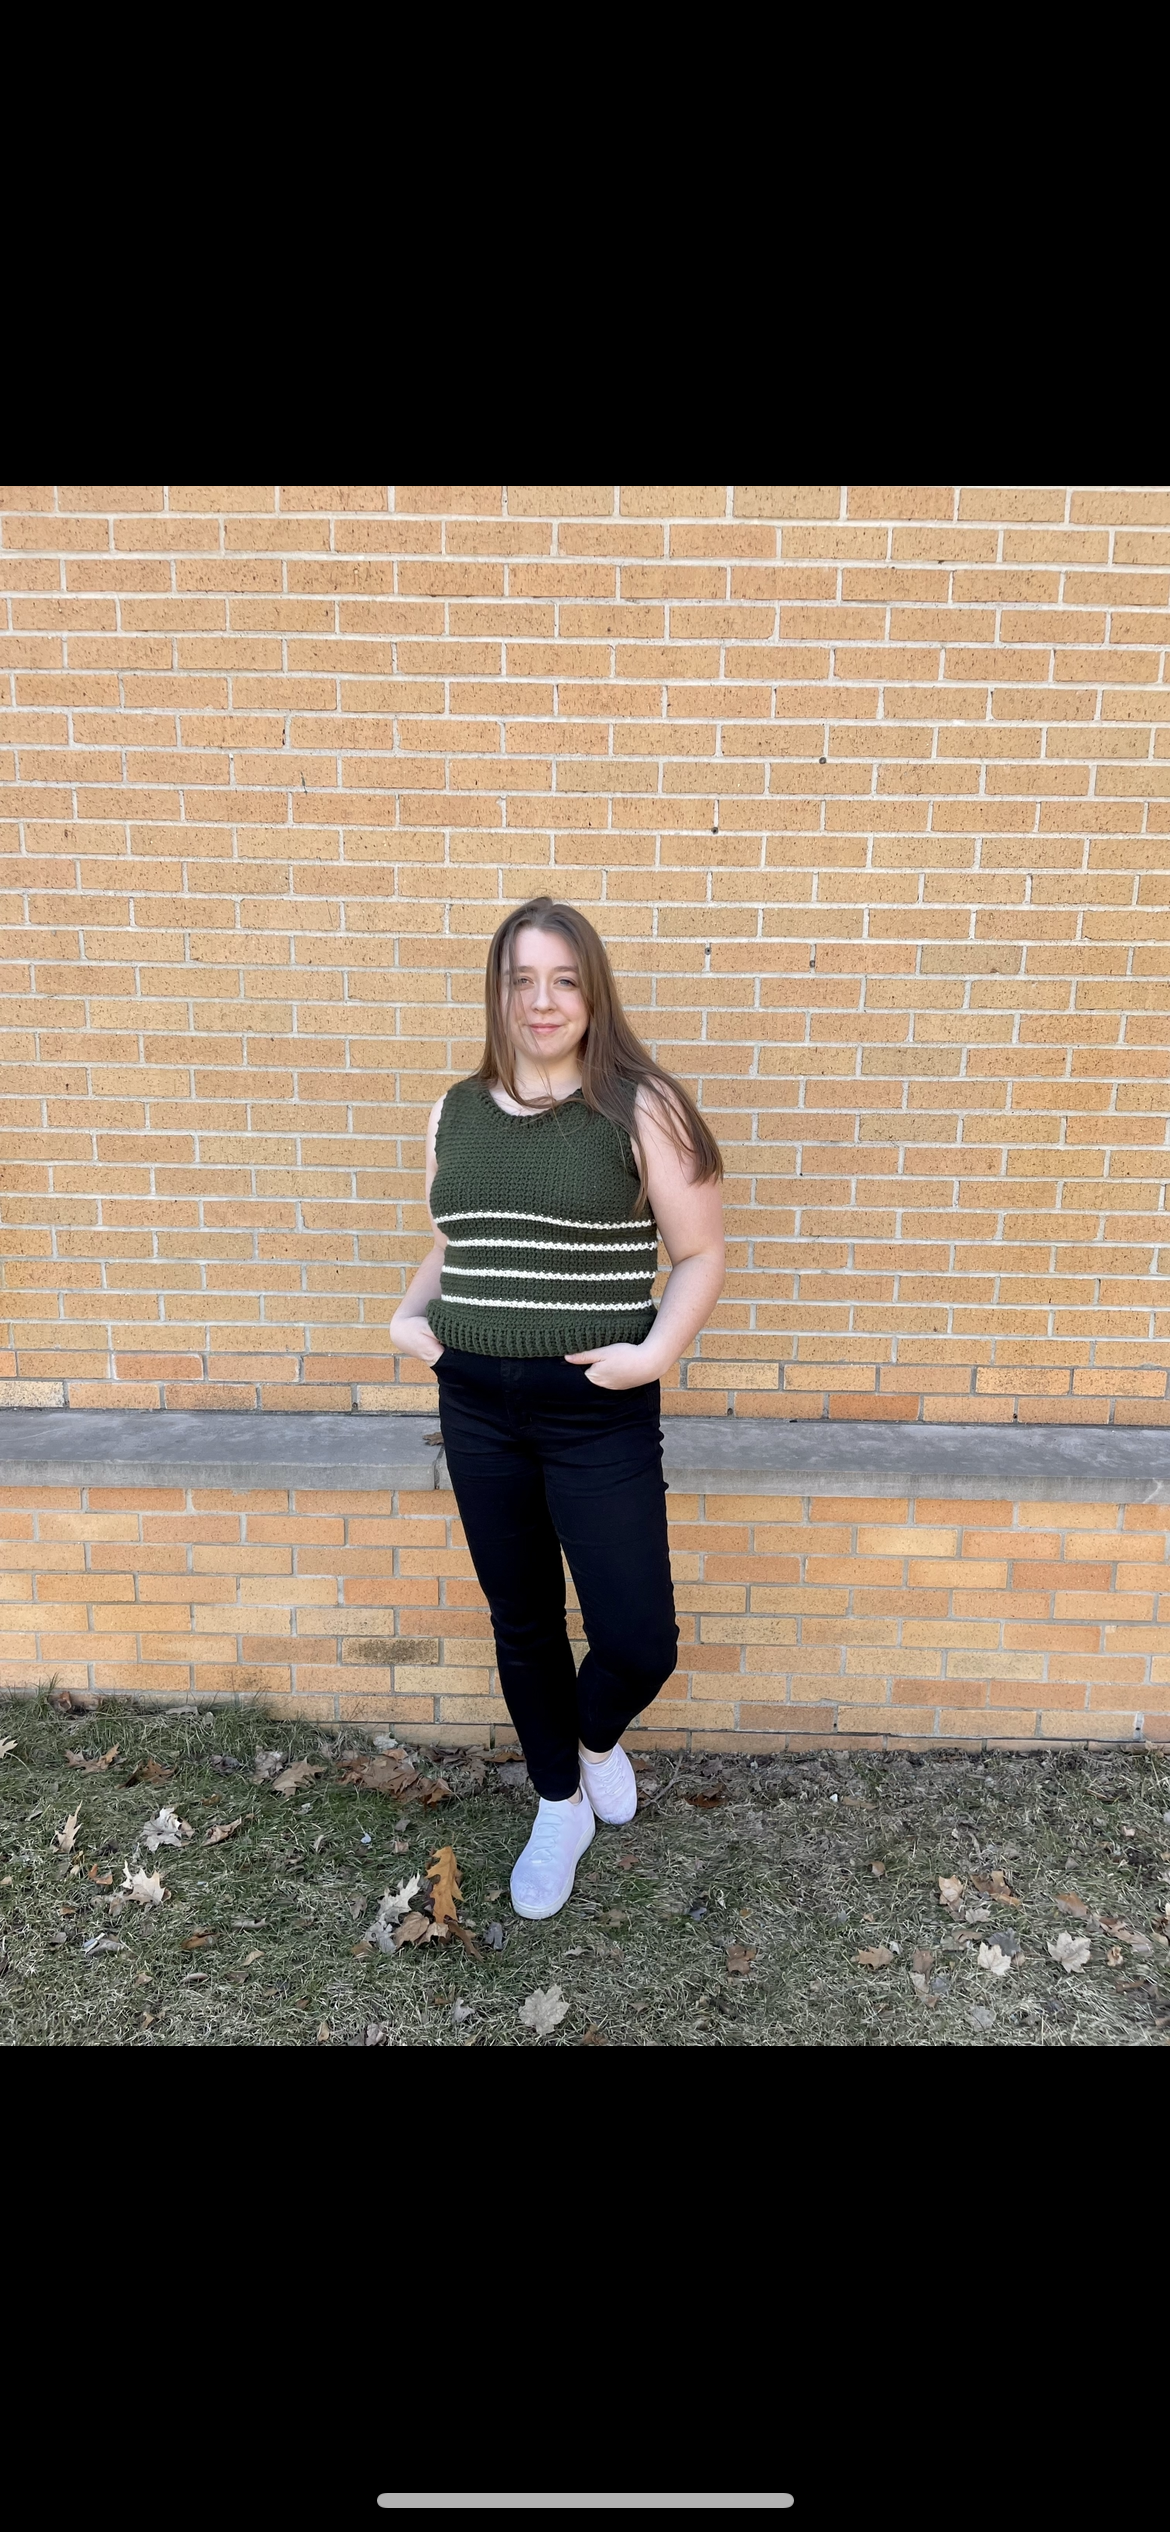
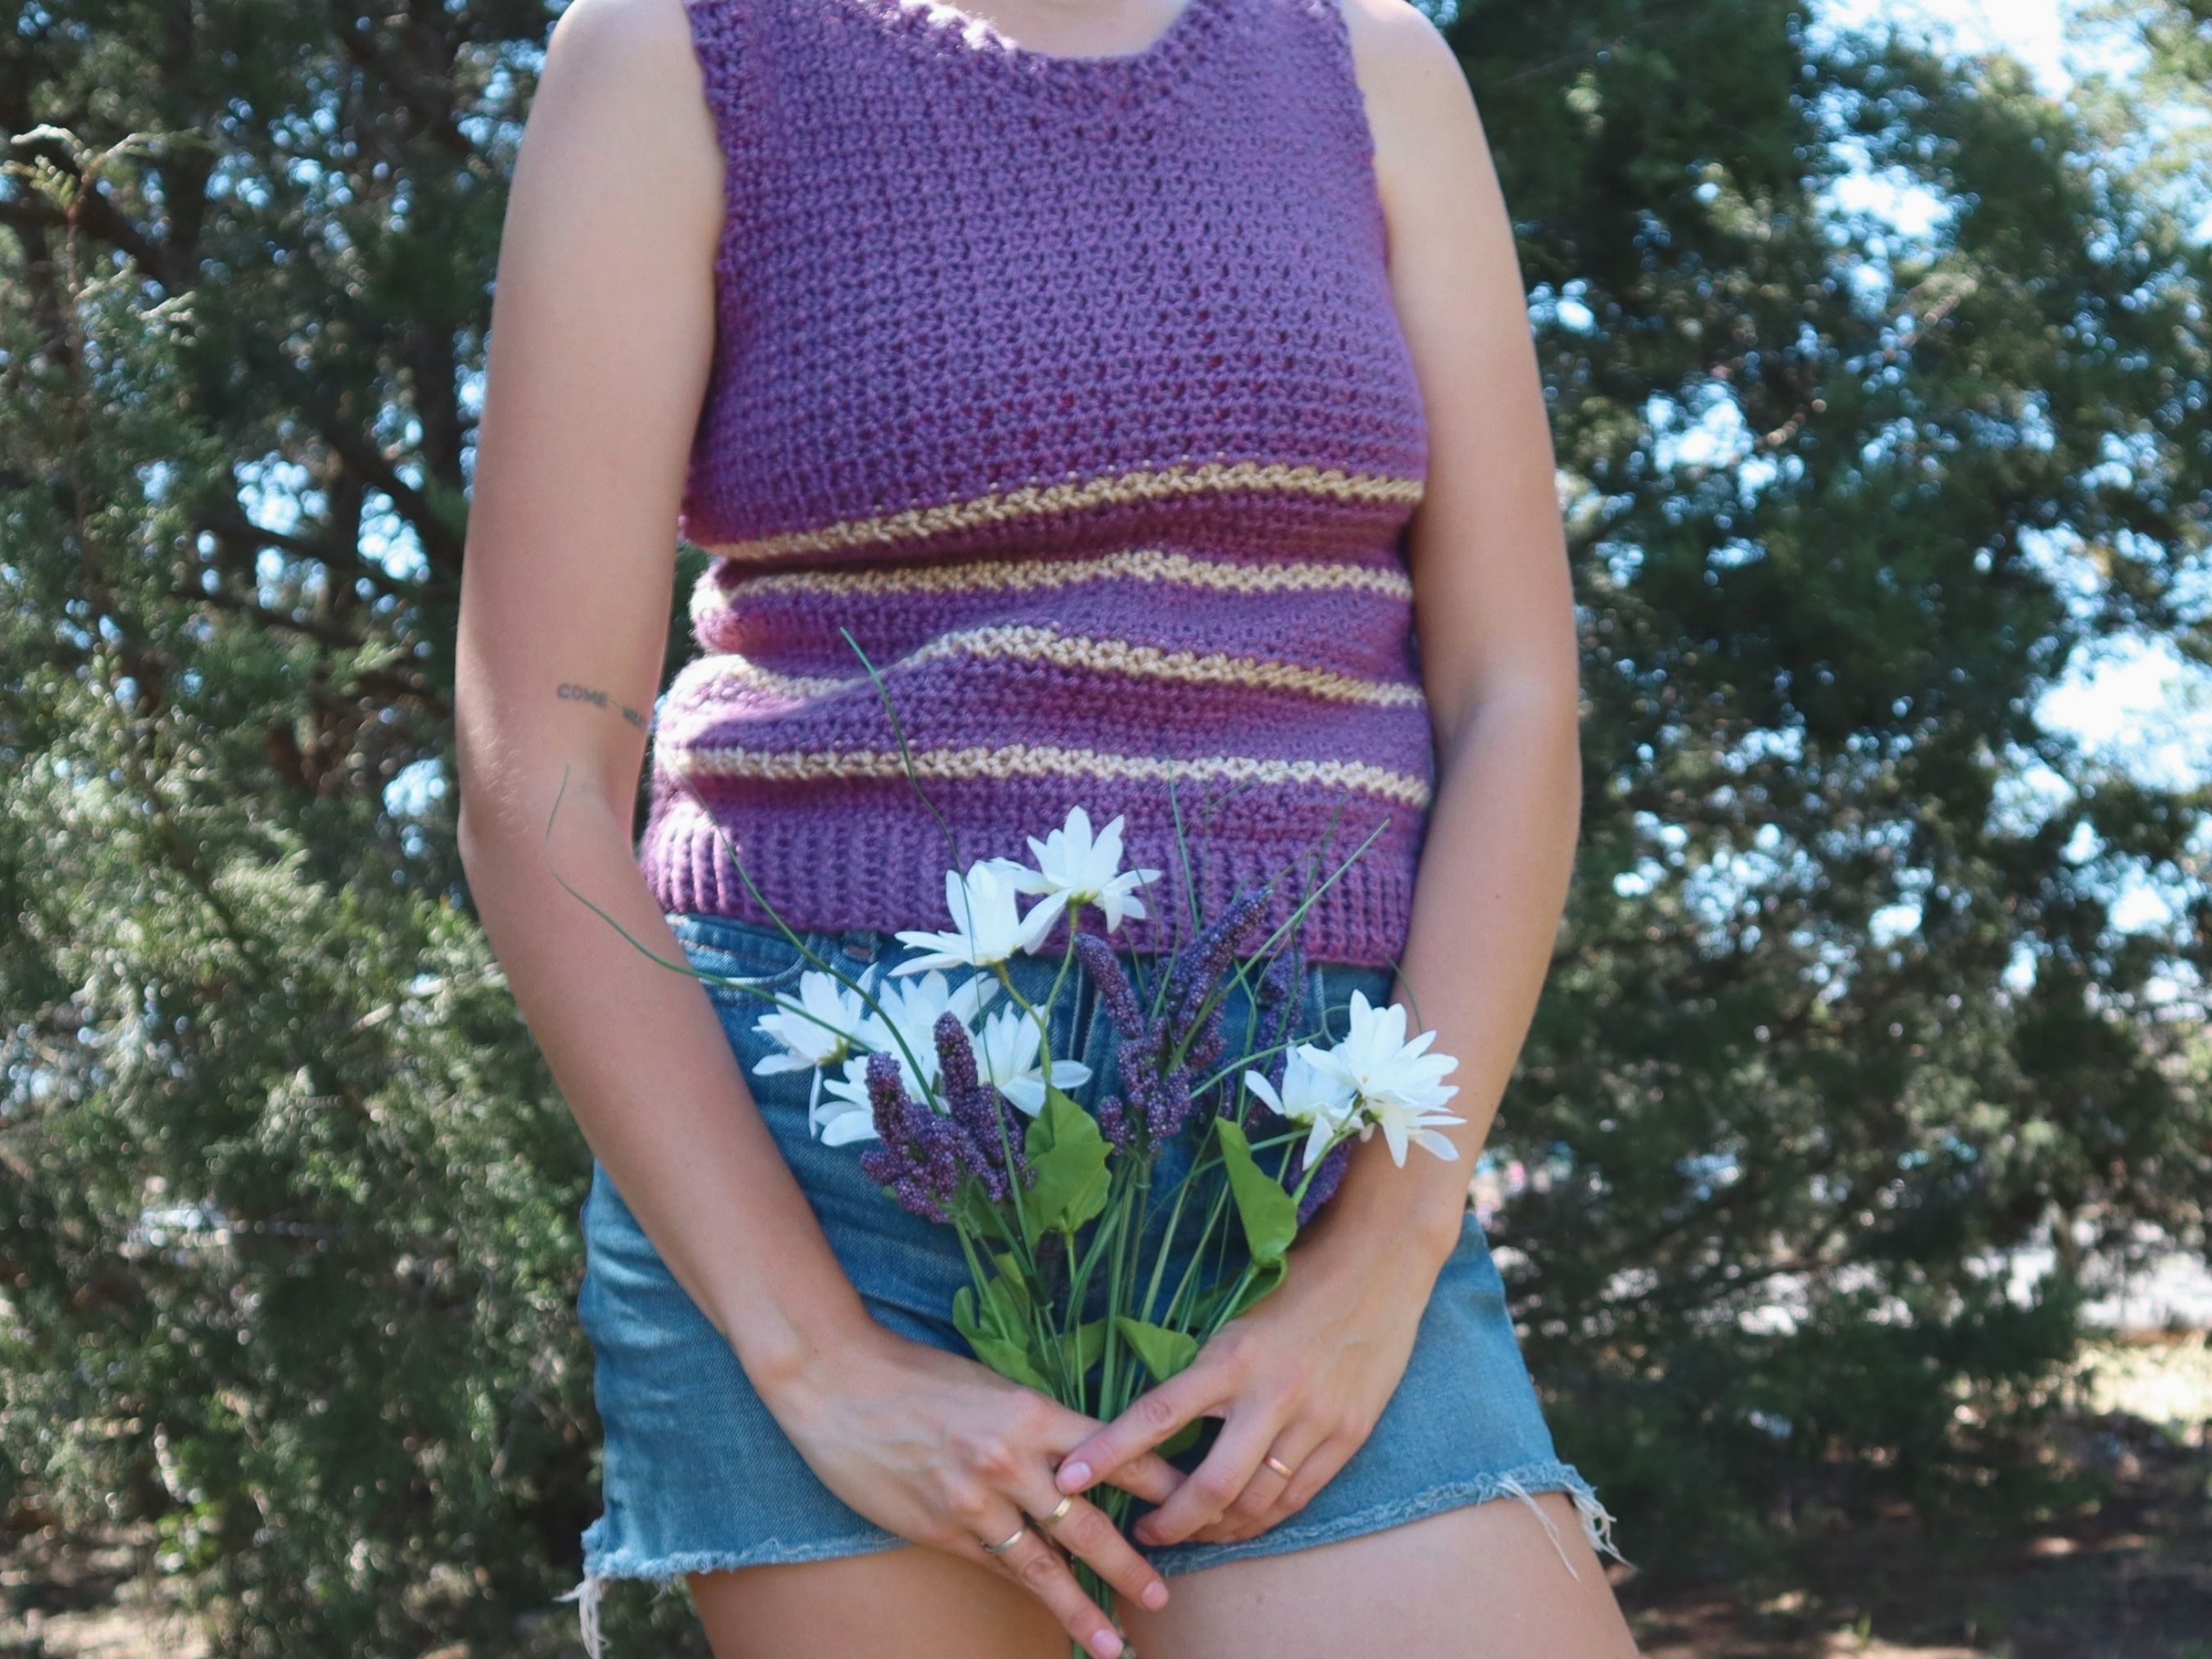
Crochet a Tank Top that is the perfect transition piece to go from spring to summer! The Wander Sweater Tank pairs the cozy texture of sweater ribbing with the open breeziness of the single crochet mesh stitch, making it a super versatile wardrobe staple! Scroll down to get the free pattern or read on to learn more about the materials and construction for this crochet top.
Click here to Pin the Wander Crochet Tank Top pattern for later!
This post may contain affiliate links, which means I may receive a small commission, at no extra cost to you, when you make a purchase. Please read my affiliate disclosure for more details.
Wander Crochet Tank Top Materials
I’m not the most creative when it comes to naming my designs, so you might have guessed that the Wander crochet tank top got its name from the Furl’s Wander acrylic yarn I used to make it, haha! This was my first time using Furl’s Wander yarn, but I used Furl’s Whims Merino to make last year’s Spring Plaid Poncho and I loooooove it!
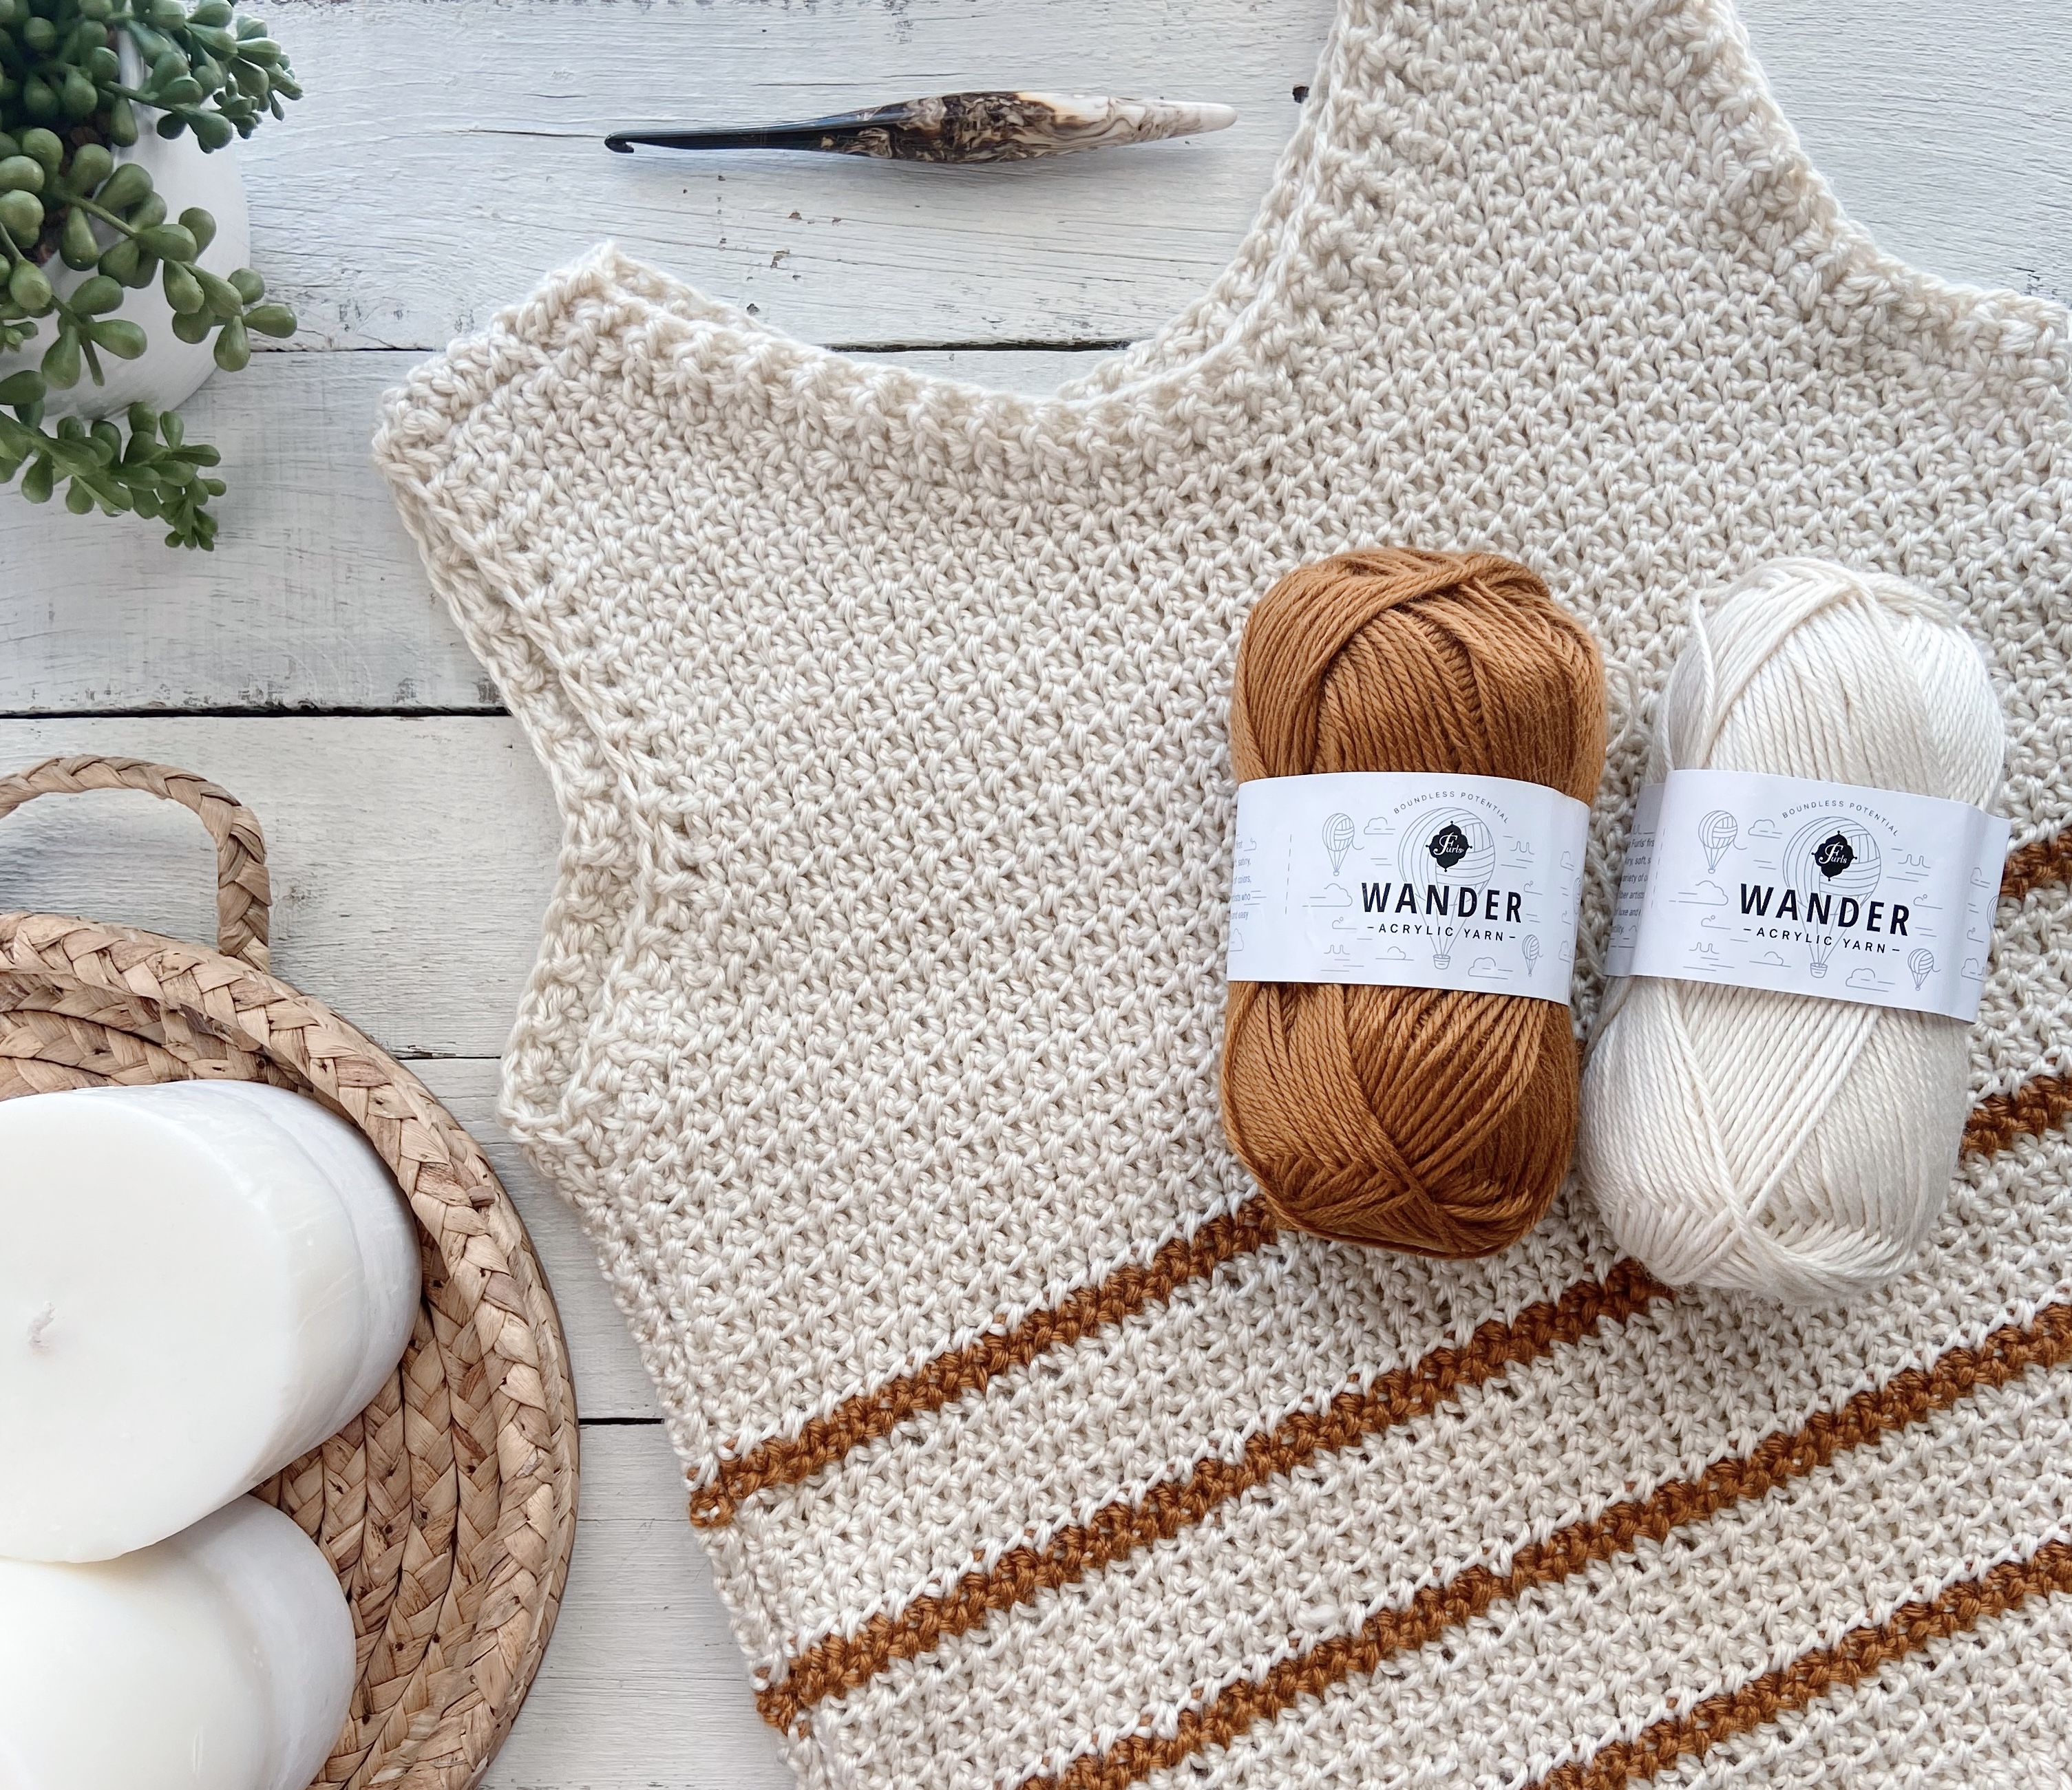
I wasn’t sure that I would be as onboard with the Wander since I’m not usually a fan of yarns that have a sheen, but I was very pleasantly surprised when I opened the box. The sheen on Wander is much more subdued in person and it is genuinely one of the softest acrylics I have used. The colors are super saturated and vibrant as well. I think it works perfectly for this sweater tank!
Depending on the size you choose, you’ll need approximately 480 (500, 520, 580, 600) yards of worsted weight yarn for this crochet tank top. This works out to be 4 (5, 5, 5, 6) skeins of Wander.
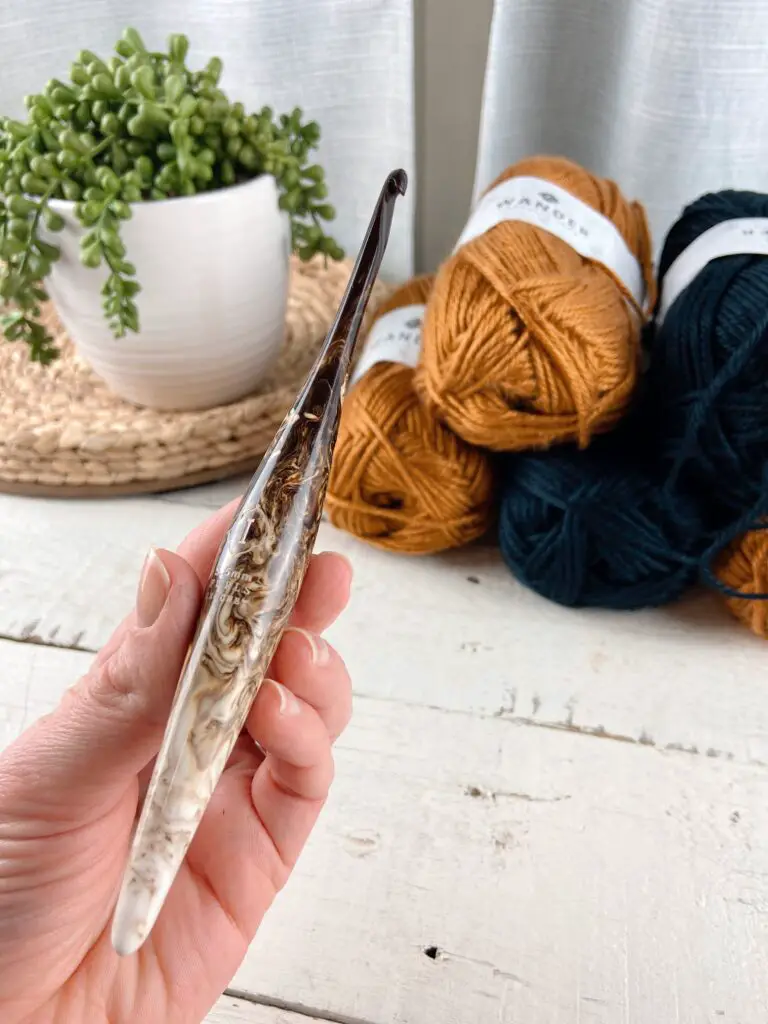
The hook I used for this project is my new favorite hook (well, it’s part of my collection of favorite hooks!). It’s the Furls’ Streamline Resin (size I (5.5mm)) in the color Cafe. Isn’t it just SO pretty?!
You’ll also need the standard notions for this project – scissors, yarn needle, tape measure, and (optional) stitch markers.
Wander Crochet Tank Top Construction
The Wander crochet tank top is written for 5 sizes: S (M, L, XL, 2XL) and is rated as an intermediate level project. When I set out to design this pattern, I knew I wanted to play around with the idea of mashing up a sweater with a tank top. I wanted it to have the cozy look of a sweater, but also the warm-weather wearability of a tank top. My solution? Give it the chunky textured ribbing of a favorite winter sweater, but with the lightweight, drape-y-ness of an open mesh stitch. I think it works!
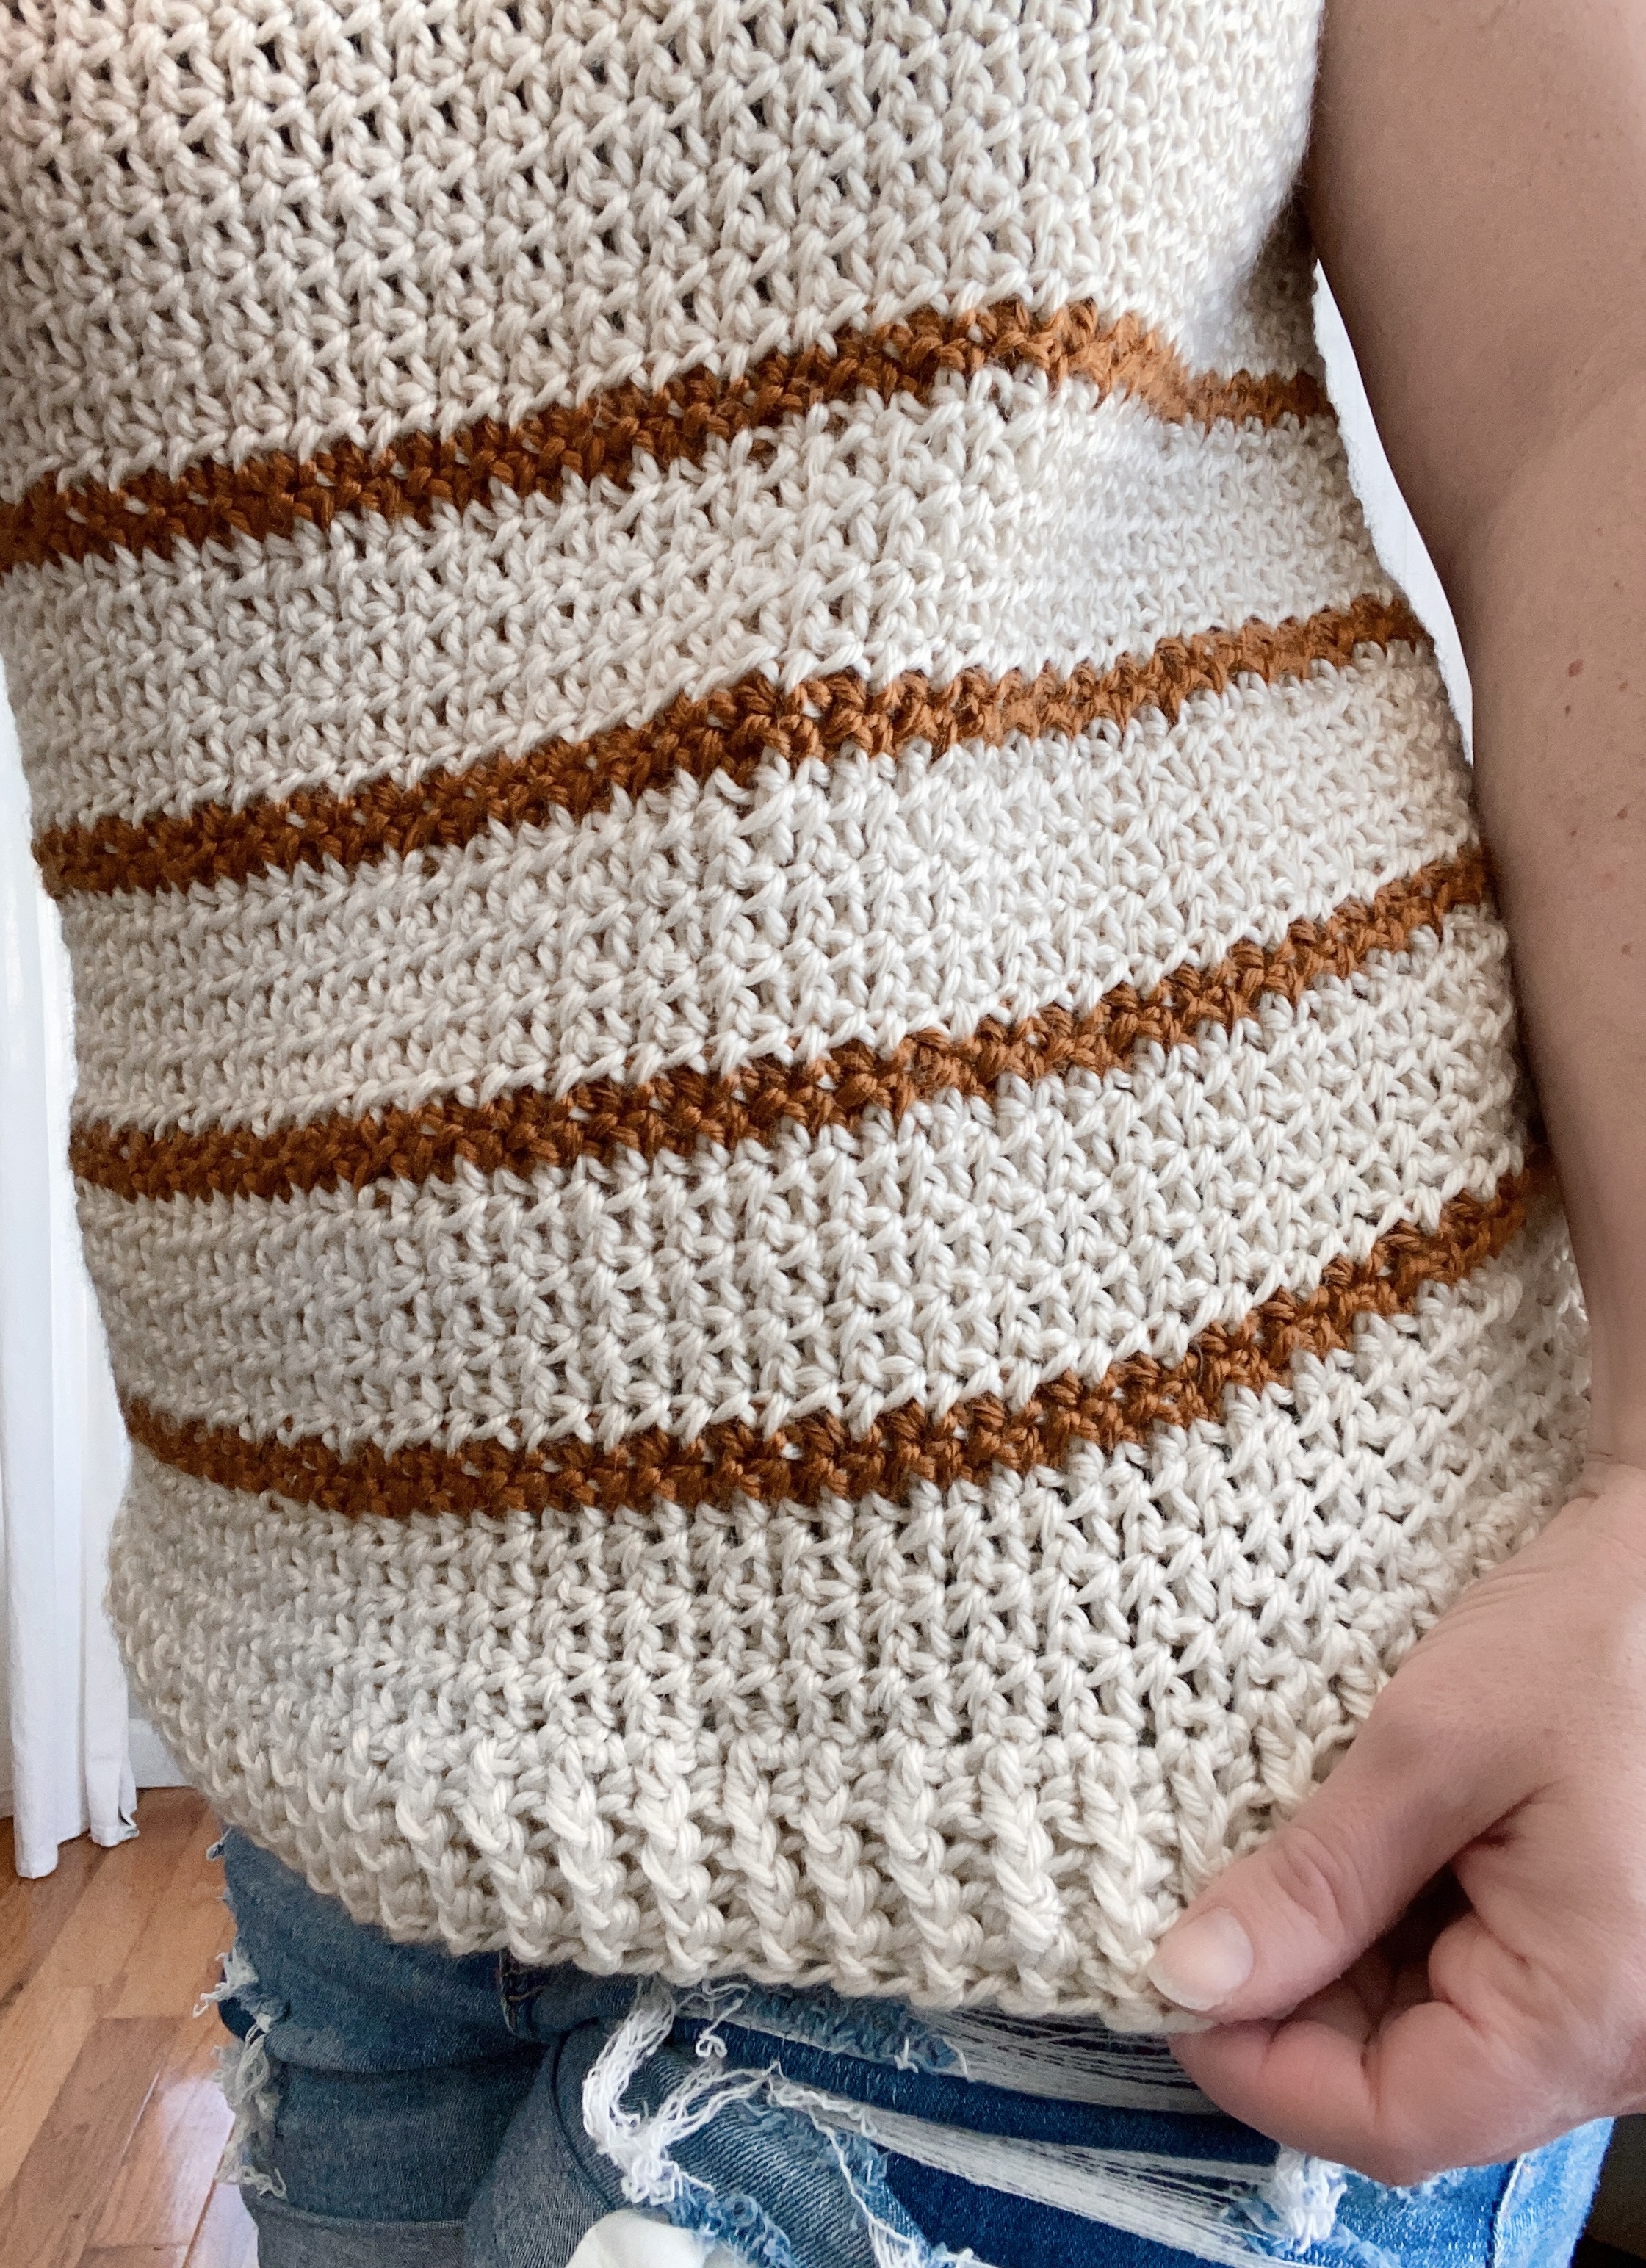
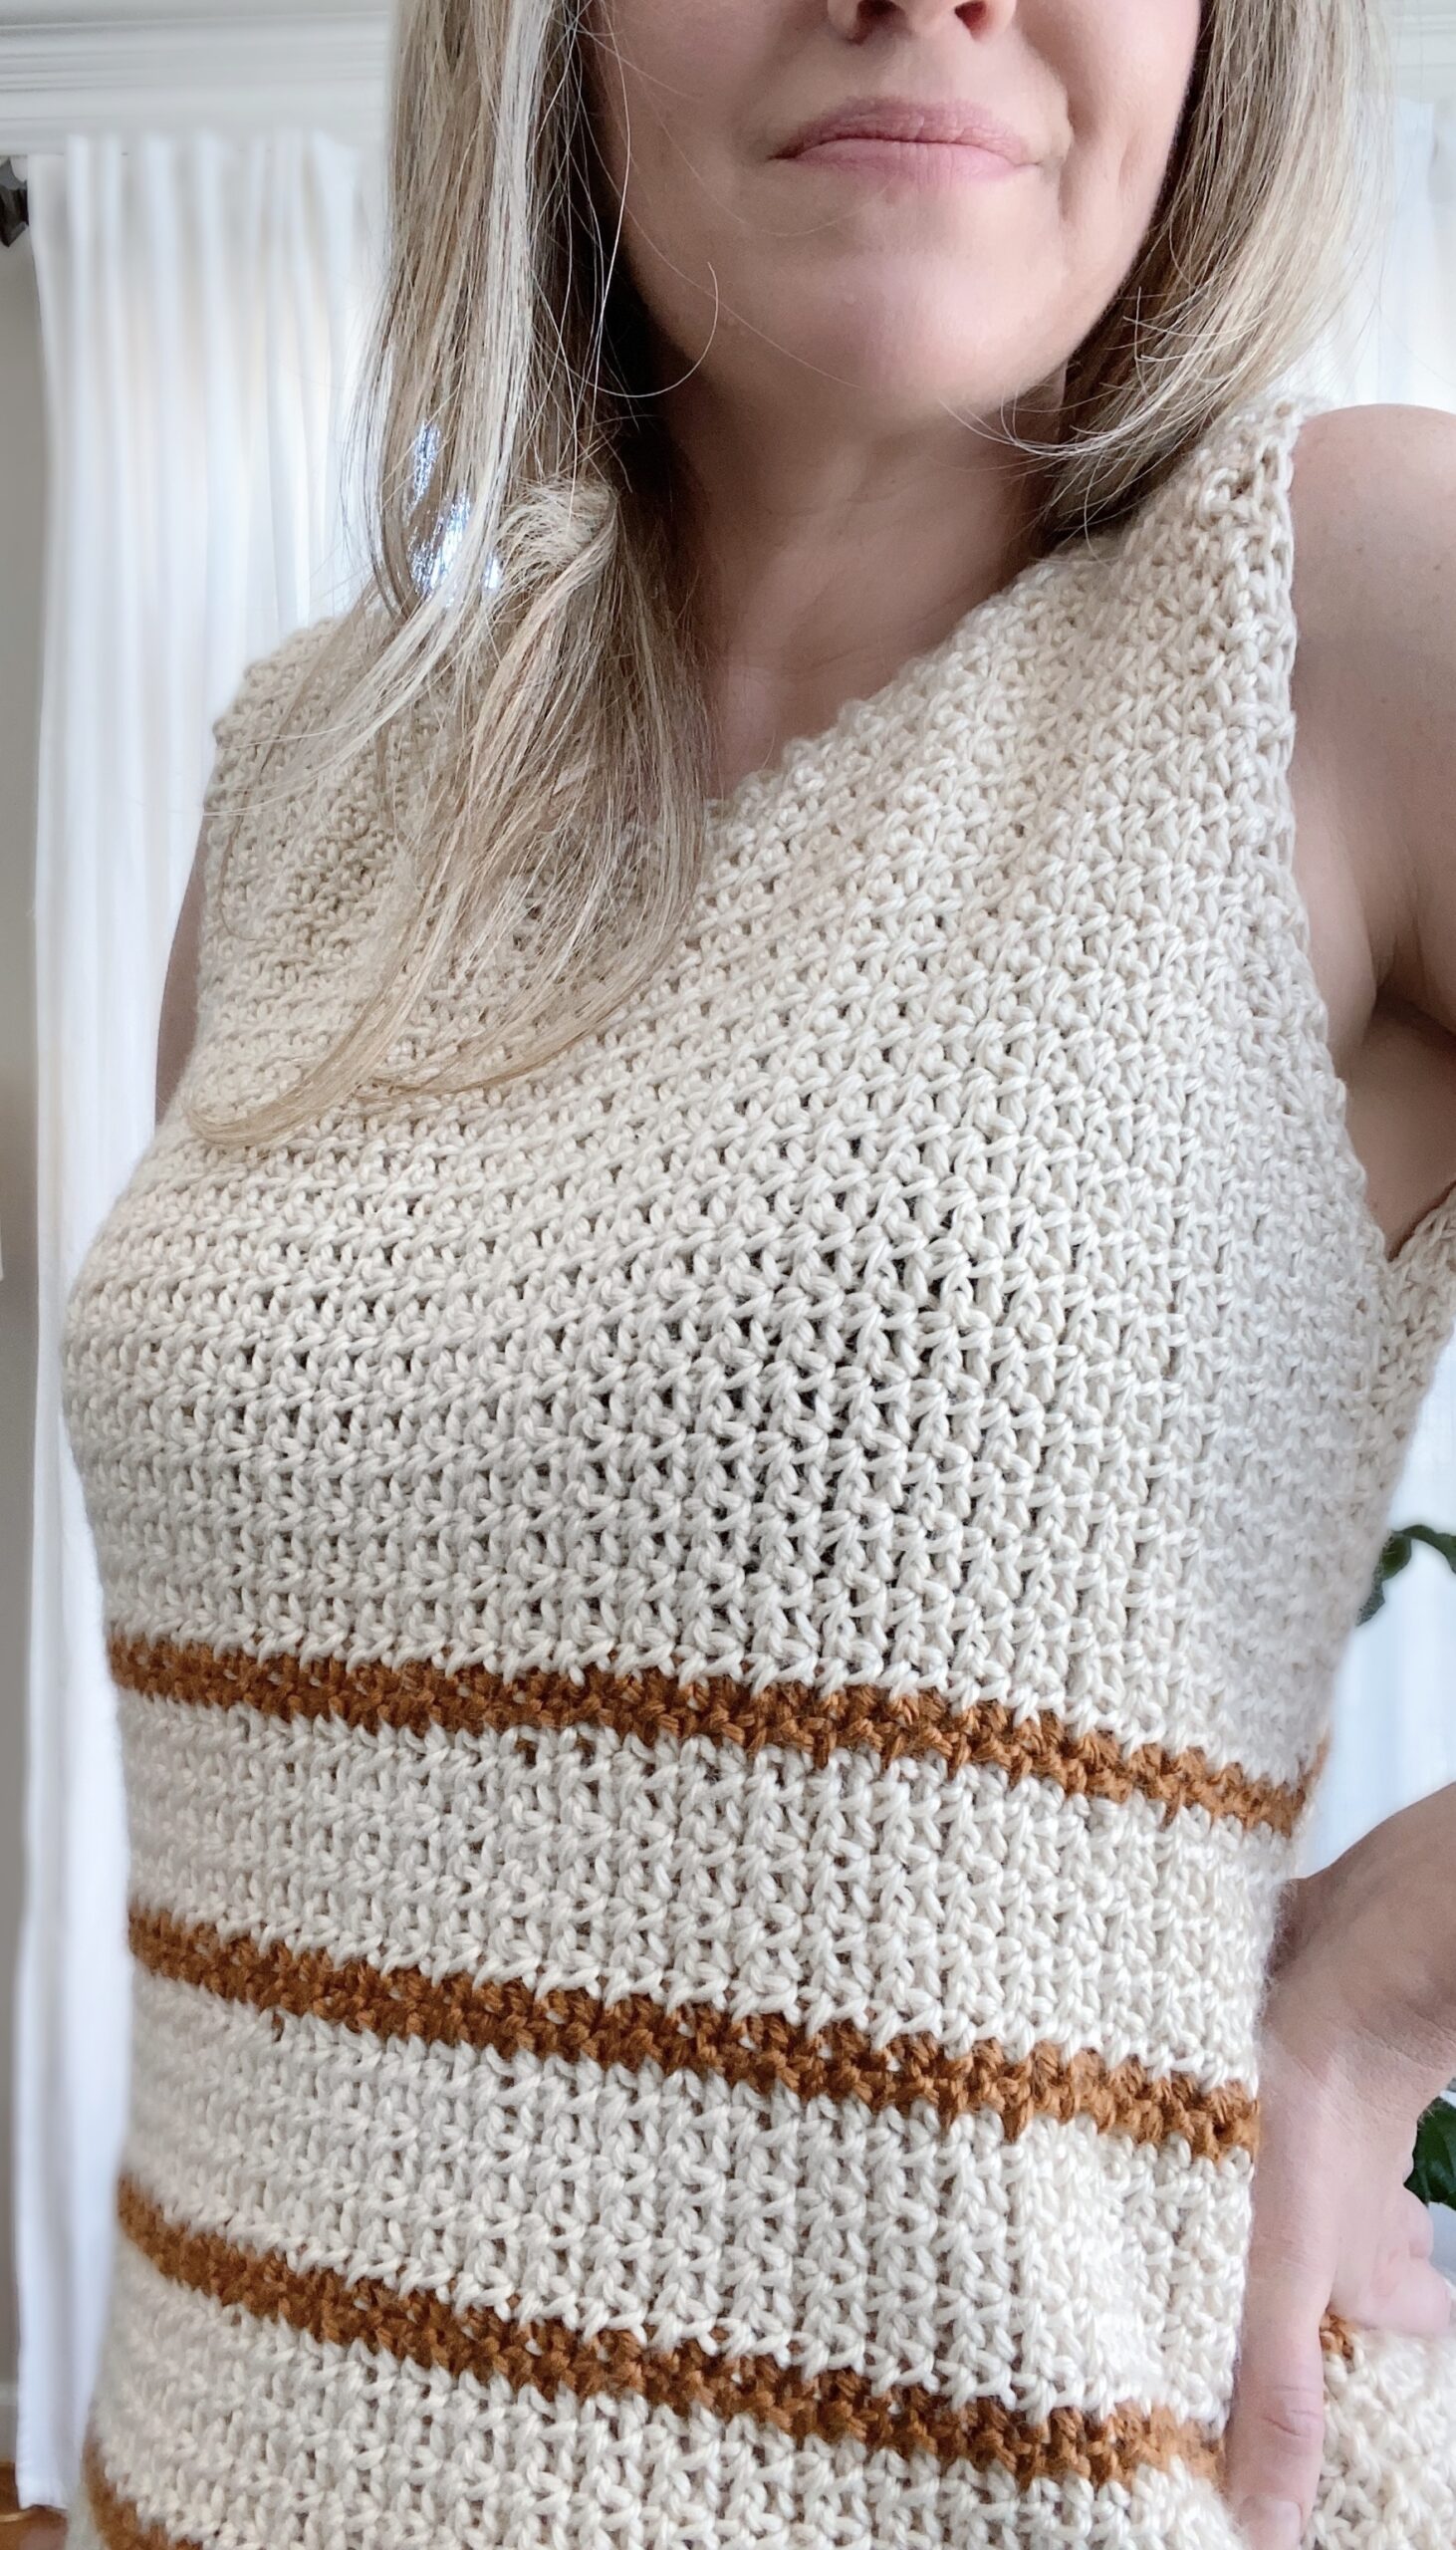
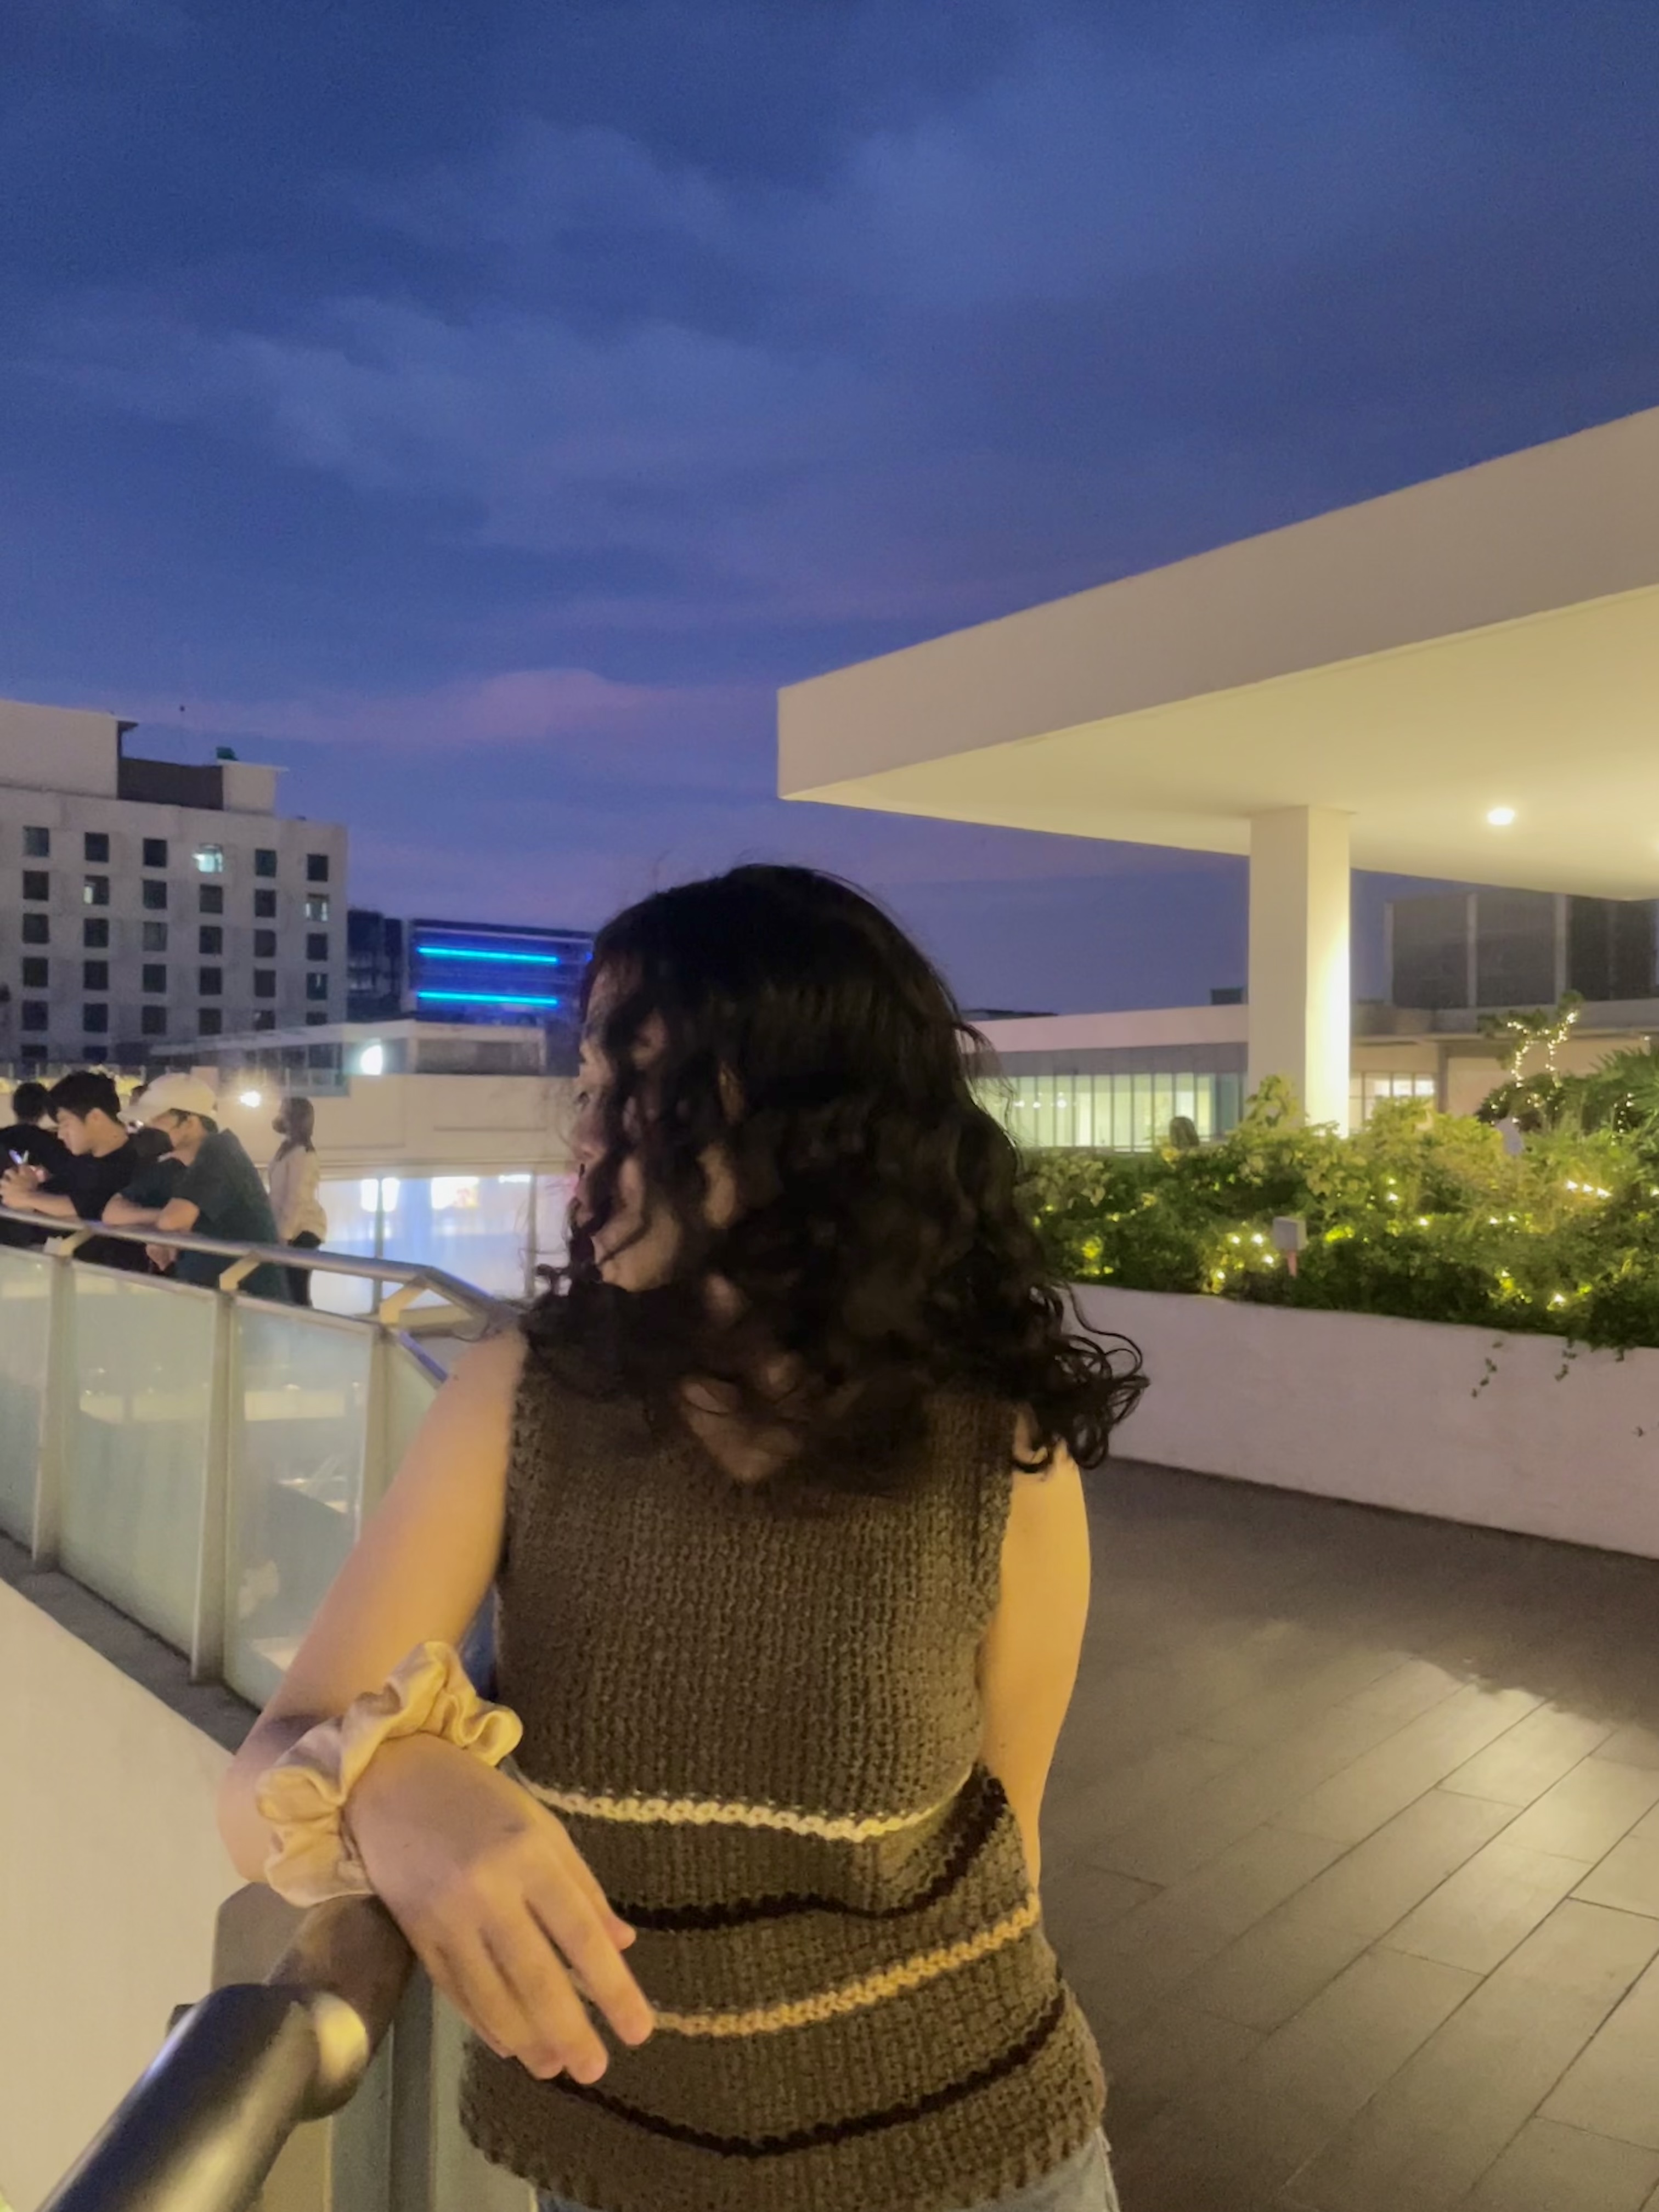
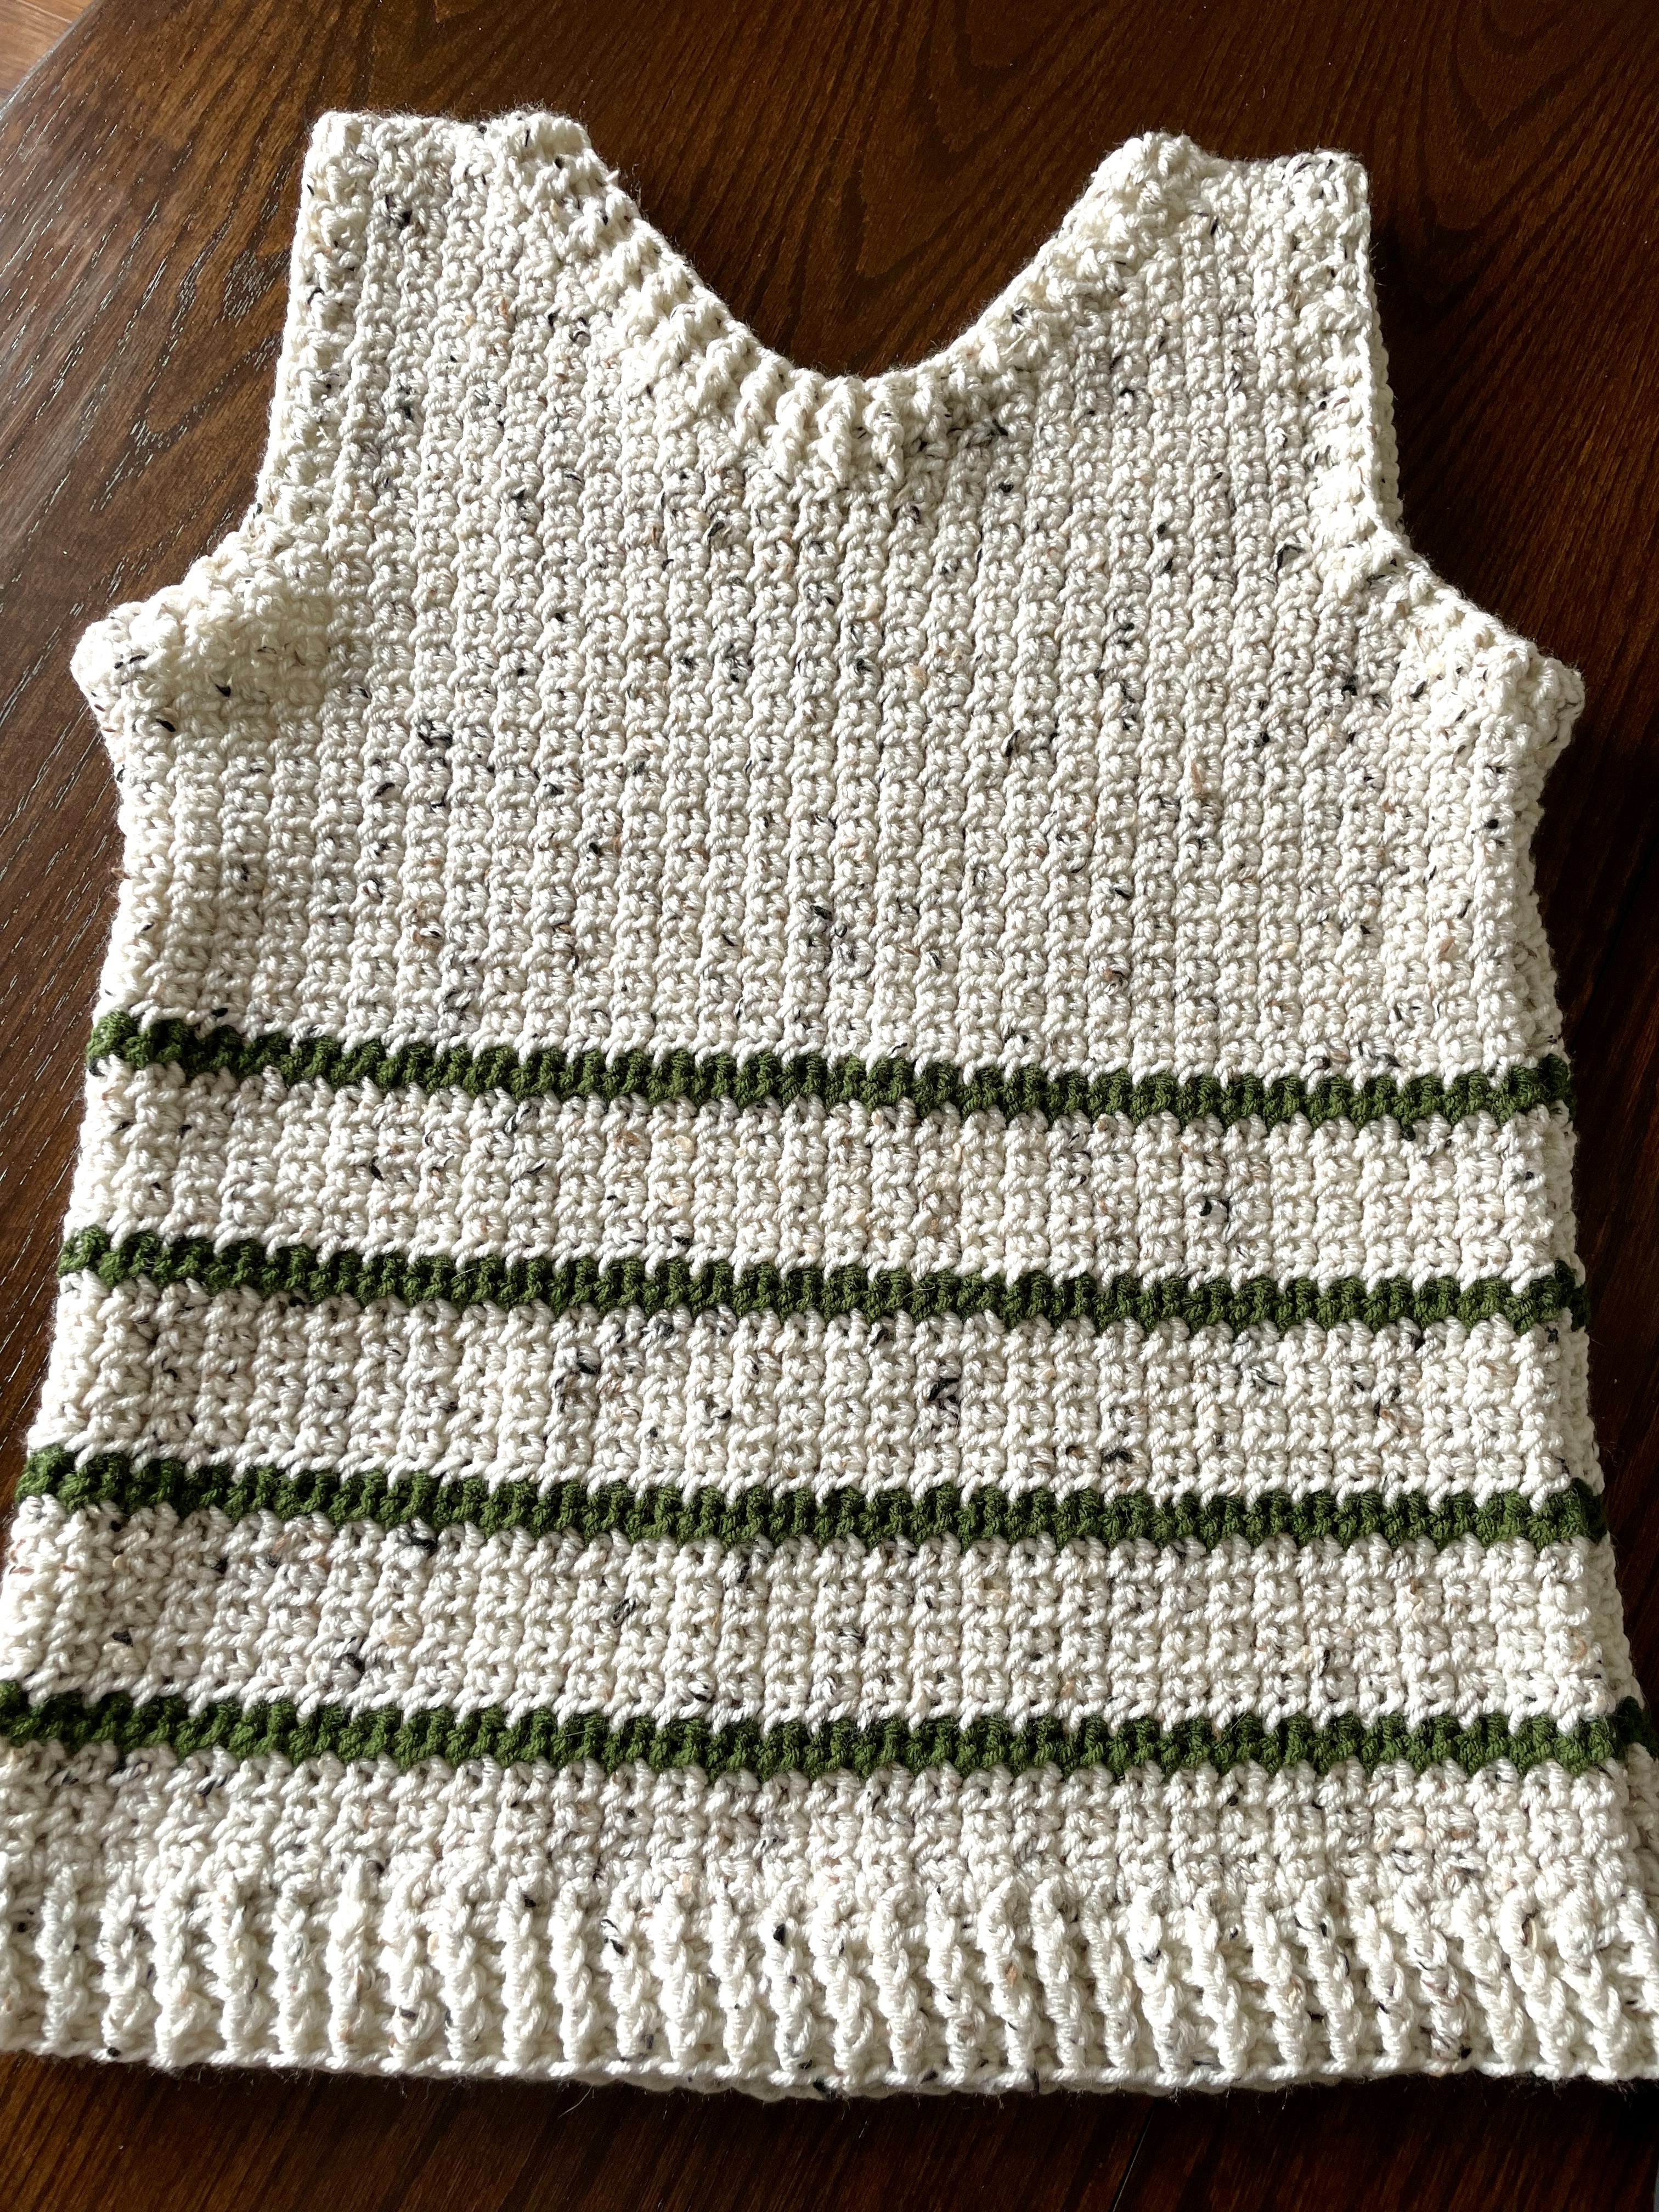
So! This crochet tank top pattern uses the single crochet mesh stitch in vertical rows to create an open, textured look (it’s worked from side to side, not bottom-up or top-down!). The straps are created by increasing/decreasing as you work across the panel. You’ll make two identical panels that are seamed together and Fphdc/Bphdc ribbing is then added at the neck, arms, and bottom edge.
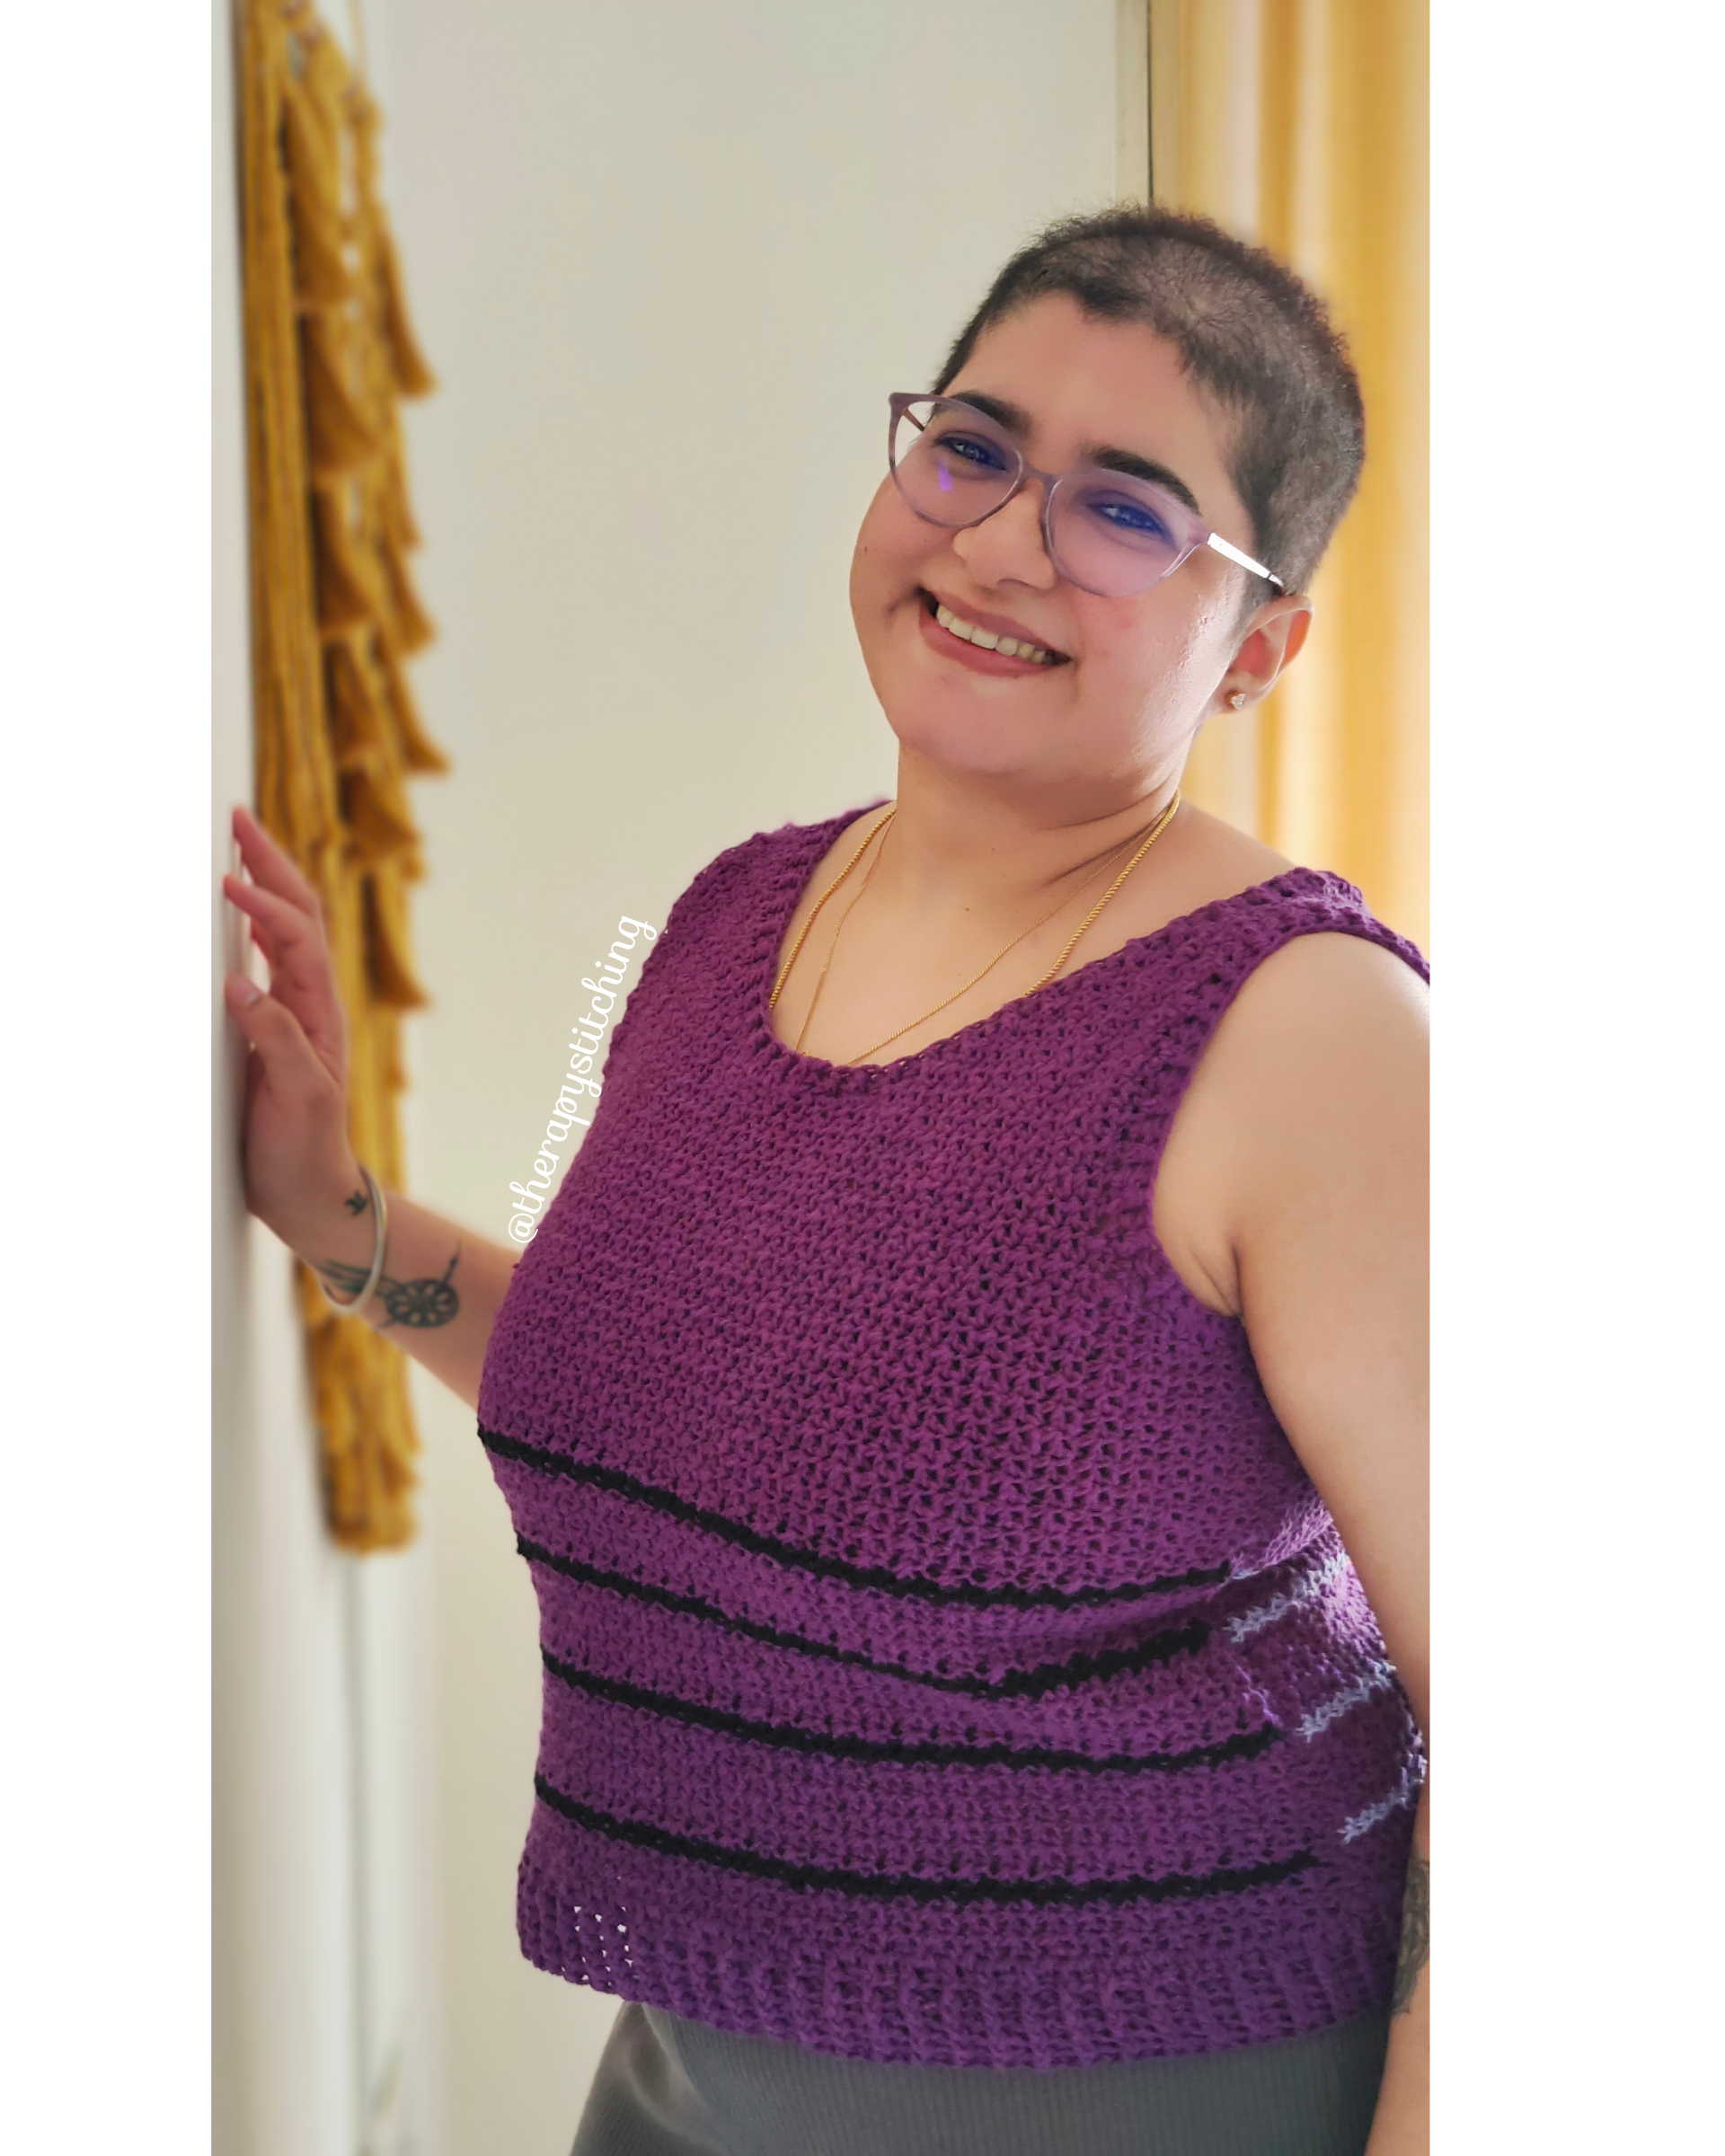
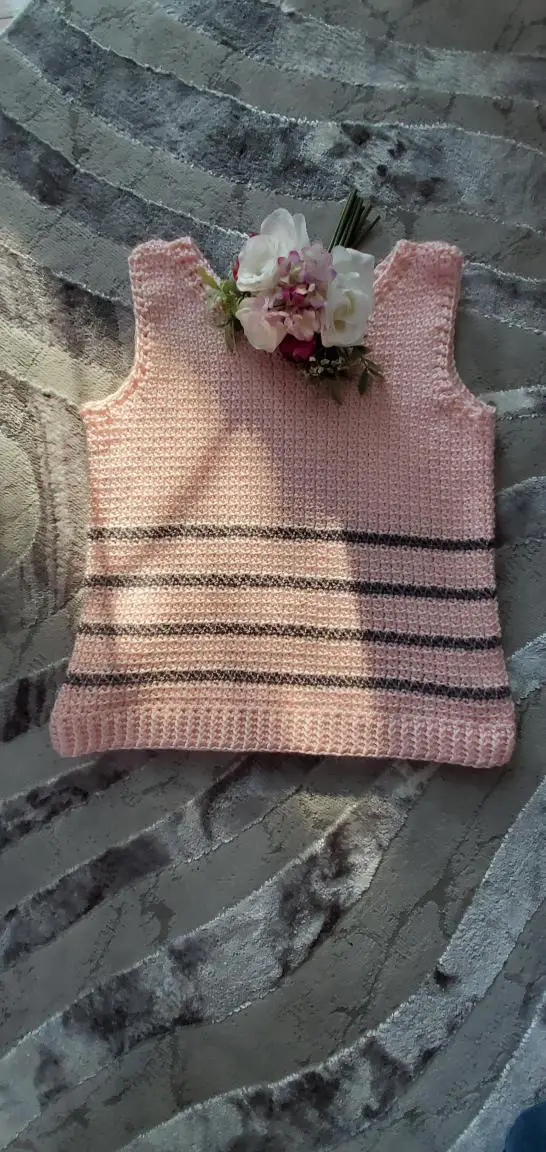
Just to add one more special detail, I threw in some stripes! You can go all one color for the stripes like I did, or mix it up! So many possibilities….
A printable, ad-free PDF version of this pattern is available for a small fee in my Etsy and Ravelry shops!
Before we get started, just wanted to give a shout out to my fabulous pattern testers – the true heroes of pattern designing! Thank you, ladies!
Ok, on to the free pattern!
Wander Crochet Tank Top Free Pattern
SKILL LEVEL
Intermediate: this pattern involves color changes as well as increasing and decreasing and working front post/back post stitches. You will also need to be able to follow the pattern instructions for your size.
MATERIALS
- Yarn: worsted weight (size 4)
- For the main color, I used Furls Wander acrylic yarn in the color Snow (100% acrylic, 120yds (109m)/100g per skein).
- Yardage for main color:
- Small – 480 yds (4 skeins of Wander)
- Medium – 500 yds (5 skeins)
- Large – 520 yds (5 skeins)
- X-Large – 560 yds (5 skeins)
- 2 – XL – 600 yards (6 skeins)
- Yardage for main color:
- For the stripes, all sizes will need approximately 100 – 120 yds of worsted weight in a contrasting color. I used Furls Wander in the color Thatch (1 skein) .
- For the main color, I used Furls Wander acrylic yarn in the color Snow (100% acrylic, 120yds (109m)/100g per skein).
- Size I/9 (5.50mm) crochet hook. Mine is a Furls Streamline Resin in the color Cafe.
- Notions: Scissors, Yarn needle, tape measure, (optional) locking stitch markers
SIZING
This pattern is written for 5 sizes: S (M, L, XL, 2X) to fit bust sizes 32 (36, 40, 44, 48) inches.
Approximate width of each panel at widest point: 16 (18, 20, 22, 24) inches.
Approximate length of finished top from top of strap to bottom of ribbing: 22.5 (23, 23.5, 24, 24.5) inches.
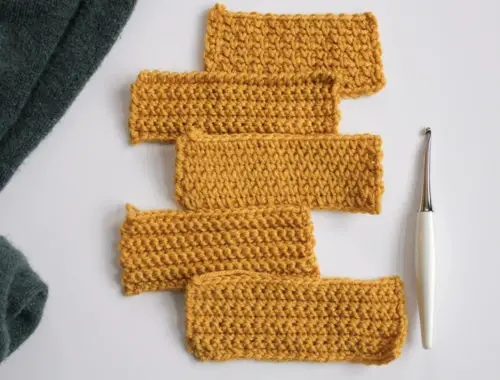
GAUGE
9 sc (and 8 ch 1-sps) x 14.5 rows = 4” square using single crochet mesh stitch.
For gauge swatch:
Ch 26.
Row 1: Sc in 2nd ch from hook, work [ch 1, sk next ch, sc in next ch] down the chain, ending with a sc in the last chain. Ch 1, turn.
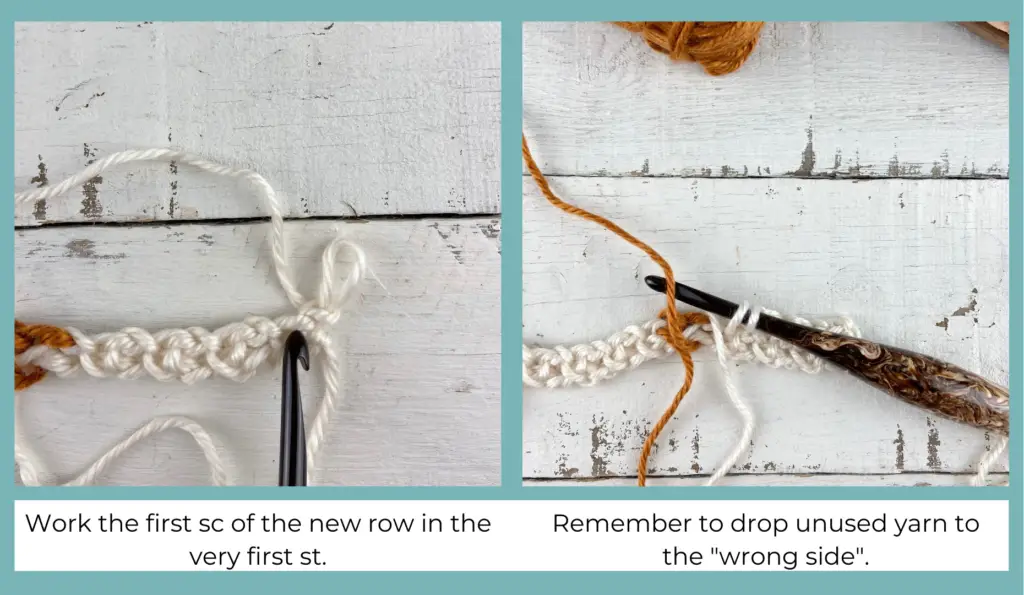
Row 2: Sc in the very first sc, ch 1, sk the ch 1-sp, sc in the next sc. Work [ch 1, sk next ch 1-sp, sc in next sc] until the end of the row. You should end with a sc in the last sc of the previous row. Ch 1, turn.
Rows 3 – 22: Repeat Row 2.
Note on gauge: This swatch should work up slightly bigger than 4×4” so that you can take your measurements using the inside stitches (this tends to be more accurate than using edge stitches). Also, for this stitch pattern, I recommend blocking or slightly stretching the swatch before taking the gauge measurement so that the mesh stitches are as open as they should be.
NOTES
- This pattern is written for 5 sizes as follows: S (M, L, XL, 2X). Make sure to follow the numbers for your size only.
- Construction: this crochet tank top is made of two identical panels that are worked in vertical rows using the single crochet mesh stitch. The panels are seamed together using a slip stitch and then a Fphdc/Bphdc border is added at the neck, armholes, and bottom edge.
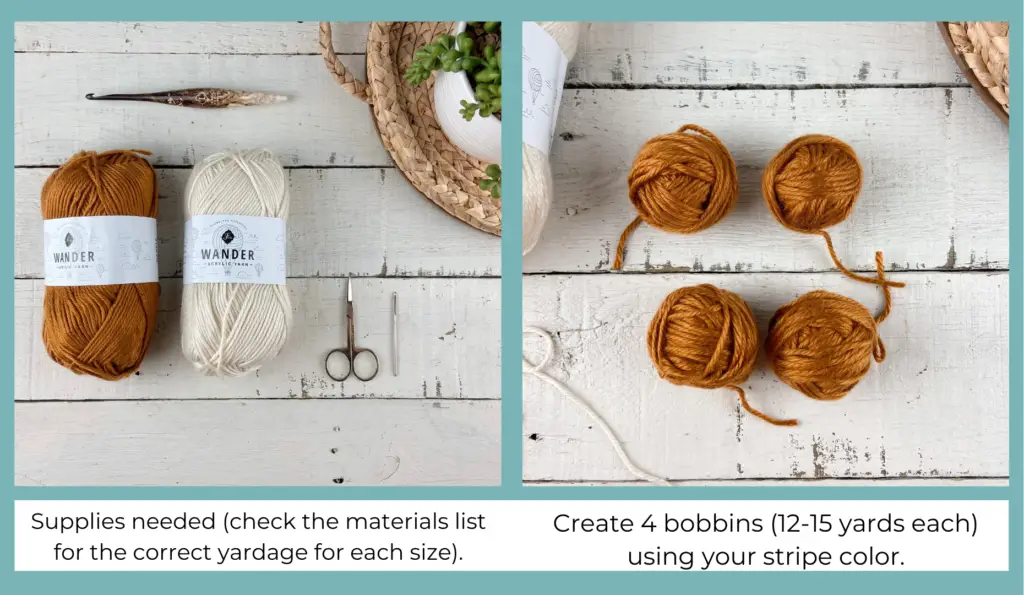
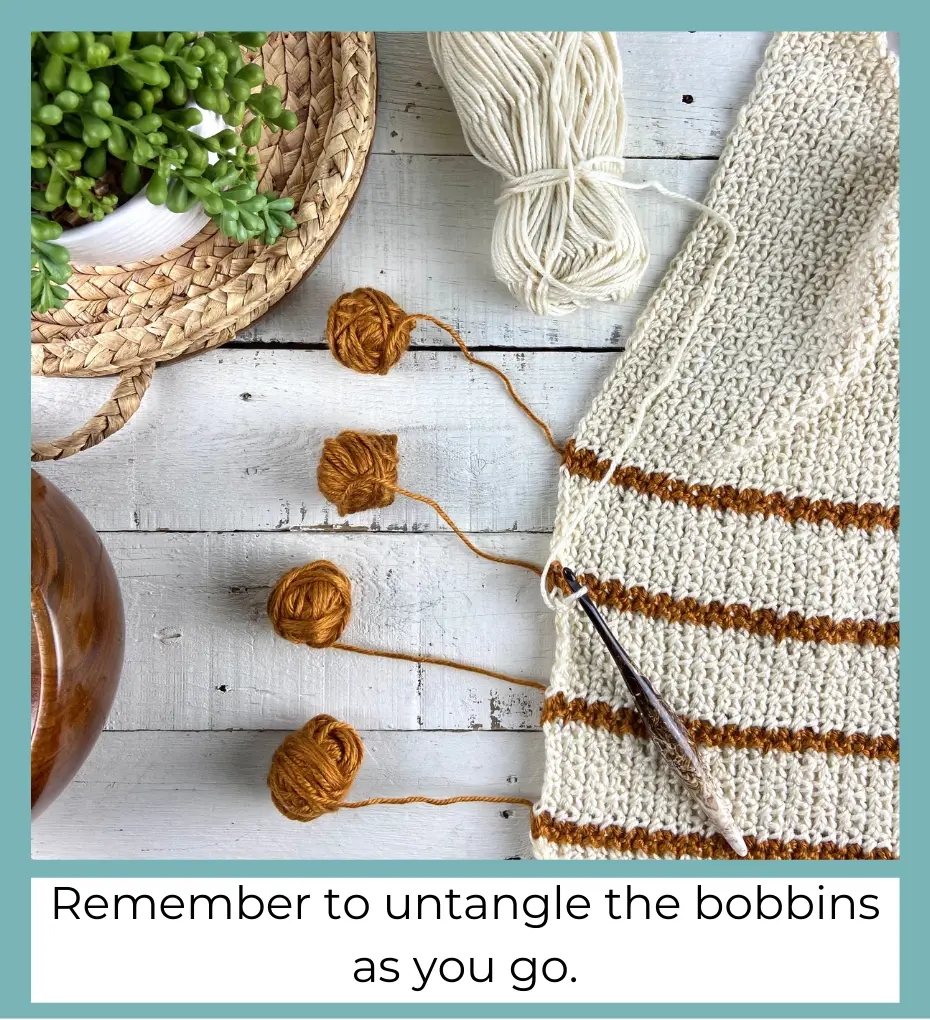
- Before you start, make 4 balls or bobbins of the contrasting color yarn for the stripes, about 20 – 25 yards each. This should be enough for both panels.
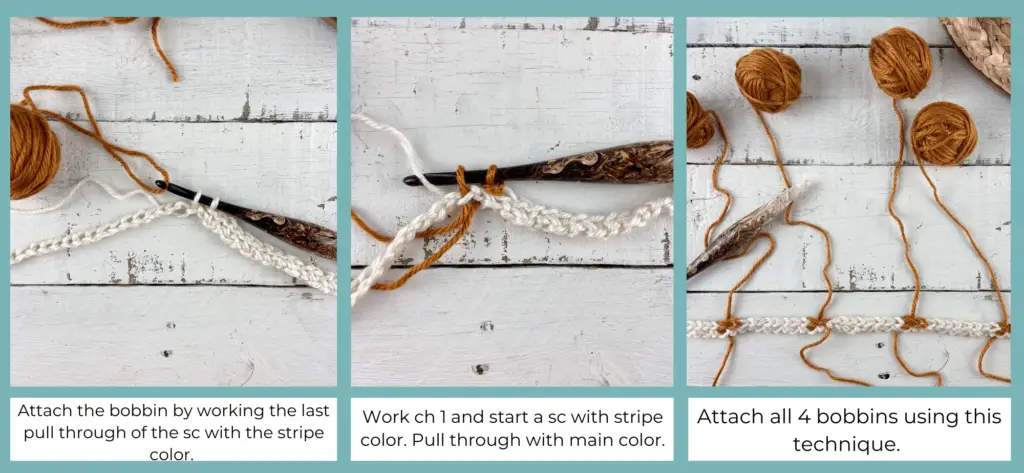
- For all color changes: when working the last single crochet of the “old” color, stop before the last “pull through” of the stitch. There will be two loops left on the hook. Pull through with the “new” color and continue with the pattern. Give each color a tug to tighten and keep the color changes sharp.
- Choose one side of each panel to be the “wrong side” (this will be the side facing in when you join the two panels – it doesn’t matter which side you choose). Note that, since you will turn at the end of each row, sometimes the wrong side will be facing you as you work, sometimes it will be facing away from you. When changing colors, always drop the unused yarn to this “wrong side.” Since you won’t see it, you can drop the yarn when not in use and carry it over the back of the work to pick up the next time you need it.
- The ch 1 at the beginning of each row does NOT count as a stitch.
- Pattern written in US terms.
- Crochet Abbreviations:
- Bphdc = back post half double crochet
- ch = chain
- Fphdc = front post half double crochet
- hdc = half double crochet
- sc =single crochet
- sk = skip
- sl st = slip stitch
- sp = space
- st =stitch
PATTERN
Tank Top Panel (make 2):
With a size I/9 (5.50mm) hook and main color yarn, ch 56 (58, 60, 62, 64).
Row 1: Sc in 2nd ch from hook, then work [ch 1, sk next ch, sc in next ch] 7 (8, 9, 10, 11) times (so this should give you a total of 8 (9, 10, 11, 12) scs so far). On the last sc, attach the first stripe color bobbin by working the last pull through with stripe color (drop main color to wrong side),
**With stripe color, ch 1, sk next ch, sc in next ch, switch to main color by working the last pull through of the sc with the main color (drop stripe color to wrong side),
With main color, work [ch 1, sk next ch, sc in next ch] 4 times, switch to stripe color by attaching the next bobbin (drop main color to wrong side),
Repeat from ** 3 more times, ending with a sc in the last ch (continue using main color at the end of the last repeat). Ch 1, turn. Stitch count: 28 (29, 30, 31, 32)sc and 27 (28, 29, 30, 31)ch 1-sps (See graphic below to double check your numbers)
NOTE: from here on, to keep things more streamlined, I will only be listing the number of single crochets in the stitch count for each size. The number of ch 1-sps will always be one less than the number of scs listed for your size.

Row 2: With main color, sc in the very first sc, ch 1, sk the ch 1-sp, sc in the next sc. Work [ch 1, sk next ch 1-sp, sc in next sc] 2 times, switch to stripe color (drop main color to wrong side),
**With stripe color, ch 1, sk next ch 1-sp, sc in next sc (this should be the stripe color sc form the row before), switch to main color (drop stripe color to wrong side),
With main color, work [ch 1, sk next ch 1-sp, sc in next sc] 4 times, switch to stripe color (drop main color to wrong side),
Repeat from ** 2 more times.
With stripe color, ch 1, sk next ch 1-sp, sc in next sc, switch to main color (drop stripe color to wrong side),
With main color, work [ch 1, sk next ch 1-sp, sc in next sc] to the end of the row. Ch 1, turn. Stitch count: 28 (29, 30, 31, 32)sc
Row 3: With main color, sc in the very first sc, ch 1, sk the ch 1-sp, sc in the next sc. Work [ch 1, sk next ch 1-sp, sc in next sc] until the first stripe, switch to stripe color (drop main color to wrong side),
**With stripe color, ch 1, sk next ch 1-sp, sc in next sc, switch to main color (drop stripe color to wrong side),
With main color, work [ch 1, sk next ch 1-sp, sc in next sc] 4 times, switch to stripe color (drop main color to wrong side),
Repeat from ** 3 more times (continue using main color at the end of the last repeat). Ch 1, turn. Stitch count: 28 (29, 30, 31, 32)sc
For sizes S (M, L) – skip to the “Increasing for the Armhole section”.
For size XL – Repeat Row 2 and Row 3 one more time, then move on to the “Increasing for the Armhole” section.
For size 2XL – Repeat Row 2 and Row 3 two more times, then move on to the “Increasing for the Armhole” section.
Increasing for the armhole:
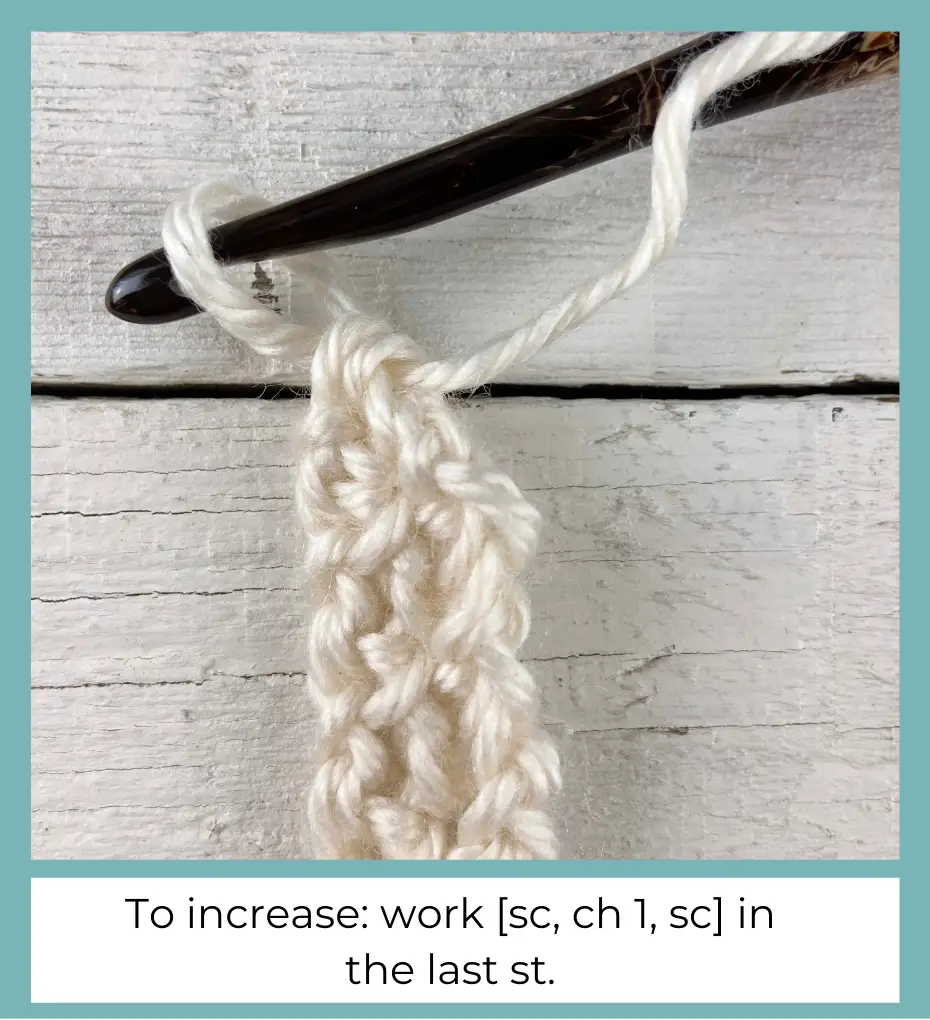
Over the next several rows, you will increase at the end. When indicated to work an increase: work a sc in the last st, as usual, then ch 1 and sc again in the same st.
For all sizes:
(Increase Row) Row 4 (4, 4, 6, 8): Repeat Row 2 with an increase in the very last st. Ch 1, turn. Stitch count: 29 (30, 31, 32, 33)sc
Row 5 (5, 5, 7, 9): Repeat Row 3. Stitch count: 29 (30, 31, 32, 33)sc
Row 6 (6, 6, 8, 10): Repeat Increase Row. Stitch count: 30 (31, 32, 33, 34)sc
Row 7 (7, 7, 9, 11): Repeat Row 3. Stitch count: 30 (31, 32, 33, 34)sc
Row 8 (8, 8, 10, 12): Repeat Increase Row). Stitch count: 31 (32, 33, 34, 35)sc
Row 9 (9, 9, 11, 13): Repeat Row 3. Stitch count: 31 (32, 33, 34, 35)sc
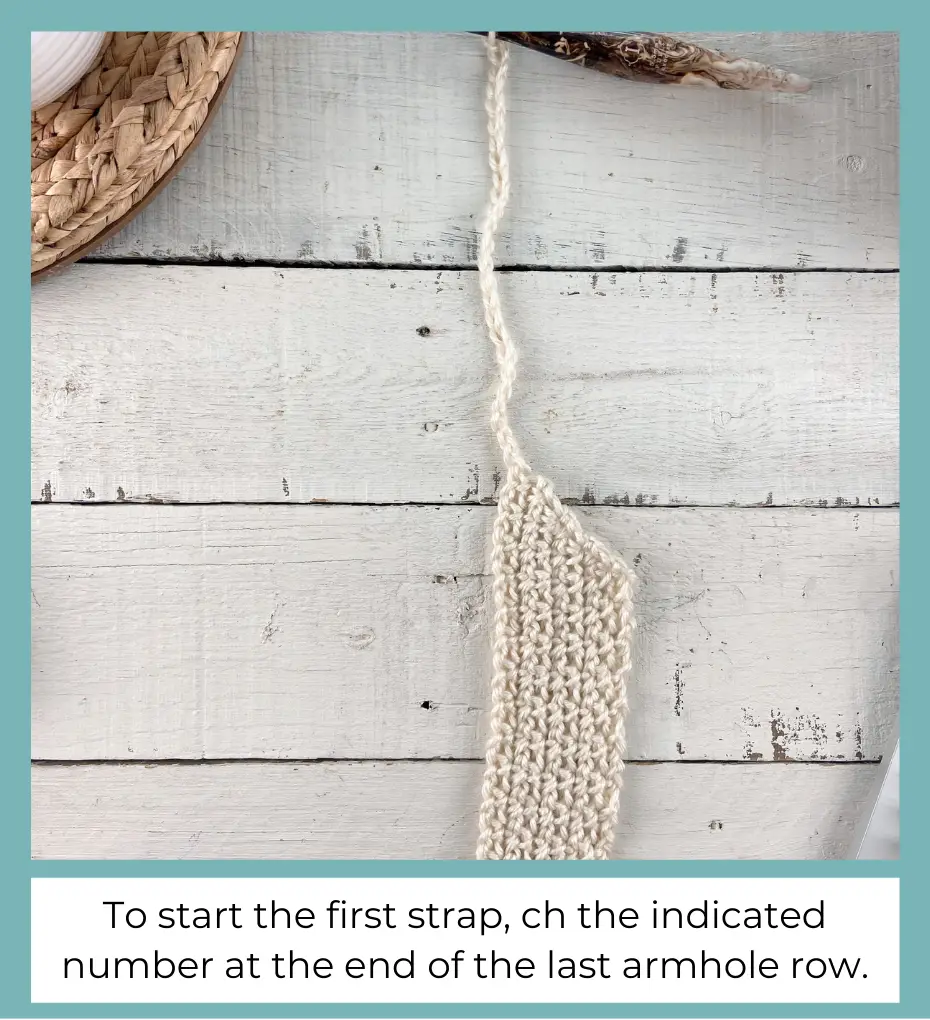
Making the first strap:
Row 10 (10, 10, 12, 14): Repeat Row 2 (no increase at the end). After the last sc, ch 21 (23, 25, 27, 29). Turn. Stitch count: 31 (32, 33, 34, 35)sc and 21 (23, 25, 27, 29)chs
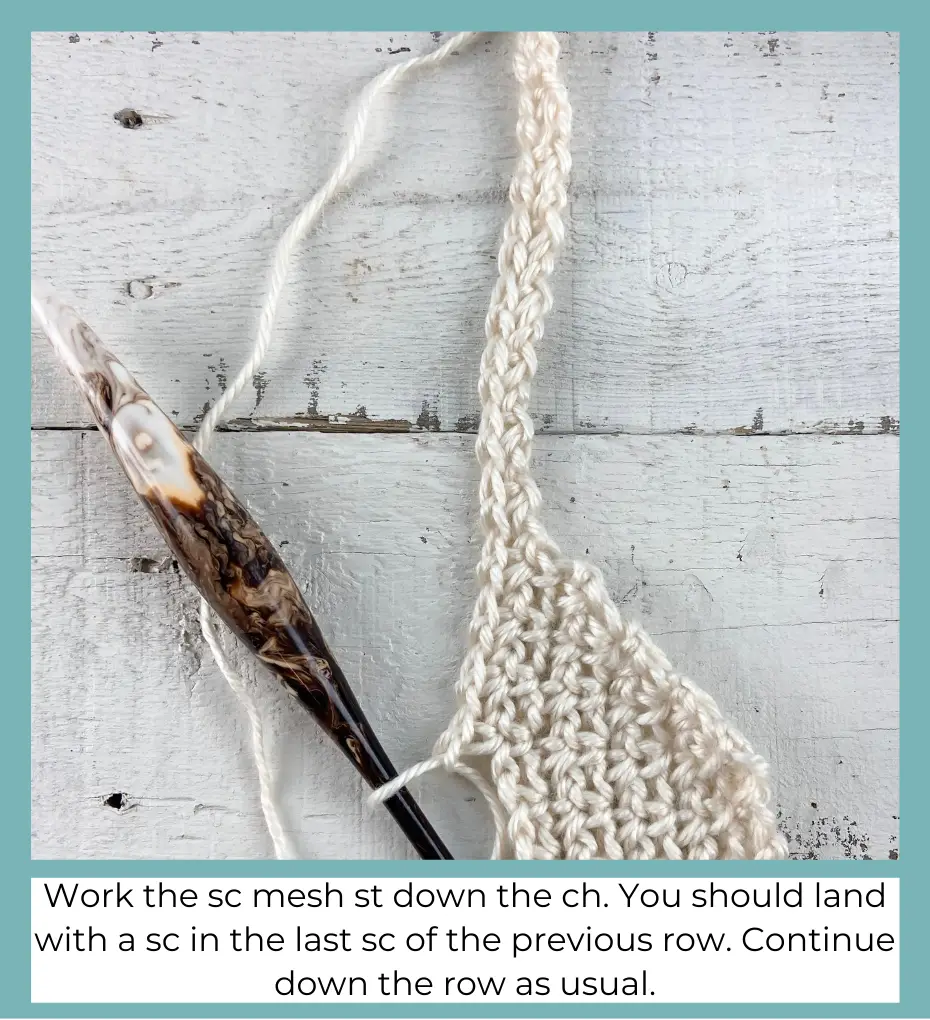
Row 11 (11, 11, 13, 15): Sc in 2nd ch from hook, work [ch 1, sk next ch, sc in next ch] down the chain. You should land with a sc going in the last sc from the previous row. Continue the pattern from Row 3 down the row. Ch 1, turn. Stitch count: 41 (43, 45, 47, 49)sc
Row 12 (12, 12, 14, 16): Repeat Row 2 all the way to the top of the strap. Stitch count: 41 (43, 45, 47, 49)sc
Row 13 (13, 13, 15, 17): Repeat Row 3. Stitch count: 41 (43, 45, 47, 49)sc
Row 14 (14, 14, 16, 18): Repeat Row 2. Stitch count: 41 (43, 45, 47, 49)sc
Neckline Overview:

Decreasing for the neckline:
Over the next several rows, you will decrease at the beginning. When indicated to work a decrease: skip the first st and the first ch 1-sp, sc in the next sc. Continue in st pattern.
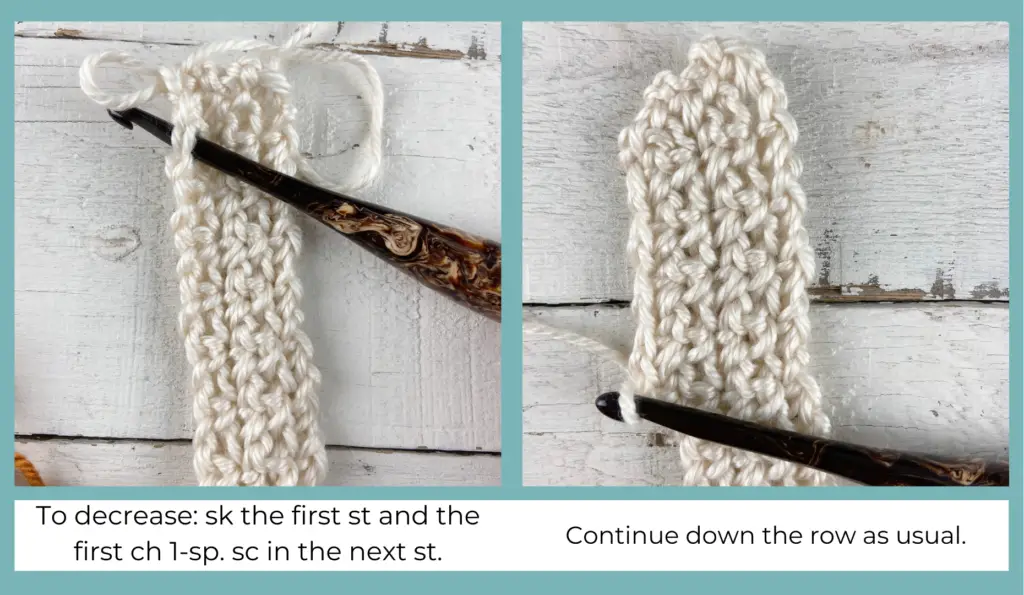
(Decrease Row) Row 15 (15, 15, 17, 19): Decrease, then follow the usual stitch pattern from Row 3. Stitch count: 40 (42, 44, 46, 48)sc
Row 16 (16, 16, 18, 20): Repeat Row 2. Stitch count: 40 (42, 44, 46, 48)sc
Rows 17 – 30 (17 – 30, 17 – 30, 19 – 32, 21 – 34): Work [Repeat Decrease Row, repeat Row 2] 7 more times. Stitch count: 33 (35, 37, 39, 41)sc
Row 31 (31, 31, 33, 35): Repeat Decrease Row. Stitch count: 32 (34, 36, 38, 40)sc
For size Small only – skip to the “Increasing for the Second Strap” section.
For all other sizes – proceed to the “Expanding the Width” section.
Expanding the width:
Sizes (M, L, XL, 2XL) only
Rows x (32 – 35, 32 – 39, 34 – 45, 36 – 51): Alternate Row 2 and Row 3, ending with a Row 3. Stitch count: x (34, 36, 38, 40)sc
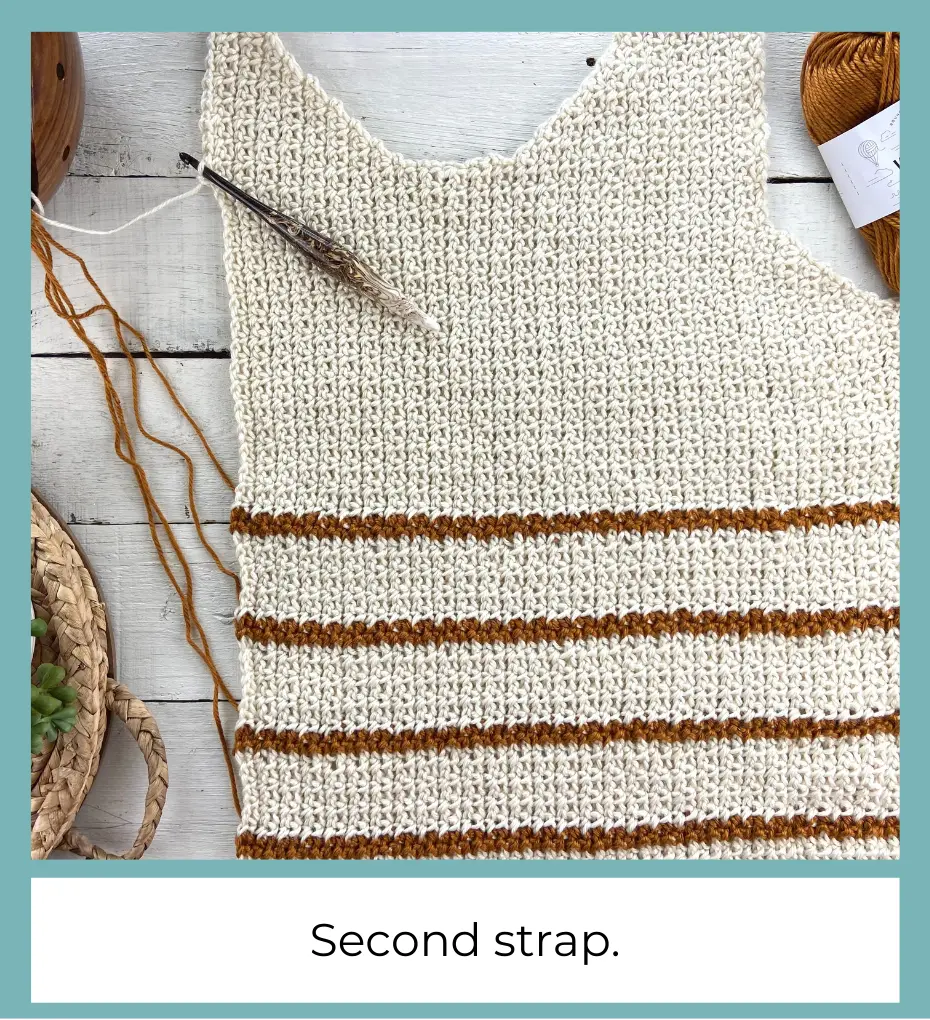
Increasing for the second strap:
For all sizes –
Rows 32 – 49 (36 – 53, 40 – 57, 46 – 63, 52 – 69): Work [Increase Row, Repeat Row 3] 9 times. Ending stitch count: 41 (43, 45, 47, 49)sc
Second Strap (all sizes):
Row 50 (54, 58, 64, 70): Repeat Row 2. Stitch count: 41 (43, 45, 47, 49)sc
Row 51 (55, 59, 65, 71): Repeat Row 3. Stitch count: 41 (43, 45, 47, 49)sc
Row 52 (56, 60, 66, 72): Repeat Row 2. Stitch count: 41 (43, 45, 47, 49)sc
Row 53 (57, 61, 67, 73): Repeat Row 3. Stitch count: 41 (43, 45, 47, 49)sc
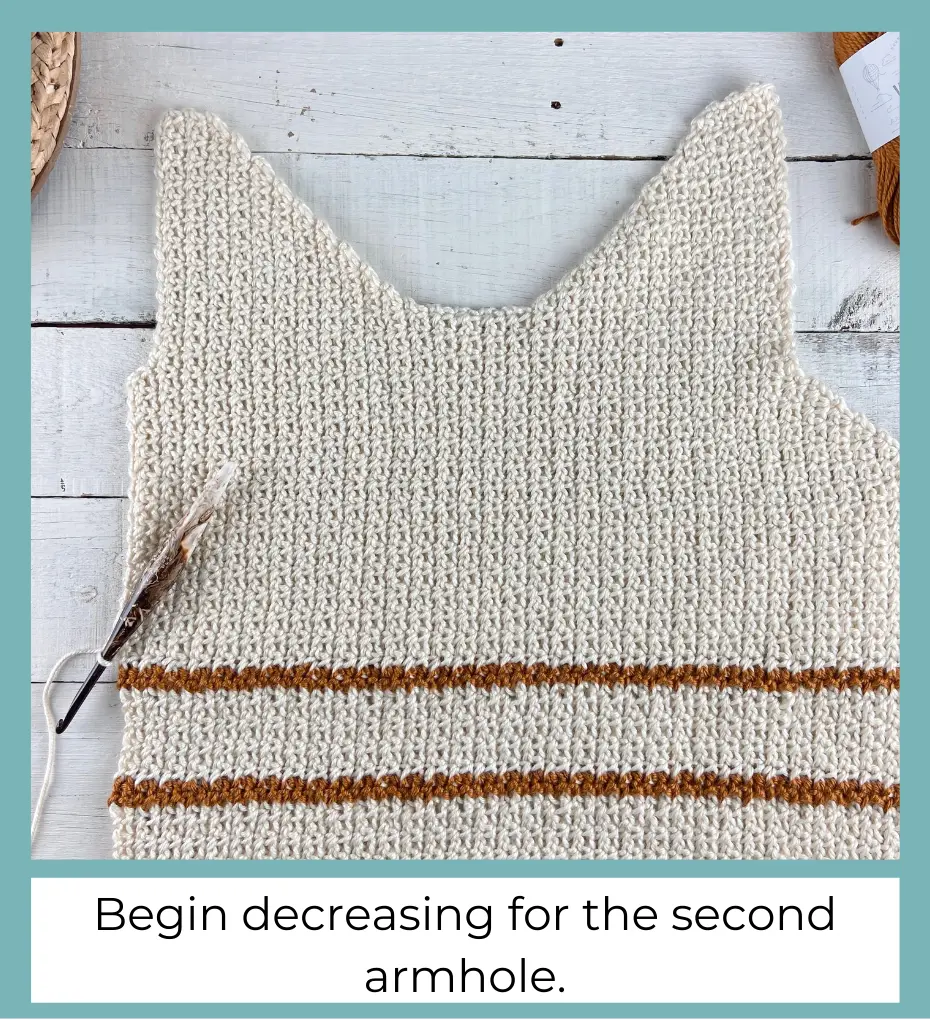
Decreasing for the second armhole (all sizes):
Row 54 (58, 62, 68, 74): Repeat Row 2, but after the last stripe, continue to work the sc mesh stitch for only 11 (12, 13, 14, 15) more scs. Leave remaining sts unworked. Ch 1, turn. Stitch count: 31 (32, 33, 34, 35)sc
Row 55 (59, 63, 69, 75): Decrease Row. Stitch count: 30 (31, 32, 33, 34)sc
Row 56 (60, 64, 70, 76): Repeat Row 2. Stitch count: 30 (31, 32, 33, 34)sc
Row 57 (61, 65, 71, 77): Decrease Row. Stitch count: 29 (30, 31, 32, 33)sc
Row 58 (62, 66, 72, 78): Repeat Row 2. Stitch count: 29 (30, 31, 32, 33)sc
Row 59 (63, 67, 73, 79): Decrease Row. Stitch count: 28 (29, 30, 31, 32)sc
Row 60 (64, 68, 74, 80): Repeat Row 2. Stitch count: 28 (29, 30, 31, 32)sc
Row 61 (65, 69, 75, 81): Repeat Row 3. Stitch count: 28 (29, 30, 31, 32)sc
Row 62 (66, 70, 76, 82): Repeat Row 2. Stitch count: 28 (29, 30, 31, 32)sc
For sizes S (M, L) – Stop here. Fasten off main color for first panel. Do not fasten off main color for second panel. Fasten off stripes and weave in those ends and any others. Move on to the “Seaming” section.
For size XL –
Row 77: Repeat Row 3. Stitch count: (31)sc
Row 78: Repeat Row 2. Stitch count: (31)sc. Fasten off main color for first panel. Do not fasten off main color for second panel. Fasten off stripes and weave in those ends and any others. Move on to the “Seaming” section.
For size 2XL –
Row 83: Repeat Row 3. Stitch count: (32)sc
Row 84: Repeat Row 2. Stitch count: (32)sc.
Row 85: Repeat Row 3. Stitch count: (32)sc
Row 86: Repeat Row 2. Stitch count: (32)sc. Fasten off main color for first panel. Do not fasten off main color for second panel. Fasten off stripes and weave in those ends and any others. Move on to the “Seaming” section.
**I recommend blocking the panels before seaming**
Seaming
Lay one panel on top of the other with the right sides facing in. Double check that the stripes are lined up. (Optional – use several locking stitch markers to keep the panels aligned while you seam.)
Note: I tried multiple methods of seaming this top (mattress stitch, whip stitch, etc), but I found that the slip stitch method gave it the most structure due to the open nature of the sc mesh stitch. Feel free to use the seaming method of your choice, just be aware that it may slightly change the finished measurements of your top.
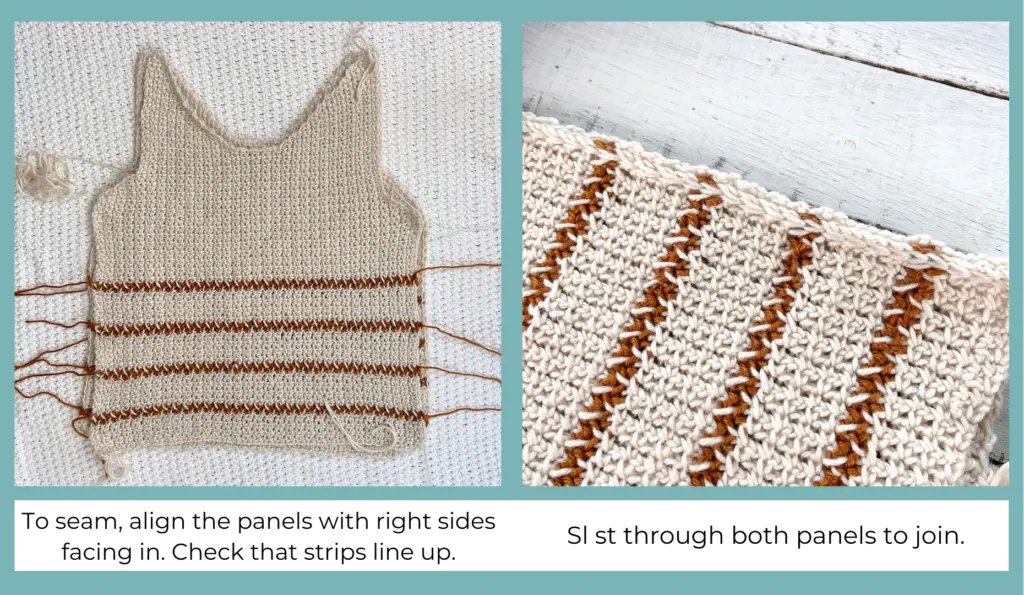
Sides
For the first side: use the working yarn from the end of the last row to slip stitch through both panels.
Continue to loosely slip stitch through both panels as evenly as you can down the side (checking that the front and back panel stripes line up as you go) until you get to the bottom of the panels. Fasten off and weave in ends.
For the second side: Starting at the bottom of the armhole, attach main color yarn with a sl st through both panels.
Loosely slip stitch through both panels as evenly as you can (checking that the front and back panel stripes line up as you go) until you get to the bottom of the panels. Fasten off and weave in the ends.
Straps
Attach main color yarn with a sl st through both panels at the top of one strap. Evenly sl st through both panels across the top of the strap to join. Fasten off and weave in ends. Repeat for the other strap.
Flip top right side out.
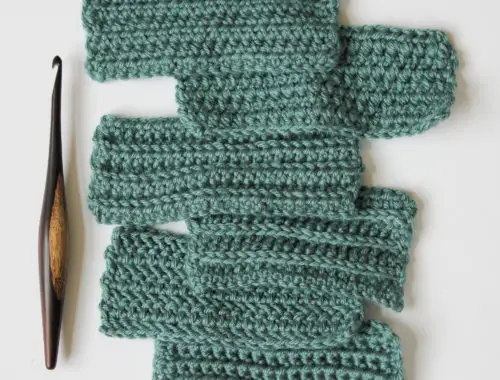
Adding the Ribbing
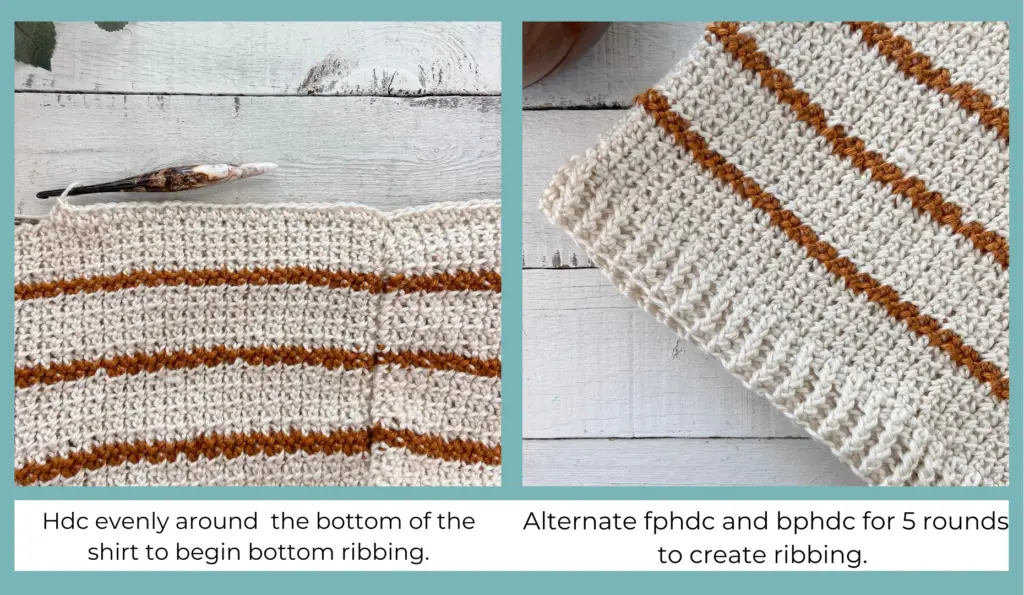
Bottom
Attach main color yarn with a sl st near one of the side seams. Ch 1.
Round 1: Work approximately 124 (132, 140, 156, 166) hdc evenly around the bottom of the shirt (try to place 1 hdc at the end of each row, making sure you end with an even number). Sl st to the top of the first hdc to join the round. Ch 1, do not turn.
Round 2: Work [Fphdc around the post of the first st, bphdc around the next st] around. Sl st to the top of the first Fphdc to join. Ch 1, do not turn.
Rounds 3 – 6: Repeat Round 2. Fasten off at the end of Round 6 and weave in ends.
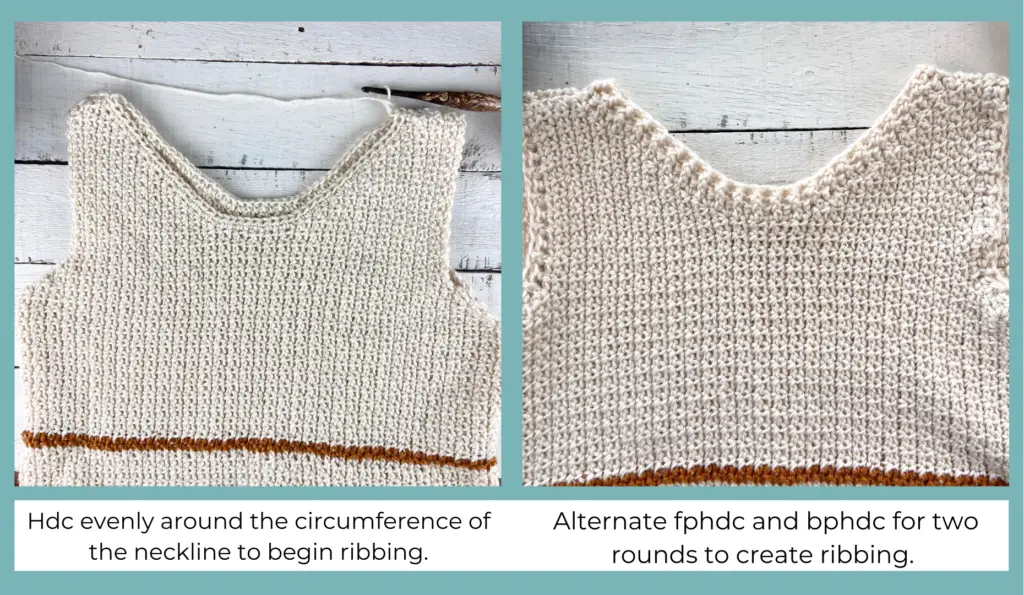
Neck
Attach main color yarn with a sl st in the middle of the neckline on the back panel. Ch 1.
Round 1: Work approximately 76 (84, 90, 98, 106) hdc evenly around the neck of the shirt (sometimes you will need to work into the end of a row, sometimes you will need to work into the side of a row. Do your best to keep the hdcs evenly spaced). Sl st to the top of the first hdc to join the round. Ch 1, do not turn.
Round 2: Work [Fphdc around the post of the first st, bphdc around the next st] around. Sl st to the top of the first Fphdc to join. Ch 1, do not turn.
Round 3: Repeat Round 2. Fasten off and weave in ends.
Armholes
Attach main color yarn with a sl st near the top of one side seam (this is the bottom of the armhole). Ch 1.
Round 1: Work approximately 46 (48, 50, 54, 58) hdc evenly around the armhole (Do your best to keep the hdcs evenly spaced). Sl st to the top of the first hdc to join the round. Ch 1, do not turn.
Round 2: Work [Fphdc around the post of the first st, bphdc around the next st] around. Sl st to the top of the first Fphdc to join. Fasten off and weave in ends.
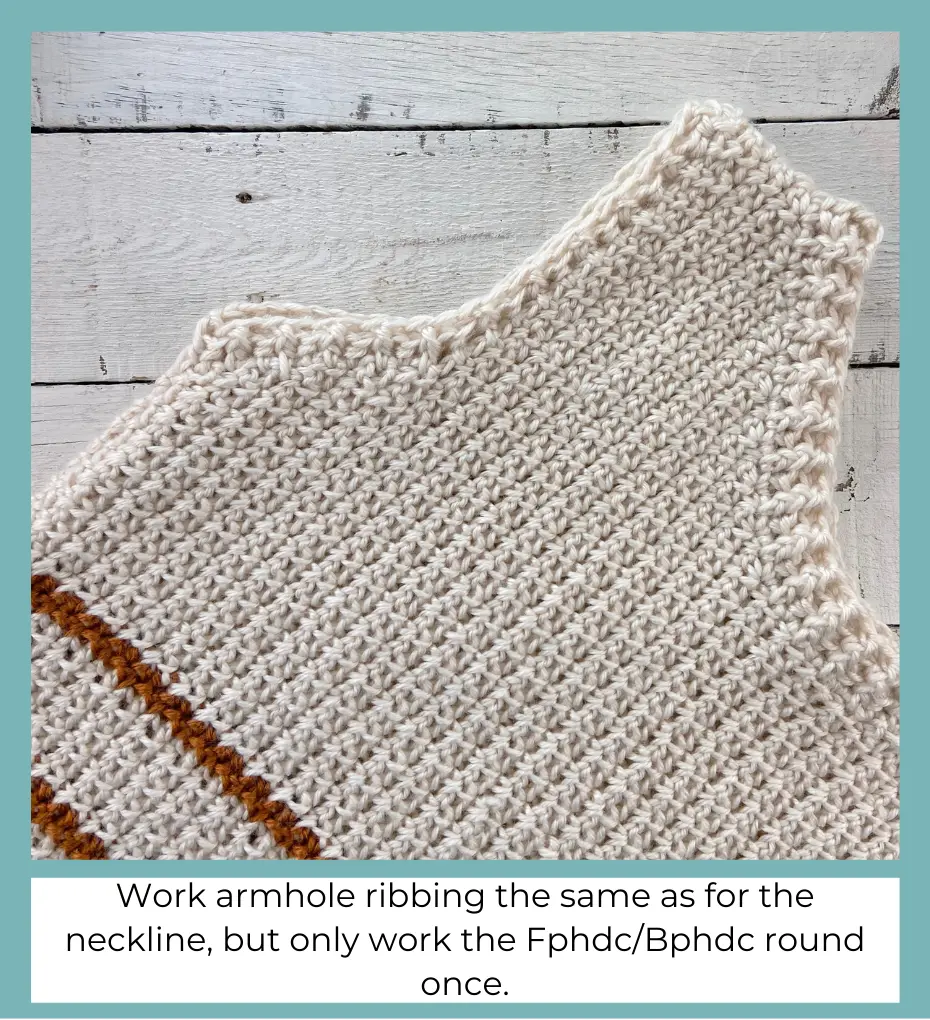
Repeat for the other armhole.
Block your tank top if desired and you’re done!
I hope you enjoyed this crochet tank top pattern! Tag me on Instagram @theknottednest to share your project. You can find more project ideas in the Patterns section here on the blog. Happy making!

COPYRIGHT: The Wander Striped Sweater Tank pattern and photographs are property of The Knotted Nest and are for personal, non-commercial use only. You may not alter, share, or sell this pattern in any way. However you are welcome to sell the finished product you produce using this pattern. Please credit The Knotted Nest by including a link to the pattern listing if selling the finished piece online. Thank you!

2 Comments
Ashley
this tank top is super cute, i’m looking forward to making it!!!
theknottednest
thank you!