Crochet Snowman Garland – Free Pattern
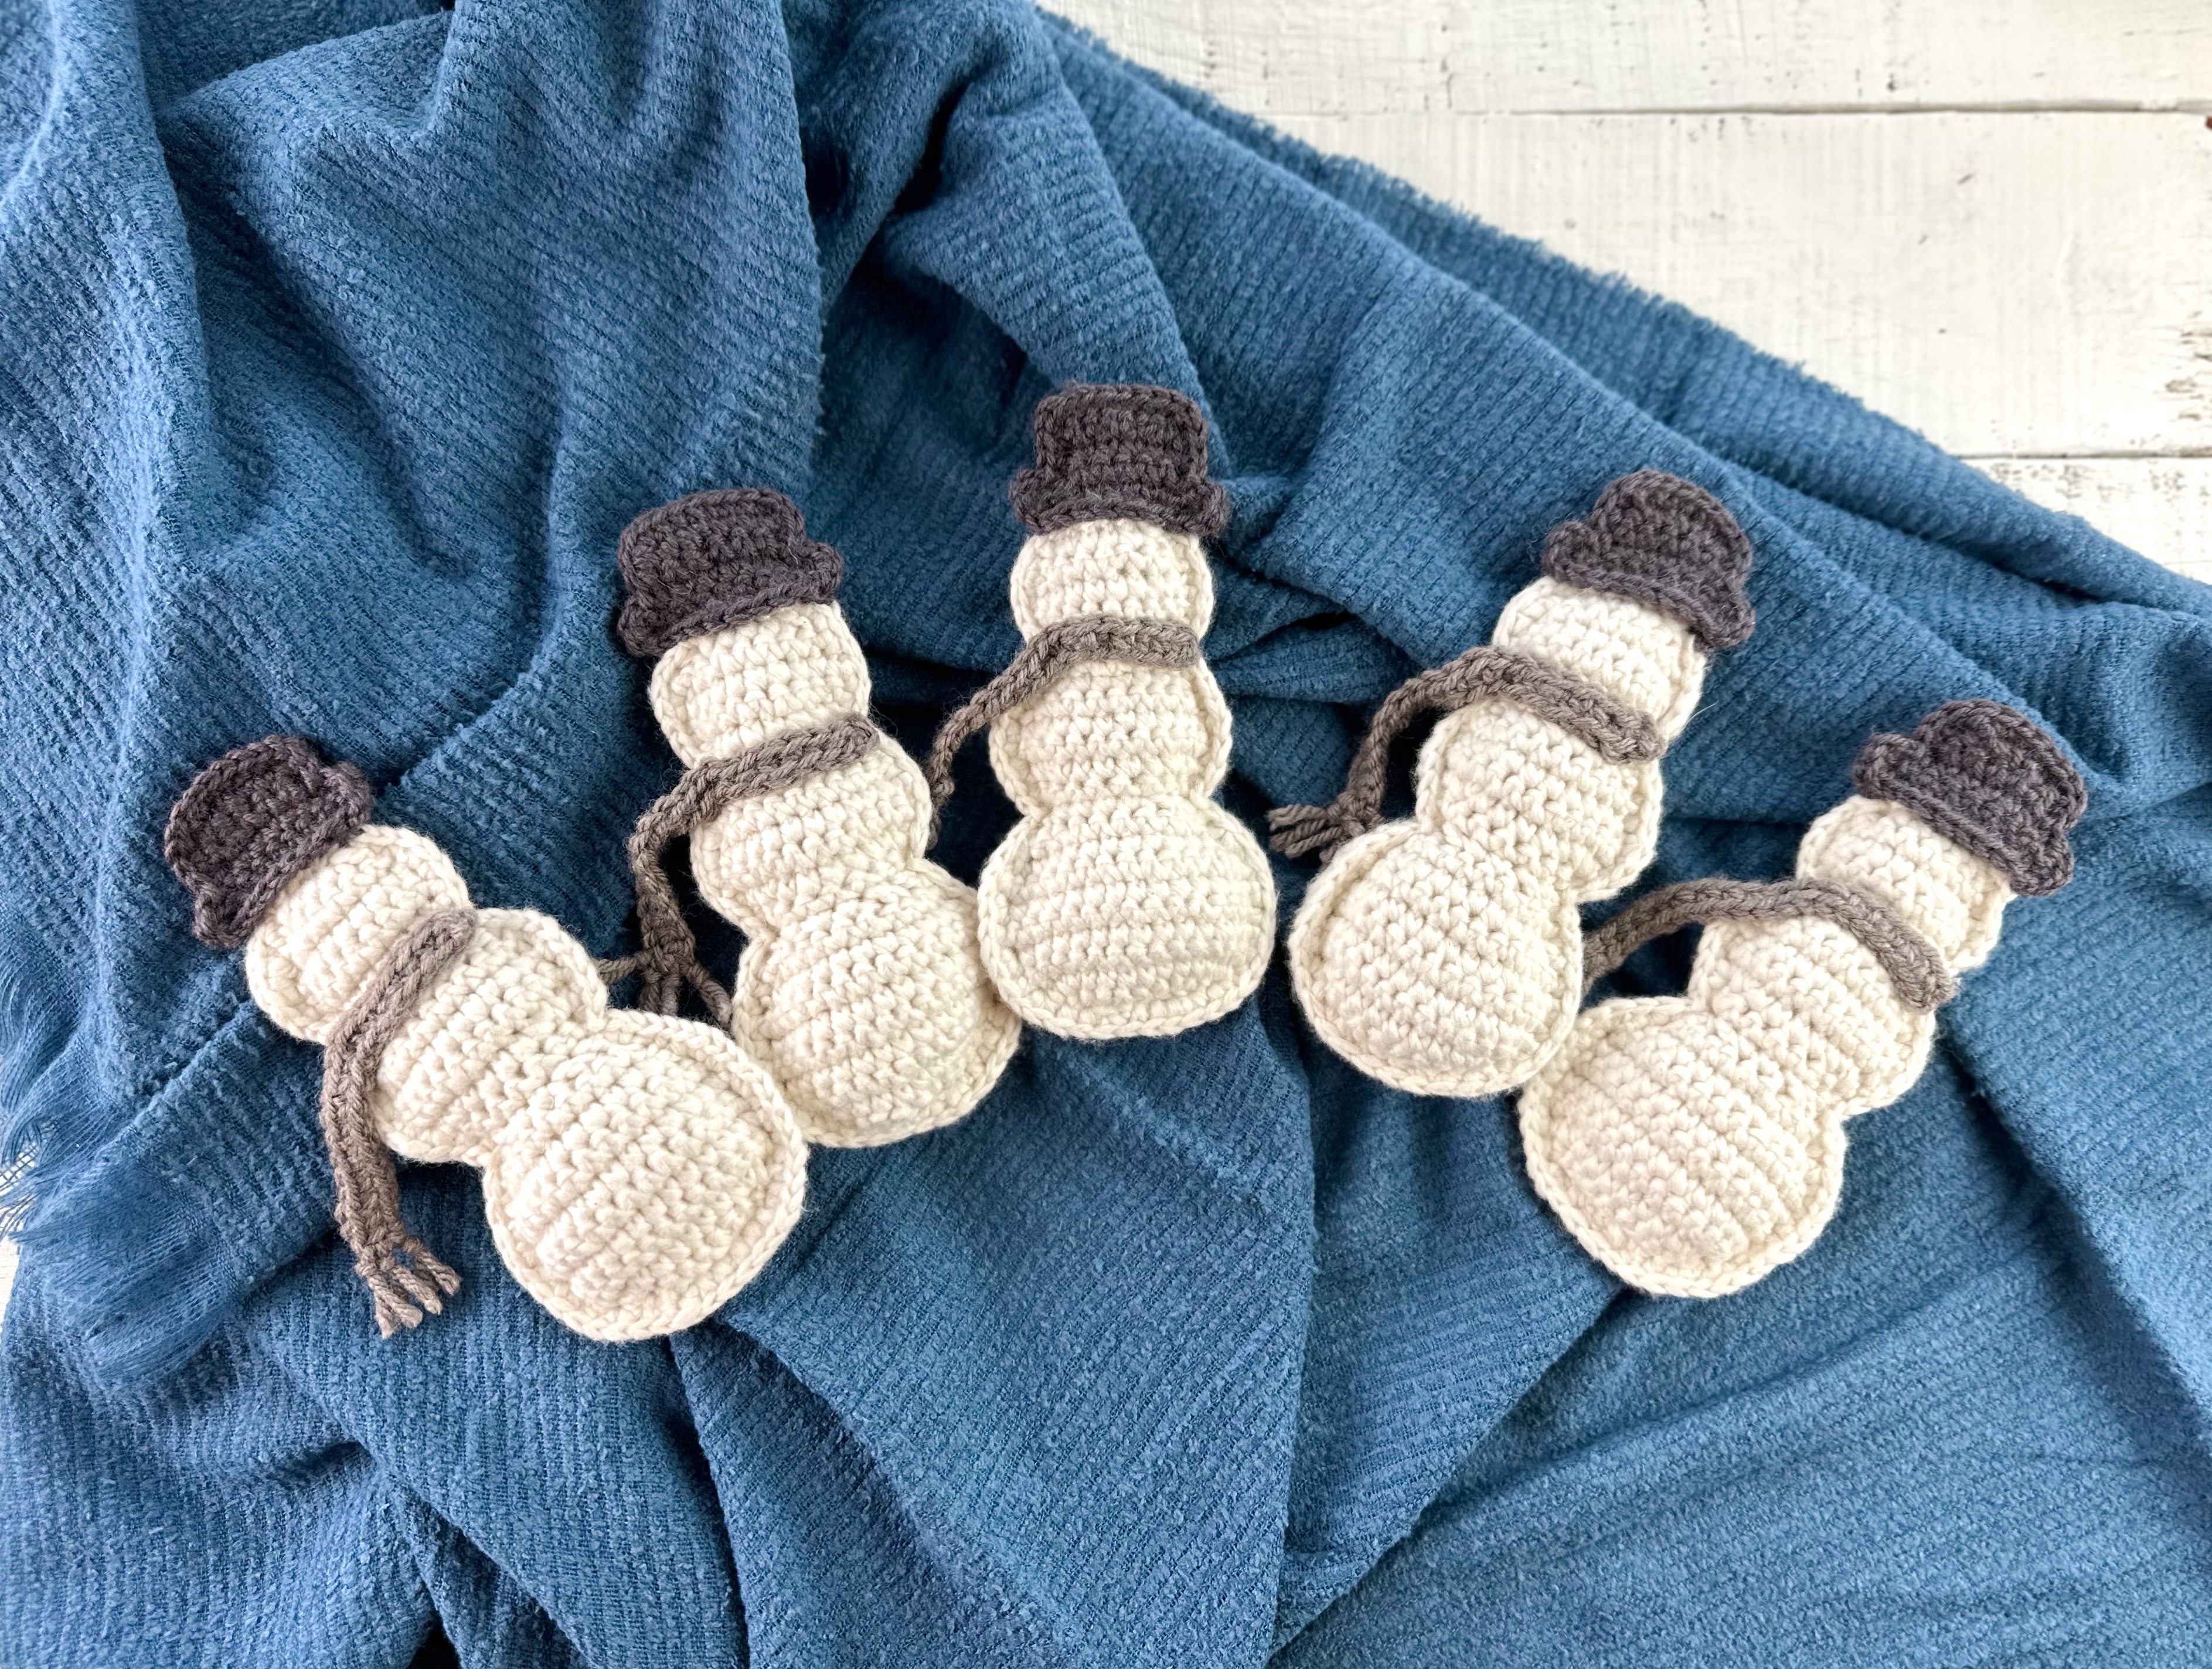
Learn how to crochet an adorable rustic snowman garland! This easy pattern is a fast and fun way to add a little handmade coziness to your home all winter long! Scroll down or click here to see the free pattern or read on for a little background info on the materials and construction for this project!
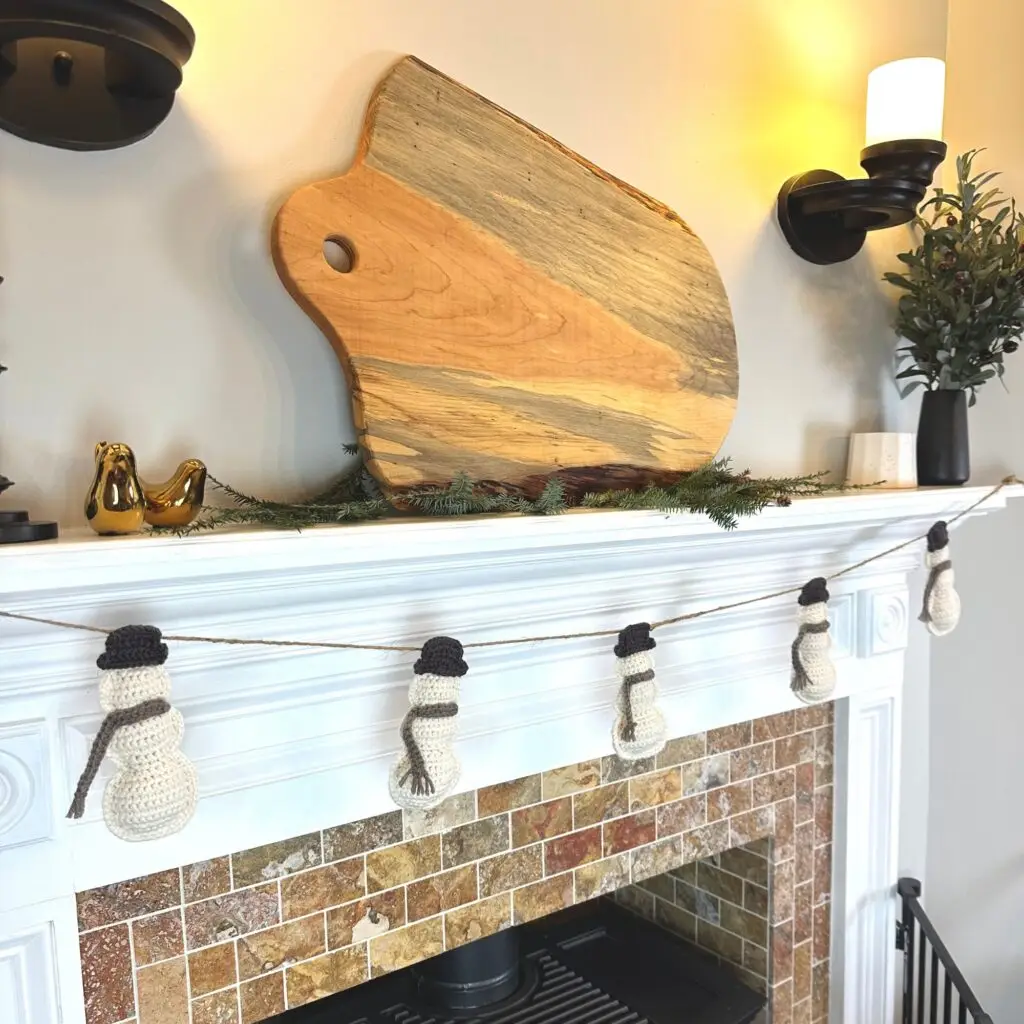
The Garland Collection’s Newest Addition – The Rustic Crochet Snowman Garland!
After the chaos of Christmas this year, I was more than ready to get our house back in order ASAP! I had the tree down and Christmas decor packed up and stored in the basement by New Years. Woohoo! Buuuuut, coming off a month plus of cozy, festive Christmas decor, things felt a little….bare. This time of year, the house always seems so stark to me after the hustle and bustle of the holidays. SO I started rummaging in my stash and came up with an easy crochet snowman garland project to cozy up some of the blank spaces! And I am so excited to be sharing it with you!
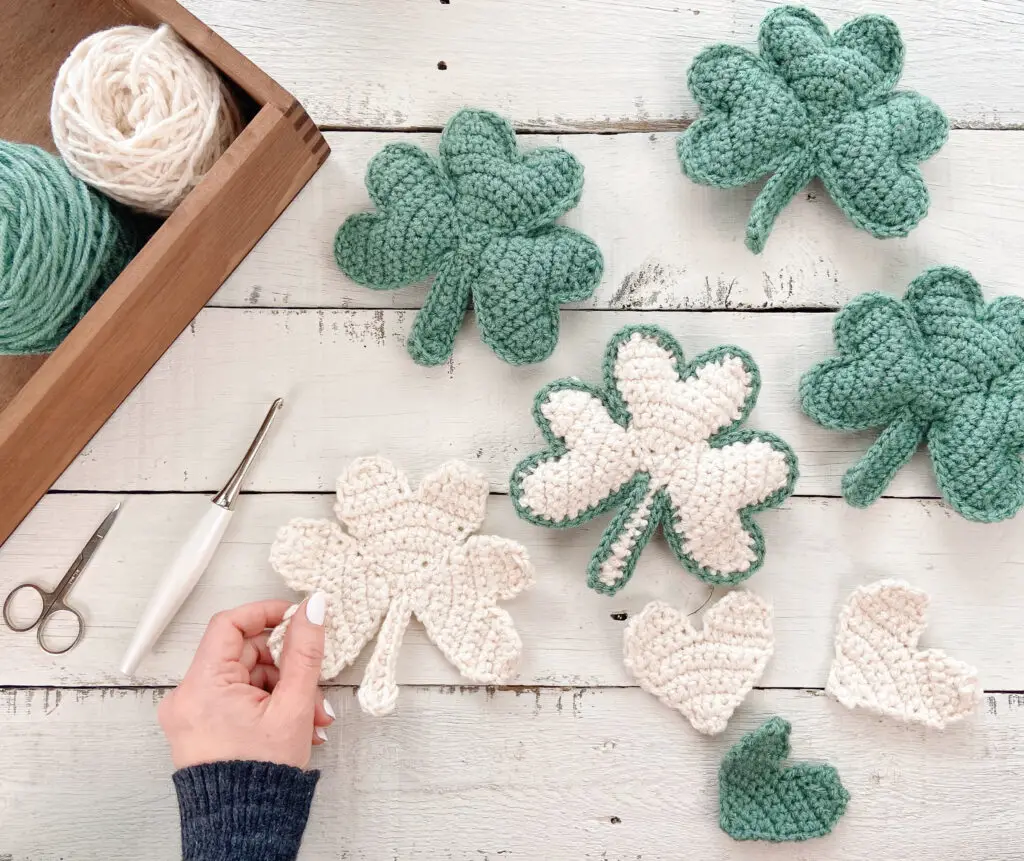
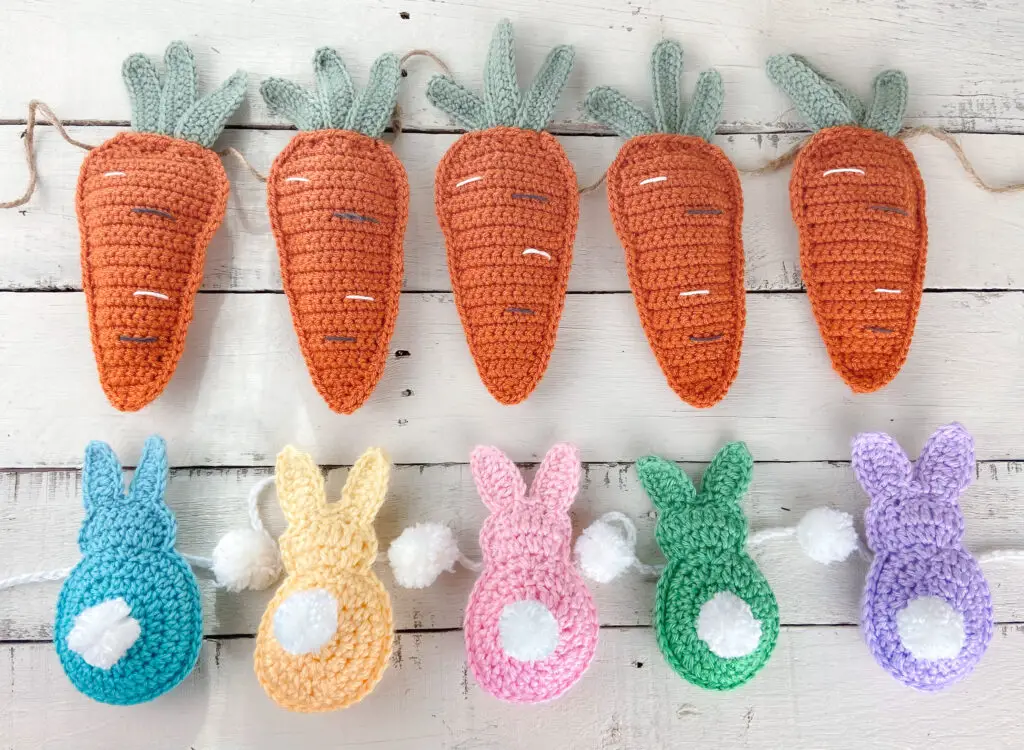
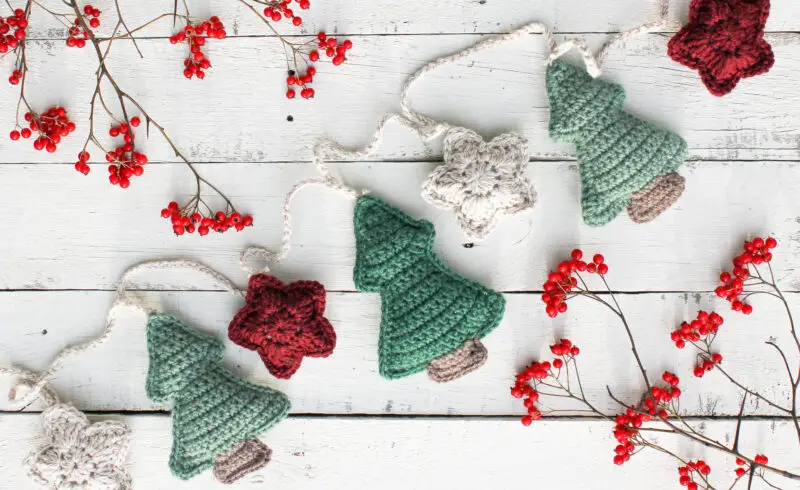
Crochet garlands have kind of become my thing over the years (you can check out all my other seasonal garland patterns here!). I have several Christmas-themed garlands and one for Valentine’s Day and even St.Patrick’s Day, but it occurred to me that I never designed one for January! I don’t know about you, but where I live, January is cold, gray, and drags on forever. If ever there was a month that needs a little crochet love, it’s January! Crochet snowmen it is!
How to Style and Use Your Crochet Snowman
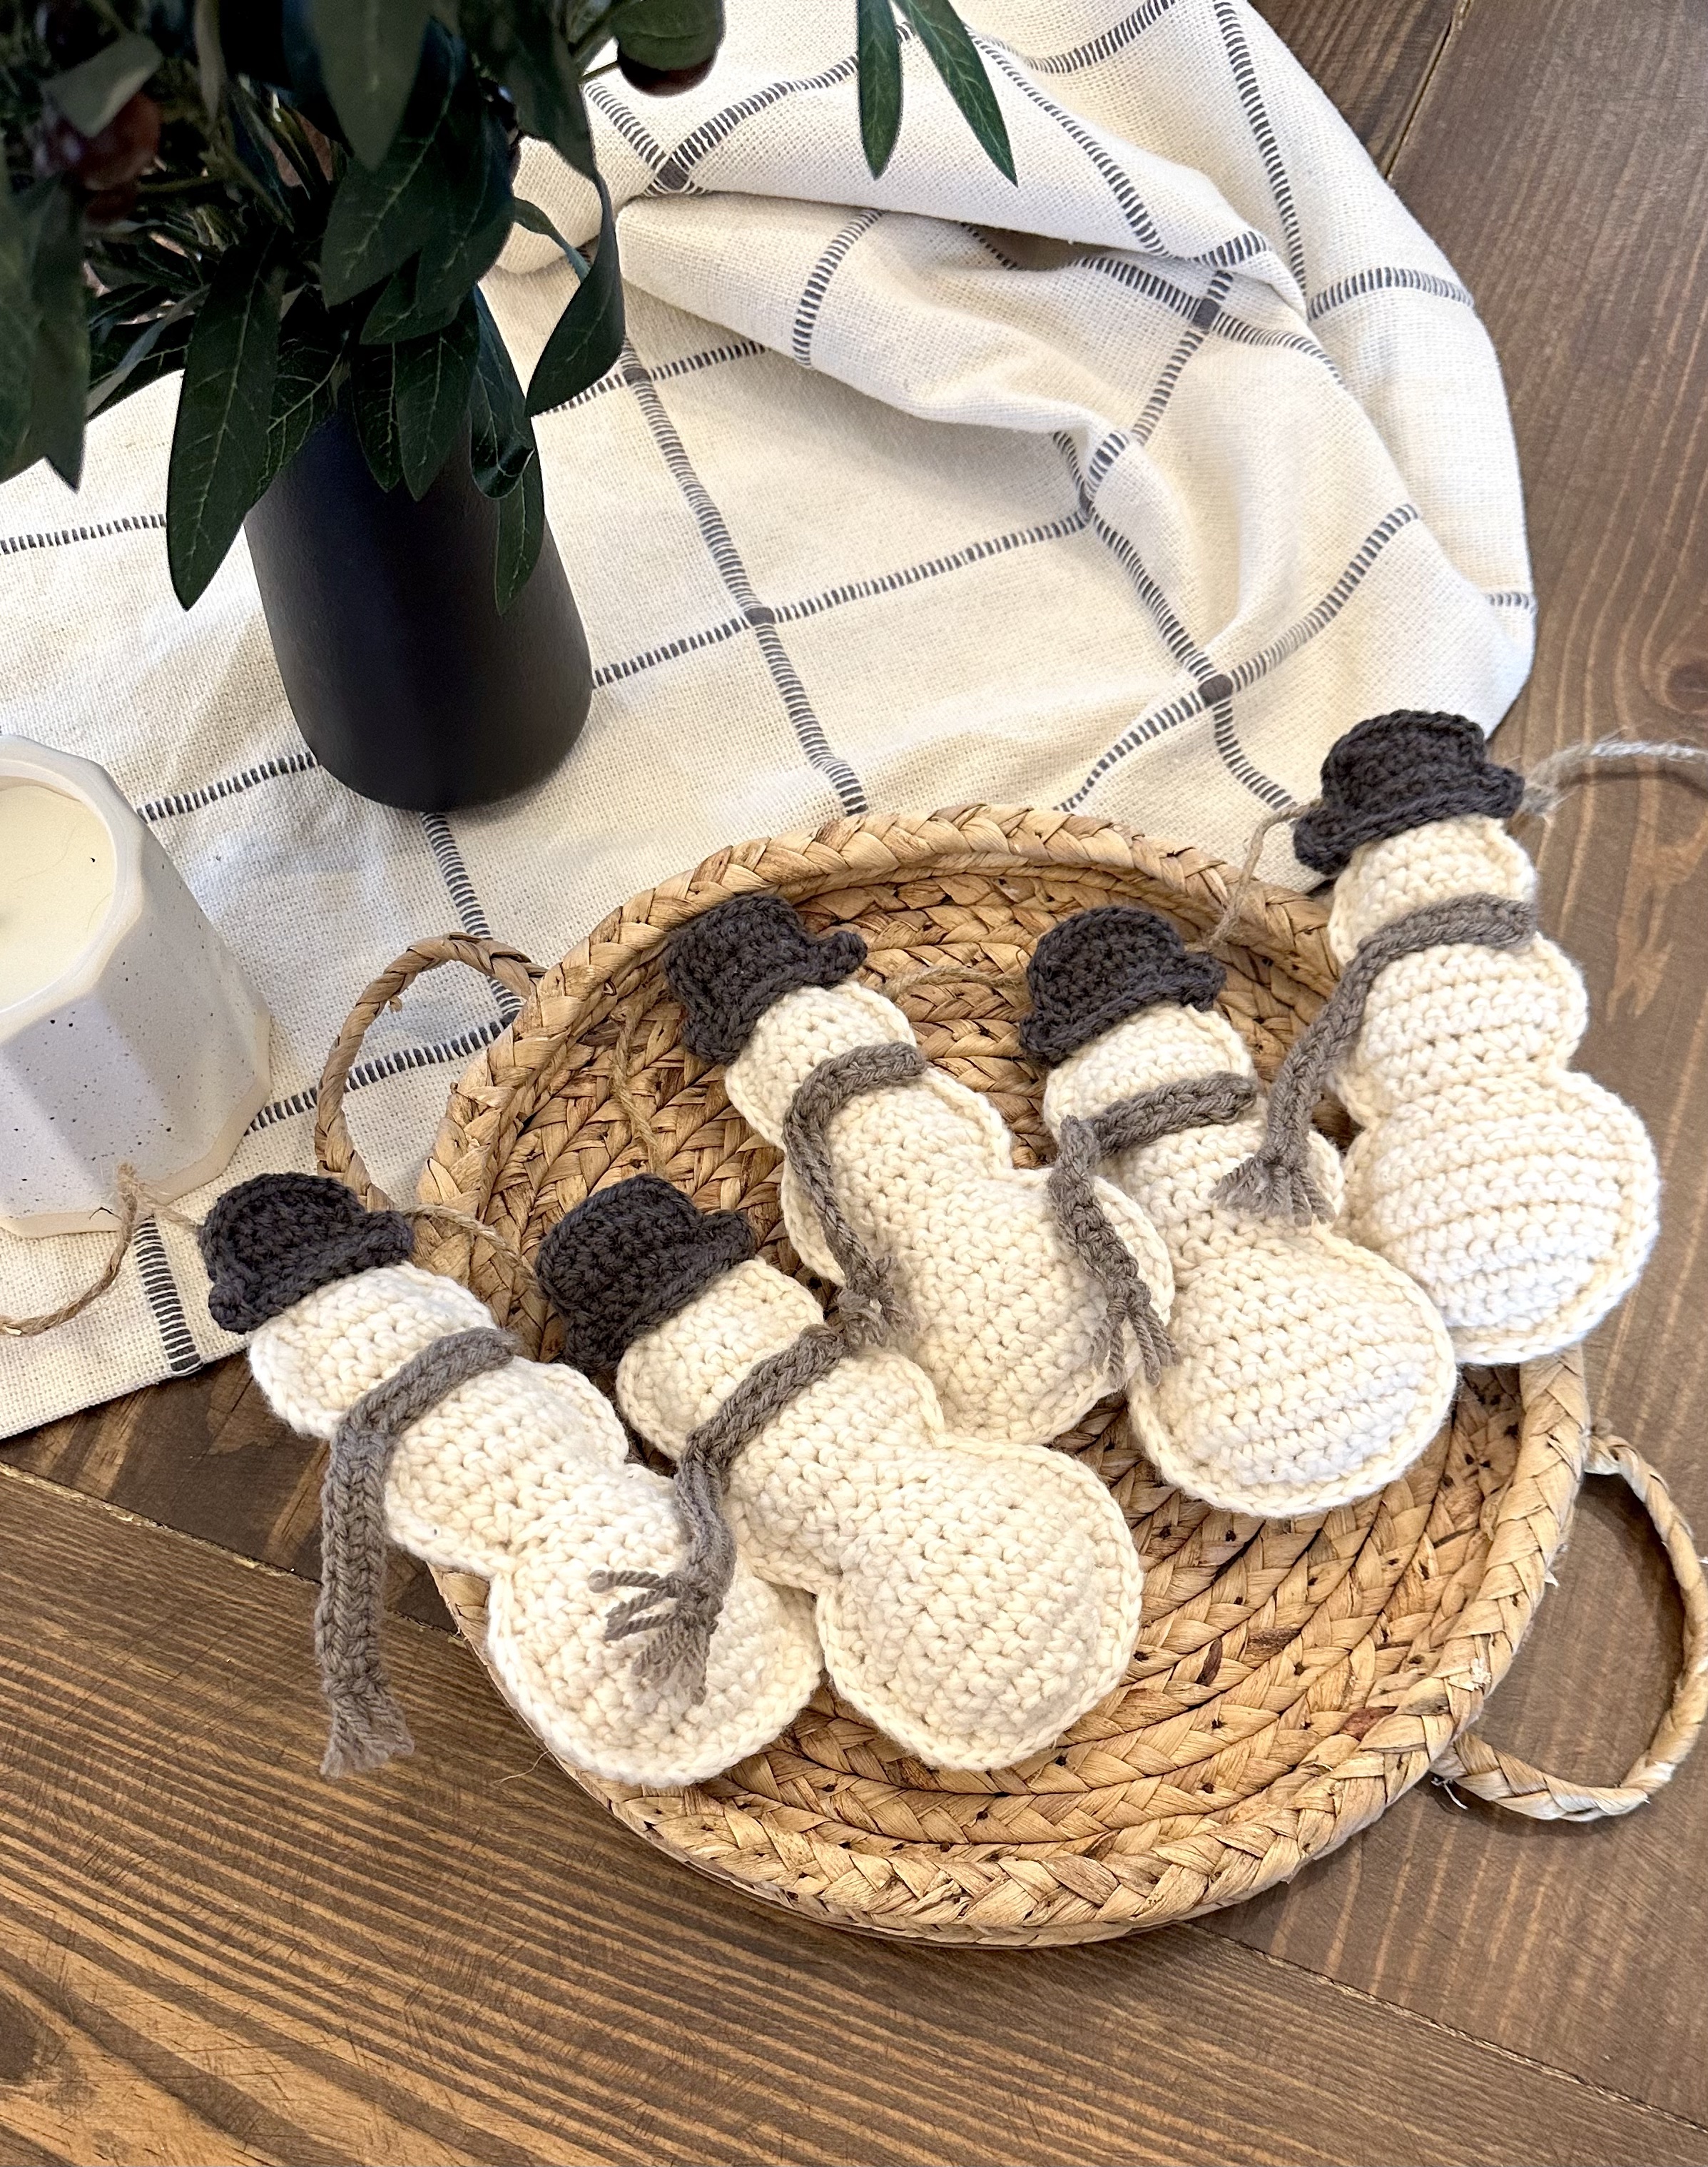
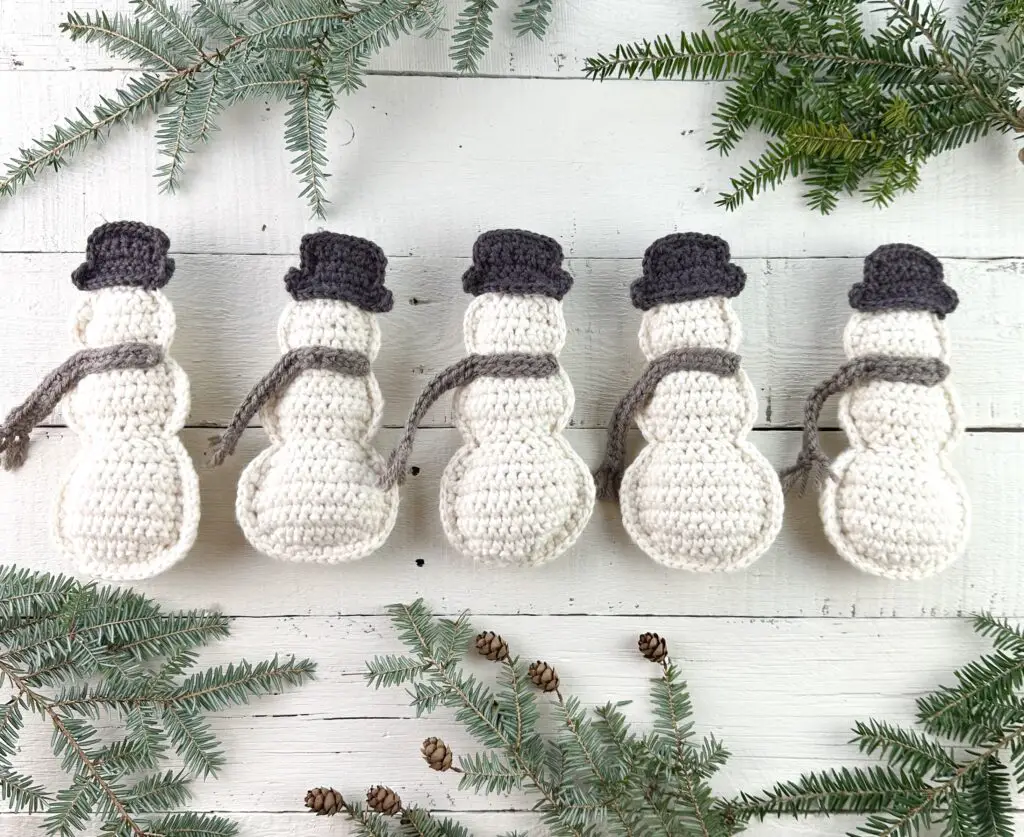
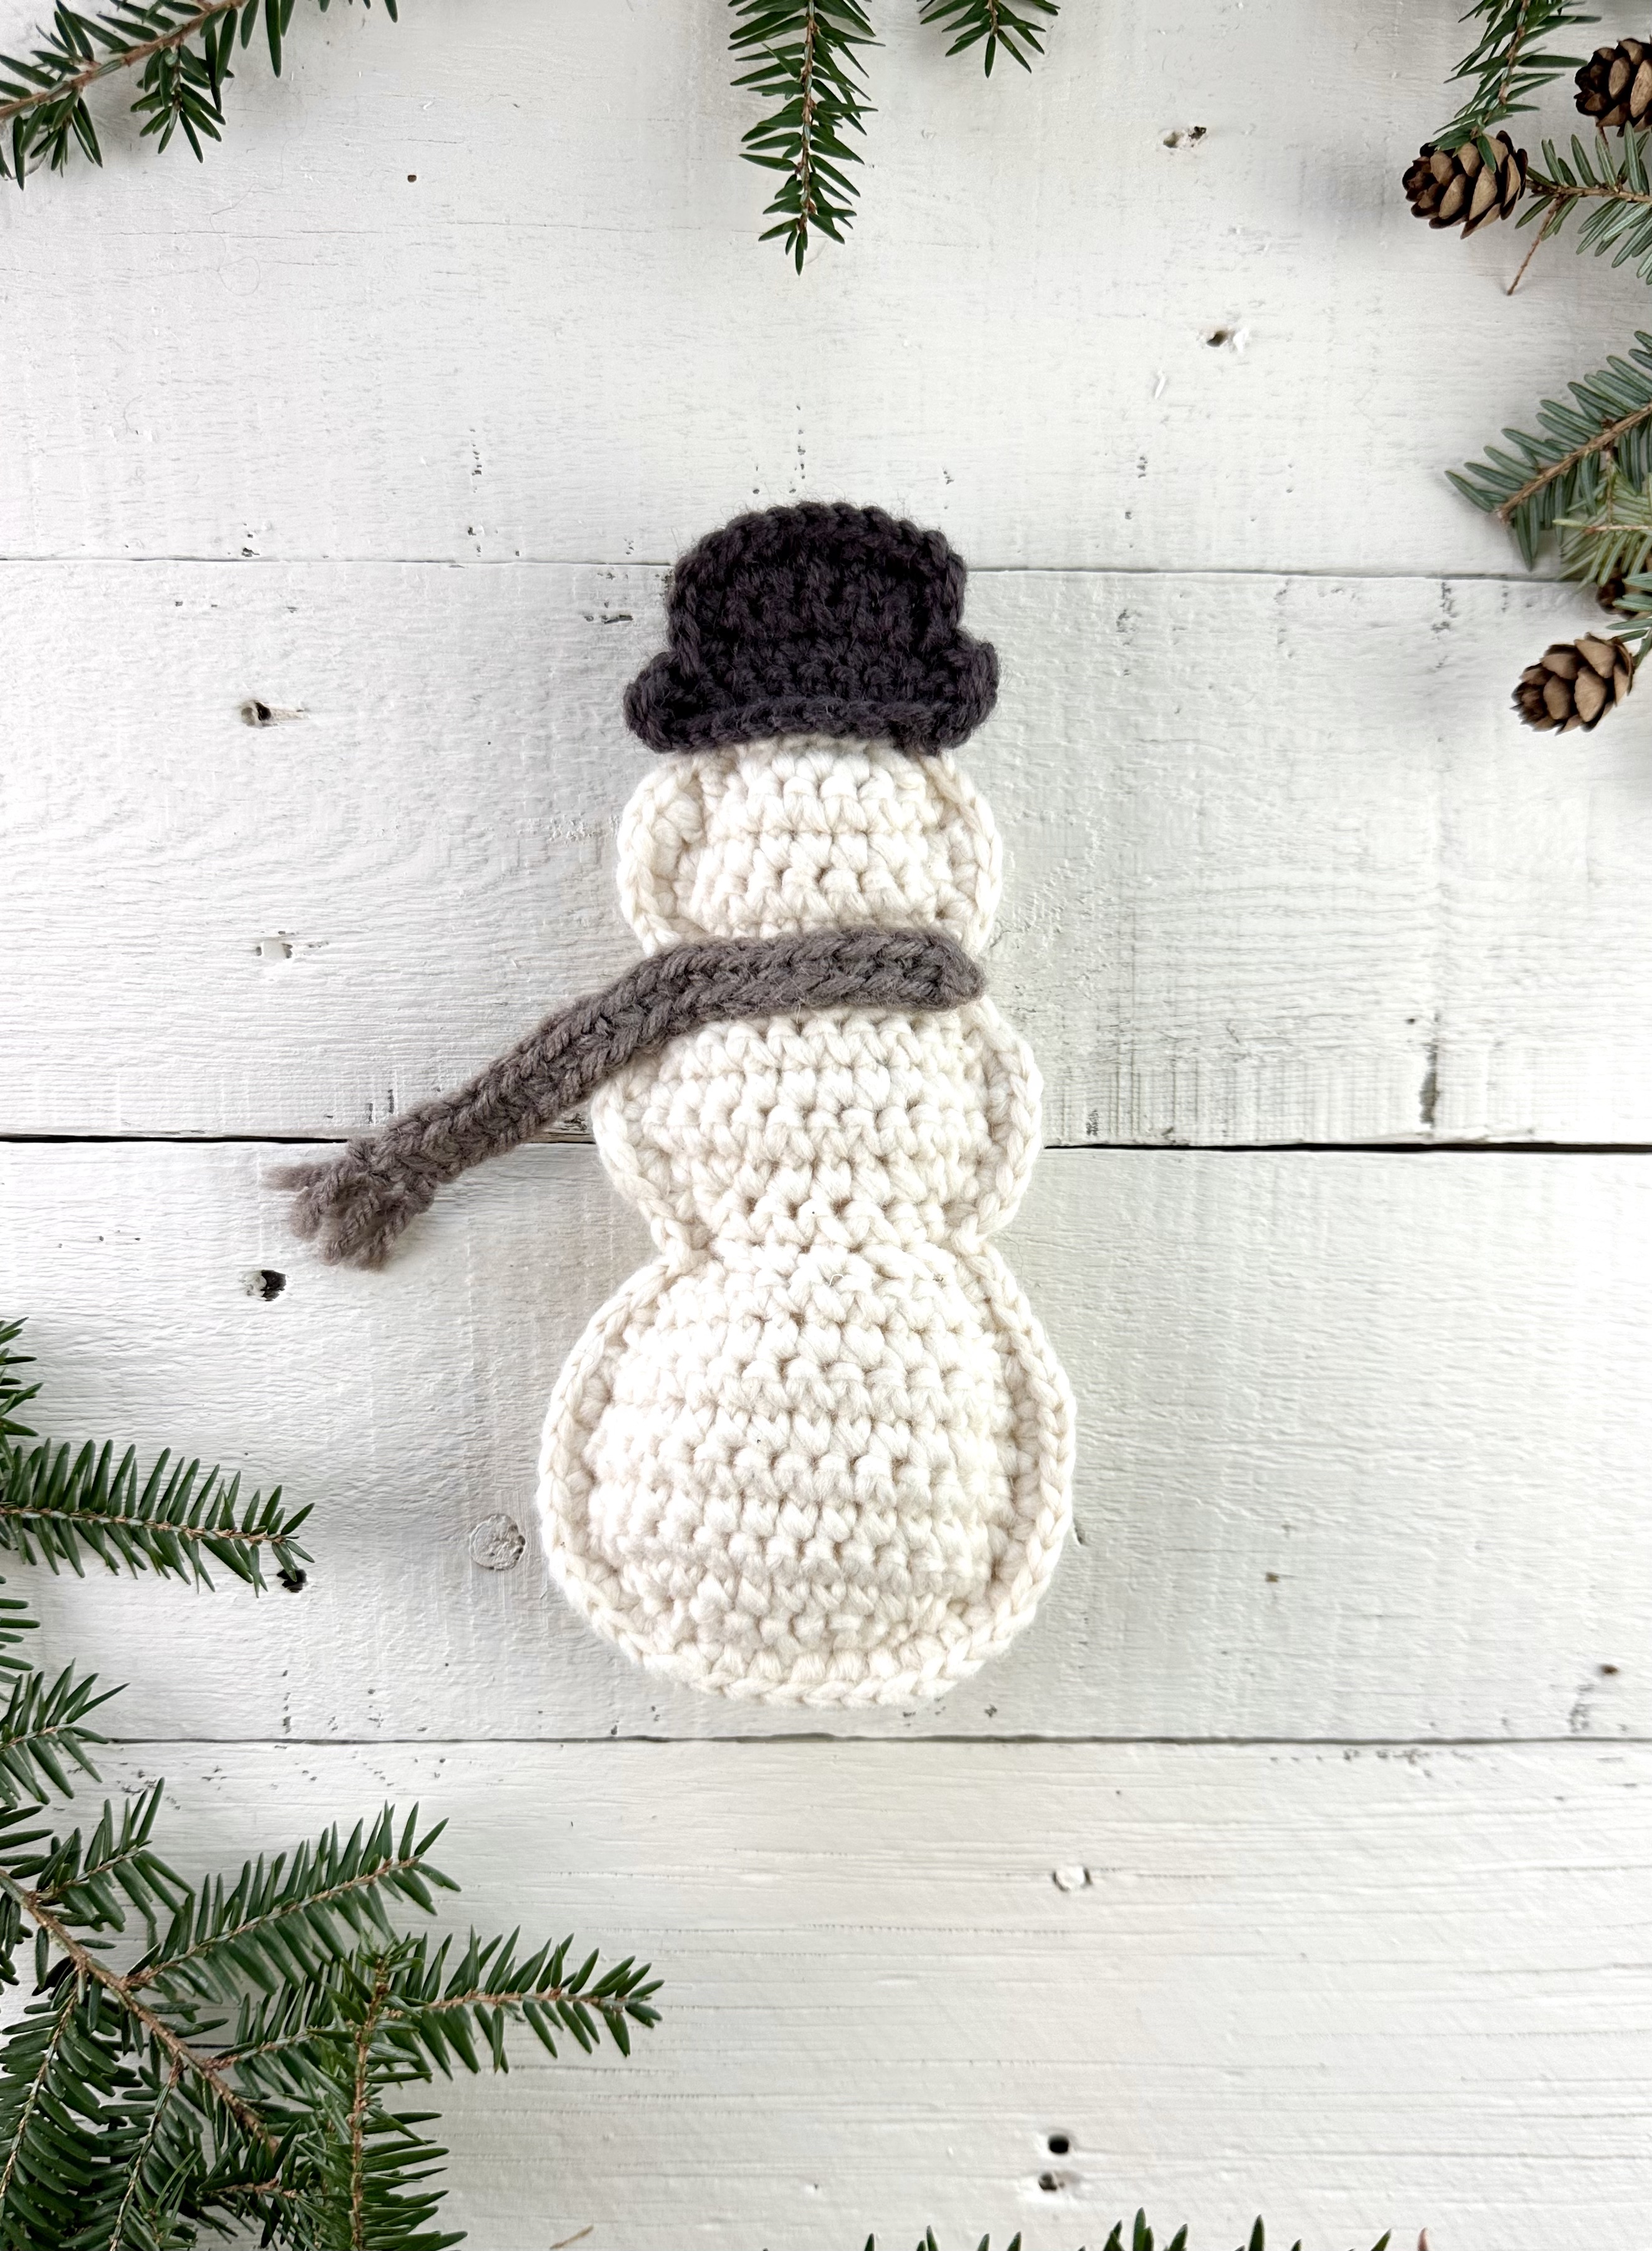
Lately, I have been leaning toward more simple home decor. With that in mind, I designed these snowmen in a very minimal, slightly rustic style with just a plain brown scarf and a charcoal top hat. But you could use this pattern as a template and take your crochet snowman in any direction you can dream up! You could add safety eyes or give him a felt carrot nose. Or dress him up with a striped scarf and buttons. Maybe a tiny flower or snowflake for his hat? Or make each snowman a different color! So many cute ideas!
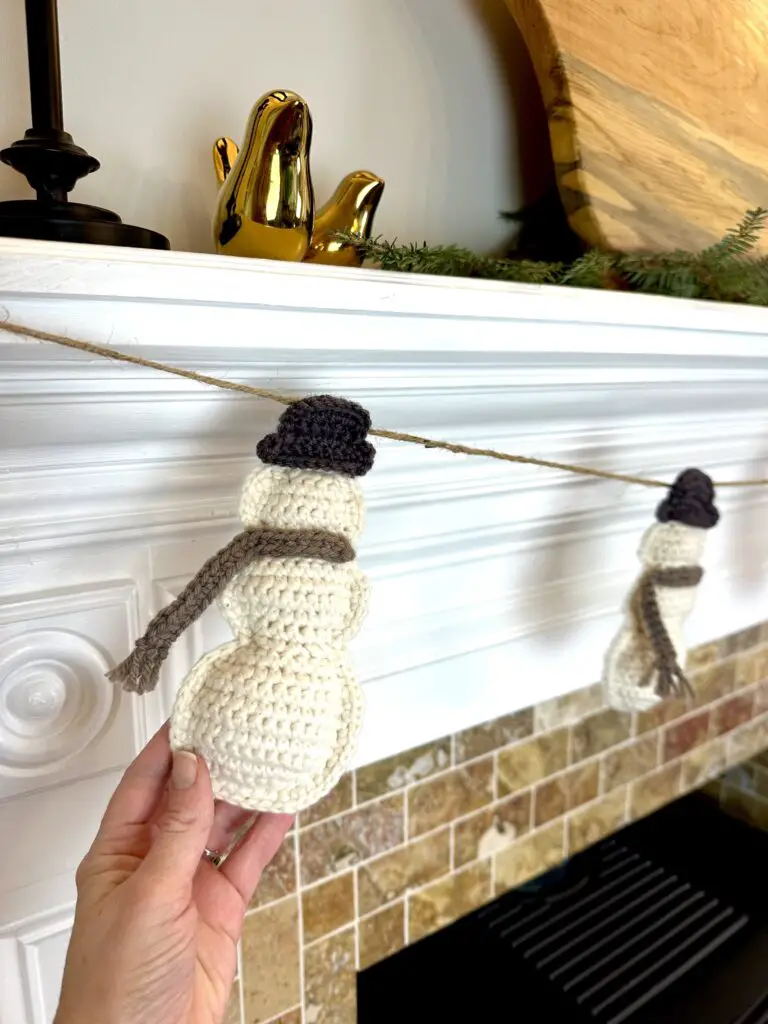
And you’re not locked into making a garland – you could crochet one or two snowmen to add to a winter wreath. Or add a few to your winter table decor. They even look adorable hanging in a window!
Construction
As with my other garland patterns, each crochet snowman is constructed of two flat single crochet panels. They are joined together with single crochet and lightly stuffed. The hat and scarf accessories are crocheted separately and sewed on to the main body. To create the ball shapes of the snowman body, this patterns uses single crochet increases and decreases.
I found that regular increases and decreases caused more holes and gaps in the finished panel than I’d like. To offset this, I opted to use a technique called invisible increasing/decreasing. These techniques are described in detail in the pattern, but basically to inv-inc, just work one sc in the front loop, then one sc in both loops of the same stitch (see a video here). To inv-dec, do a regular single crochet decrease, but work only in the front (or back) loops (see a video here). Easy peasy! However, if you find this technique too much to keep track of, it’s totally fine to use regular increases and decreases!
Materials
The materials for this project are fairly minimal as well. To make the garland as shown with 5 snowmen, you’ll need about 200 yards of worsted weight yarn (about 40yds per snowman). I used Snuggle Puff by WeCrochet, which I love for this project because it has a soft fuzzy quality that works perfectly for making a cozy snowman! A note about Snuggle Puff: this yarn is categorized as a “heavy” worsted weight. This is still considered a size 4 weight, but it is definitely on the thicker side of size 4. You can substitute regular worsted weight, but just be aware that your snowmen might come out a smidge smaller that the dimensions given in the pattern.
You will also need about 75 yards of worsted weight for the hats and 15 or so yards of worsted for the scarves, polyfil or other stuffing material, a size F hook, yarn needle and scissors.
Ok! Lets make some snowmen! (I have young children so I had to stop myself from singing “Do you want to build a snowman? Haha!)
You can purchase a printable version (no ads) in my Etsy or Ravelry shops.
A Video Tutorial is now available for this the Rustic Snowman Garland!
Rustic Crochet Snowman Garland Free Pattern
Skill Level
Easy – Level 2: this pattern is worked in single crochet, with several shaping techniques, including invisible increasing and decreasing, and a small amount of sewing.
Materials
- Yarn (For each snowman): About 40 yards of worsted weight (size 4) yarn for the main color. I used Snuggle Puff by WeCrochet (70% cotton, 30% nylon, 142yds / 50g per skein) in the color Lamb.
Note – Snuggle Puff is classified as a “Heavy Worsted/Aran” weight yarn which is a size 4 weight. For this pattern, regular worsted weight is a suitable substitute, but you may need to go down a hook size to reduce gaps.
- About 15 yards worsted weight yarn for the hat.
- About 2 yards of worsted weight for the scarf.
- Hook: size F/5 (3.75mm)
- A few yards of yarn or twine for stringing garland.
- Small amount of Polyfil or other stuffing material.
- Stitch marker.
- Yarn needle, scissors, tape measure.
Dimensions
Each snowman is about 6.5 inches tall and about 3.5 inches wide. As written, the finished garland is about 70 inches long.
Gauge
9 sc x 9 rows = 2” square using single crochet.
Notes
- Each snowman is made of two flat panels (worked in rows) that are joined together with single crochet and lightly stuffed. The accessory pieces are made separately and sewn on.
- Invisible increase and decreases (explained in the special stitches section) – they are used in this pattern to reduce gaps. You can substitute regular increases and decreases if you prefer, but you may need to go down a hook size to keep the stitches tight.
- Front loop (fl)/Back loop (bl) – Since invisible decreases are worked in only one loop of each stitch, they leave unworked loops showing on the other side. In order to keep these unused loops always on the “wrong side” of the panel, I note whether you should work the invisible decrease in the front loop or in the back loop for that row. Again, this is a personal preference and not necessary for the pattern, but it does produce a cleaner looking finished product.
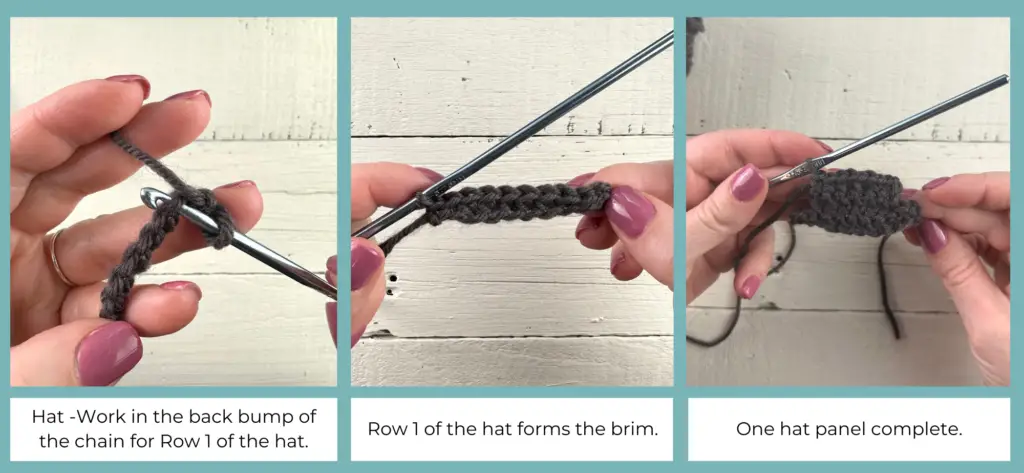
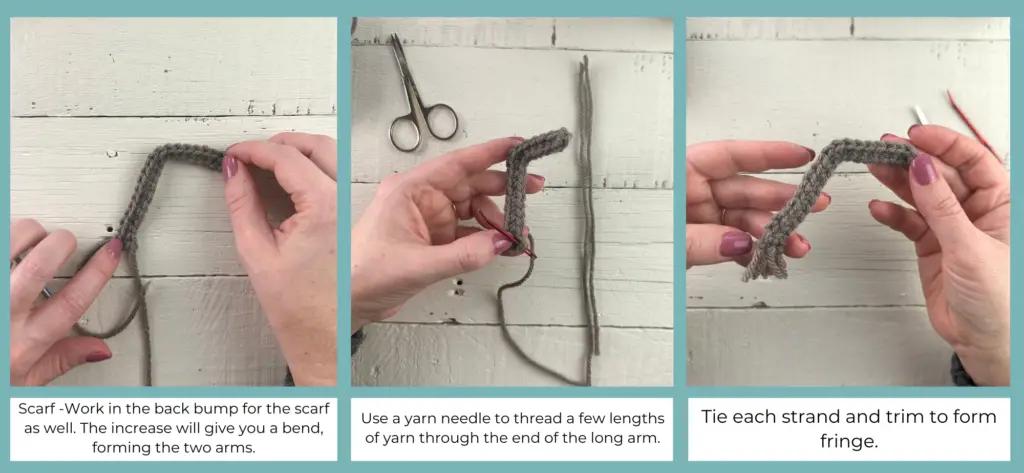
- Working in the Back Bump – For the hat and the scarf pieces, the instructions say to “work in the back bump of the chain.” To do this, make your initial chain as instructed. You will see the two loops of each chain in a V-shape. Turn the chain over and on the back of each “V” you should see another loop or “bump.” This is what you will work your Row 1 stitches into. See this blog post for more info on this technique.
- The first few rows of the snowman panels may curl a bit, but it will flatten out as you go.
- The ch 1 at the beginning of each row does not count as a stitch.
- Pattern is written in US crochet terms.
Special Stitches
Invisible Increase (inv-inc) – Insert your hook into the front loop only of the stitch, yarn over and pull up a loop, yarn over and pull through the two loops. Insert your hook back into the same stitch, but under both loops this time. Yarn over and pull up a loop. Yarn over and pull through the two loops. Watch a video tutorial here.
Invisible Decrease (inv-dec) – Insert hook under one loop of the first stitch (whether front loop or back loop will be indicated in the pattern), and insert hook under one loop of the next stitch. Yarn over and pull back through both stitches, yarn over and pull through both loops on the hook. Watch a video tutorial here.
Abbreviations
- bl = back loop
- ch = chain
- fl = front loop
- inv-dec = invisible decrease
- inv-inc = invisible increase
- sc = single crochet
- sl st = slip stitch
- st(s) = stitch(es)
- yo = yarn over
Pattern
Snowman Body Panel (make 2)
Using white (or main color), chain 5.
Row 1: (See Special Stitches section for stitch instructions) Inv-inc in 2nd chain from hook, 1 sc in each of the next 2 chs, inv-inc in the last ch. Ch 1, turn. (6 sts)
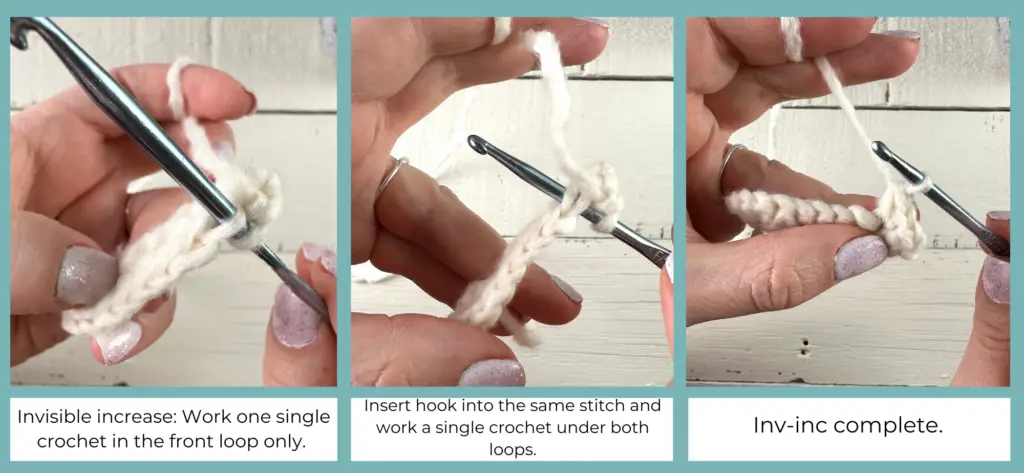
Row 2: Inv-inc in 1st st, inv-inc in next st, 1 sc in the next 2 sts, inv-inc in second to last st, inv-inc in last st. Ch 1, turn. (10 sts)
Row 3: Inv-inc in 1st st, inv-inc in next st, 1 sc in the next 6 sts, inv-inc in second to last st, inv-inc in last st. Ch 1, turn. (14 sts)
Rows 4 – 8: 1 sc in each st. Ch 1, turn. (14 sts)
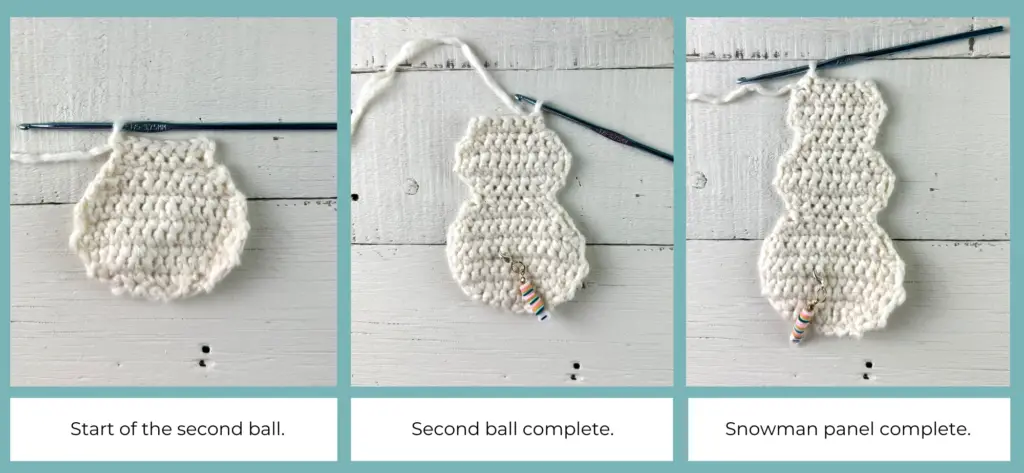
Row 9: (See Special Stitches and Notes sections for stitch instructions) Inv-dec (fl), 1 sc in the next 10 sts, inv-dec (fl). Place a stitch marker on the side of the panel that is facing you. This will help you remember which side is the “right side”. Ch 1, turn. (12 sts)
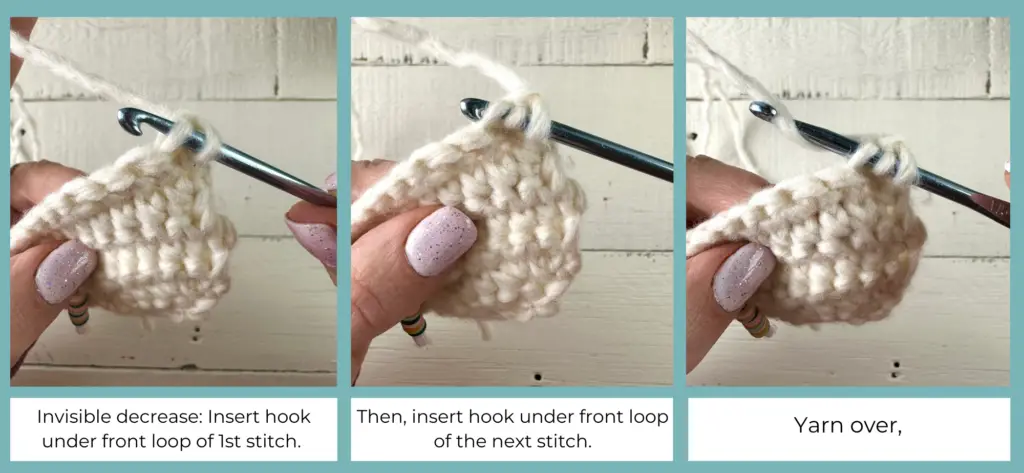
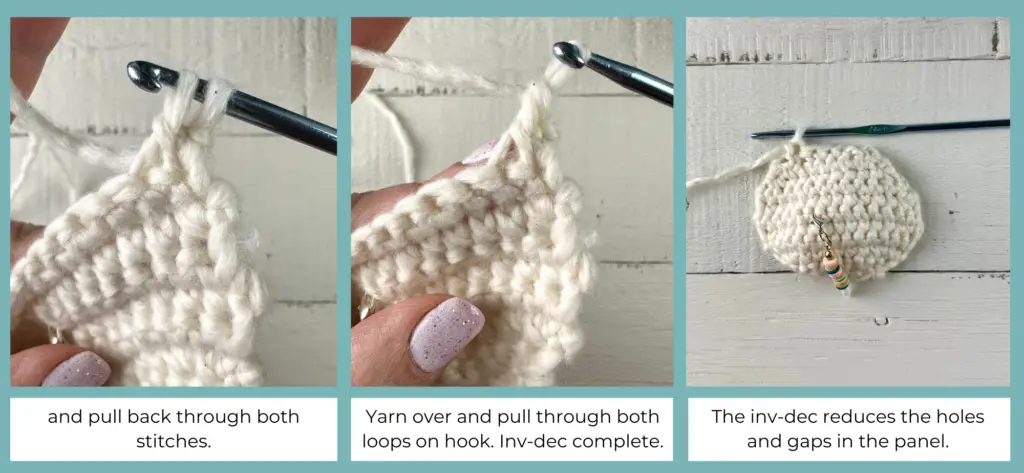
Row 10: Inv-dec (bl), 1 sc in the next 8 sts, inv-dec (bl). Ch 1, turn. (10 sts)
Row 11: Inv-dec (fl), Inv-dec (fl), 1 sc in the next 2 sts, inv-dec (fl), Inv-dec (fl). Ch 1, turn. (6 sts)
Row 12: Inv-inc in 1st st, 1 sc in each of the next 4 sts, inv-inc in the last st.
Ch 1, turn. (8 sts)
Row 13: Inv-inc in 1st st, inv-inc in next st, 1 sc in the next 4 sts, inv-inc in second to last st, inv-inc in last st. Ch 1, turn. (12 sts)
Rows 14 – 15: 1 sc in each st. Ch 1, turn. (12 sts)
Row 16: Inv-dec (bl), 1 sc in the next 8 sts, inv-dec (bl). Ch 1, turn. (10 sts)
Row 17: Inv-dec (fl), 1 sc in the next 6 sts, inv-dec (fl). Ch 1, turn. (8 sts)
Row 18: Inv-dec (bl), 1 sc in the next 4 sts, inv-dec (bl). Ch 1, turn. (6 sts)
Row 19: Inv-inc in 1st st, 1 sc in each of the next 4 sts, inv-inc in the last st. Ch 1, turn. (8 sts)
Row 20: Inv-inc in 1st st, 1 sc in each of the next 6 sts, inv-inc in the last st. Ch 1, turn. (10 sts)
Row 21: 1 sc in each st. Ch 1, turn. (10 sts)
Row 22: Inv-dec (bl), 1 sc in the next 6 sts, inv-dec (bl). Ch 1, turn. (8 sts)
Row 23: Inv-dec (fl), 1 sc in the next 4 sts, inv-dec (fl). Ch 1, turn. (6 sts)
Fasten off and weave in ends.
Hat Panel (make 2)
Using hat color, chain 11.
Row 1: (Working in the back bump of the chain, see Notes) Sl st in 2nd chain from hook and in next ch, 1 sc in each of the next 6 chs, sl st in last two chs. Ch 1, turn. (10 sts)
Row 2: Sl st in each of the first two sts, 1 sc in each of the next 6 sts (leave remaining sl sts unworked). Ch 1, turn. (8 sts)
Row 3: 1 sc in the first 6 sts (leave remaining sl sts unworked). Ch 1, turn. (6 sts)
Row 4: 1 sc in the first two sts, inv-inc in each of the next 2 sts, 1 sc in each of the last 2 sts. (8 sts)
Fasten off and weave in ends.
Scarf (make 1)
Using scarf color, chain 19.
Row 1: Working in the back bump of the chain, 1 Sc in 2nd ch from hook and in each of the next 6 chs, 2 sc in next ch, 1 sc in each of the remaining 10 chs. (19 sts)
Fasten off. Tie a few small pieces of yarn to the end of the long arm and trim to create “fringe.”
Assembling Panels
Tip: I found it helpful to steam block the scarf and hat pieces before assembling the panels. To do this, use a garment steamer or iron with a steam setting to hit each piece with a few blasts of steam. Then carefully press the piece flat with a towel or cloth while it is still warm. Do not lay the iron directly on the yarn if you are using acrylic or it could melt.
Attaching hat panel to snowman panel (each snowman panel gets a hat!):
- Thread a yarn needle with a length of main color yarn.
- Lay one body panel and one hat panel with the “right sides” facing toward you and the 6 sts at the top of the snowman’s head lining up with the 8 middle stitches of the bottom of the hat brim (I found it was more secure to sew 2 hat brim stitches to 1 snowman stitch at the beginning at end of this join, see chart below).
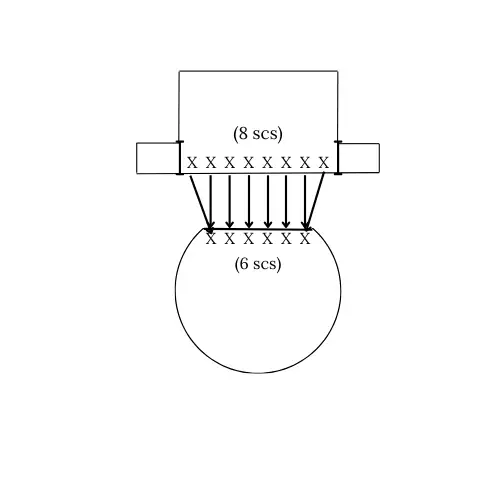
- Sew using a whip stitch through both loops of the snowman stitches and through the back loop only (loop farthest away from you) of the hat brim stitches. This will leave the front loops unworked on the “right side” for adding some detail later. Repeat for all 8 sts. Fasten off, weaving in ends.
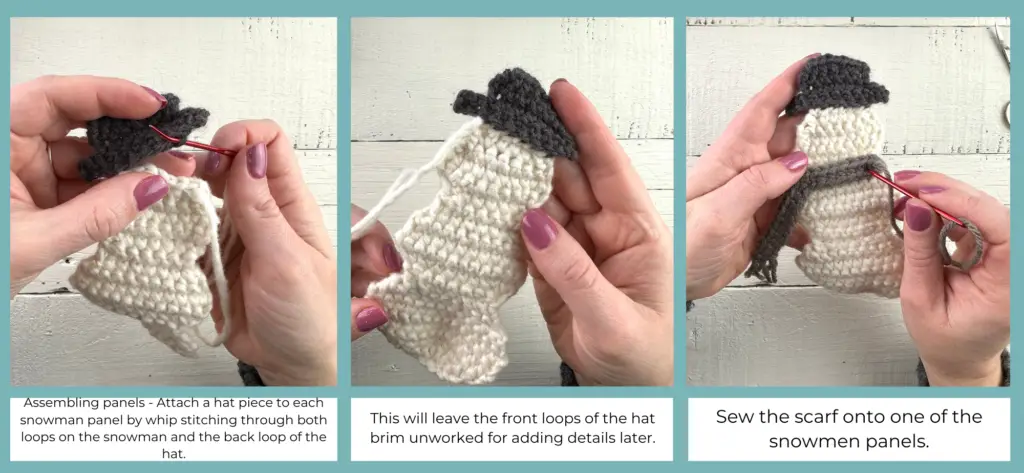
Attaching Scarf (you will only add a scarf to one panel):
- Thread a yarn needle with scarf color yarn. Choose the snowman panel you want to be the “front.”
- Lay the short arm of the scarf across the snowman panel at the top of the middle
ball on the side of the panel you want to be the front.
- Sew through the panel and short arm of the scarf several times to attach. Leave the long arm unattached. Fasten off and weave in ends.
OPTIONAL: I chose to keep my snowmen minimal, but you could absolutely add safety eyes, facial features, buttons, whatever you like! Just add them to the front panel before joining.
Assembling Snowman
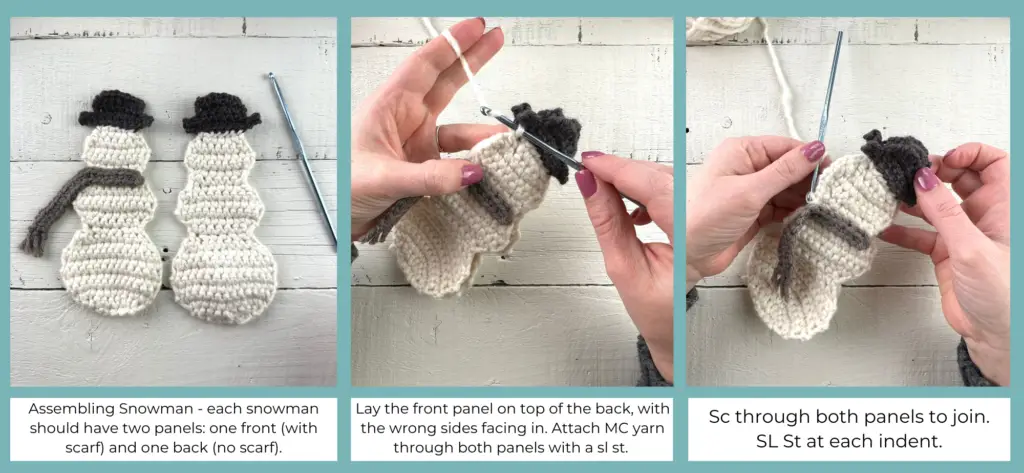
You will need two completed panels per snowman – one back panel (body + hat (no scarf)) and one front panel (body + hat + scarf).
Lay the front panel on top of the back panel with the wrong sides facing in.
Joining the Body Panels
- With the front panel facing you, attach the white (main color) yarn with a sl st through both panels just below the hat brim on the left side.
- Ch 1 and begin single crocheting evenly through both panels to join. You will be working into the sides of rows so do your best to evenly space the stitches. On the bigger curves, you may need to work 2 sc in one space.
- At each snowman ball “joint”, work a sl st instead of a sc so the indents appear more defined.
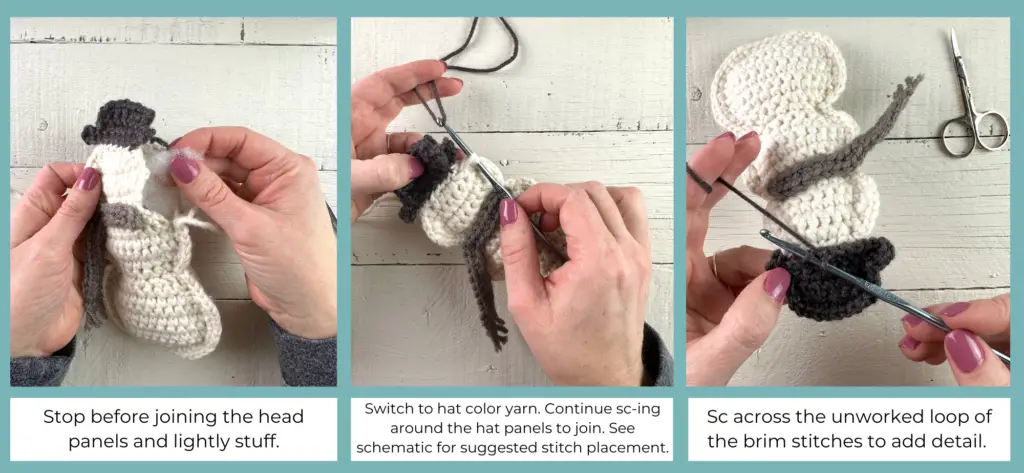
- Continue sc-ing through both panels around the snowman, stopping with about 2 inches to go.
- Very lightly stuff the body and head of the snowman with polyfil.
- Continue joining the body, stopping when you reach the bottom of the hat brim, switch to hat color yarn (on last sc, stop with two loops on the hook. Pull through with new color. Tie tails together to secure and tuck the ends inside the snowman).
Joining the Hat Panels
NOTE: This is one of those places where it works best to place your stitches in a way that looks good to you. Here are some guidelines and stitch counts that worked for me:
- With the hat color yarn, continue single crocheting through both hat panels to join.
- Follow the chart below for the path of the work and my suggested stitch counts. Note that I used 3 sc in one space at the edge of each brim, 2 sc in one space at each corner at the top of the hat, and sl sts at each indent.
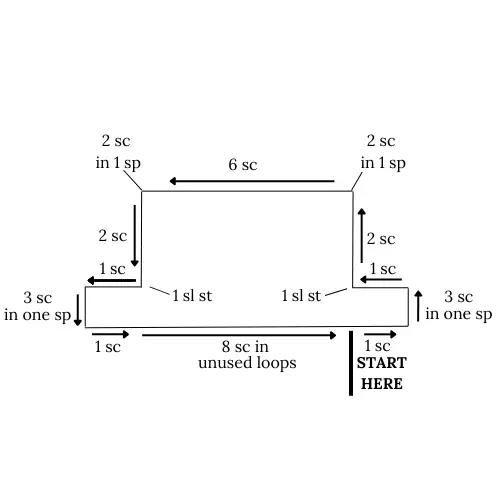
- After you have completely joined the hat panels, continue single crocheting across the hat brim. Work into the loops we left unworked when we attached the hat to the body panel.
- Sl st to the first hat-colored sc you made. Fasten off and weave in ends.
- Snowman complete!
Making the Garland
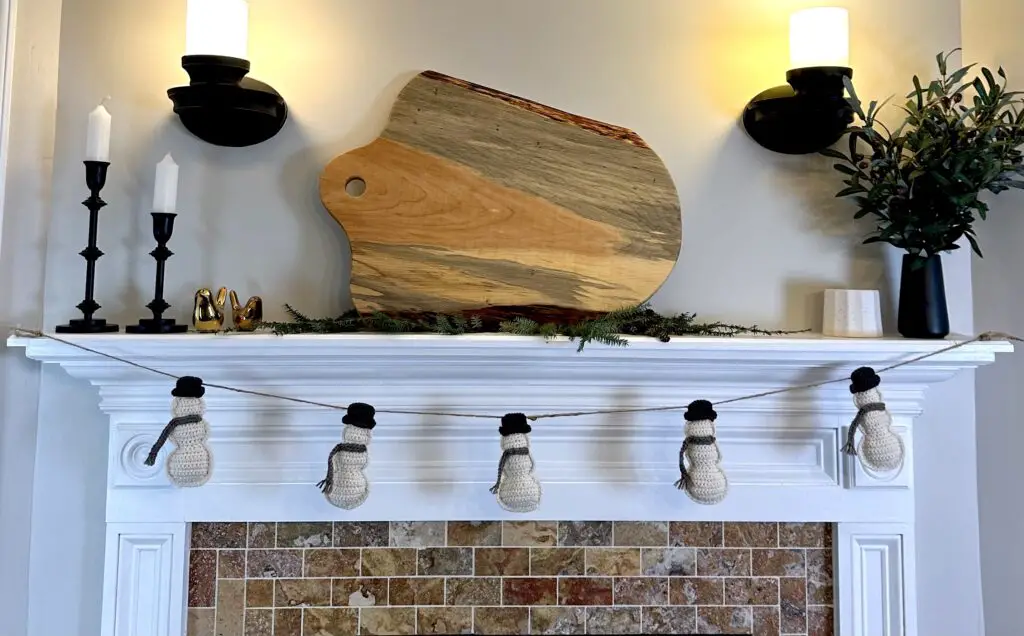
Make as many snowmen as you would like for your garland – I made five for a 6 foot garland.
Option A:
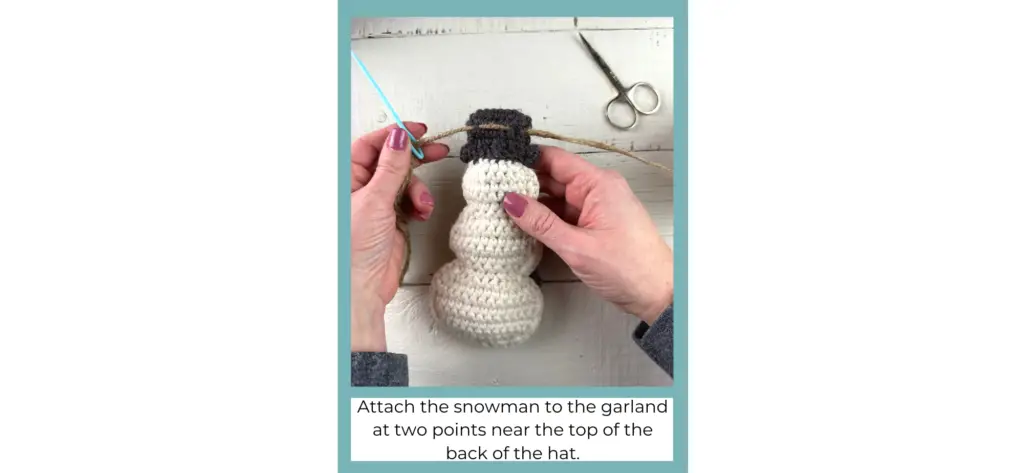
- Cut a 6 foot piece of twine, string, or yarn and thread it onto a yarn needle.
- Use the needle to thread the string through a few stitches on the back of each hat (at the very top). I think they hang best when I attach at two spots on each hat.
- Continue attaching the other snowmen and slide them to adjust positioning.
- This is the faster and easier method, but the snowmen might slide around once hung.
Option B:
- With a F hook and worsted weight yarn, ch 280. Fasten off. I think it’s easiest to hang the yarn chain first (stretching it tight because it will sag a lot with the weight of the snowmen) and then attach the snowmen.
- Attach the center snowman first. Thread a 6” piece of yarn through a few stitches on one side of the back of the hat. Use a needle to thread each end through the garland chain (threading it through the chain will keep the snowmen from sliding). Tie the two ends tightly and trim or tuck them. Repeat this on the other side of the back of the hat so that each snowman is attached to the chain in two places.
- Repeat for each snowman. This method is more time consuming, but might be the better option if you are worried about the snowmen sliding.
- Your garland is finished!
I hope you enjoyed this pattern! Tag me on Instagram @theknottednest to share your project. You can find more project ideas and patterns in the Patterns Section here on the blog.
Happy making!
