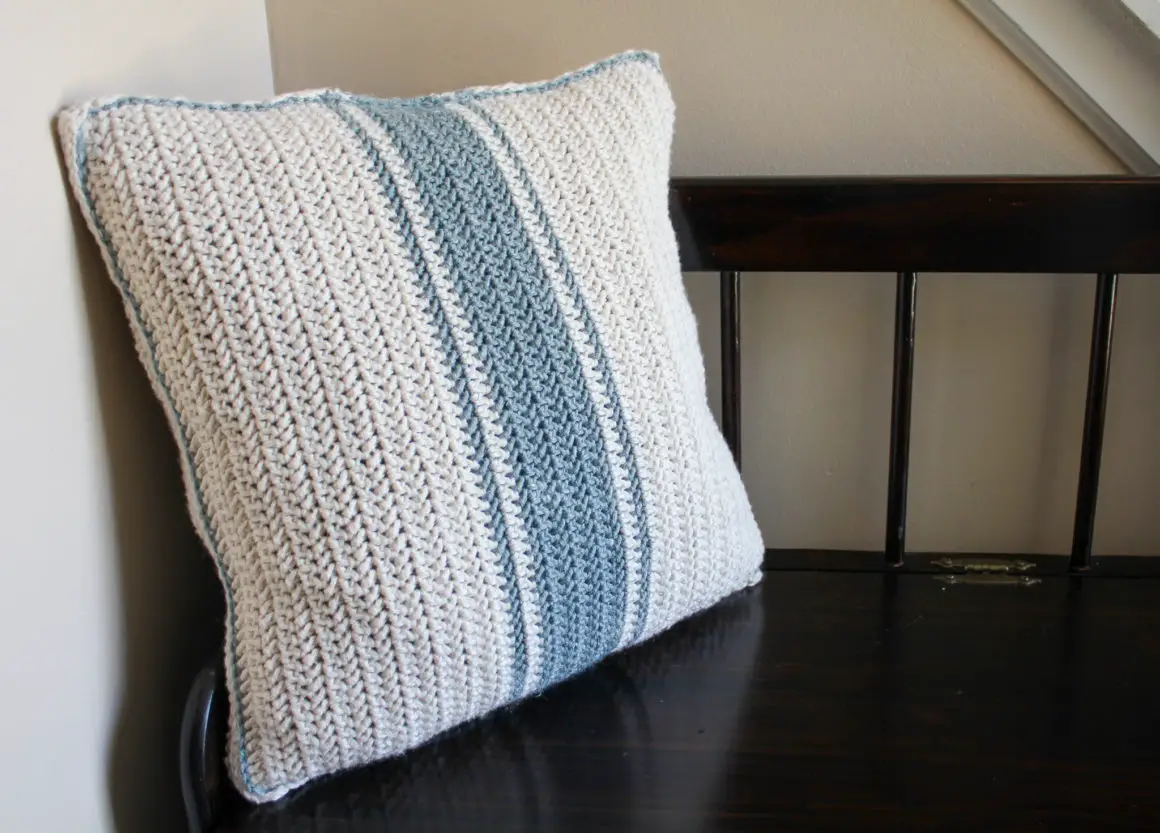
Easy Crocheted Grain Sack Pillow

It’s finally spring – my favorite time of year! Something about this time of year makes me want to redecorate! I guess it’s the whole “new beginnings” feeling of winter finally ending and sunshine coming back to the party.
I have to admit, although I live in a fairly traditional-style house, I really do LOVE the modern farmhouse look (I did grow up on a farm! …a Christmas tree farm, but it counts!). In my mind, one of the best ways to farmhouse-ify my traditional space is with accessories like rugs and pillows (plus they’re a quick and cheap way to make a big impact!).
A few weeks ago, I fell in love with some farmhouse-style grain sack throw pillows I spotted at Target (a la Joanna Gains – the queen of farmhouse!). I don’t know about you, but one of the problems (benefits?) I have with the crafty life is my tendency to think “I bet I can make that!” any time I see something I like in the store. It worked out for me this time because I think this pillow turned out even cuter than the ones I saw at the store (if I do say so myself!).

History of Grain Sack Fabric
The “Grain Sack” pattern I used in this pillow was inspired by the vintage grain sack fabric that is so popular in farmhouse decor these days. Originally, grain sacks were woven by Eastern European farmers in the late 1800s and early 1900s. They were typically made from hemp and used unique striping patterns in green, blue, red, or gold to distinguish one farmer’s grain bags from another’s at the mill.
As a nod to the original fabric, I used Yarn Bee Rustic Romance yarn from Hobby Lobby for the stripes, which is made with 15% hemp. I also chose the herringbone half double crochet (hhdc) stitch for this project since many grain sacks were woven with a slight herringbone pattern. If you’re a beginner, don’t be nervous about the hhdc stitch – it’s actually just a very slightly modified version of half double crochet, but it produces a dramatically different and beautiful stitch!

Beginner Friendly
If you’re looking for a beginner friendly crocheted pillow pattern, this is a great pattern to chose! Crocheted pillows in general are a great next step after dish cloths and scarves. Pillow = just two squares! Pillows are also a great project for trying out a new stitch.
So, on to the pattern! (A printer-friendly PDF of this pattern is available for purchase on Ravelry here.)
PATTERN
SKILL LEVEL
Easy
MATERIALS
- 3 skeins (~250 yds) Yarn Bee Denim in Color in Ivory (Color A)
- 1 skein (~ 120 yds) Yarn Bee Rustic Romance in Slate Roof (Color B)
- 18”x18” pillow form
- Size I hook (5.5mm)
- Scissors, Yarn needle
DIMENSIONS
Finished pillow cover measures approximately 18’x18”
GAUGE
12 stitches x 10 rows in hhdc = 4” square
NOTES
- The Ch 2 used for turning DOES count as a stitch throughout.
- The Yarn Bee Rustic Romance yarn is no longer available in the colorway “Slate Roof”. The YBRR colors “Olive” and “Blueberry Bushel” would also look great for this project.
- Special stitch:
- Herringbone half double crochet (hhdc) – Yarn over (YO) and insert your hook into the stitch. YO and pull through stitch AND also pull through the next loop on your hook. Then YO and pull through remaining two loops on your hook.
- Abbreviations
- Ch = chain
- hhdc = herringbone half double crochet
- sl st =slip stitch
- st = stitch
- Stripes Color Chart:

PATTERN
*Make 2*
Chain 58 using Color A.
Tip: Work your stitches in the “back bar” of the chain instead of in the “V”. This will give a more uniform edge to your first row.

Row 1: Hhdc in 3rd chain from hook and in each chain across. <56 hhdc> (See Pictures for step-by-step help with hhdc)


Rows 2 – 16: Ch 2, turn. Hhdc in the next stitch (See Figure 6) and in each st across. The last hhdc will be worked in the top of the Ch 2 (turning chain) from the row below. <56 hhdc> (See Figure 7)
Color change (see chart in Notes section for help with stripe pattern): At the end of Row 16, begin working the last hhdc with Color A, but stop when you still have 2 loops on your hook. Pull through with Color B. Cut Color A, leaving about a 6” tail. (See Figures 8-9)


Row 17: (With Color B) Ch 2, turn. Hhdc in next stitch and in each st across. (See Figure 10) In the last stitch, change back to Color A using the technique described above. <56 hhdc>

Row 18: (With Color A) Ch 2, turn. Hhdc in next stitch and in each st across. In the last stitch, change back to Color B. <56 hhdc>
Rows 19 – 25: (With Color B) Ch 2, turn. Hhdc in next stitch and in each st across. In the last stitch of Row 25, change back to Color A. <56 hhdc>
Row 26: (With Color A) Ch 2, turn. Hhdc in next stitch and in each st across. In the last stitch, change back to Color B. <56 hhdc>
Row 27: (With Color B) Ch 2, turn. Hhdc in next stitch and in each st across. In the last stitch, change back to Color A. <56 hhdc>
Rows 28 – 43: (With Color A) Ch 2, turn. Hhdc in the next stitch and in each st across. <56 hhdc>
Fasten off and weave in ends from color changes using a yarn needle.
Assembly*:
- Stack both panels with right sides facing out, being sure that the stripe pattern lines up at the top and bottom (you might want to pin this in place while you join to be sure it doesn’t shift around).
- Using Color B, attach yarn at one of the corners and begin slip stitching through BOTH layers of the cover. Keep your sl sts loose and even. (See Figure 11)
- On the row-end sides, try to space your sl sts evenly (inserting your hook where ever works), keeping them about the same size as the sl sts on the adjacent side.
- Work evenly around the first 3 sides of the pillow cover. Stuff with pillow form and continue slip stitching across the 4th side.
- Sl st into the first sl st you made, fasten off, weave in ends and you’re done!

*Alternative Seaming Method– I think the exposed rough edges fit with the rustic feel of this project, but if you prefer a more “finished” look, I suggest using single crochet to join the panels instead of slip stitch. 🙂


3 Comments
Michelle McNamer
Schools just closed for Wisconsin. I will attack this pattern with my stash and cuppa coffee! Thank you so much! Hhdc patterns are scarce and I love the stitch!
theknottednest
That sounds like a great way to pass the time! Hope you love it! Hhdc is one of my favorites, not sure why it’s not used more! Enjoy!
Pingback: