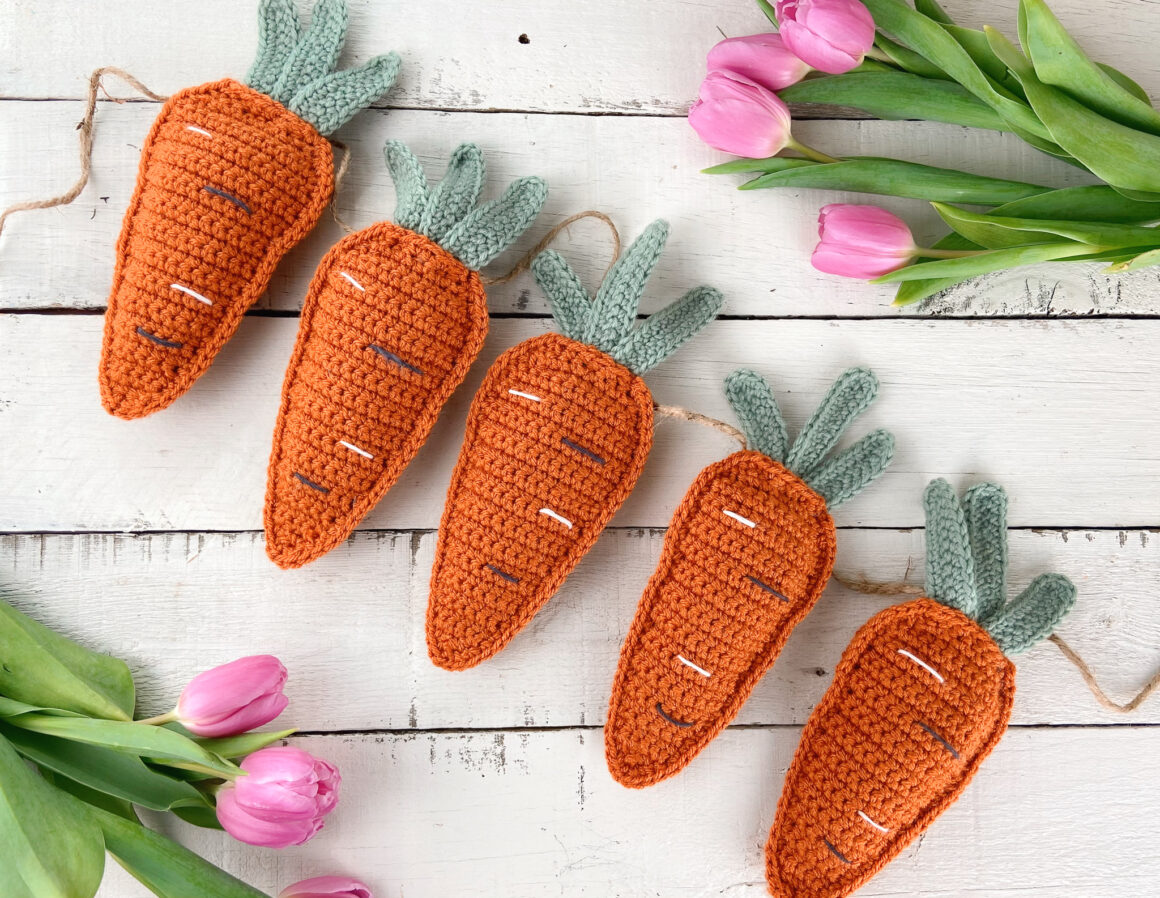
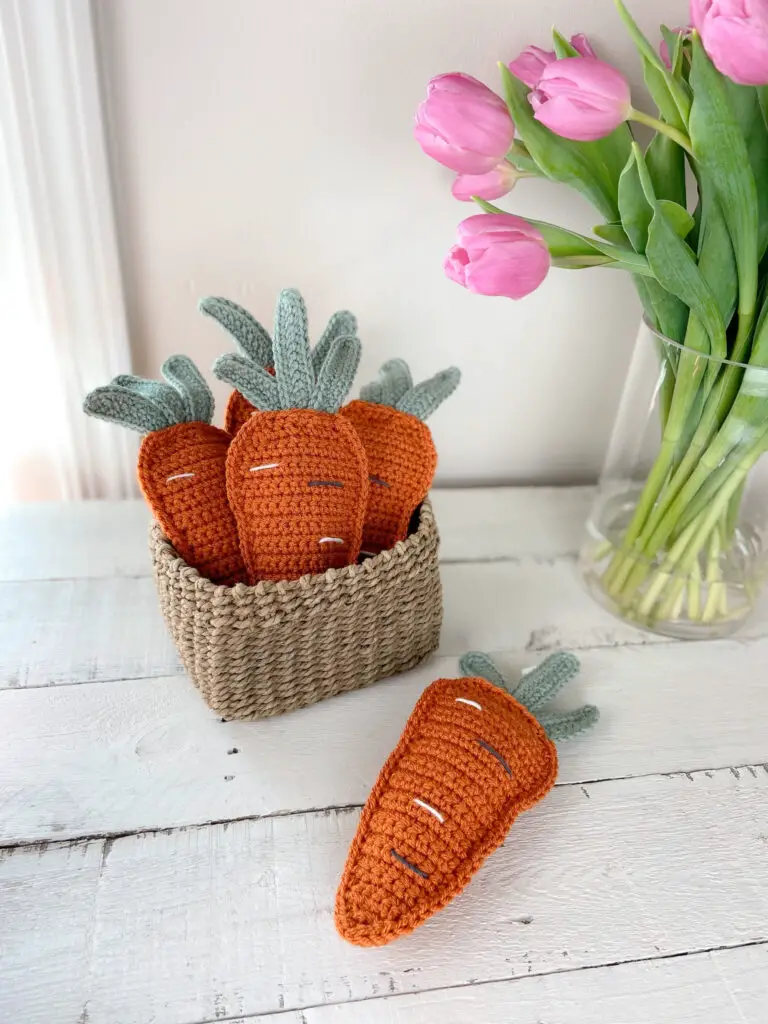
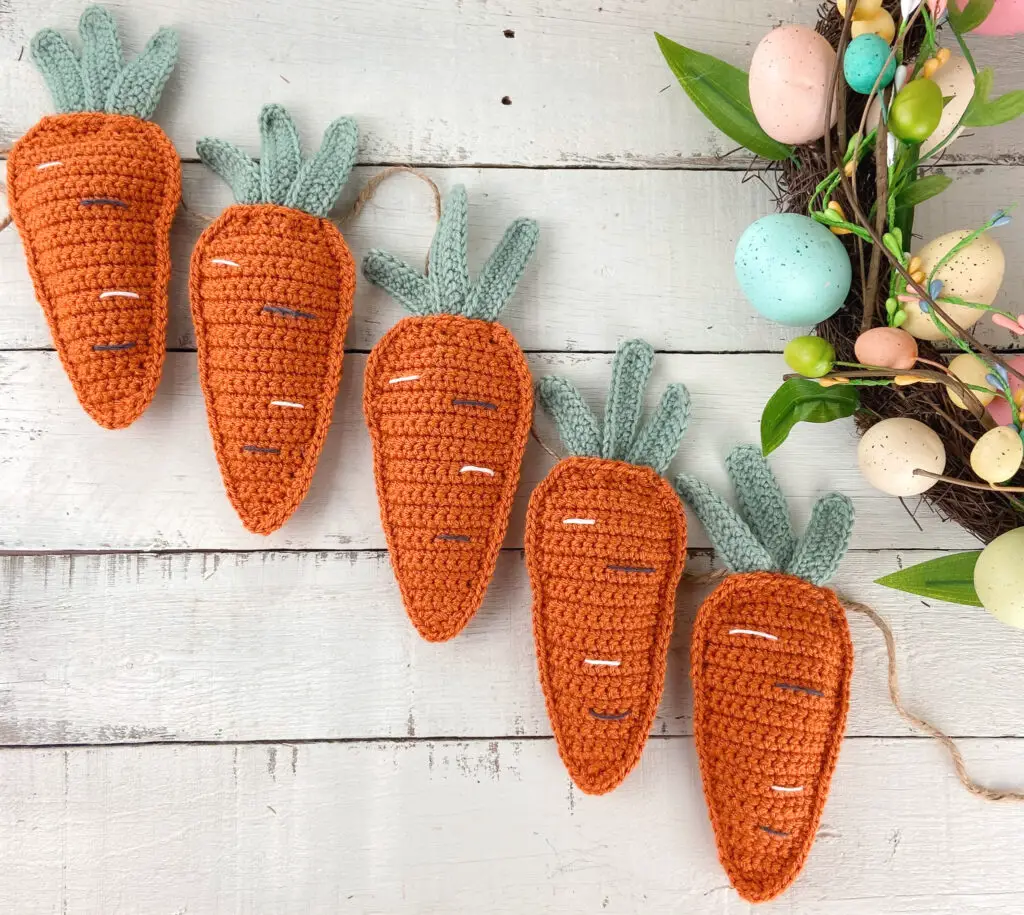
Crochet Carrot Easter Garland Free Pattern
This sweet Crochet Carrots Garland will add a touch of Spring to your home! String the carrots as a bunting or use them as a fun decoration for your Easter table. You could even use them to dress up your Easter baskets! Click below to jump to the free pattern or read on for some more info on the construction and materials you’ll need to make your carrot garland!
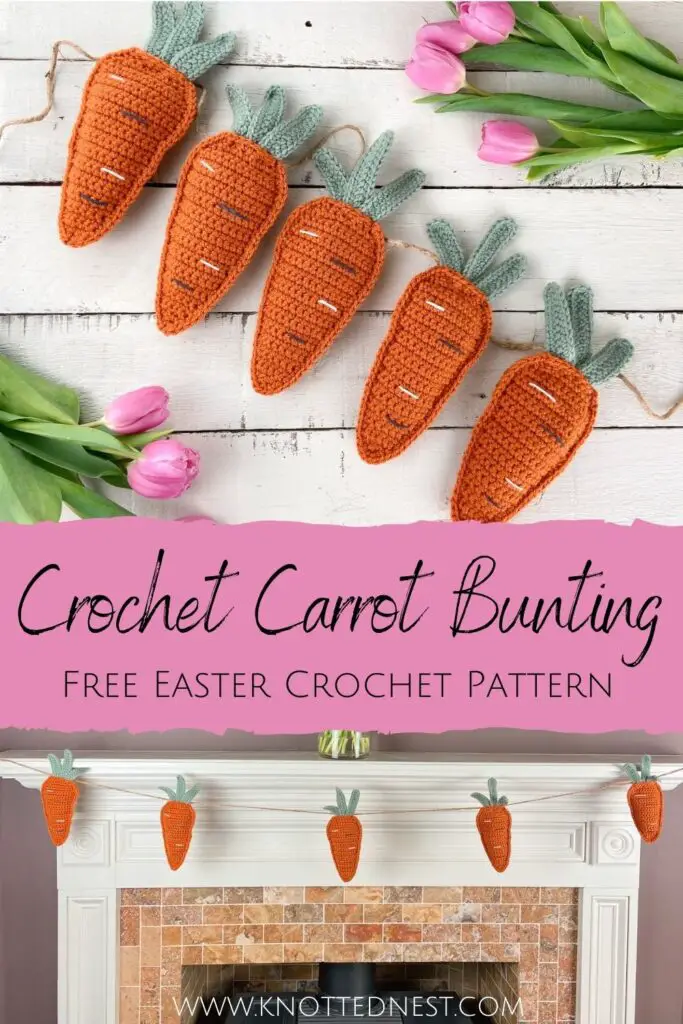
Click here to Pin this pattern for later!
Crochet Carrots Garland Inspiration
Since I designed my Bunny Garland for Easter last year, I think the carrots are sort of a natural progression for this Easter. Bunnies need carrots, right?! The crochet carrots look great strung up on their own, but a bunting of the carrots and bunnies together would also be super cute!
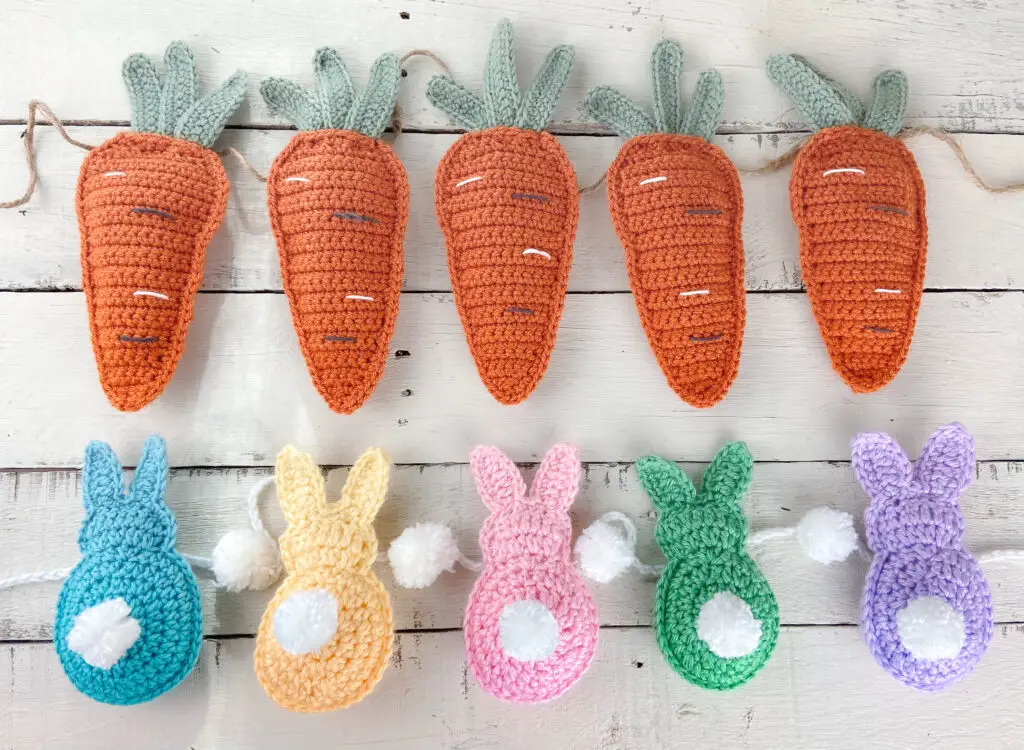
The Easter Bunny Garland was my first garland design ever and I think it’s safe to say, it sparked a bit of an obsession. Haha! Check out the Garlands section here on the blog to see all the designs I’ve come up with over the past year. And I have so many more ideas to come, hopefully to include something for the summer months! What do you think – are you hoping for more garland patterns or are you over it? Let me know in the comments!
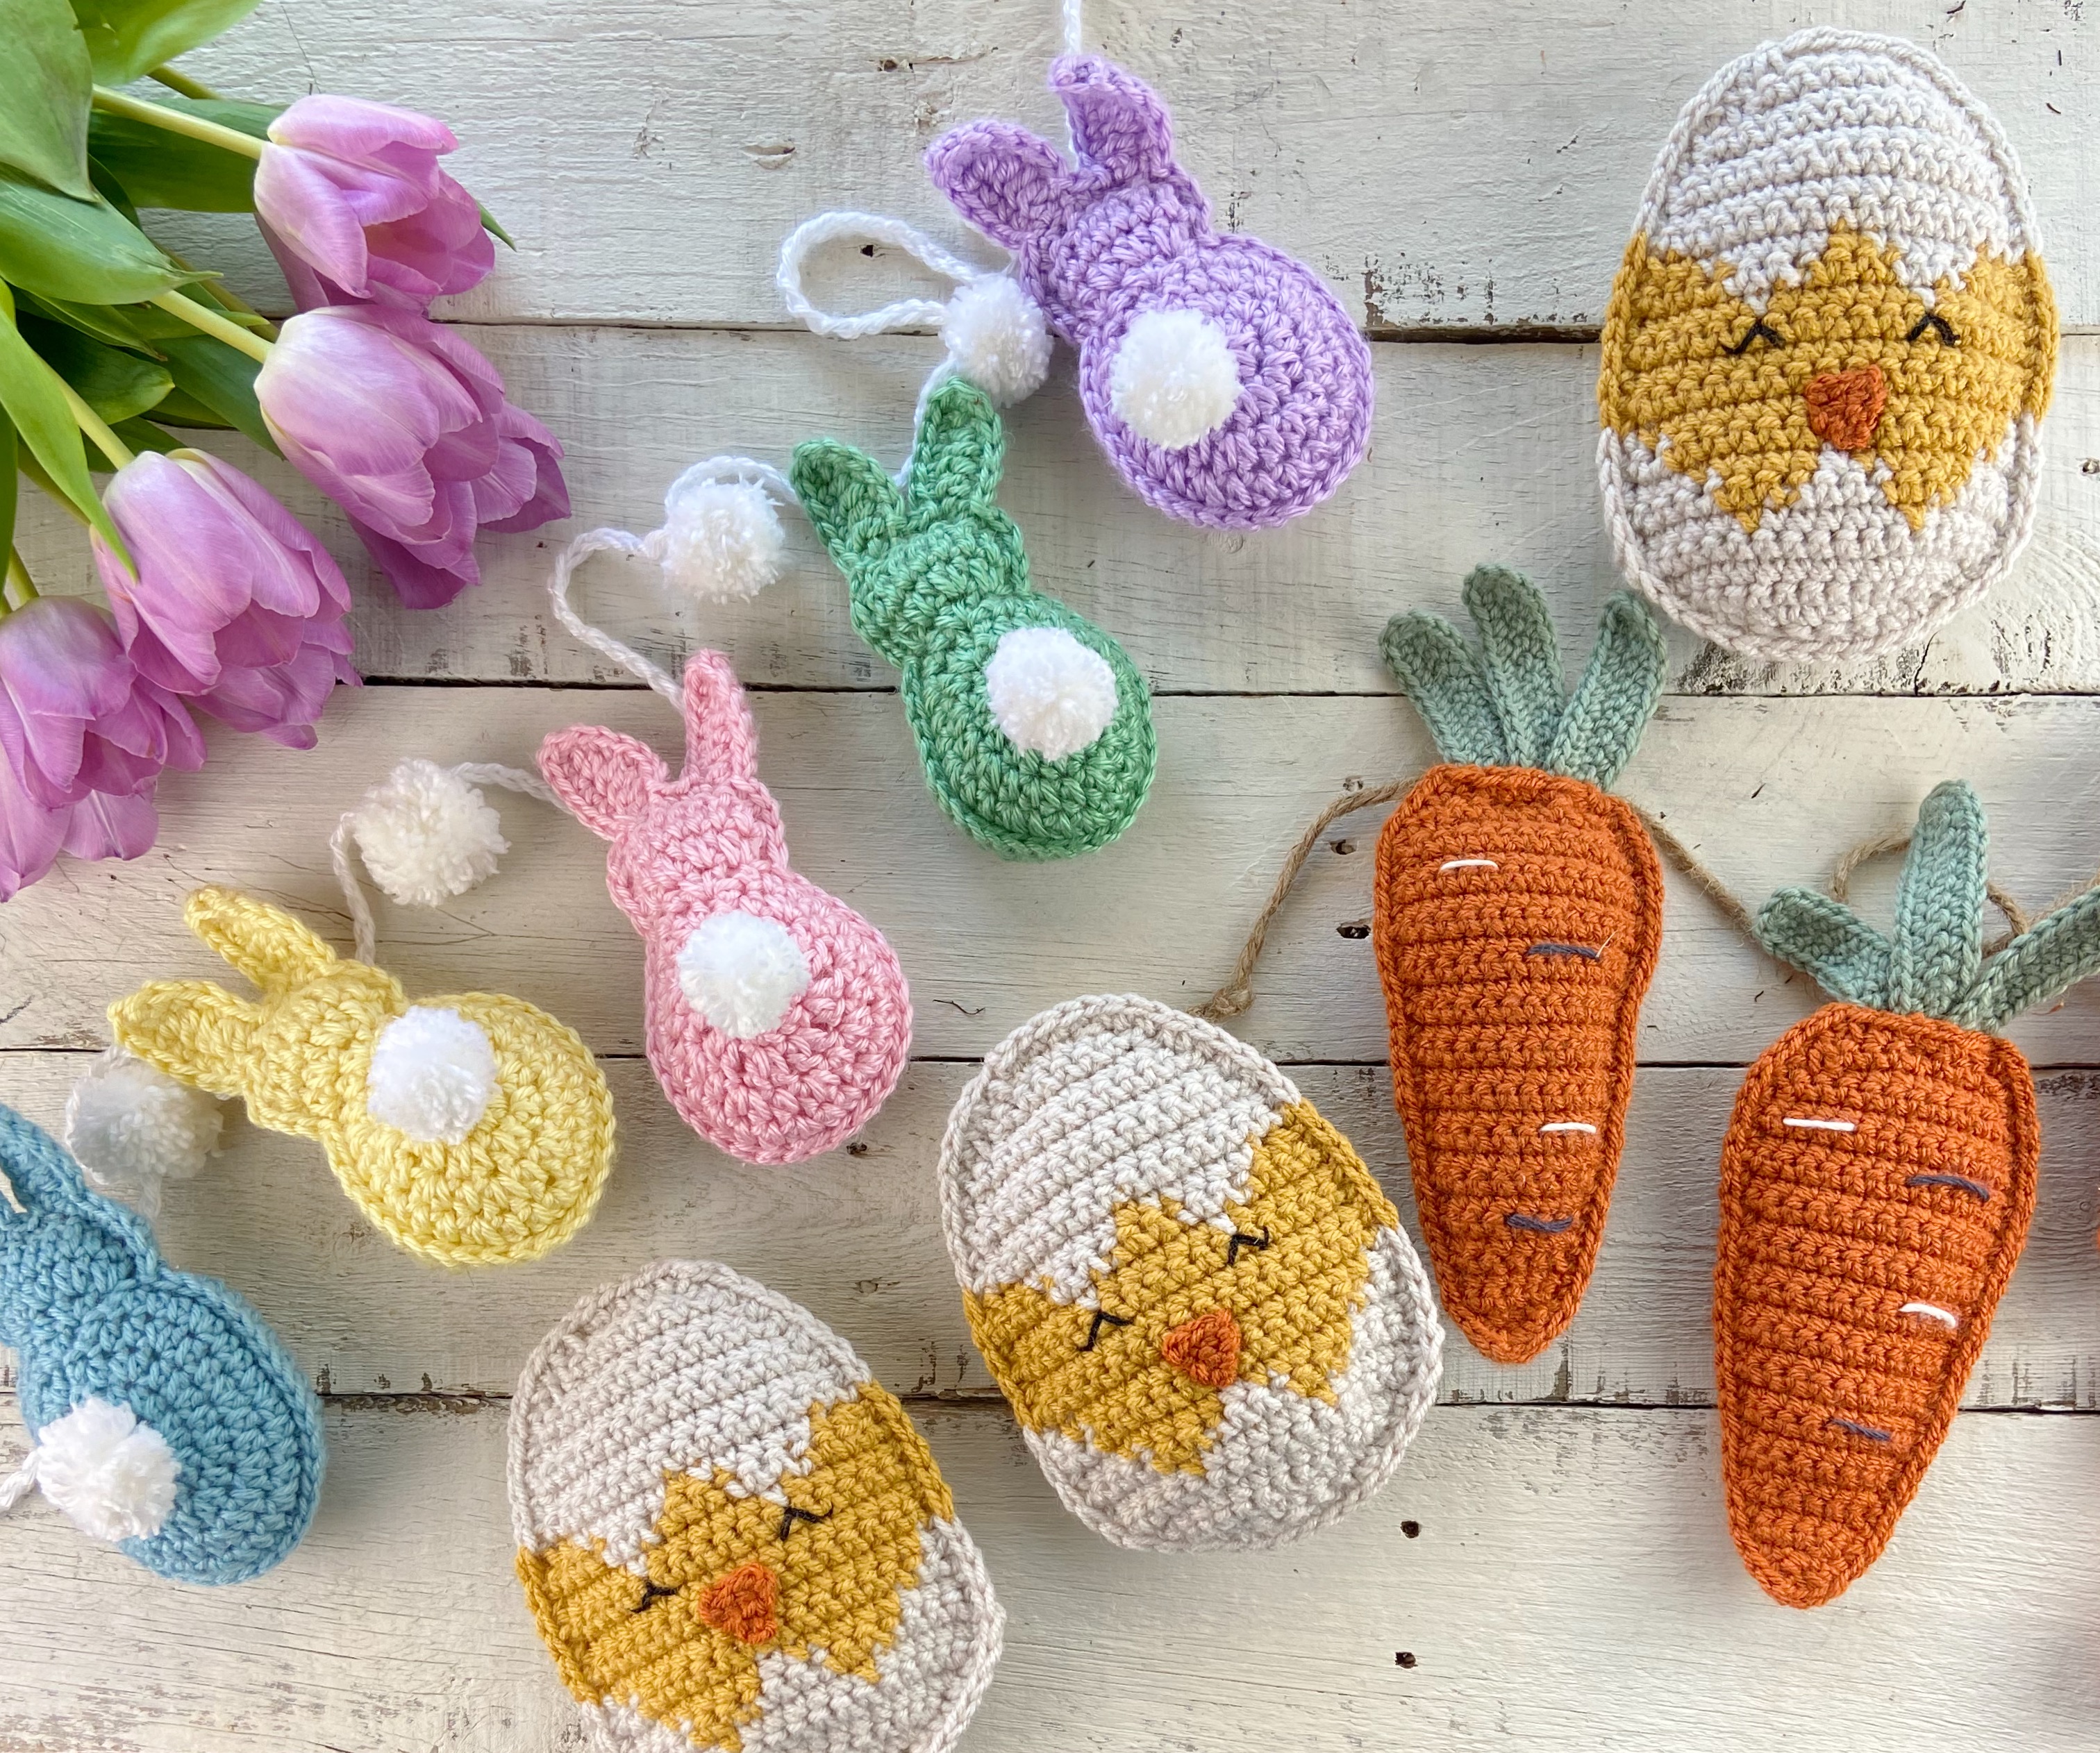
Update: Chicks have now been added to the Easter Garland pattern lineup! Get the free pattern here!
These crochet carrots are made in the same 2D style as my other Garlands. The beginner-friendly pattern uses only single crochet to make two flat panels which are joined together and lightly stuffed. I added a few green stems and some other details to make the carrots a bit more whimsical, but this is still a pattern any crocheter can tackle.
Materials
I used Red Heart Super Saver in the colors “Carrot” (lol) and “Frosty Green” but this project is perfect for using up any worsted weigh scrap yarn you have laying around. I haven’t tried this yet, but I imagine using a DK weight yarn would product the most adorable itty bitty crochet carrots! To make the bunting, I went with some simple jute twine in keeping with the rustic vibe I was shooting for. I also include instructions for using yarn to string your crochet carrots if that’s what you prefer!
Some other fun additions for accessorizing your carrot garland are wooden beads, mini pom poms, or (this one just came to me) mini easter eggs! The possibilities to customize are endless. Please tag me on SM if you share pics of your creations! I love to see all the amazing and creative variations you talented makers come up with!
Ok, who’s ready to crochet some carrots!
You can also get a printable (ad-free) version of the Crochet Carrots Garland on Etsy or Ravelry!
Crochet Carrots Garland Free Pattern
SKILL LEVEL
Easy – Level 2: this pattern requires increasing/decreasing, some sewing, and joining panels together.
MATERIALS
- Yarn:
- About 40 yards of worsted weight yarn per carrot. I used Red Heart Super Saver in the color Carrot (haha!) and Red Heart Super Saver in Frosty Green.
- A small amount of DK (3) weight yarn in white and/or dark gray for the accent lines on the carrot.
- You will also need about 30 yards of worsted weight yarn for the garland chain if you want to use yarn to string your garland.
- Size G (4.00mm) crochet hook.
- Polyfil or other stuffing material.
- Jute Twine (optional)
- Scissors, Yarn needle
DIMENSIONS
Each carrot is about 9” tall (including stems) x 3” wide. The finished garland is about 70” long.
GAUGE
9 sts x 9 rows = 2” square using single crochet
NOTES
- Each carrot is made of two flat panels that are joined together with sc and lightly stuffed.
- The stems are made separately, then sandwiched between the two carrot panels and sewn in place before the panels are joined.
- The Ch 1 turning chain used throughout does NOT count as a stitch.
- Pattern written in US terms.
- Abbreviations:
- ch = chain
- dec = decrease
- dc = double crochet
- inc = increase
- sc =single crochet
- sl st = slip stitch
- st =stitch
- yo = yarn over
- Special Stitches:
- Single Crochet Increase (Inc) = work 2 sc in one stitch.
- Single Crochet Decrease (Dec) = insert hook into first st, yo and pull up a loop (2 loops on hook), insert hook into next st, yo and pull up a loop (3 loops on hook), yo and pull through all 3 loops.
PATTERN
Carrot Panel (make 2 per carrot)
Ch 3.
Row 1: Sc in 2nd ch from hook and in next ch. Ch 1, turn. <2 sc>
Row 2: Inc in each st. Ch 1, turn <4 sc >
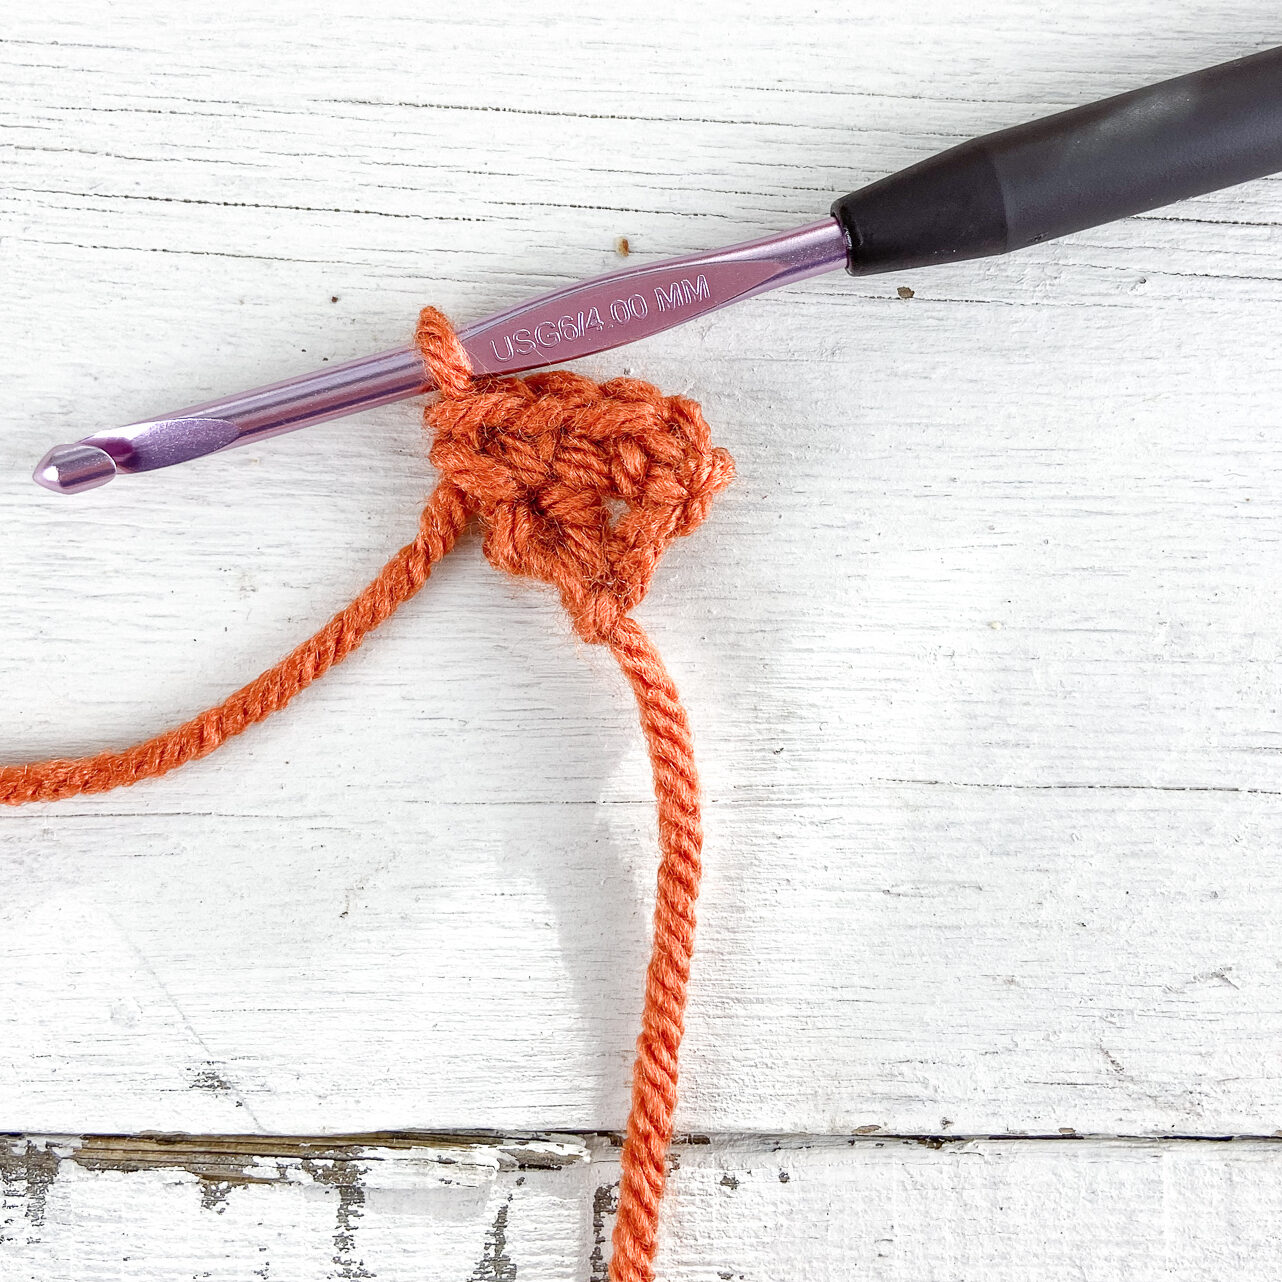
Row 3: Inc, sc in next 2 sts, inc. Ch 1, turn. <6 sc>
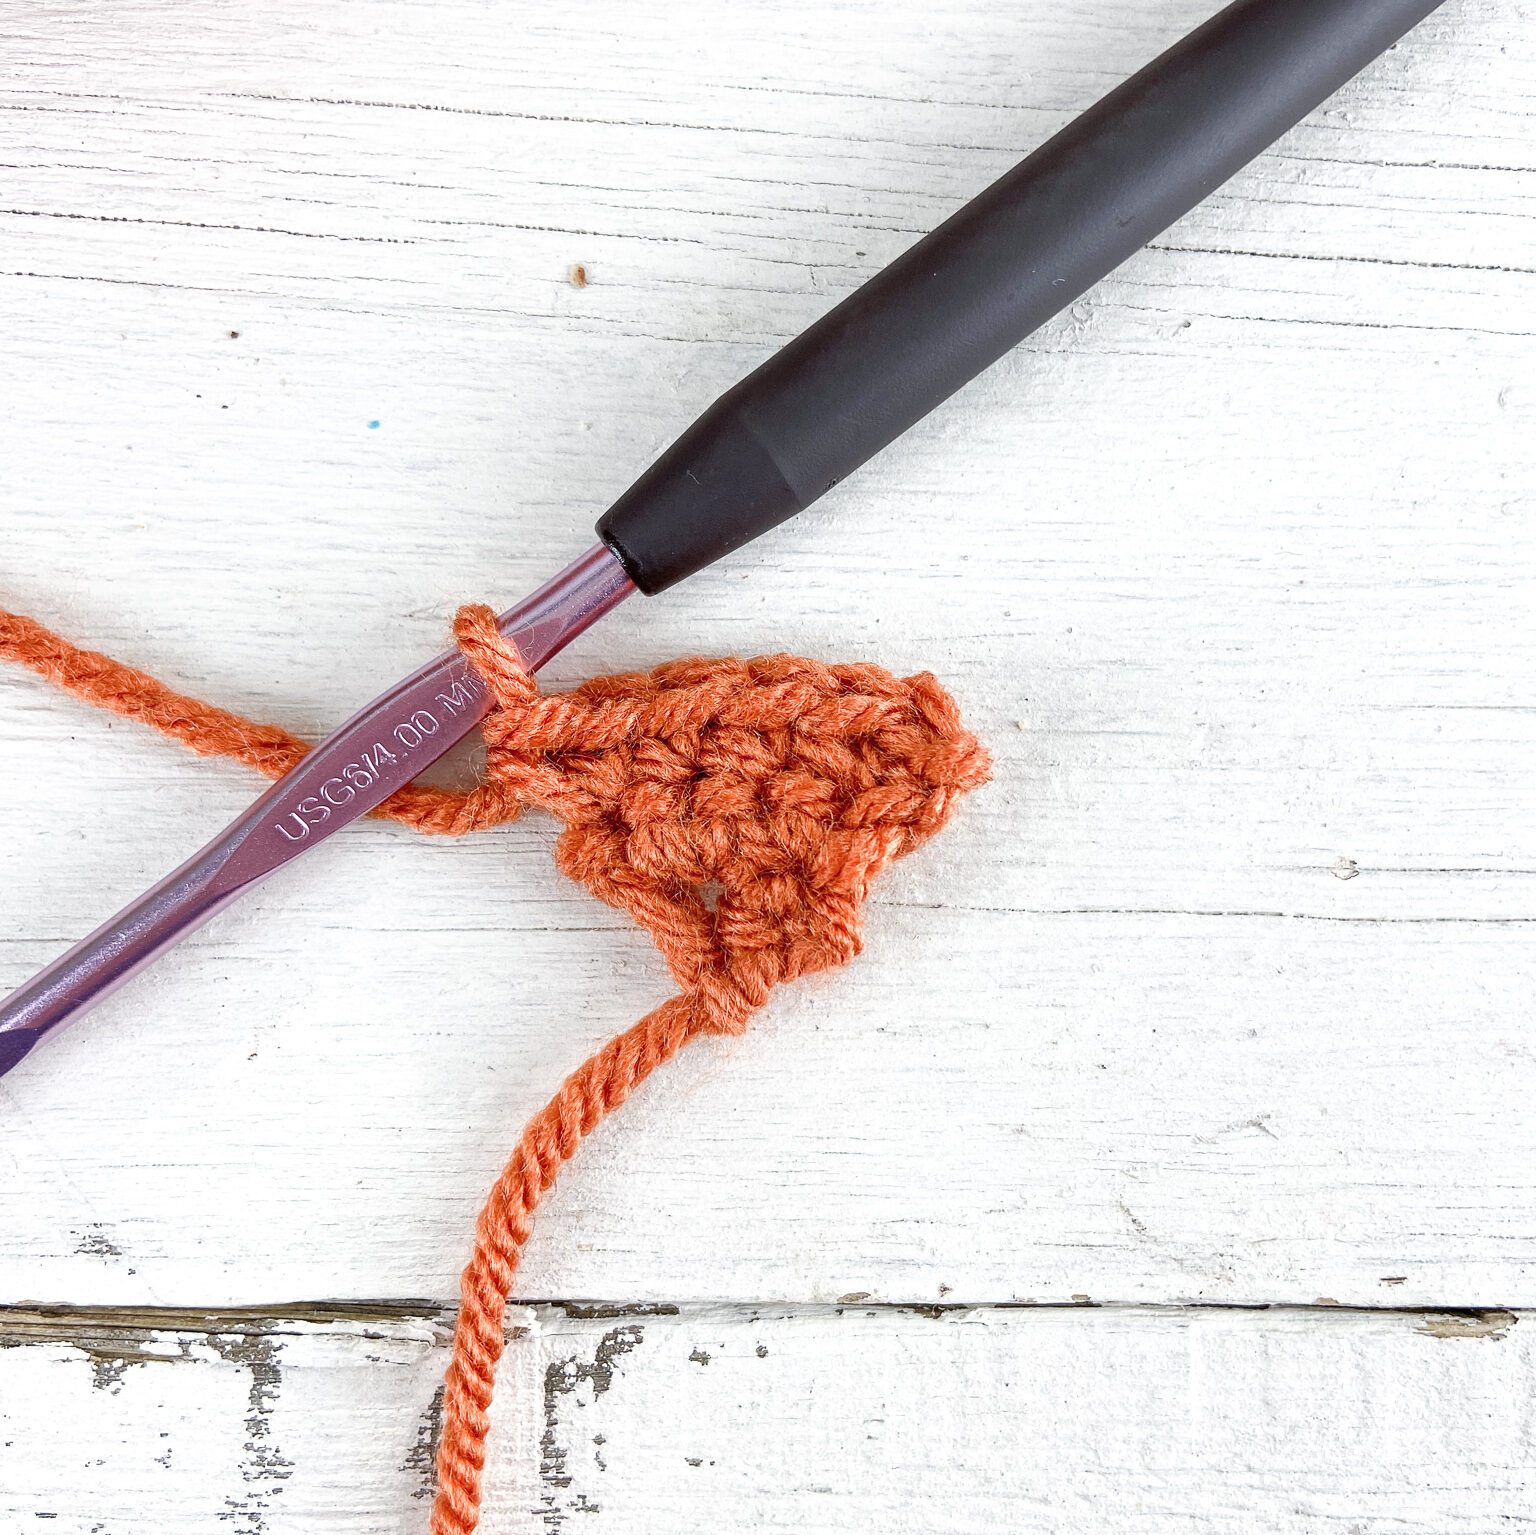
Row 4: Sc in each st. Ch 1, turn. <6 sc>
Row 5: Sc in each st. Ch 1, turn. <6 sc>
Row 6: Inc, sc in next 4 sts, inc. Ch 1, turn. <8 sc>
Row 7: Sc in each st. Ch 1, turn. <8 sc>
Row 8: Sc in each st. Ch 1, turn. <8 sc>
Row 9: Inc, sc in next 6 sts, inc. Ch 1, turn. <10 sc>
Row 10: Sc in each st. Ch 1, turn. <10 sc>
Row 11: Sc in each st. Ch 1, turn. <10 sc>
Row 12: Sc in each st. Ch 1, turn. <10 sc>
Row 13: Inc, sc in next 8 sts, inc. Ch 1, turn. <12 sc>
Row 14: Sc in each st. Ch 1, turn. <12 sc>
Row 15: Sc in each st. Ch 1, turn. <12 sc>
Row 16: Sc in each st. Ch 1, turn. <12 sc>
Row 17: Sc in each st. Ch 1, turn. <12 sc>
Row 18: Sc in each st. Ch 1, turn. <12 sc>
Row 19: Inc, sc in next 10 sts, inc. Ch 1, turn. <14 sc>
Row 20: Sc in each st. Ch 1, turn. <14 sc>
Row 21: Sc in each st. Ch 1, turn. <14 sc>
Row 22: Sc in each st. Ch 1, turn. <14 sc>
Row 23: Sc in each st. Ch 1, turn. <14 sc>
Row 24: Sc in each st. Ch 1, turn. <14 sc>
Row 25: Dec, sc in next 10 sts, dec. Ch 1, turn. <12 sc>
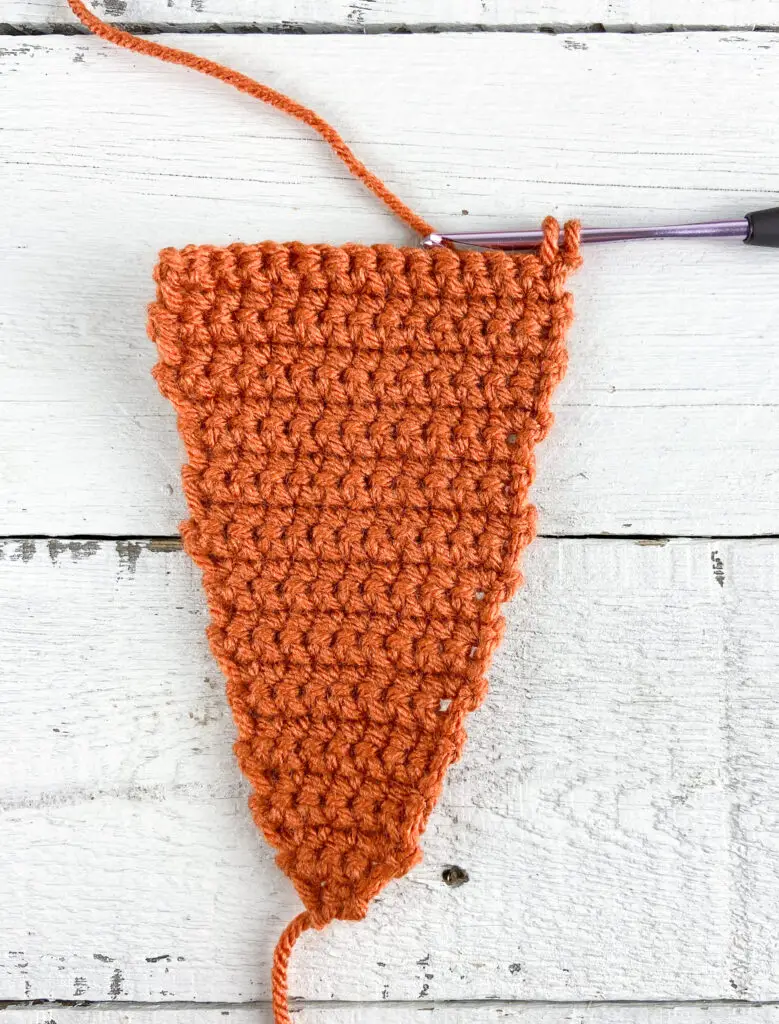
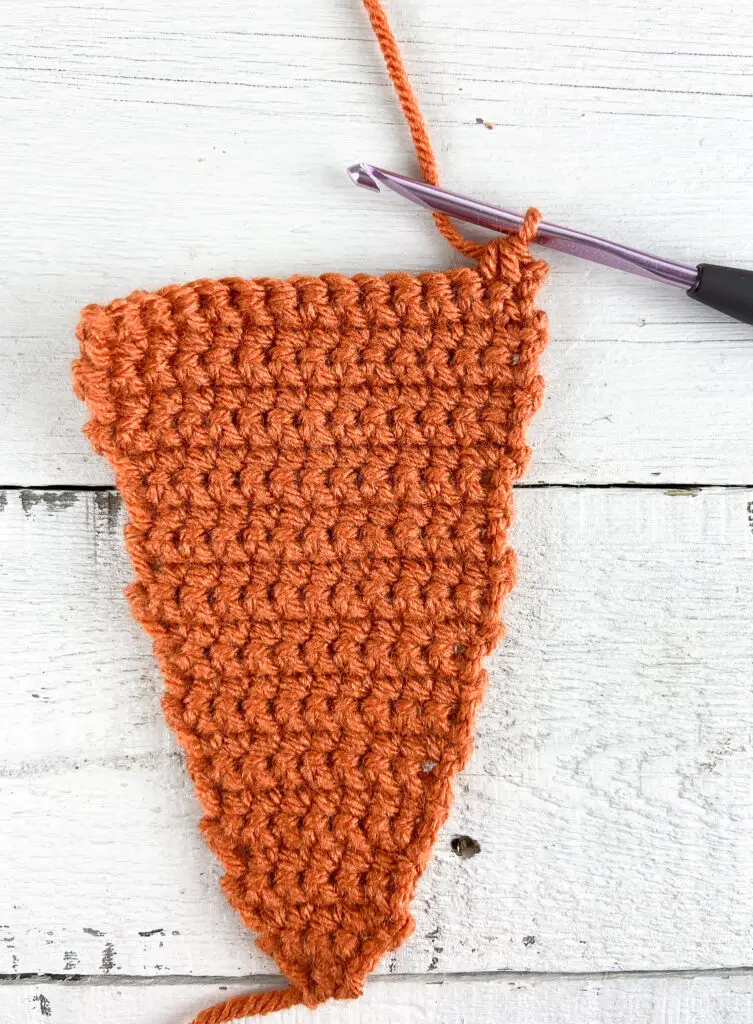
Row 26: Dec, sc in next 8 sts, dec. Ch 1, turn. <10 sc>
Row 27: Dec, sc in next 6 sts, dec. Ch 1, turn. <8 sc>
Row 28: Dec, sc in next 4 sts, dec. Ch 1, turn. <6 sc>
For the 1st panel – fasten off, leaving a 10” long tail.
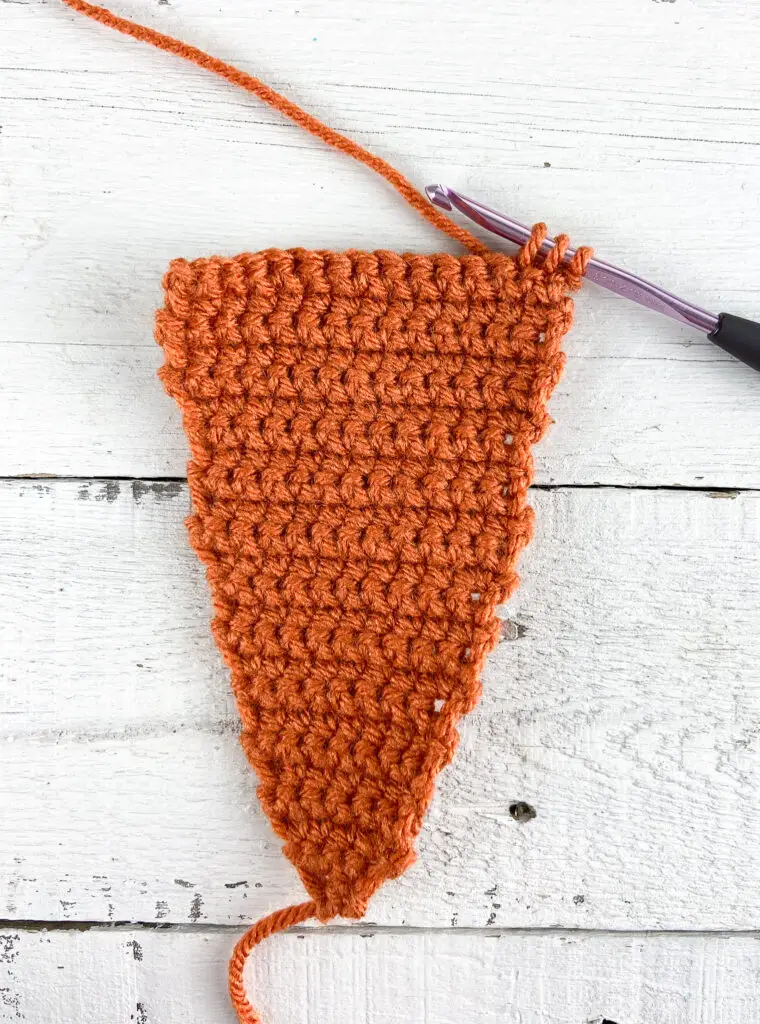
For the 2nd panel – leave attached to yarn ball.
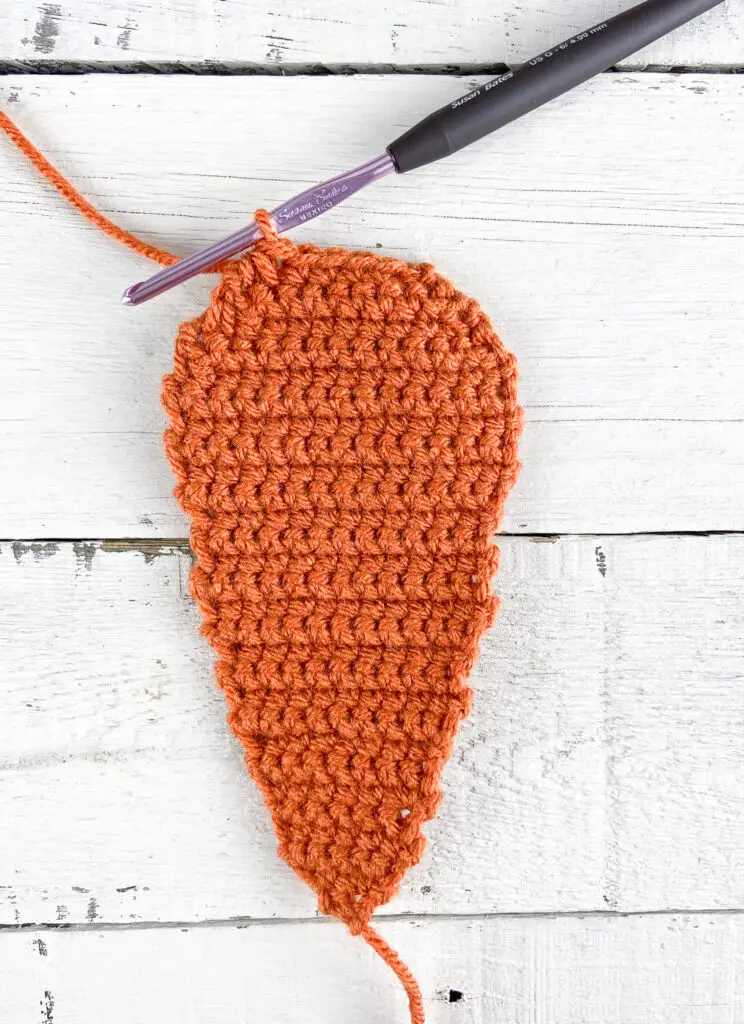
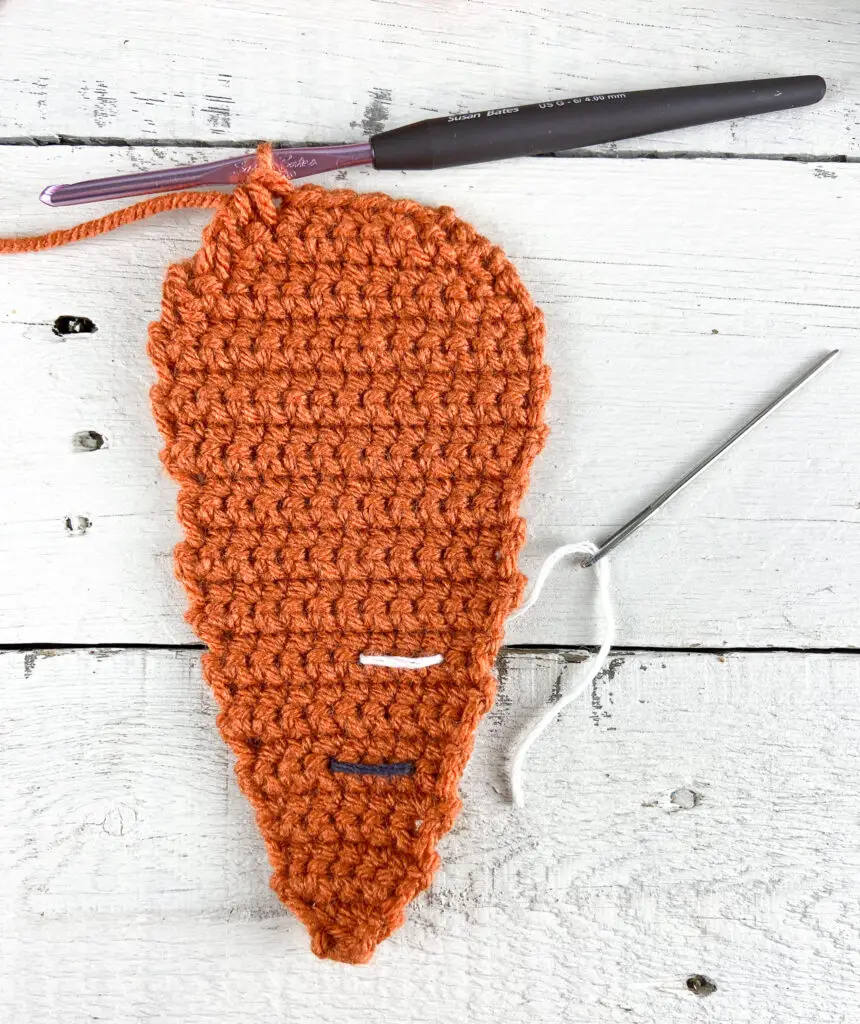
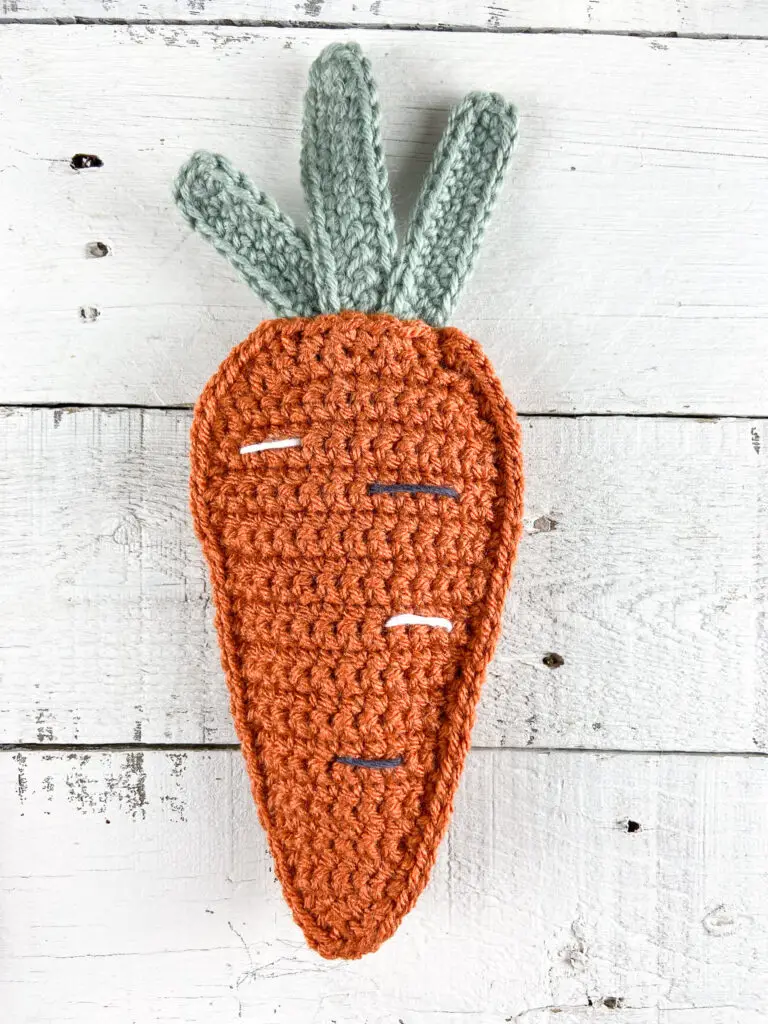
Carrot Details
- The carrot panel that is still attached to the yarn ball will become the “front” of the carrot. This is where you will add the details.
- Thread a yarn needle with a 6” length of DK yarn in white or dark gray.
- With the working yarn at the top left, sew through the panel from back to front, across 3 or 4 sts, and back to the back side. Tie the two ends together and trim the tails short.
- Repeat 2 or 3 more times with white or gray DK yarn.
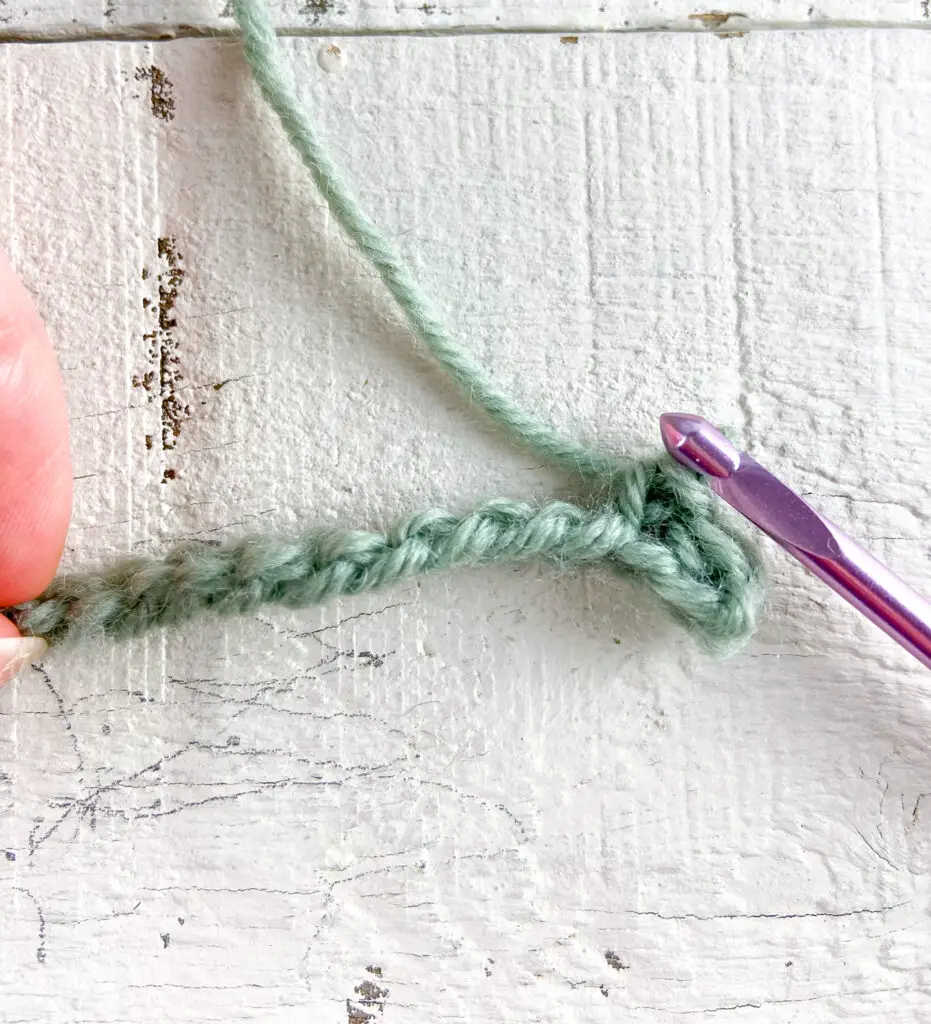
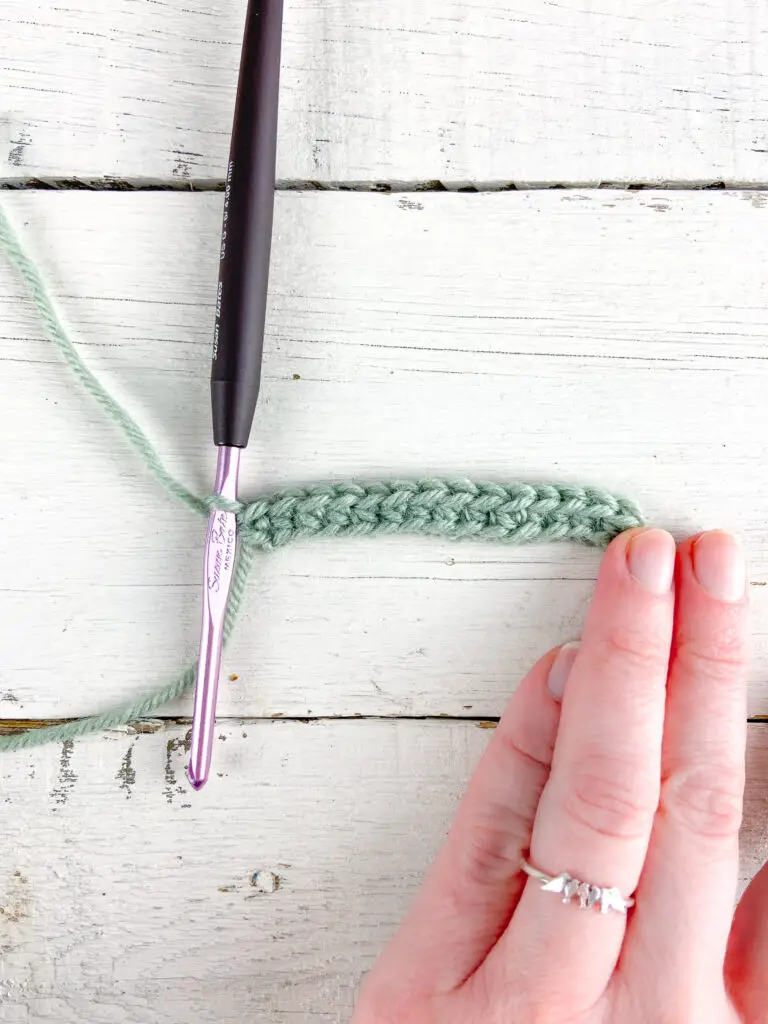
Carrot Stems
Large stem (make 1)
Ch 15.
Row 1: Sc in 2nd ch from hook and in each ch. Ch 1, turn. <14 sc> Tip: Crochet into the back bump of the chain.
Row 2: 1 sc in each st until you reach the last st, 3 sc in last st,
rotate your work so you will now be working down the starting ch (so instead of turning and working back down the sts you just made, you’ll just keep crocheting around the end to the “bottom” of the piece and sc down the ch you started with),
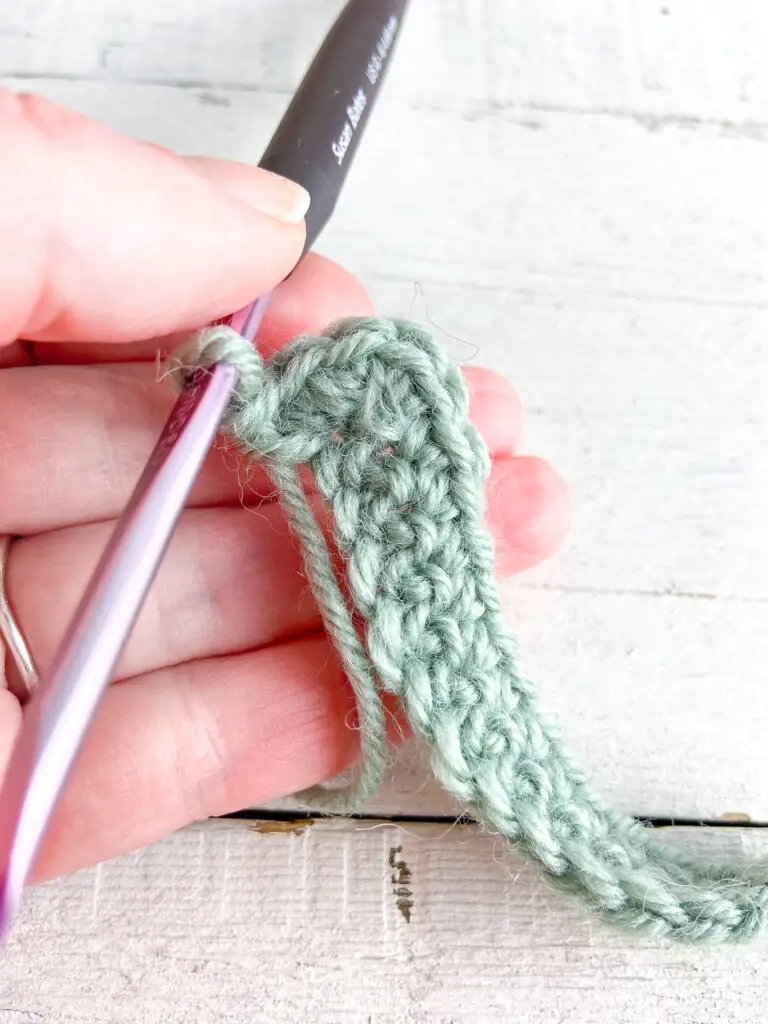
2 sc in the 1st st, 1 sc each st across. Fasten off. Tie the two tails together and trim ends short (no need to weave them in since they will be hidden inside the carrot).
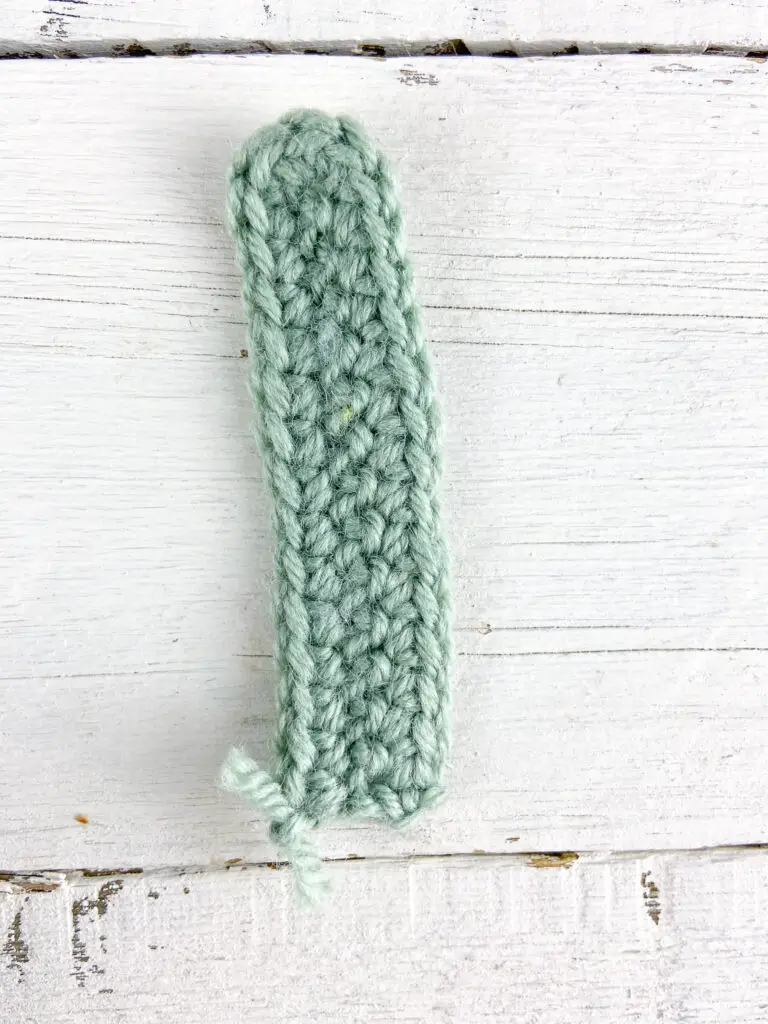
Small stem (make 2)
Ch 13.
Repeat Rows 1 and 2 of the large stem.
Tip: The stems tend to curl, so I suggest hitting them with some steam from an iron (or blocking) to help flatten them before assembly.
Carrot Assembly
- Stack the two carrot panels, with the front panel (the one with the details) facing you.
- Ch 1 and begin single crocheting through both panels to join the two together. Try to place your scs evenly as you work around the panels.
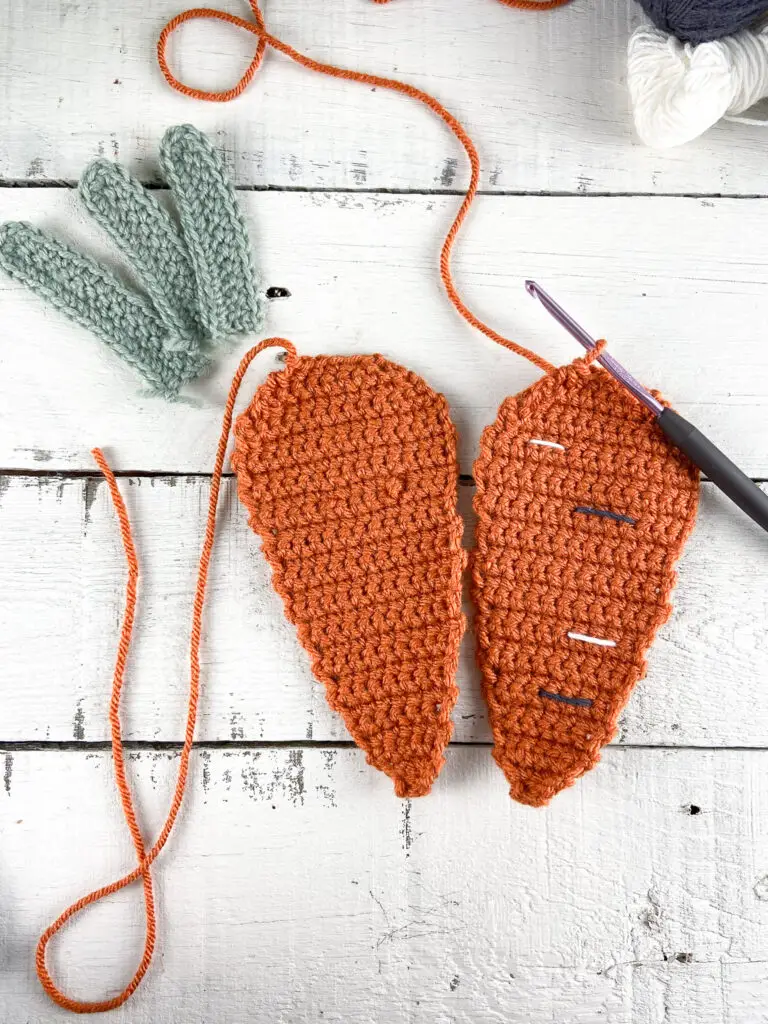
- At the point of the carrot, work (sc, ch 1, sc) all in the same space to make the point more defined. Continue sc up the second side of the carrot.

- Stop about halfway up the second side. We will now attach the stems.
- Arrange the three stems with the large stem in the middle and sandwich them between the two carrot panels at the top.
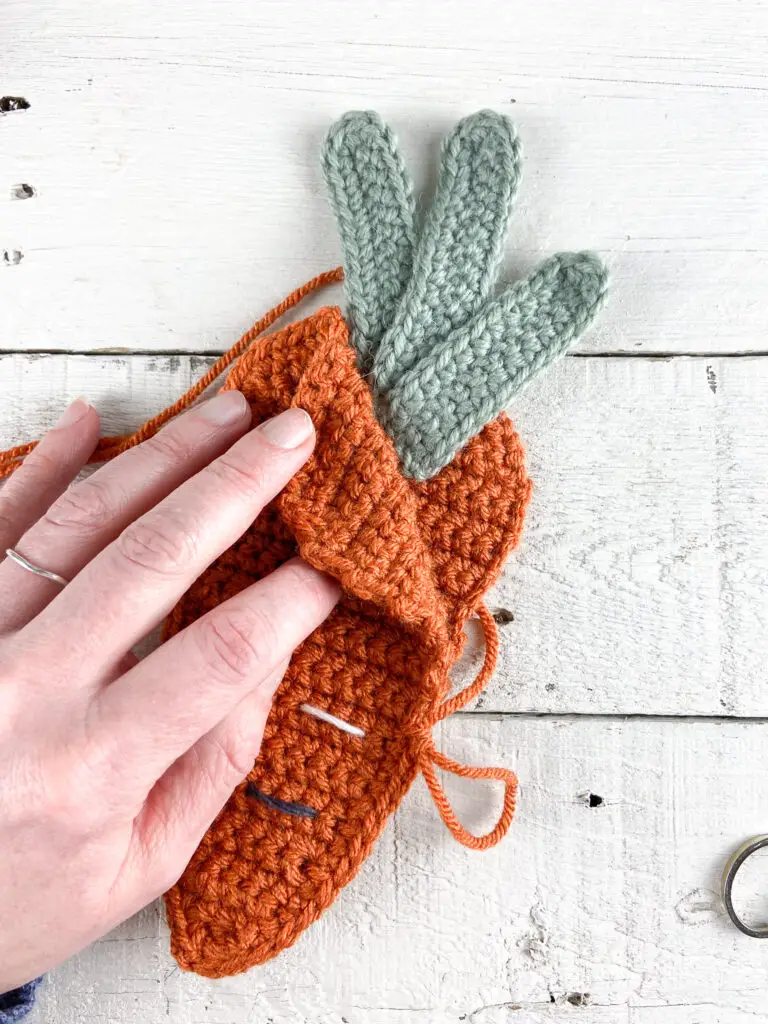
- Thread a yarn needle with the long tail we left on the first carrot panel.
- Use this to sew through all three layers (bottom panel, stems, top panel), back and forth several times to secure the stems in place. Tie off and weave in end.
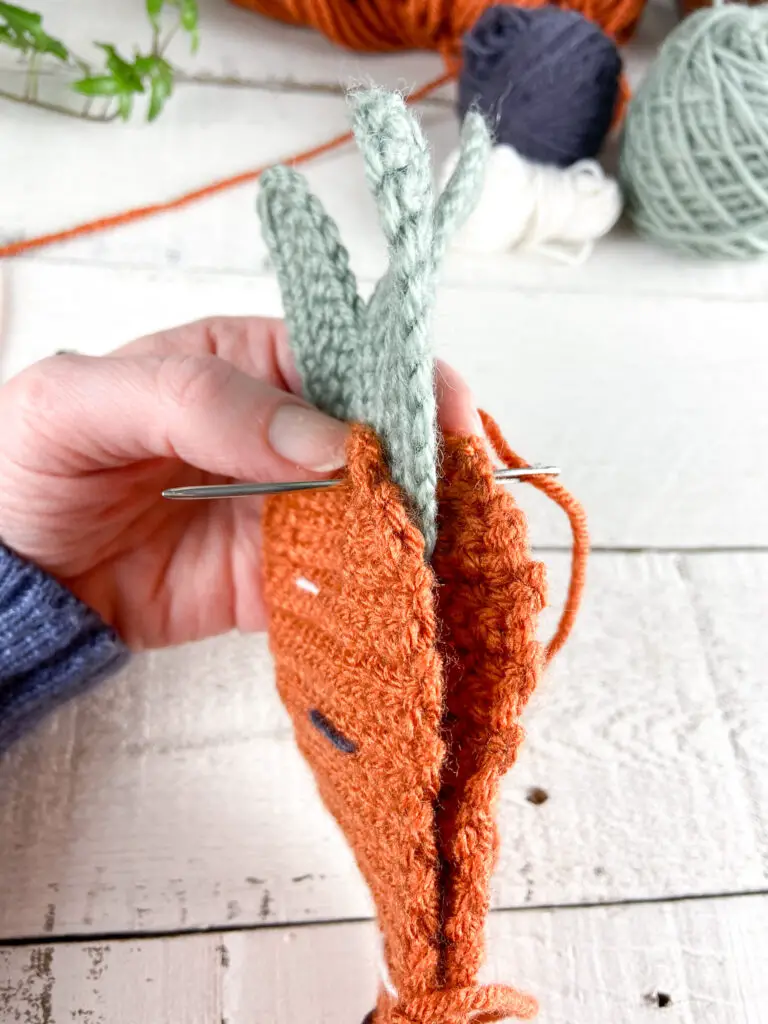
- Lightly stuff the carrot with polyfil and then continue single crocheting the two panels together until you get up to the stems.
- Sl st at the base of the stems and fasten off. Weave in end.
- Carrot complete!
Garland Assembly
Option A – twine
- Cut a 70” length of jute twine.
- Lay the twine flat and space carrots evenly along the twine where you would like to place them.
- Thread a yarn needle with the twine and pass the needle through the back panel of each carrot near the top to string.
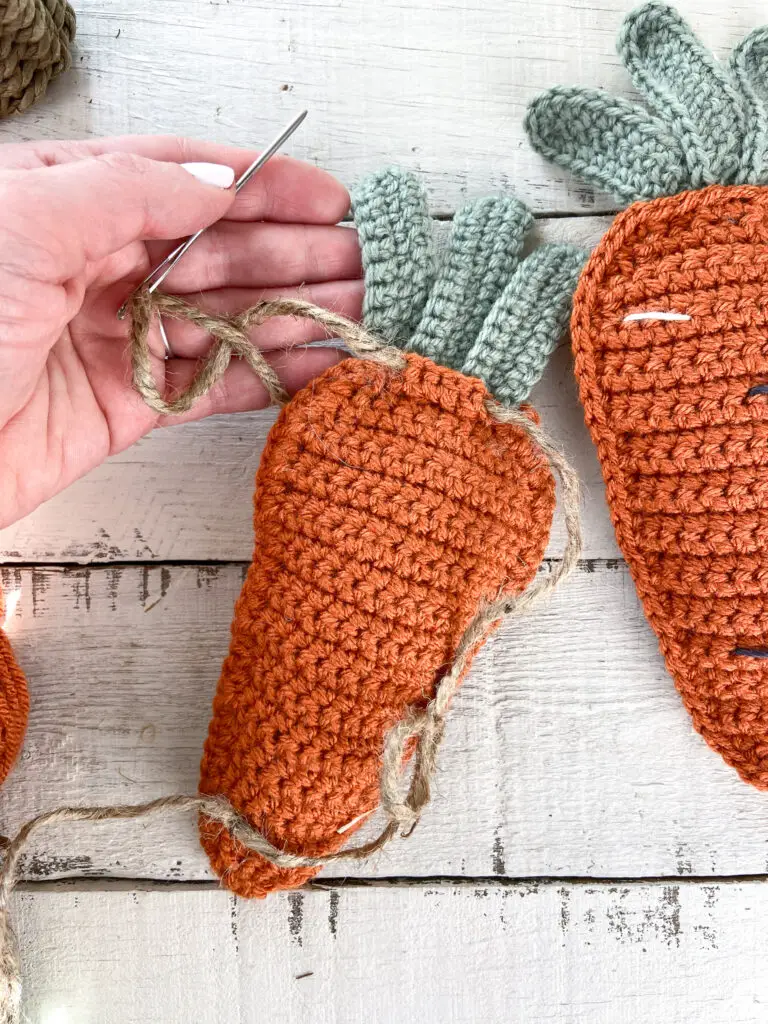
- My carrots seemed pretty secure with this method, but you may need to tie a knot at each point to keep them from sliding.
Option B – yarn
- Ch 250 with your color of choice. Fasten off.
- Lay chain out flat and evenly space crochet carrots along chain.
- Then, using a small length of corresponding color yarn and a yarn needle, thread through the back side of the carrots near the top.
- Next thread through the chain and tie tightly to secure. Repeat for each carrot. Trim or weave in to hide any ends and you’re done!
I hope you enjoyed this pattern! Tag me on Instagram @theknottednest and use the hashtag #crochetcarrotgarland to share your project! Check out my other Garland patterns on the blog and make one for every season! Or you can find more project ideas in the Patterns section here on the blog.


3 Comments
Denise
Can’t get garlands to even bring the up and when is says free printable pattern and can’t download or print. How can I get these please. I need some motivation.
theknottednest
Hi! The free version of the pattern is on this page (scroll down about midway). If you would like to purchase the printable version, it is available on Etsy and Ravelry for a small fee (there are links to these shops just above where the free pattern starts). Hope that helps!
Pingback: